Working with Triggers
Triggers are tools used to set up Wallarm response to different events. Triggers combine a significant number of events the system can react to with a variety of possible reactions. This constructor-like process allows configuring complex behaviors that match your company unique security needs.
Triggers are configured in the Triggers section in the US or EU Cloud.

How it works
Each trigger consists of the following components that you can configure:
-
Condition: an event that Wallarm should react to. For example: getting a certain amount of attacks, denylisted IP address, and new user added to the account.
-
Filters: the condition details. For example: if condition is "More than 10,000 attacks per day", then set the Type filter to "SQLi" and the Response status to "200" and for the trigger that will mean "Act if there were more than 10,000 SQLi attacks per day that got the 200 response".
-
Reaction: an action that should be performed if the specified condition and filters are met. For example: sending the notification to Slack or another system configured as the integration, blocking IP address, or marking requests as the brute‑force attack.
What you can do with triggers
Using triggers, you can:
-
Provide the following protection measures for your applications and APIs:
-
Set up extended alerts for different integrations.
-
Optimize attacks and incidents representation by grouping hits.
Understanding filters
Filters are used for condition detailing. For example, you can set up reactions to attacks of certain types, such as brute-force attacks, SQL injections and others. You can add one or more filters in the Wallarm Console interface and set values for them.
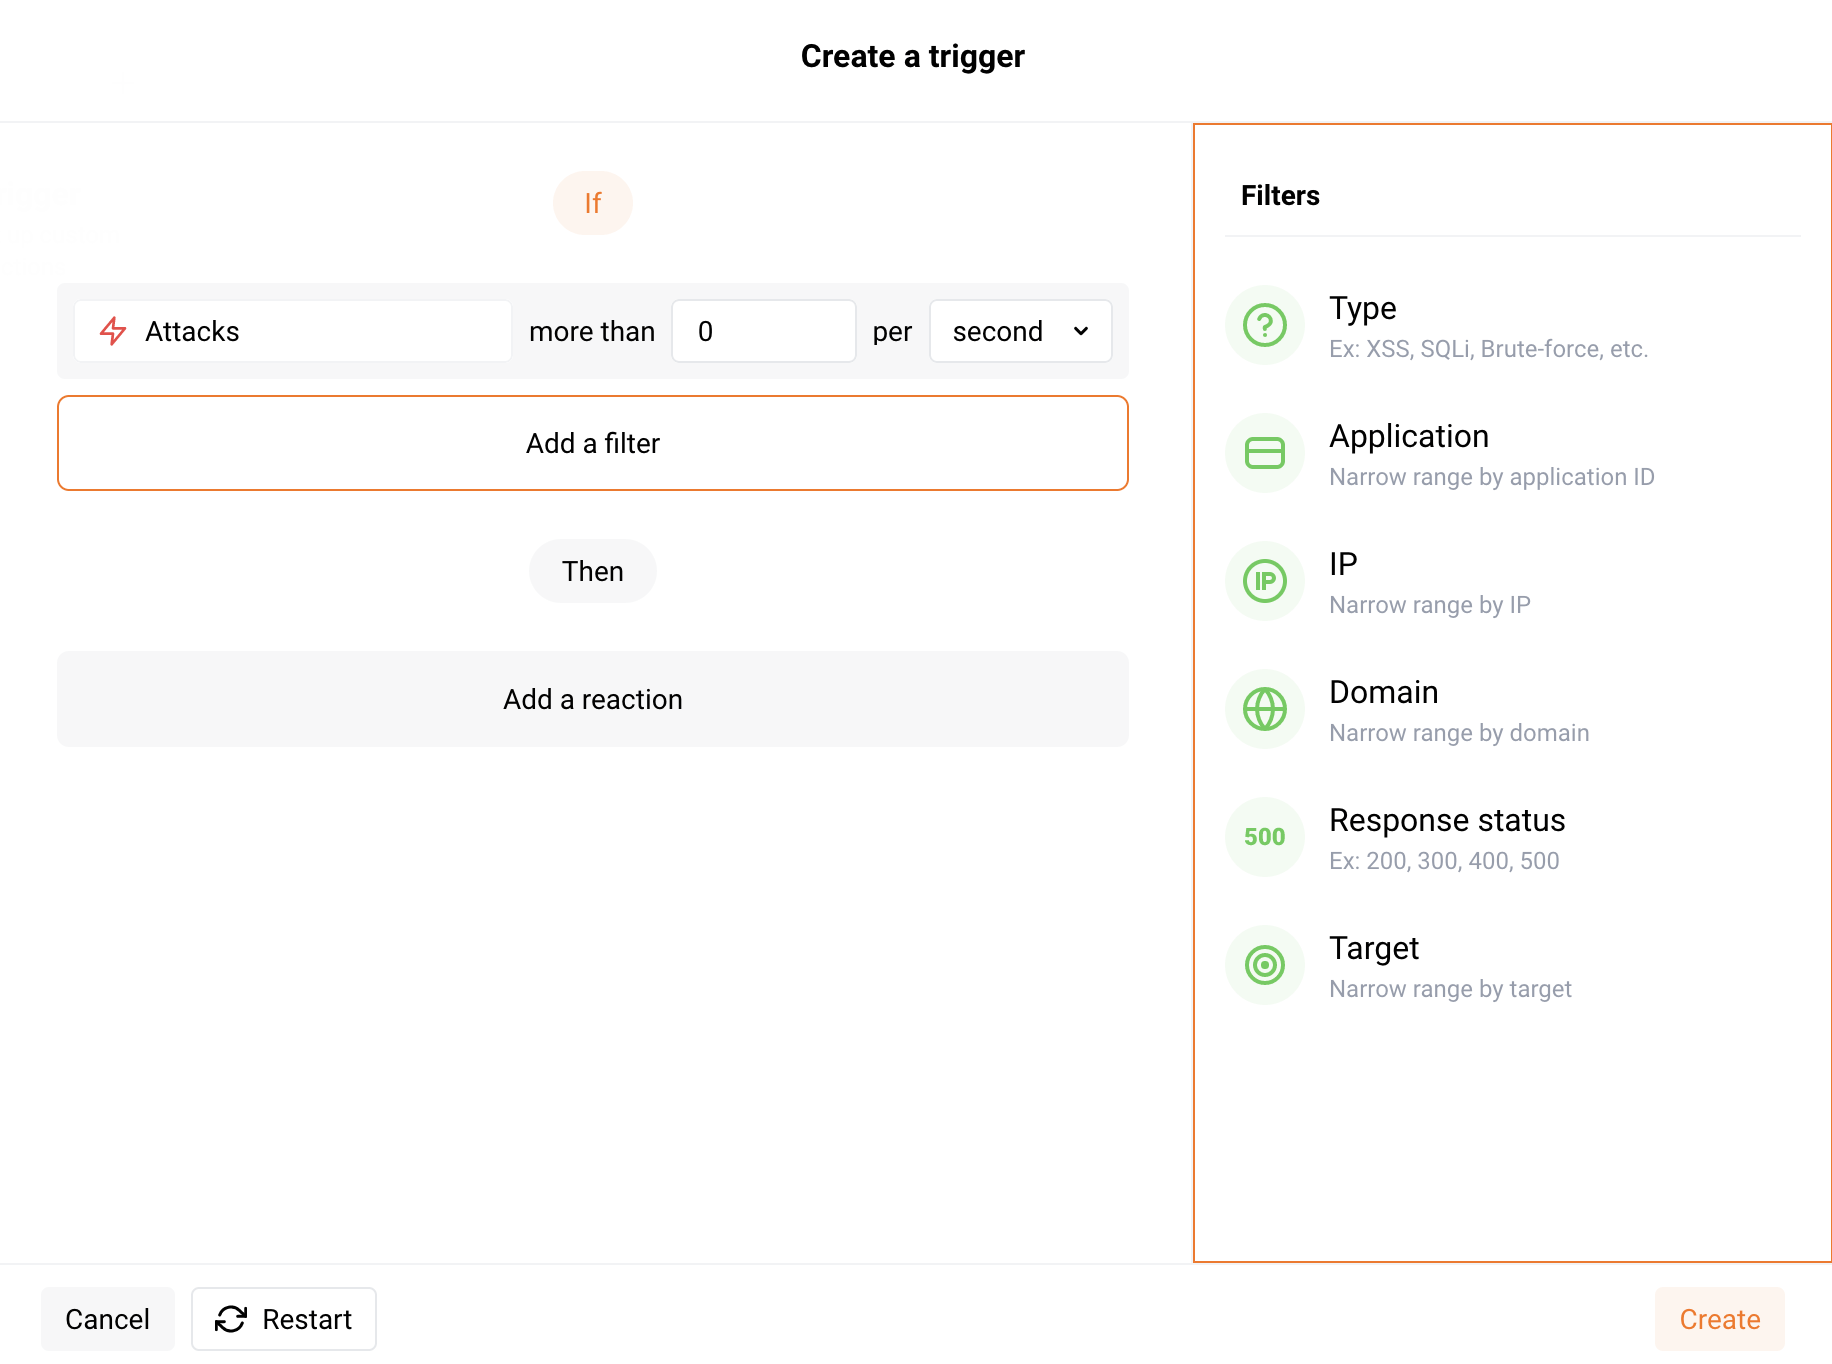
The following filters are available:
-
URI (only for the conditions Brute force, Forced browsing and BOLA): full URI to which the request was sent. URI can be configured via the URI constructor or advanced edit form.
-
Type is a type of attack detected in the request or a type of vulnerability the request is directed to.
-
Application is the application that receives the request.
-
IP is an IP address from which the request is sent.
The filter expects only single IPs, it does not allow subnets, locations and source types.
-
Domain is the domain that receives the request.
-
Response status is the response code returned to the request.
-
Target is an application architecture part that the attack is directed at or in which the incident is detected. It can take the following values:
Server,Client,Database. -
User's role is the role of the added user. It can take the following values:
Deploy,Analyst,Administrator,Read only,API developer, and if multitenancy feature is enabled -Global Administrator,Global Analyst,Global Read Only.
Default triggers
New company accounts are featured by the following default (pre-configured) triggers:
-
Group hits originating from the same IP into one attack
The trigger groups all hits sent from the same IP address into one attack in the event list. This optimizes the event list and enables faster attack analysis.
This trigger is released when a single IP address originates more than 50 hits within 15 minutes. Only hits sent after exceeding the threshold are grouped into the attack.
Hits can have different attack types, malicious payloads and URLs. These attack parameters will be marked with the
[multiple]tag in the event list.Due to different parameter values of grouped hits, the Mark as false positive button will be unavailable for the whole attack, but you still will be able to mark certain hits as false positives. Active verification of the attack will also be unavailable.
The hits with the Brute force, Forced browsing, Resource overlimit, Data bomb, or Virtual patch attack types are not considered in this trigger.
-
Graylist IP for 1 hour when it originates more than 3 different malicious payloads within 1 hour
Graylist is a list of suspicious IP addresses processed by the node as follows: if graylisted IP originates malicious requests, the node blocks them while allowing legitimate requests. In contrast to graylist, denylist points to IP addresses that are not allowed to reach your applications at all - the node blocks even legitimate traffic produced by denylisted sources. IP graylisting is one of the options aimed at the reduction of false positives.
The trigger is released in any node filtration mode, so that it will graylist IPs regardless of the node mode.
However, the node analyzes the graylist only in the safe blocking mode. To block malicious requests originating from graylisted IPs, switch the node mode to safe blocking learning its features first.
The hits with the Brute force, Forced browsing, Resource overlimit, Data bomb, or Virtual patch attack types are not considered in this trigger.
You can temporary disable any default trigger. You can also modify behavior provided by the default trigger - to do so, create your custom triggers of the same type. Creating any custom trigger deletes the default one, if you delete all your custom triggers, the default is restored.
Trigger processing priorities
When there are several triggers with identical conditions (for example, Brute force, Forced browsing, BOLA) and some of them have nesting level URI, requests to lower nesting level URI will be counted only in the trigger with the filter by the lower nesting level URI.
Triggers without URI filter are considered to be the higher nesting level.
Example:
-
The first trigger with some condition has no filter by the URI (requests to any application or its part are counted by this trigger).
-
The second trigger with the same condition has the filter by the URI
example.com/api.
Requests to example.com/api are counted only by the second trigger with the filter by example.com/api.
Disabling and deleting triggers
-
To temporarily stop sending notifications and reactions to events, you can disable the trigger. A disabled trigger will be displayed in the lists with All and Disabled triggers. To re‑enable sending notifications and reactions to events, the Enable option is used.
-
To permanently stop sending notifications and reactions to events, you can delete the trigger. Deleting a trigger cannot be undone. The trigger will be permanently removed from the trigger list.
To disable or delete the trigger, please select an appropriate option from the trigger menu and confirm the action if required.