Webhook
You can set up Wallarm to send instant notifications to any system that accepts incoming webhooks via HTTPS protocol.
Notification format
Notifications are sent in either JSON Array or New Line Delimited JSON (NDJSON) format depending on your choice during integration setup. The set of JSON objects depends on the event for which the notification is sent. For example:
-
Hit detected
[ { "summary": "[Wallarm] New hit detected", "details": { "client_name": "Test Company", "cloud": "EU", "notification_type": "new_hits", "hit": { "host": "example.com", "heur_distance": 20.714285714285715, "method": "GET", "path": "/", "payloads": [ "1' select version();" ], "point": [ "get", "id" ], "probability": 20.714285714285715, "remote_country": null, "remote_port": 41253, "remote_addr4": "8.8.8.8", "remote_addr6": null, "datacenter": "unknown", "tor": "none", "request_time": 1703519823, "create_time": 1703519826, "response_len": 345, "response_status": 404, "response_time": 359, "stamps": [ 7965 ], "regex": [], "stamps_hash": 271168947, "regex_hash": -2147483648, "type": "sqli", "block_status": "monitored", "brute_counter": "b:1111:xxxxxxxxxxxxxxxx", "final_wallarm_mode": "monitoring", "libproton_version": "4.8.0", "lom_id": 932, "protocol": "rest", "proxy_type": null, "request_id": "xxxxxxxxxxxxxxxx", "wallarm_mode": null, "id": [ "hits_production_1111_202312_v_1", "xxxxxxxxxxxxxxxx" ], "object_type": "hit", "anomaly": 1.0357142857142858, "parameter": "GET_id_value", "applications": [ "default" ] } } }, { "summary": "[Wallarm] New hit detected", "details": { "client_name": "Test Company", "cloud": "EU", "notification_type": "new_hits", "hit": { "host": "example.com", "heur_distance": 2.5, "method": "GET", "path": "/etc/passwd", "payloads": [ "/etc/passwd" ], "point": [ "uri" ], "probability": 2.5, "remote_country": null, "remote_port": 41254, "remote_addr4": "8.8.8.8", "remote_addr6": null, "datacenter": "unknown", "tor": "none", "request_time": 1703519826, "create_time": 1703519829, "response_len": 345, "response_status": 404, "response_time": 339, "stamps": [ 2907 ], "regex": [], "stamps_hash": -1063984326, "regex_hash": -2147483648, "type": "ptrav", "block_status": "monitored", "brute_counter": "b:1111:xxxxxxxxxxxxxxxx", "final_wallarm_mode": "monitoring", "libproton_version": "4.8.0", "lom_id": 932, "protocol": "none", "proxy_type": null, "request_id": "xxxxxxxxxxxxxxxx", "wallarm_mode": null, "id": [ "hits_production_1111_202312_v_1", "xxxxxxxxxxxxxxxx" ], "object_type": "hit", "anomaly": 0.22727272727272727, "parameter": "URI_value", "applications": [ "default" ] } } } ]{"summary":"[Wallarm] New hit detected","details":{"client_name":"Test Company","cloud":"EU","notification_type":"new_hits","hit":{"host":"example.com","heur_distance":20.714285714285715,"method":"GET","path":"/","payloads":["1' select version();"],"point":["get","id"],"probability":20.714285714285715,"remote_country":null,"remote_port":41253,"remote_addr4":"8.8.8.8","remote_addr6":null,"datacenter":"unknown","tor":"none","request_time":1703519823,"create_time":1703519826,"response_len":345,"response_status":404,"response_time":359,"stamps":[7965],"regex":[],"stamps_hash":271168947,"regex_hash":-2147483648,"type":"sqli","block_status":"monitored","brute_counter":"b:1111:xxxxxxxxxxxxxxxx","final_wallarm_mode":"monitoring","libproton_version":"4.8.0","lom_id":932,"protocol":"rest","proxy_type":null,"request_id":"xxxxxxxxxxxxxxxx","wallarm_mode":null,"id":["hits_production_1111_202312_v_1","xxxxxxxxxxxxxxxx"],"object_type":"hit","anomaly":1.0357142857142858,"parameter":"GET_id_value","applications":["default"]}} {"summary":"[Wallarm] New hit detected","details":{"client_name":"Test Company","cloud":"EU","notification_type":"new_hits","hit":{"host":"example.com","heur_distance":2.5,"method":"GET","path":"/etc/passwd","payloads":["/etc/passwd"],"point":["uri"],"probability":2.5,"remote_country":null,"remote_port":41254,"remote_addr4":"8.8.8.8","remote_addr6":null,"datacenter":"unknown","tor":"none","request_time":1703519826,"create_time":1703519829,"response_len":345,"response_status":404,"response_time":339,"stamps":[2907],"regex":[],"stamps_hash":-1063984326,"regex_hash":-2147483648,"type":"ptrav","block_status":"monitored","brute_counter":"b:1111:xxxxxxxxxxxxxxxx","final_wallarm_mode":"monitoring","libproton_version":"4.8.0","lom_id":932,"protocol":"none","proxy_type":null,"request_id":"xxxxxxxxxxxxxxxx","wallarm_mode":null,"id":["hits_production_1111_202312_v_1","xxxxxxxxxxxxxxxx"],"object_type":"hit","anomaly":0.22727272727272727,"parameter":"URI_value","applications":["default"]}} -
Security issue detected
[ { summary:"[Wallarm] New security issue detected", description:"Notification type: security_issue New security issue was detected in your system. ID: Title: Test Host: example.com Path: Method: Discovered by: Parameter: Type: Info Risk: Medium More details: https://us1.my.wallarm.com/object/555 Client: TestCompany Cloud: US ", details:{ client_name:"TestCompany", cloud:"US", notification_type:"security_issue", security_issue_link:"https://us1.my.wallarm.com/object/555", security_issue:{ host:"example.com", id:null, method:null, parameter:null, path:null, title:"Test", discovered_by:null, risk:"Medium", type:"Info" } } } ]{"summary":"[Wallarm] New security issue detected","description":"Notification type: security_issue\nNew security issue was detected in your system.\nID: \nTitle: Test\nHost: example.com\nPath: \nMethod: \nDiscovered by: \nParameter: \nType: Info\nRisk: Medium\nMore details: https://us1.my.wallarm.com/object/555\nClient: TestCompany\nCloud: US","details":{"client_name":"TestCompany","cloud":"US","notification_type":"security_issue","security_issue_link":"https://us1.my.wallarm.com/object/555","security_issue":{"host":"example.com","id":null,"method":null,"parameter":null,"path":null,"title":"Test","discovered_by":null,"risk":"Medium","type":"Info"}}}
Setting up integration
-
Open Wallarm UI → Integrations.
-
Click the Webhook block or click the Add integration button and choose Webhook.
-
Enter an integration name.
-
Enter the target Webhook URL.
-
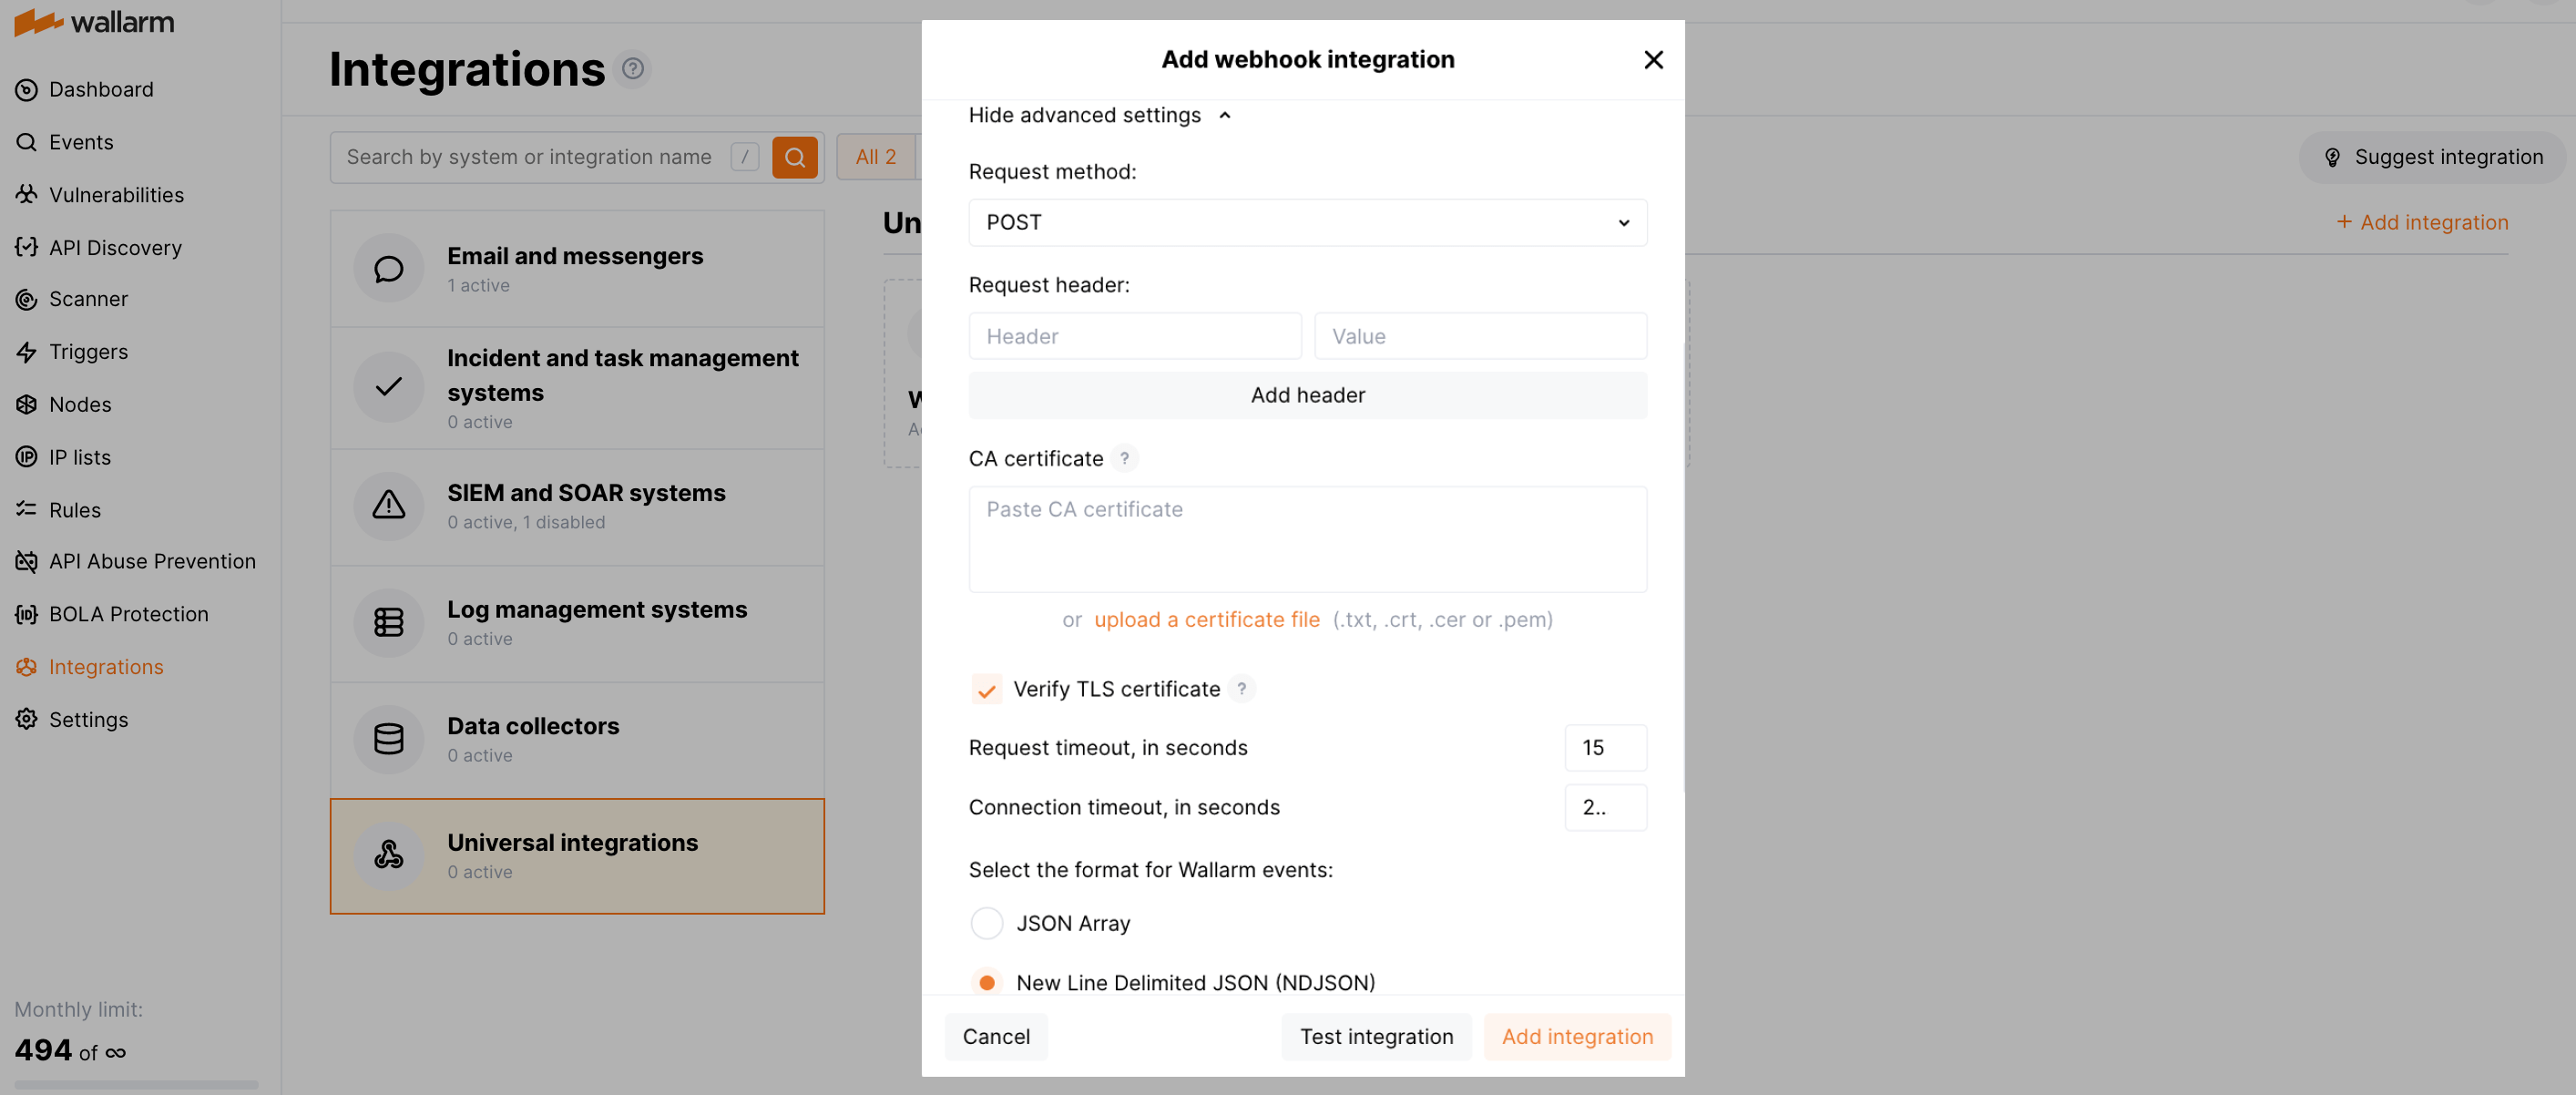
If required, configure advanced settings:
- Request method:
POSTorPUT. By default, POST requests are sent. - Request header and its value if the server requires a non-standard header to execute the request. The number of headers is not limited.
- CA certificate: certificate of the CA that signed the server certificate. If the CA is publicly trusted, this field is optional. If a server certificate is self-signed, this field is required and must contain a certificate of your own CA that signed a server certificate.
- Verify TLS certificate: this setting allows you to disable verification of the specified server certificate. By default, Wallarm verifies whether a server certificate is signed by a publicly trusted CA. We do not recommend disabling the verification of production server certificates. If your server uses a self-signed TLS certificate, you can add a self-signed CA certificate to allow sending requests to this server.
- Request timeout, in seconds: if the server does not respond to the request within the specified time, the request fails. By default: 15 seconds.
- Connection timeout, in seconds: if the connection to the server cannot be established during the specified time, the request fails. By default: 20 seconds.
- Wallarm data format: either a JSON Array (default) or a New Line Delimited JSON (NDJSON).
- Request method:
-
Choose event types to trigger notifications.
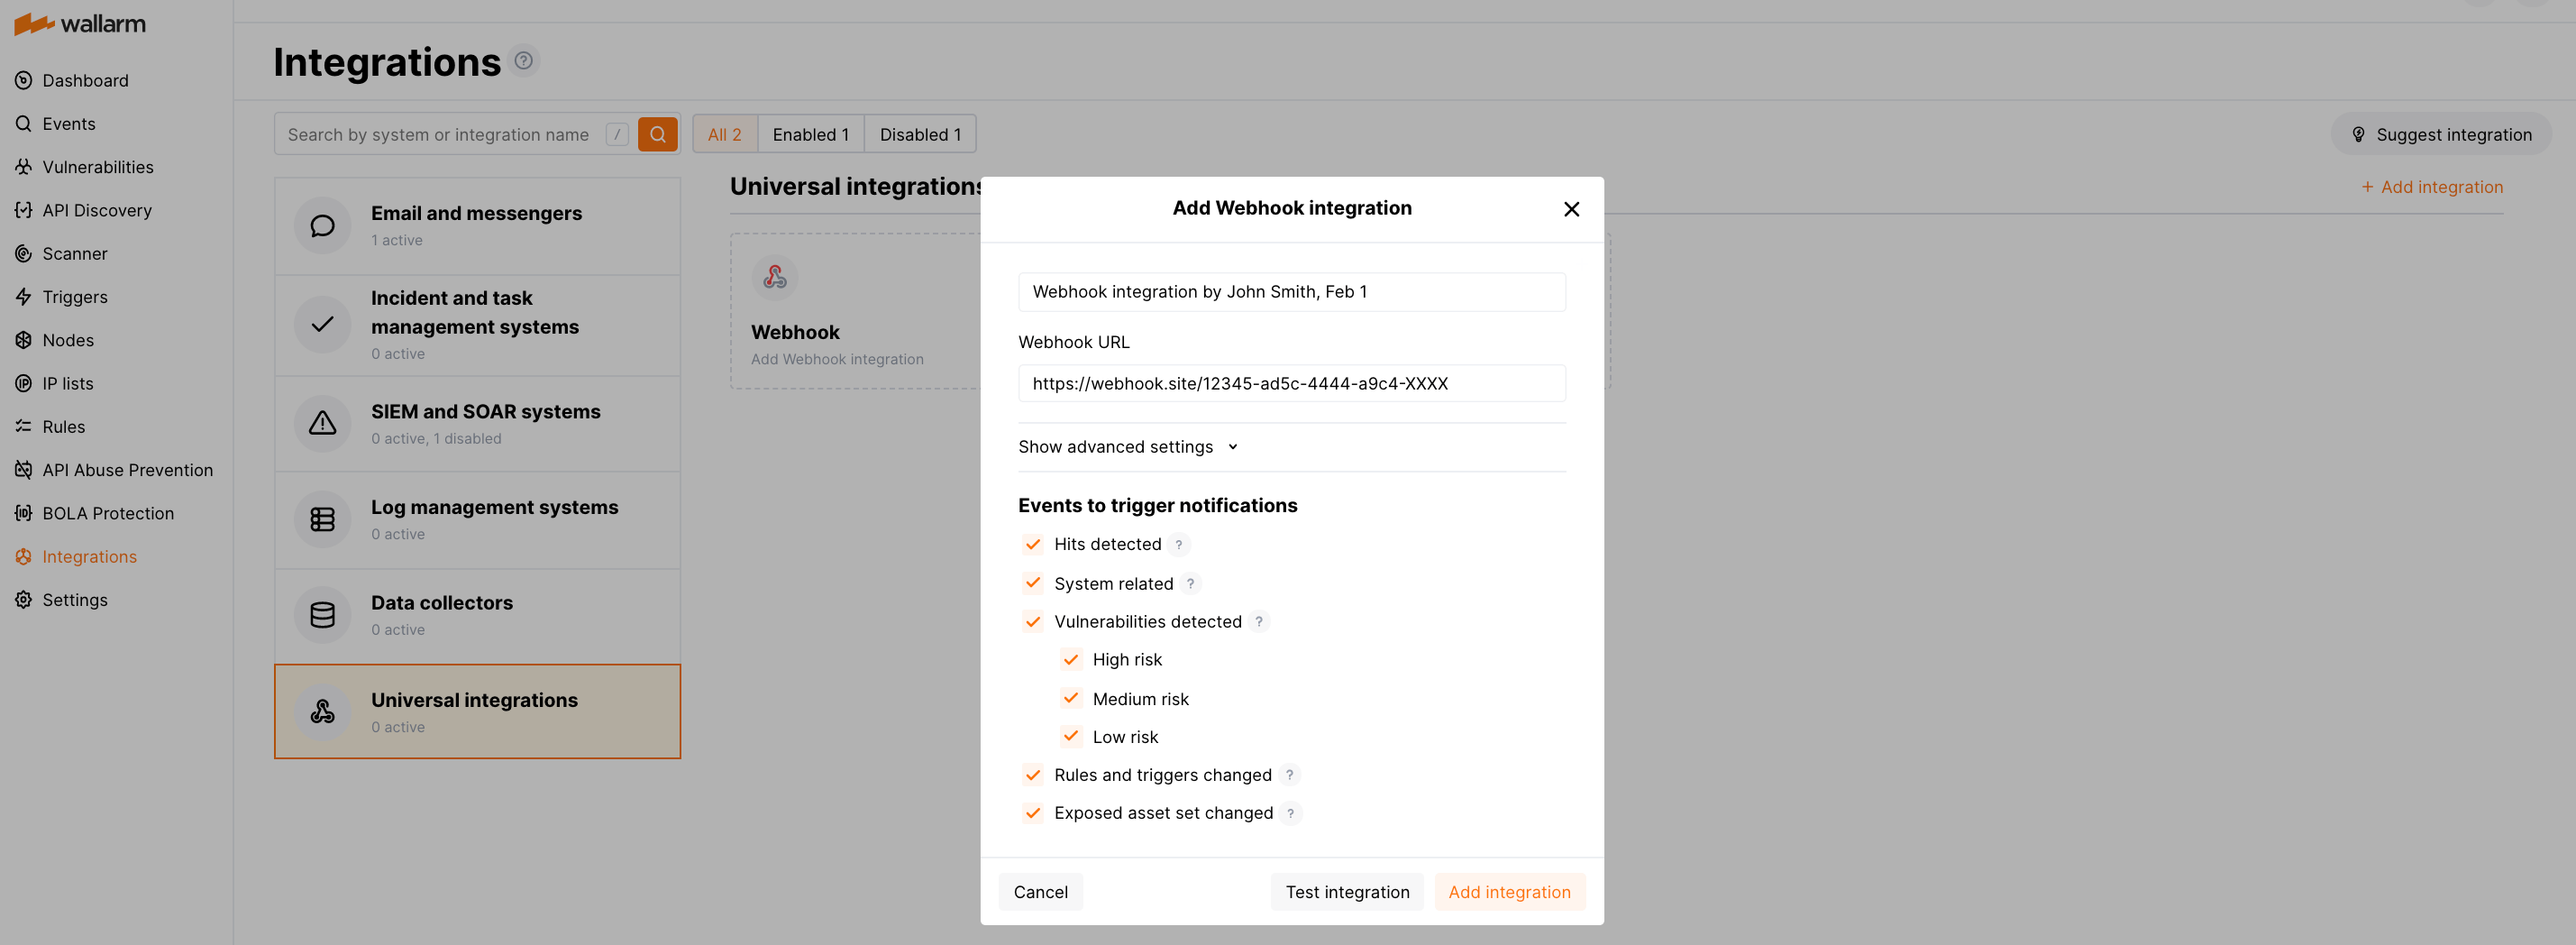
Details on available events:
-
Hits detected except for:
- Experimental hits detected based on the custom regular expression. Non-experimental hits trigger notifications.
- Hits not saved in the sample.
Optionally include the
headersobject with hit headers in hit logs. If disabled, headers are not included in the logs. -
System related:
- User changes (newly created, deleted, role change)
- Integration changes (disabled, deleted)
- Application changes (newly created, deleted, name change)
- Errors during regular update of specifications used for rogue API detection or API specification enforcement
- Rules and triggers changed (creating, updating, or deleting the rule or trigger)
- Security issues detected by all methods, all or only for the selected risk levels:
- Critical risk
- High risk
- Medium risk
- Low risk
- Info risk
- On an hourly basis, you can get a notification with the number of requests processed during the previous hour
-
-
Click Test integration to check configuration correctness, availability of the target system, and the notification format. Test notifications are always sent in the JSON Array format, even if New Line Delimited JSON (NDJSON) is chosen.
-
Click Add integration.
Wallarm Cloud IP addresses
To provide Wallarm Cloud access to your system, you may need a list of its public IP addresses:
Setting up additional alerts
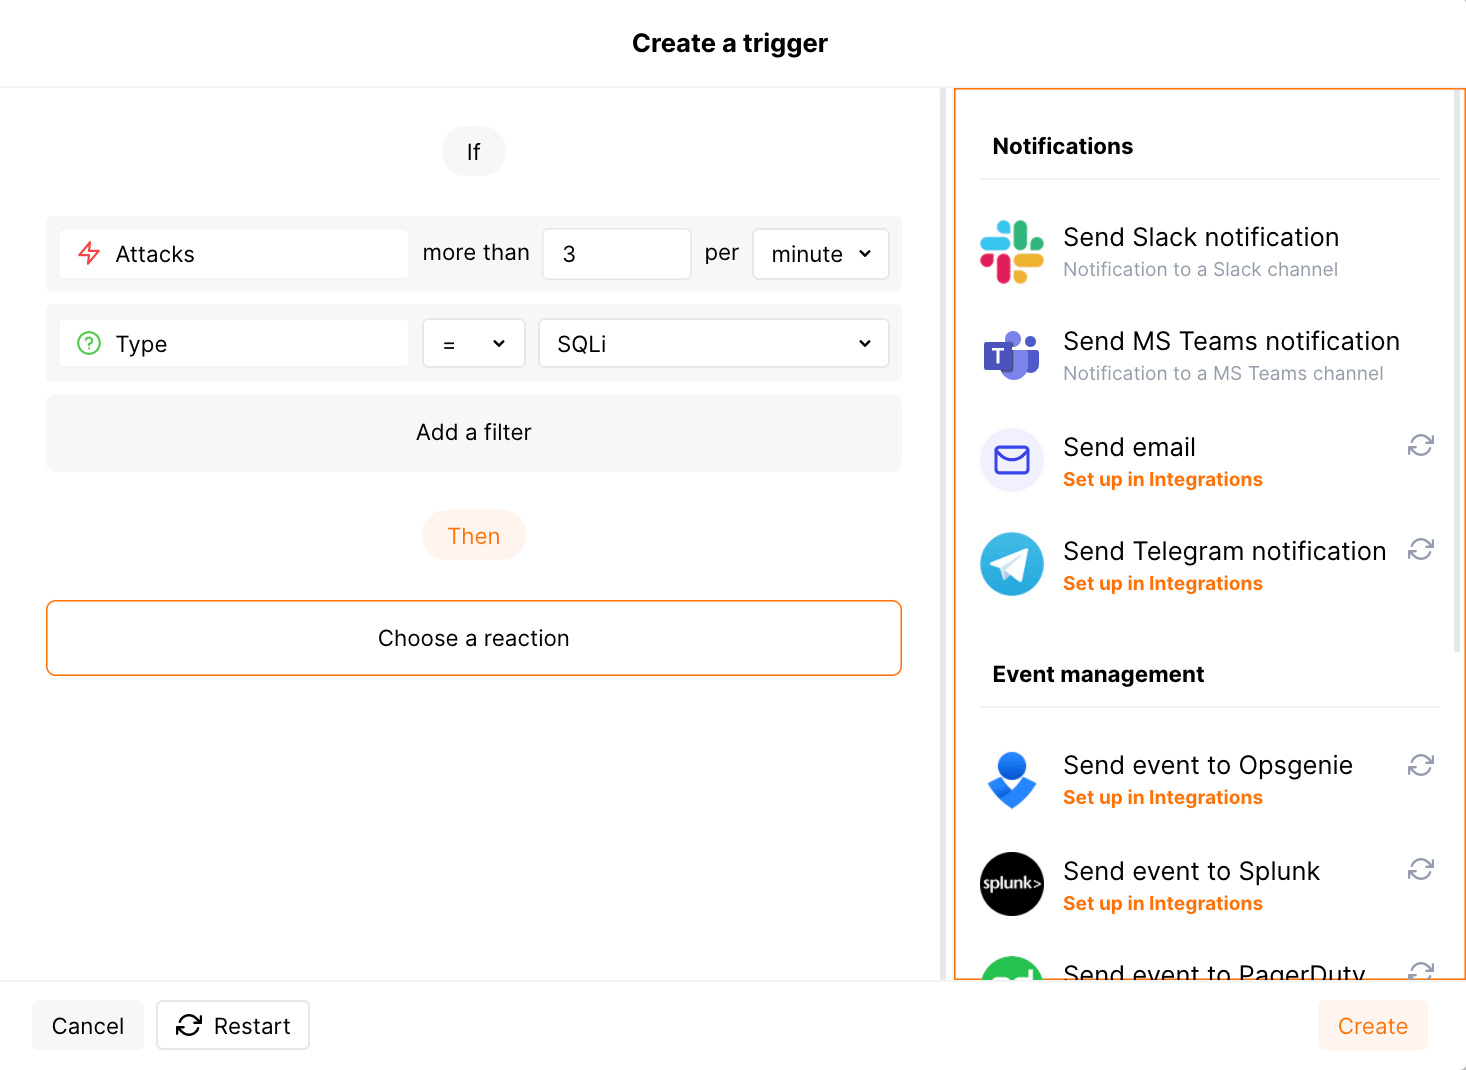
Besides the notifications you have already set up through the integration card, Wallarm triggers allow you to select additional events for notifications:
-
Number of attacks, hits or incidents per time interval (day, hour, etc.) exceeds the set number
What is not counted
- For attacks:
- The experimental attacks based on the custom regular expressions.
- For hits:
- The experimental hits based on the custom regular expressions.
- Hits not saved in the sample.
- For attacks:
-
Changes in API took place
-
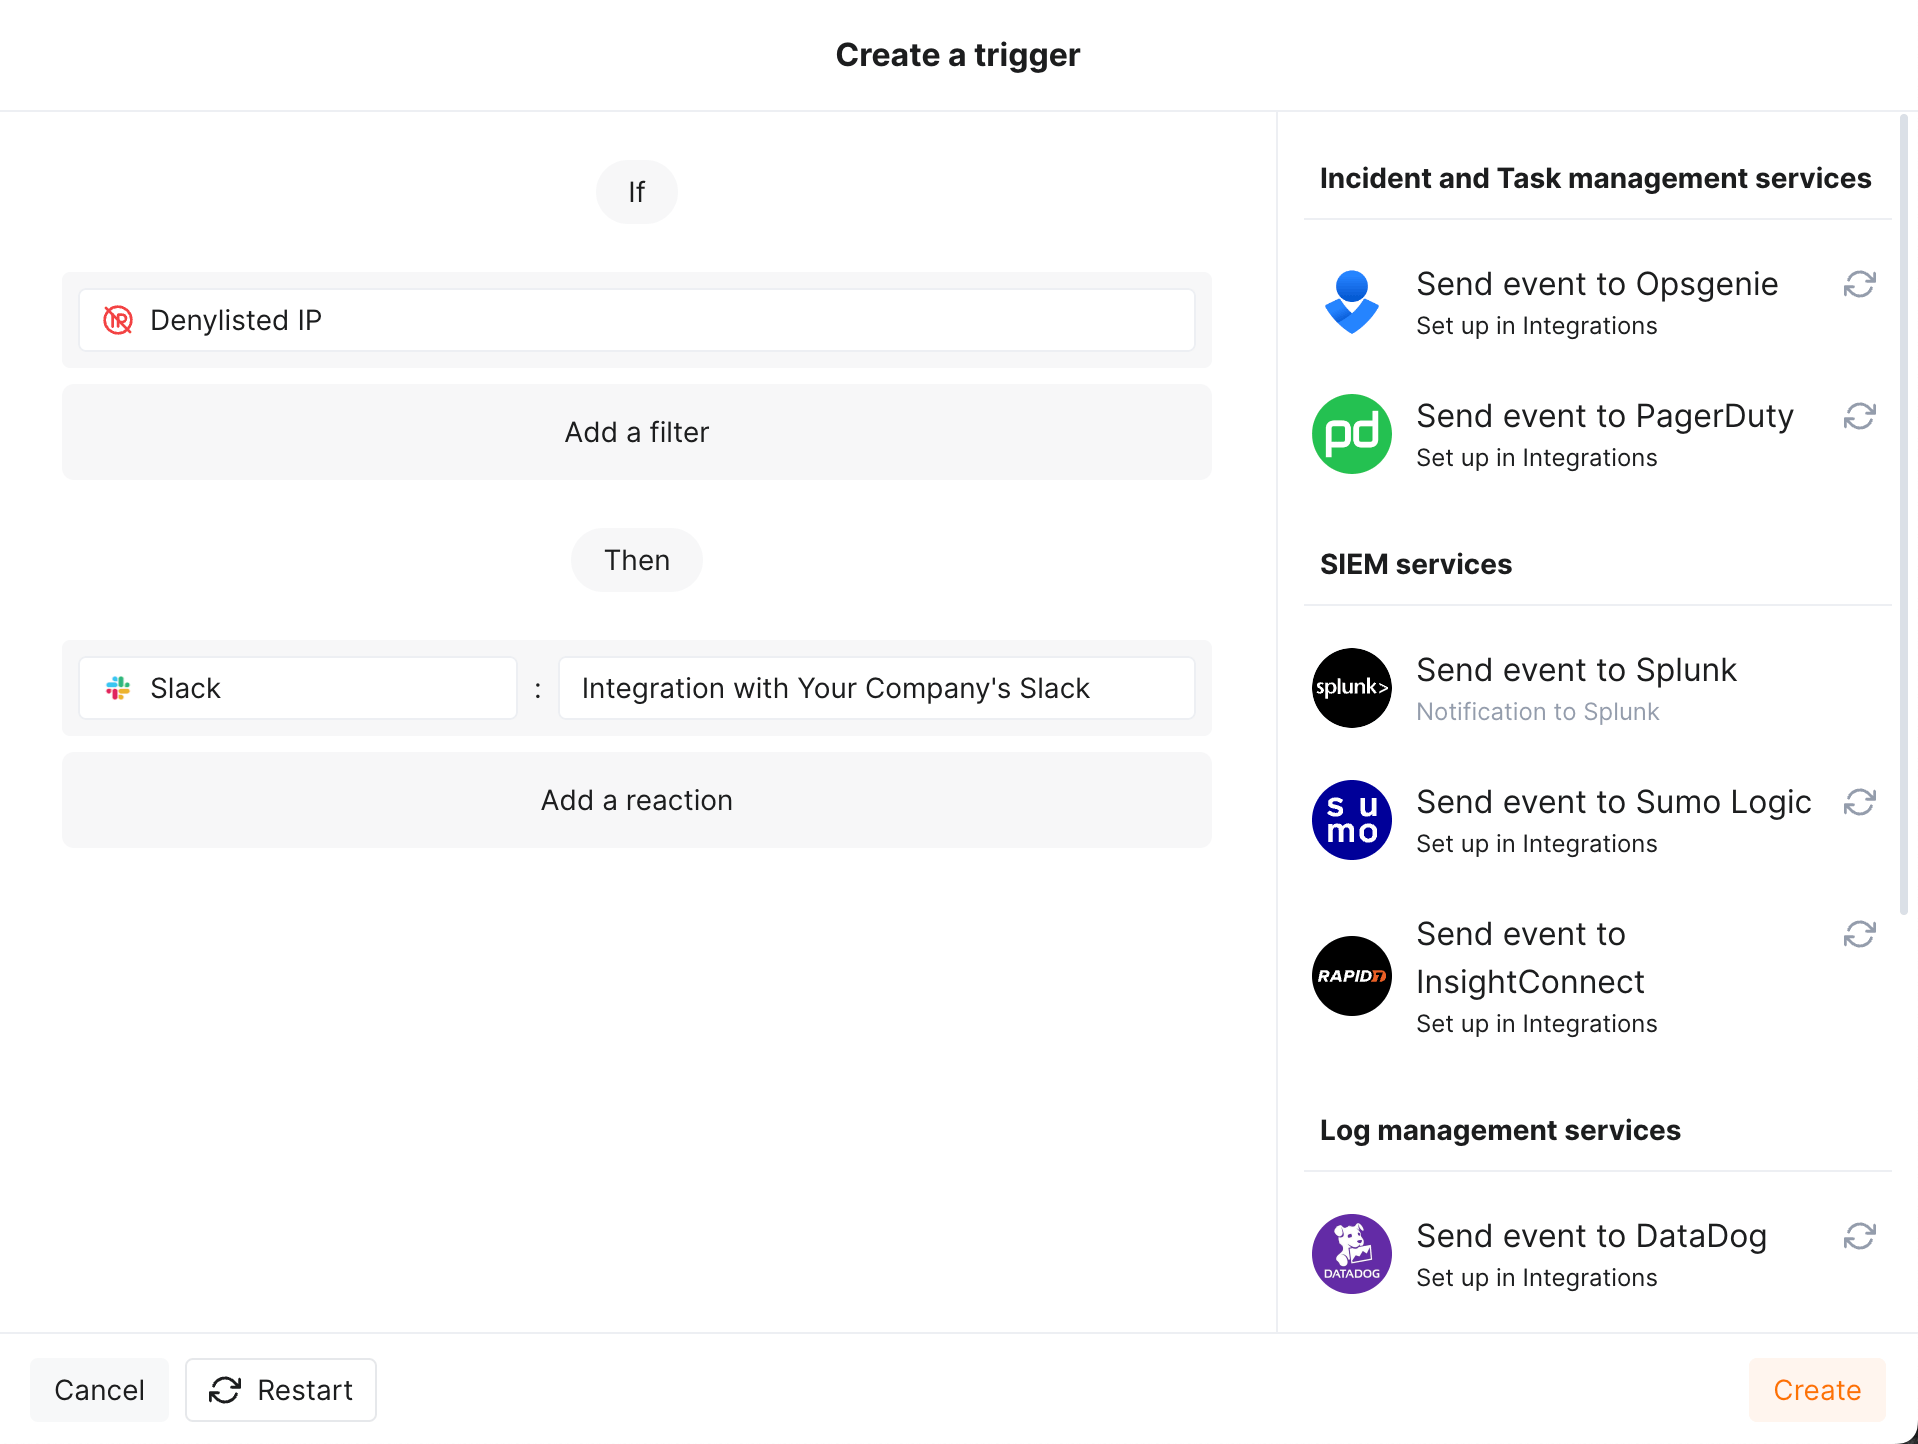
IP address was denylisted
-
New rogue API (shadow, zombie) was detected
-
New user was added to the company account
To detail the condition, you can add one or more filters. As soon as the condition and filters are set, select the integration through which the selected alert should be sent. You can select several integrations simultaneously.
Example: notification to Webhook URL if IP address is added to the denylist
If an IP address was added to the denylist, the webhook about this event will be sent to the Webhook URL.
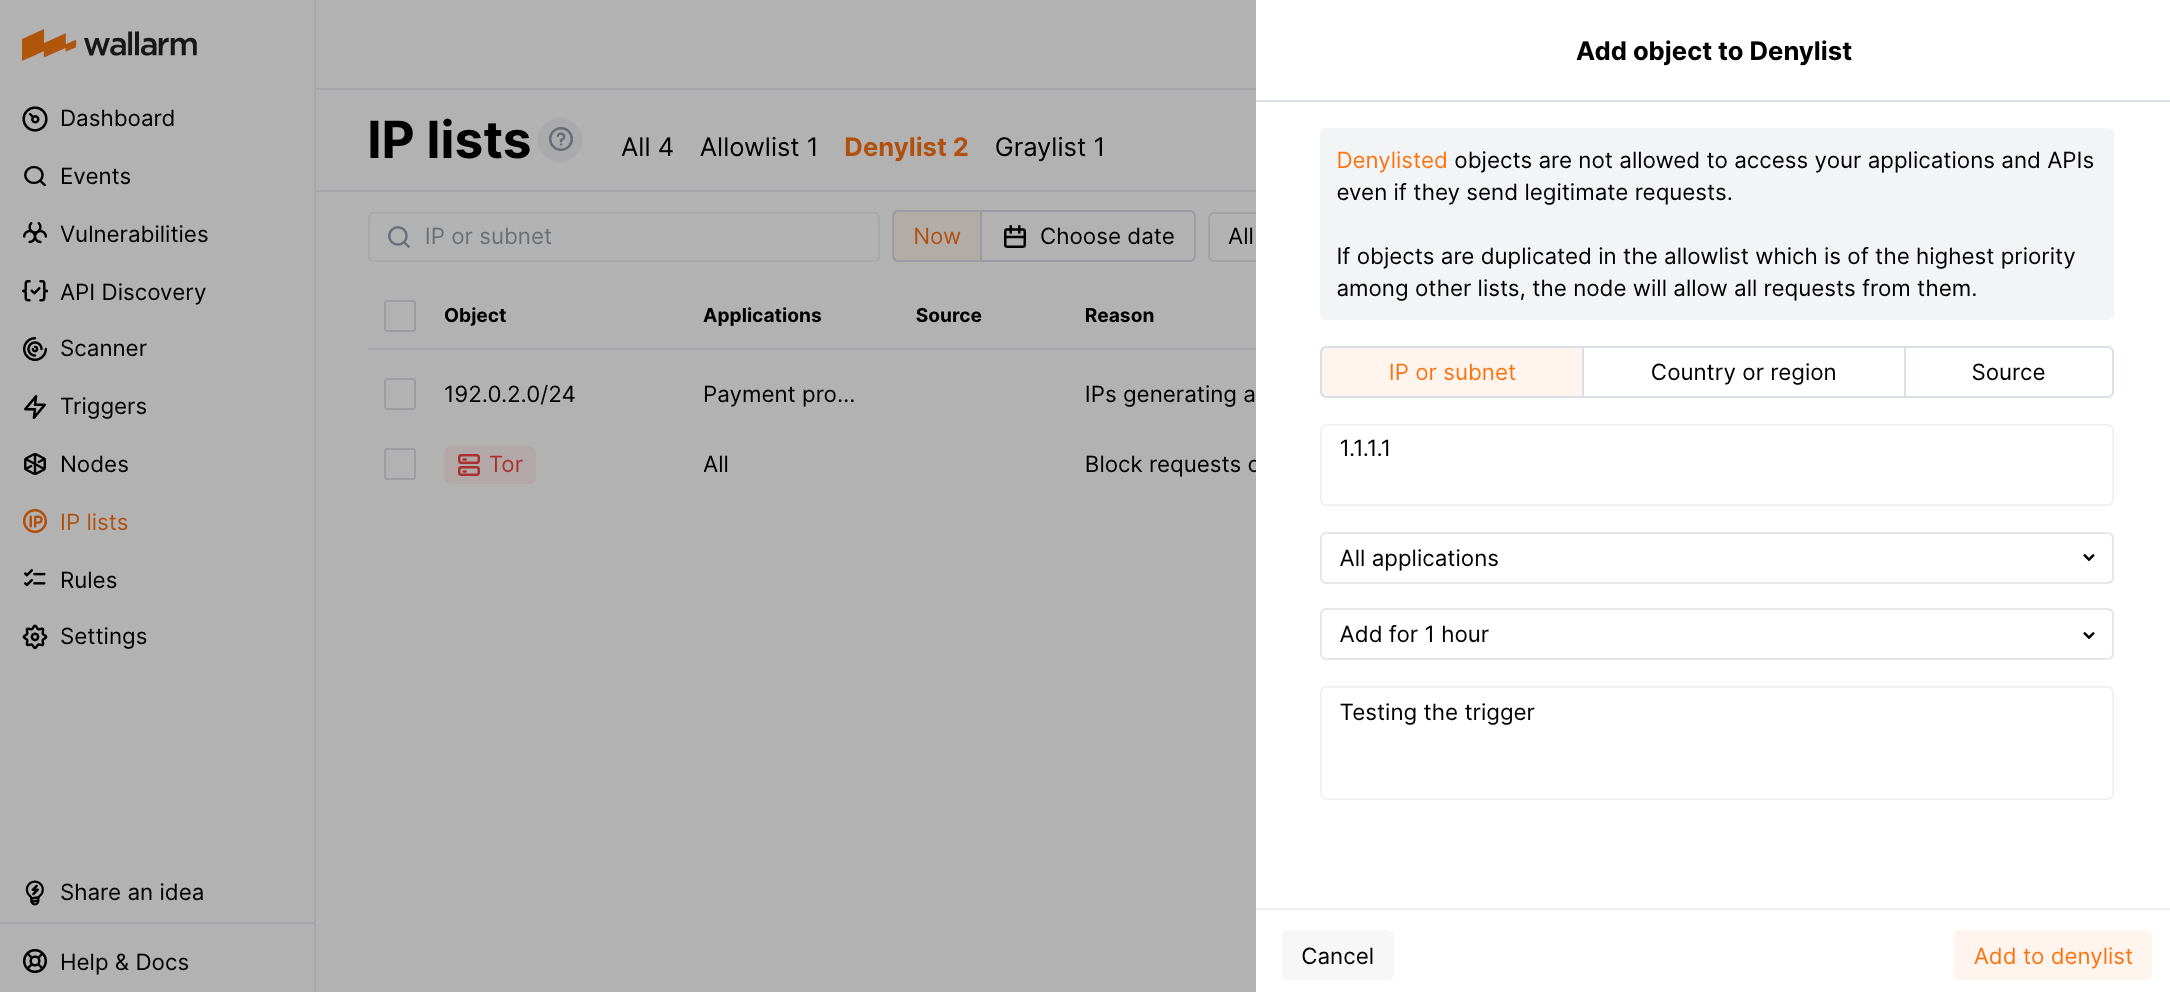
To test the trigger:
-
Open the Wallarm Console → IP lists → Denylist and add the IP address to the denylist. For example:
-
Check that the following webhook was sent to the Webhook URL:
[
    {
        "summary": "[Wallarm] Trigger: New IP address was denylisted",
        "description": "Notification type: ip_blocked\n\nIP address 1.1.1.1 was denylisted until 2021-06-10 02:27:15 +0300 for the reason Produces many attacks. You can review blocked IP addresses in the \"Denylist\" section of Wallarm Console.\nThis notification was triggered by the \"Notification about denylisted IP\" trigger. The IP is blocked for the application Application #8.\n\nClient: TestCompany\nCloud: EU\n",
        "details": {
        "client_name": "TestCompany",
        "cloud": "EU",
        "notification_type": "ip_blocked",
        "trigger_name": "Notification about denylisted IP",
        "application": "Application #8",
        "reason": "Produces many attacks",
        "expire_at": "2021-06-10 02:27:15 +0300",
        "ip": "1.1.1.1"
        }
    }
]
Notification about denylisted IPis the trigger nameTestCompanyis the name of your company account in Wallarm ConsoleEUis the Wallarm Cloud where your company account is registered
Disabling and deleting an integration
You can delete or temporarily disable the integration. While deleting stops sending notifications and completely deletes all configuration, disabling just stops sending notifications, which you can re-enable at any moment with the same settings.
If the System related events are selected to trigger notifications for the integration, Wallarm will notify you about both of these actions.
System unavailability and incorrect integration parameters
Notifications to the system are sent via requests. If the system is unavailable or integration parameters are configured incorrectly, the error code is returned in the response to the request.
If the system responds to the Wallarm request with any code other than 2xx, Wallarm resends the request at intervals until the 2xx code is received:
-
The first cycle intervals: 1, 3, 5, 10, 10 seconds
-
The second cycle intervals: 0, 1, 3, 5, 30 seconds
-
The third cycle intervals: 1, 1, 3, 5, 10, 30 minutes
If the percentage of unsuccessful requests reaches 60% in 12 hours, the integration is automatically disabled. If you receive system notifications, you will get a message about the automatically disabled integration.