Filtering by IP
In the IP & Session Lists → IP lists section of Wallarm Console, you can control access to your applications by allowlisting, denylisting, and graylisting of IP addresses, geographical locations, data centers or source types.
-
Allowlist is a list of trusted sources that bypass Wallarm protection and access your applications without any checks. Requests from allowlisted IPs are not counted against quota.
-
Denylist is a list of sources that cannot access your applications - all requests from them will be blocked.
-
Graylist is a list of suspicious sources processed by the node only in the safe blocking filtration mode as follows: if graylisted IP originates malicious requests, the node blocks them while allowing legitimate requests; the requests from other IPs are never blocked although malicious ones are detected and displayed in the Attacks with the
Monitoringstatus.Malicious requests originating from graylisted IPs are those containing the signs of the following attacks:

How allowlist, denylist, and graylist work together
The filtering node employs different approaches based on the selected operation mode to analyze IP lists. In certain modes, it assesses all three types of IP lists, namely allowlists, denylists, and graylists. However, in other modes, it focuses on only specific IP lists.
The image provided below visually represents the priorities and combinations of IP lists in each operation mode, highlighting which lists are considered in each case:
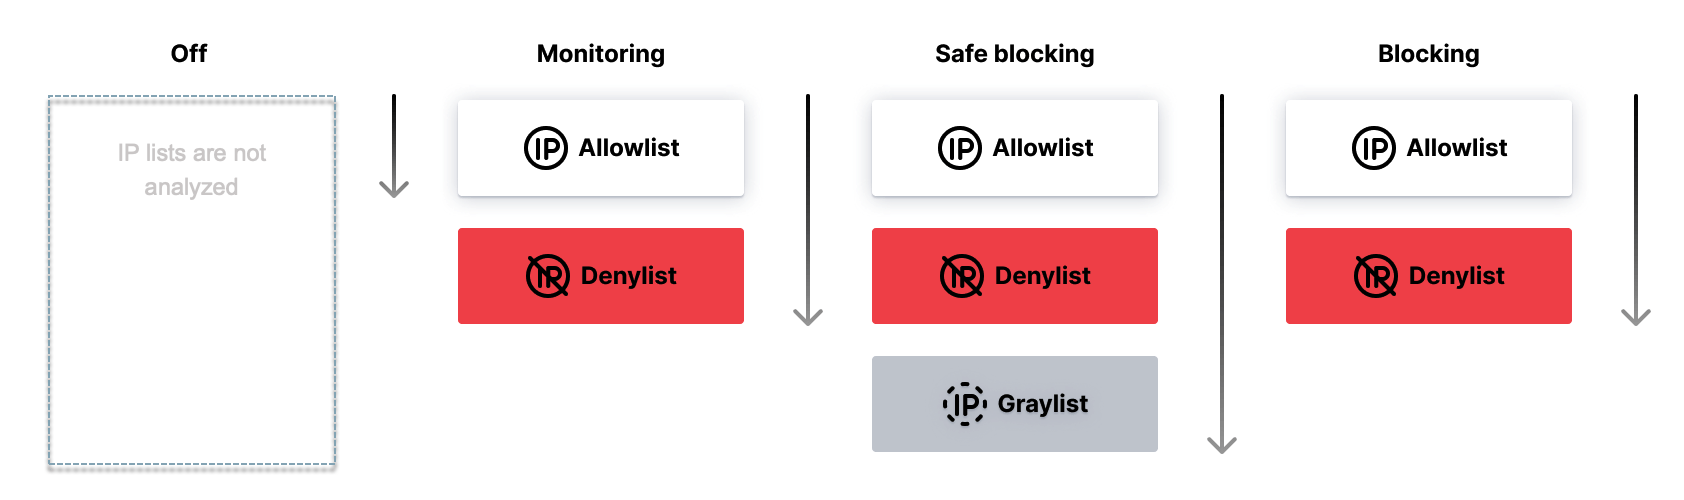
This means that:
-
In any mode, if an IP is found in the earlier list, the next one is not considered.
-
Graylist is only considered in
Safe blockingmode.
Exceptions
If wallarm_acl_access_phase off, the Wallarm node does not block requests from denylisted IPs in the Monitoring mode.
Configuring IP lists
Steps:
-
Decide which list to use depending on your purpose.
-
Select which object to add: IP, subnet, location, source type.
-
Select time for which the object will stay in a list (it is usually not forever).
-
Limit by target application (not all requests, but only targeting specific application).
Select object
Use Add object to add the following into any of the IP lists:
-
IP or subnet - the supported maximum subnet mask is
/32for IPv6 addresses and/12for IPv4 addresses. -
Location (country or region) to add all IP addresses registered in this country or region
-
Source type to add all IP addresses that belong to this type. Available types are:
- Search Engines
- Datacenters (AWS, GCP, Oracle, etc.)
- Anonymous sources (Tor, Proxy, VPN)
- Malicious IPs
Locations and source types
Wallarm uses paid feeds from IP2location for detecting country/region and source type in which the IP addresses are registered.

Automatic population of IP lists
Note that besides adding objects manually, you can use automatic list population, which is preferable.
Select time to stay in list
When adding an object to a list, you specify the time for which it is added. The minimum time is 5 minutes, default is 1 hour, the maximum is forever. On expiration, the object is automatically deleted from the list.
You can change the specified time at any moment later - to do this, in the object's menu, click Change time period and make adjustments.
Setting this time along with manually adding and deleting objects leads to changes to IP lists over time. You can view the historical states of all lists.
Limit by target application
When adding an object to a list, by default all requests from the listed IP will be processed. But you can limit that by target applications: select one or several applications and only requests from the listed IP to those applications will be processed.
Malicious IP feeds
When adding the Malicious IPs source type to one of the IP lists, note that this will include all IP addresses that are well-known for malicious activity, as mentioned in public sources, and verified by expert analysis. We pull this data from a combination of the following resources:
IP list history
IP lists have not only the current state, but also the states back in time and they differ. Choose specific dates to examine the IP list content, and the system will return a detailed History of its changes, including the exact timing and method of addition, be it manual or automated. The report also provides data on the individuals responsible for the changes and the reasons behind each inclusion. Such insights help in maintaining an audit trail for compliance and reporting.
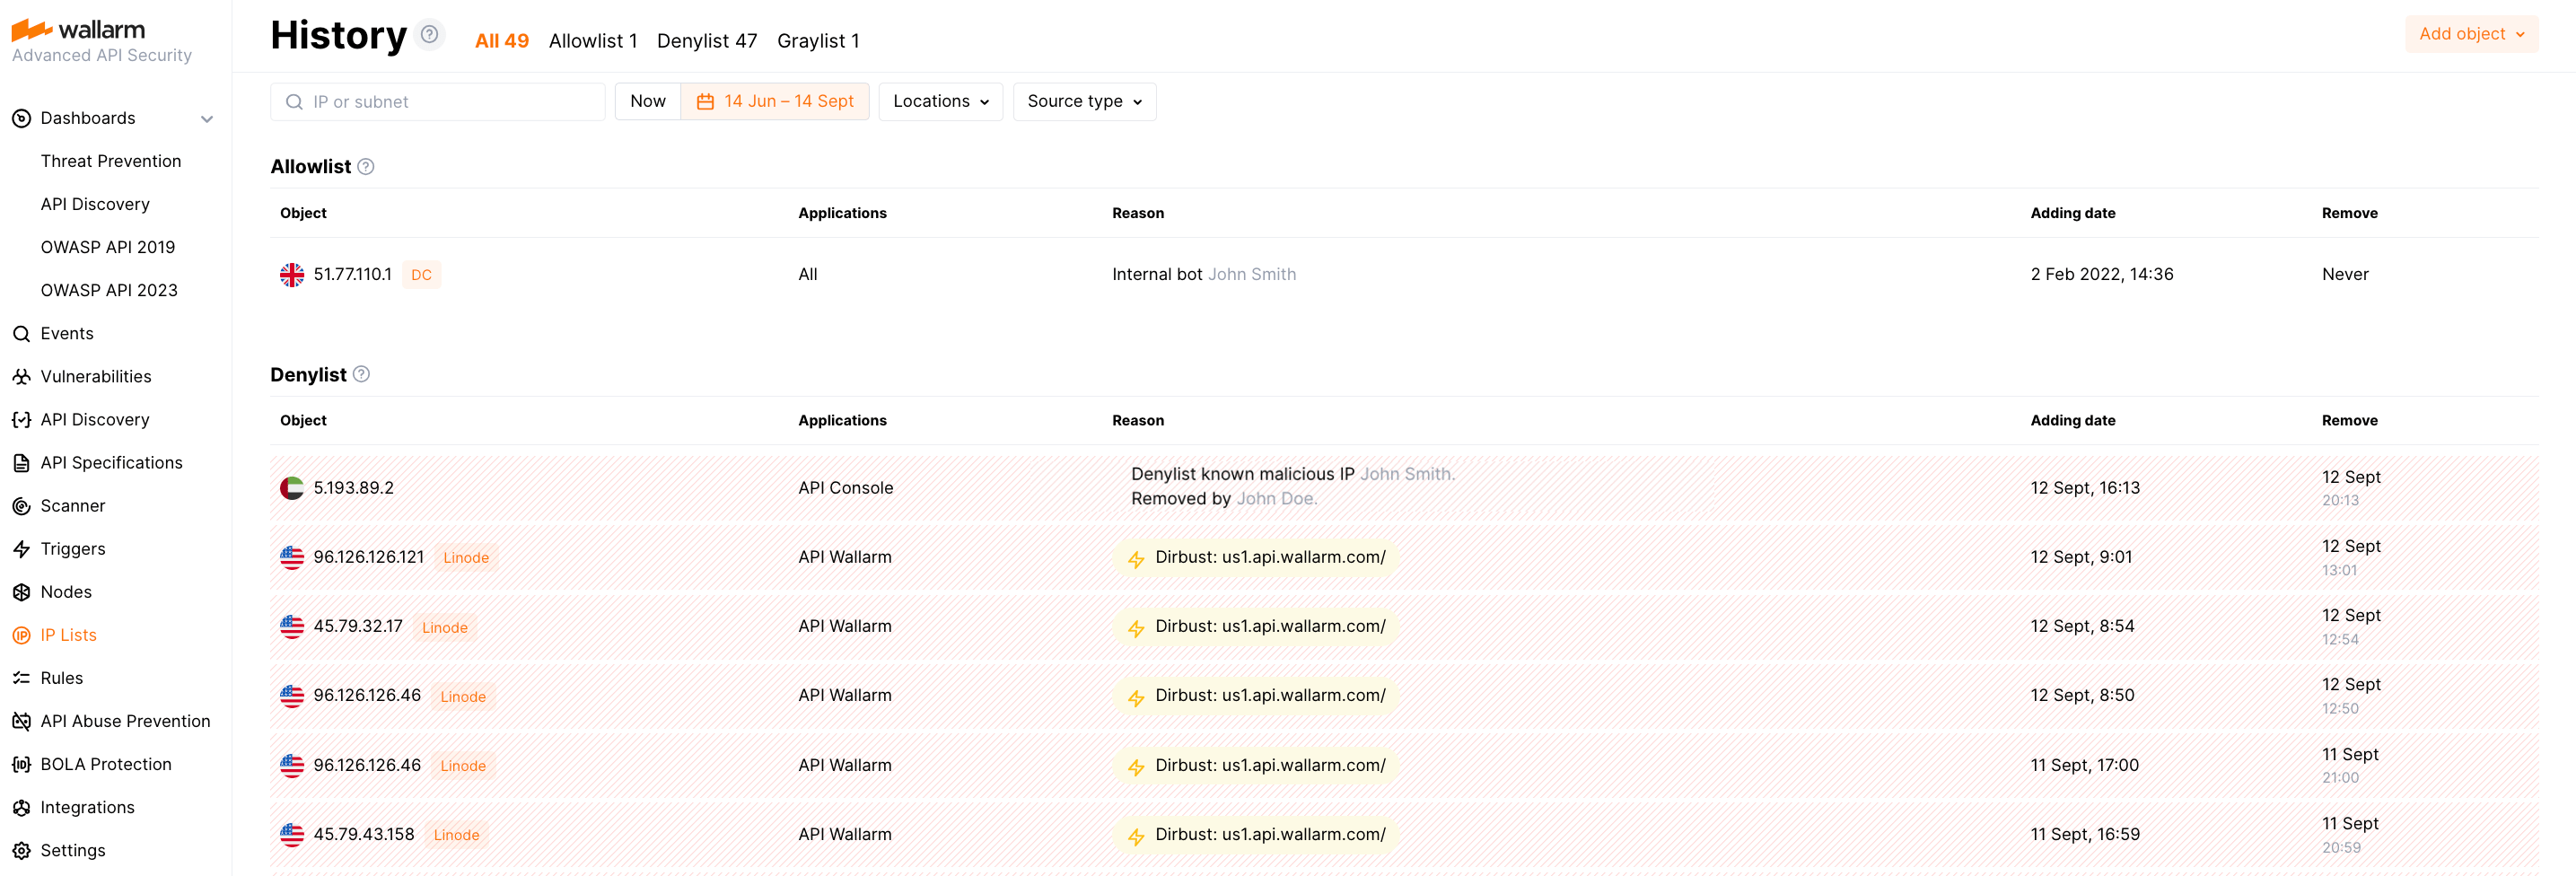
Switch back to the Now tab to get the current state of the IP list, allowing you to view the objects presently included in the list.
Automatic listing
You can enable Wallarm to denylist or graylist IP addresses automatically if they produce some suspicious traffic. This can be done for:
Note that if you manually delete an automatically listed IP, if new malicious activity is detected it will be automatically added again but:
-
Not before half of the previous time period
For example, if IP address was automatically denylisted for 4 hours due to BOLA attack from it and you delete it from denylist, it will not be re-added within next 2 hours, even if attacks occur.
-
For API Abuse Prevention - immediately
Requests from denylisted IPs
Even if an IP is in the denylist, it is good to have information about further requests from it. This allows conducting precise analysis of the IP's behavior. Wallarm collects and displays statistics regarding blocked requests from denylisted source IPs.
Feature availability
The feature is available starting from node version 4.8, for NGINX-based nodes. You can control this with the wallarm_acl_export_enable directive.
Such information is available for:
-
Manually denylisted IPs
-
IPs, automatically denylisted by:
The listed behavioral attacks can be detected only after accumulating certain statistics the required amount of which depends on the corresponding trigger thresholds. Thus, in the first stage, before denylisting, Wallarm collects this information but all requests are passed and displayed as the attacks with the Monitoring status.
Once trigger thresholds are exceeded, Wallarm adds the IP to the denylist and blocks further requests. You will see Blocked requests from this IP in the attack list. This applies to manually denylisted IPs as well.
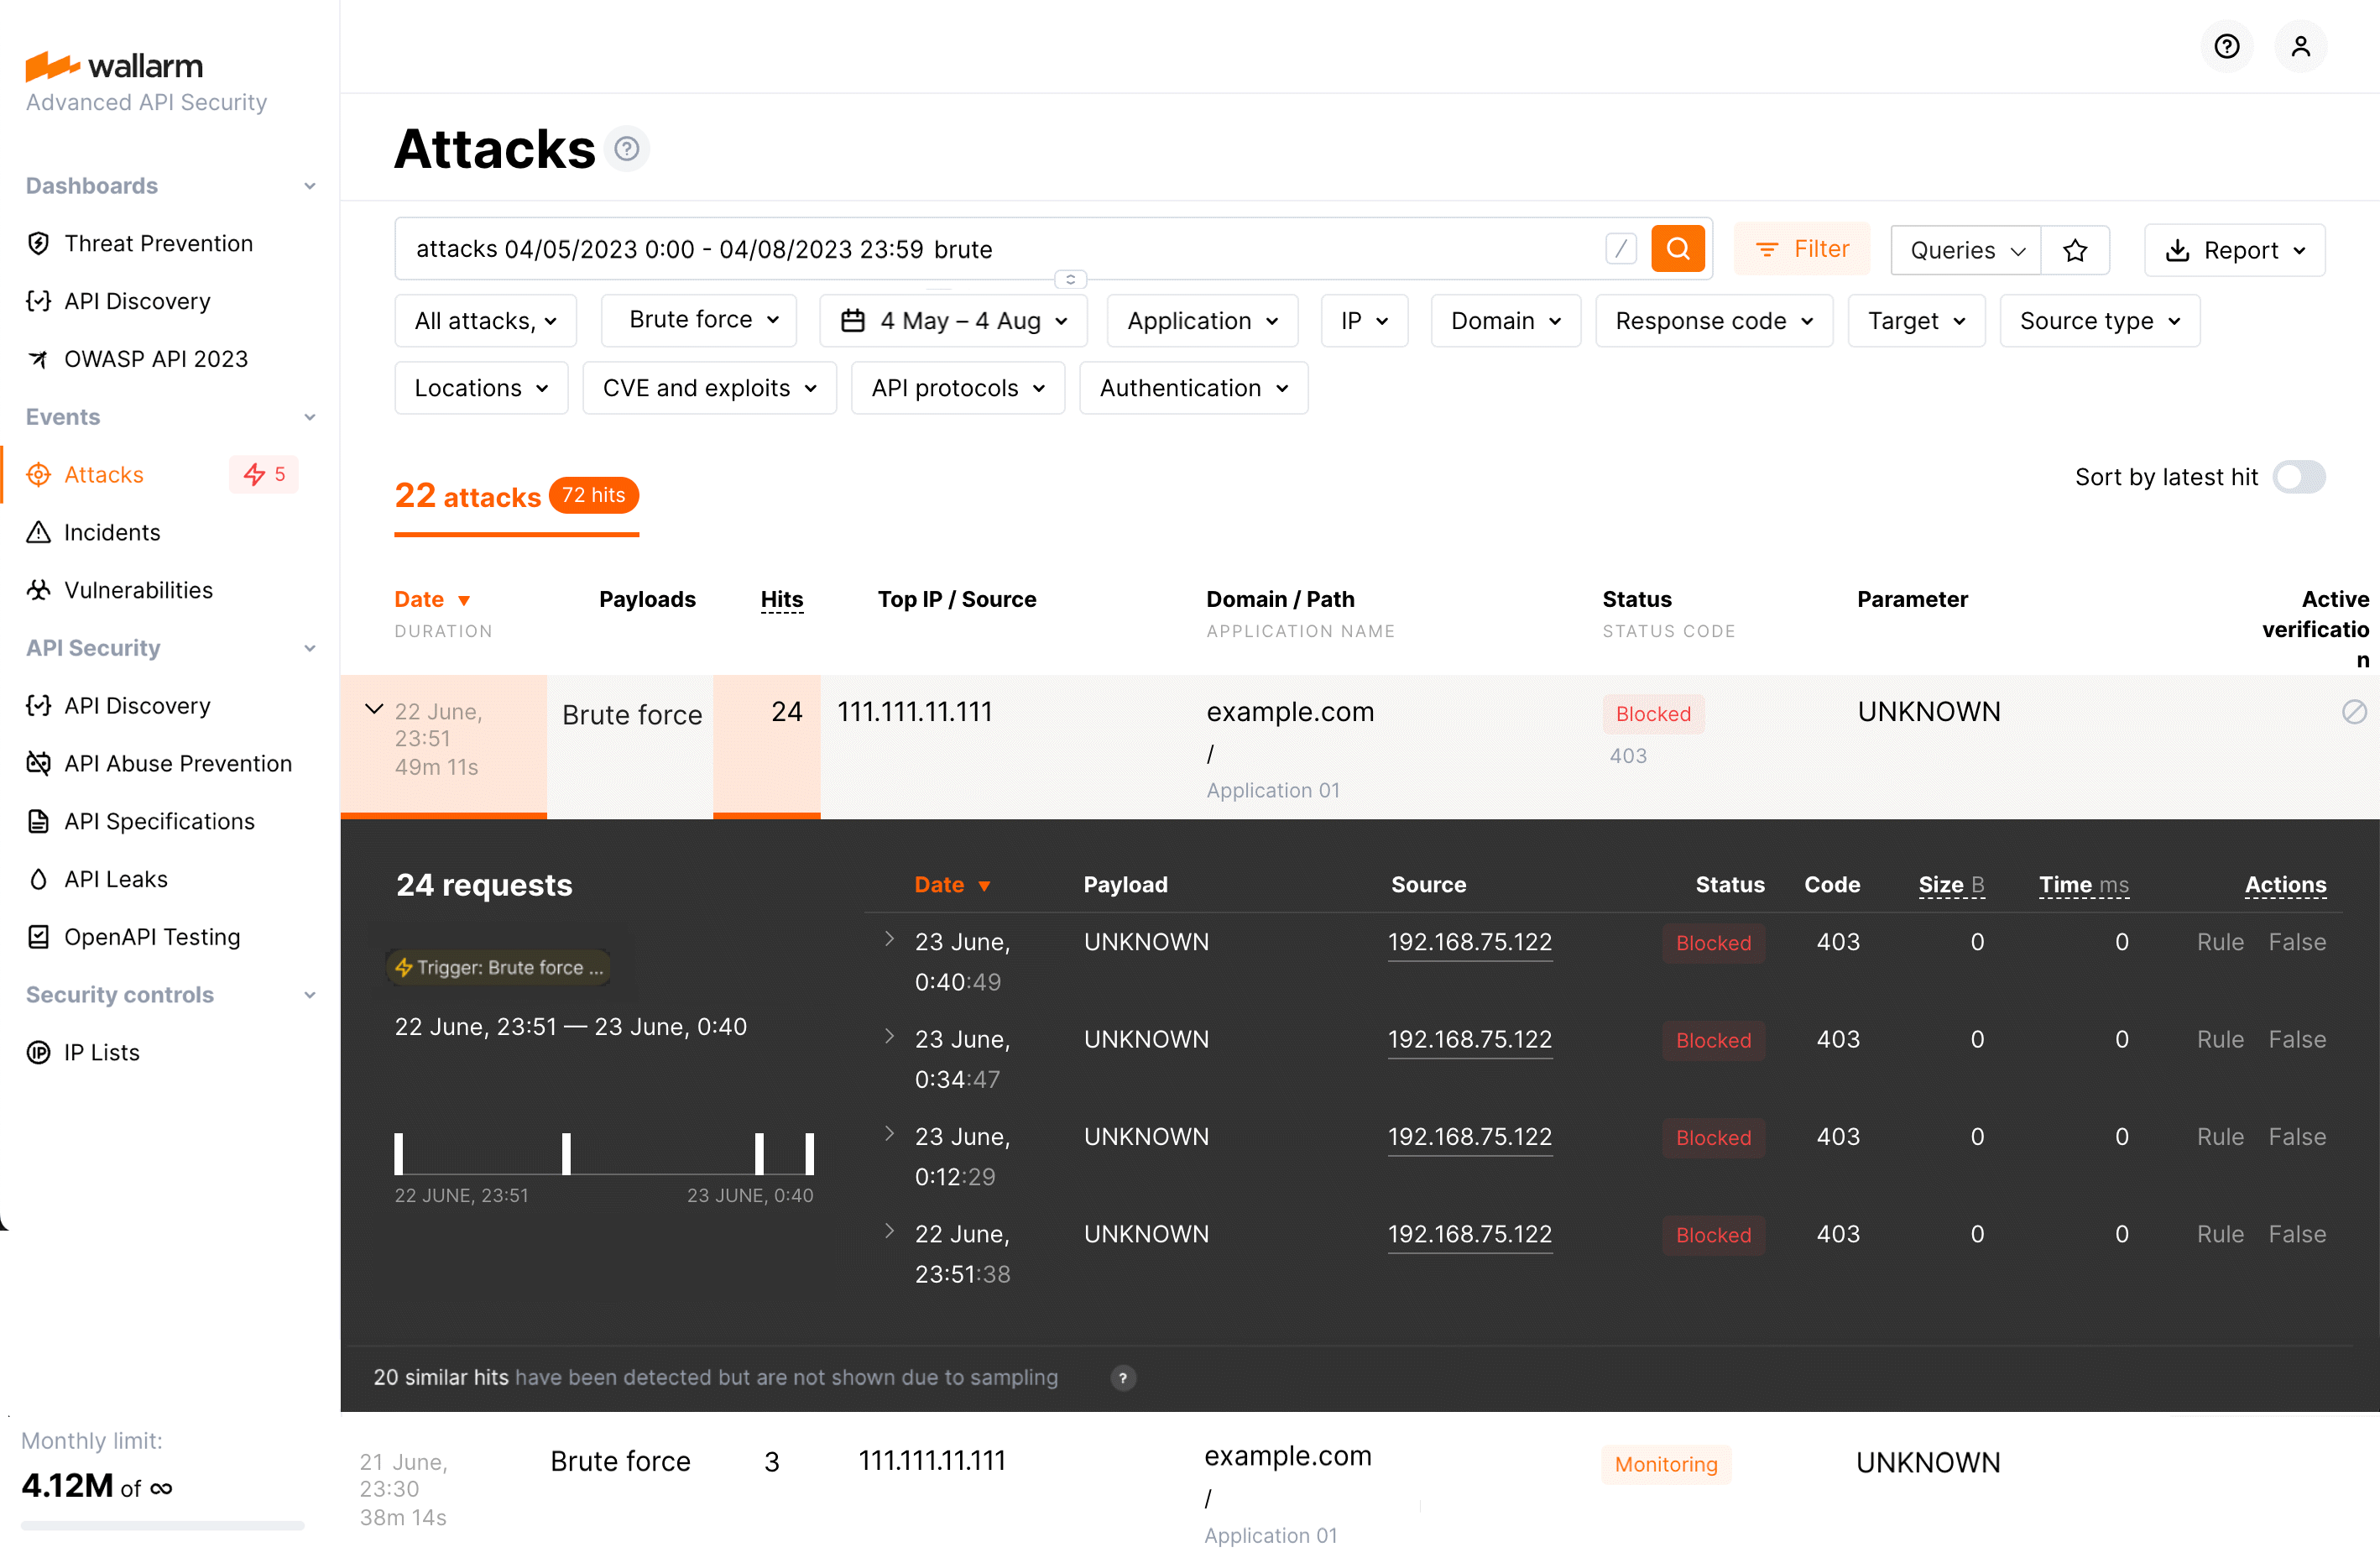
Use search tags of filters to find requests from denylisted IPs: API abuse related, brute, dirbust, bola, multiple_payloads for automatically listed, blocked_source - for manual ones.
Note that search/filters will display both attacks in the Monitoring status and - if sending information is enabled - with the Blocked status for each attack type. For manually denylisted IPs an attack with the Monitoring status never exists.
Among the attacks in the Blocked status, use tags to switch to the reason of denylisting - BOLA settings, API Abuse Prevention, trigger or causing record in denylist.
Getting notifications on the denylisted IPs
You can get notifications about newly denylisted IPs via the messengers or SIEM systems you use every day. To enable notifications, in Triggers section, configure one or several triggers with the Denylisted IP condition, e.g.:
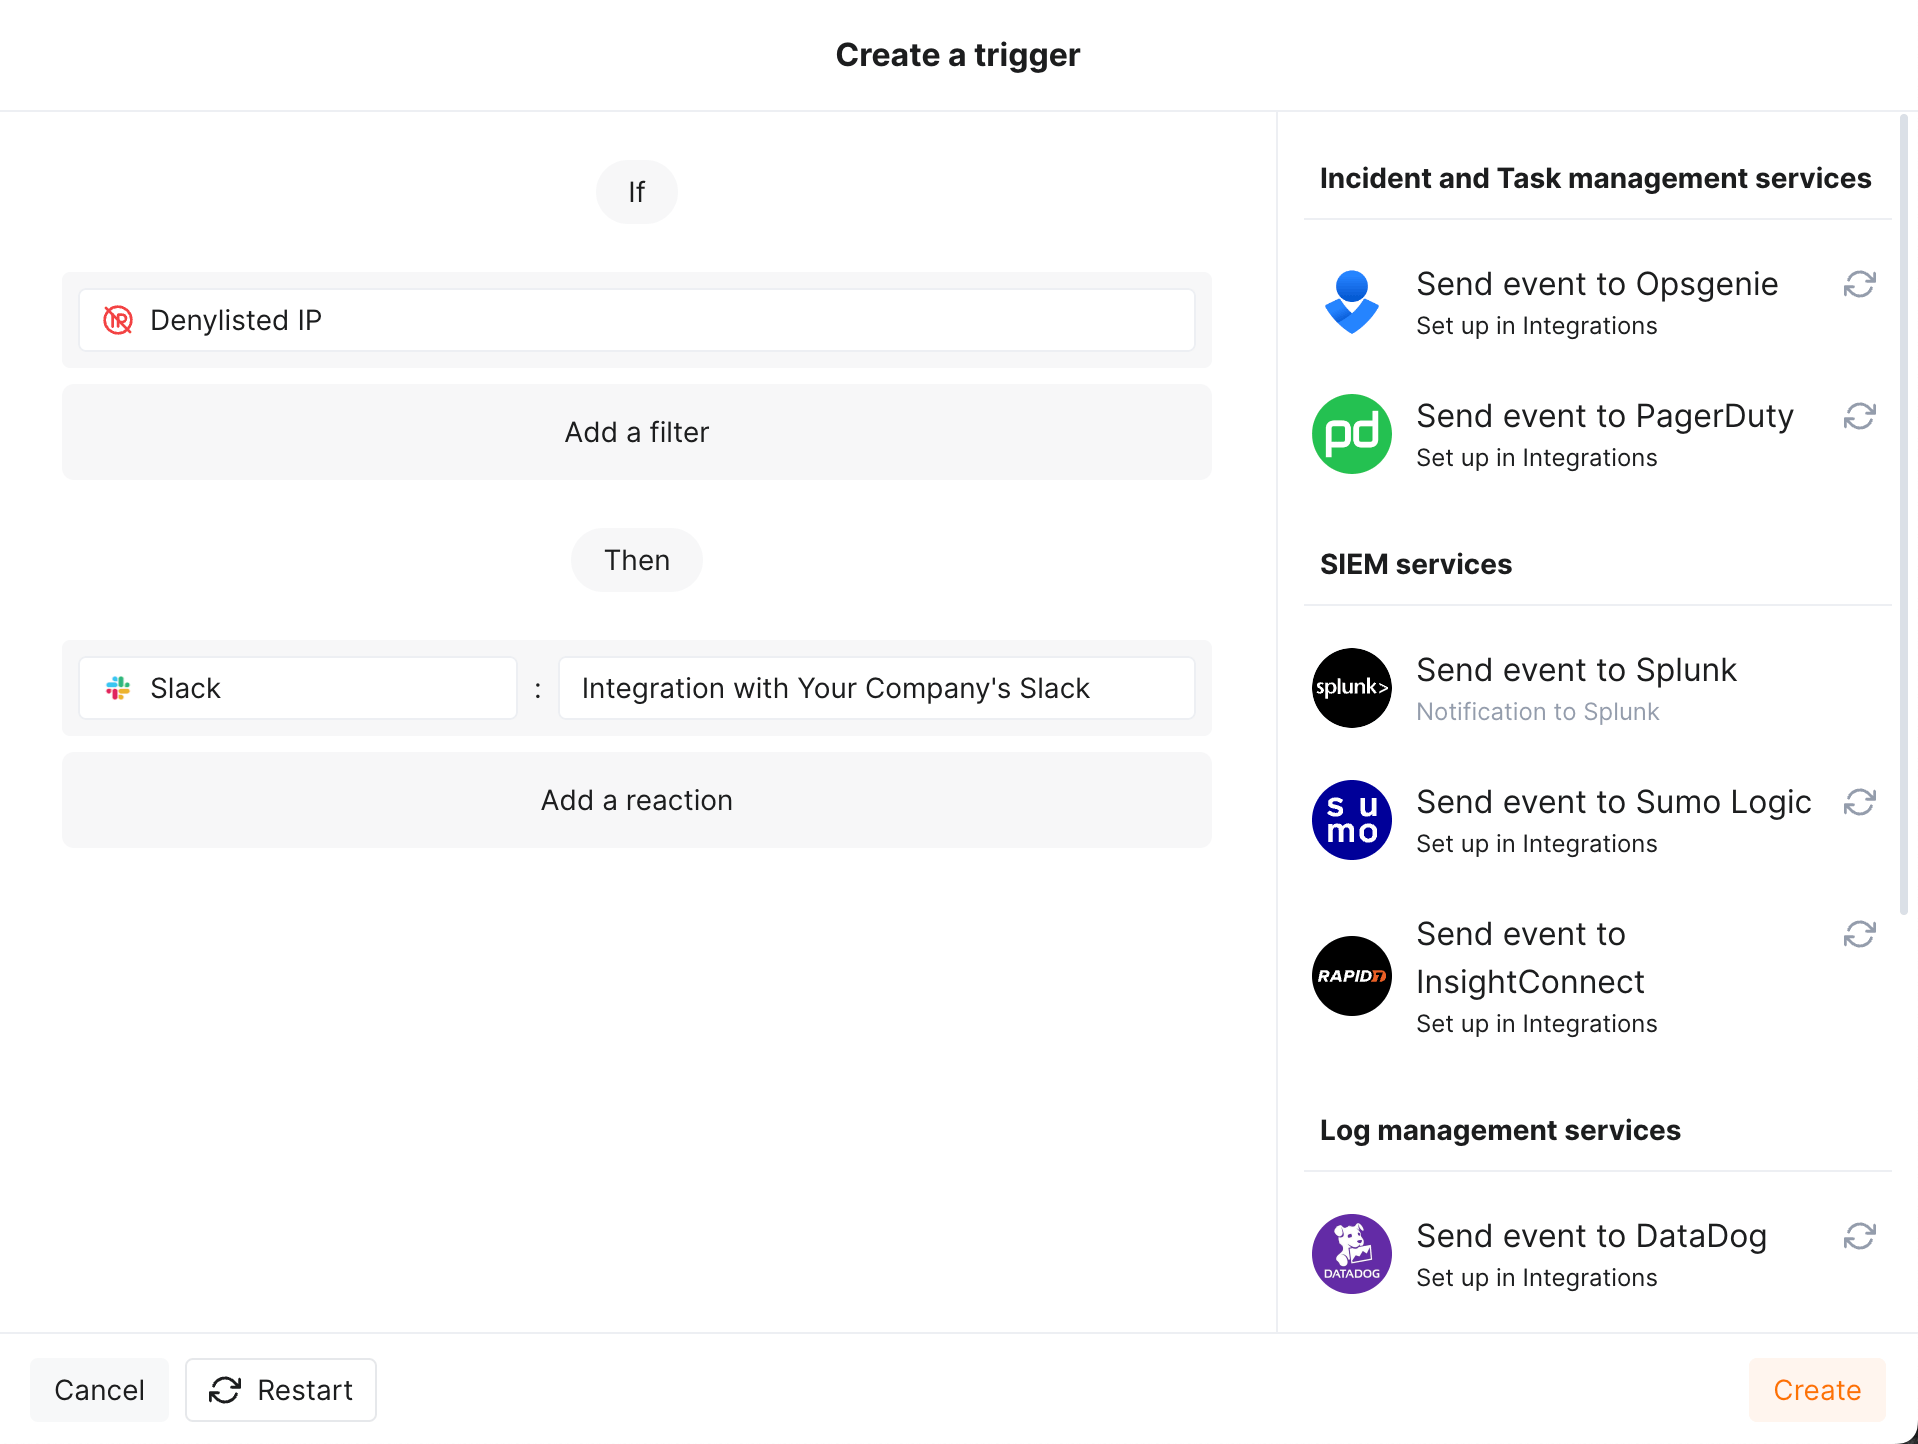
To test the trigger:
-
Go to Wallarm Console → Integrations in the US or EU cloud, and configure integration with Slack.
-
In Triggers, create trigger as shown above.
-
Go to IP & Session Lists → IP Lists → Denylist and add the
1.1.1.1IP with the "It is a malicious bot" reason. -
Check messages in your Slack channel like:
[wallarm] New IP address has been denylisted

Notification type: ip_blocked

IP address 1.1.1.1 has been denylisted until 2024-01-19 15:02:16 +0300
for the reason "It is a malicious bot". You can review denylisted IP addresses
in the "IP lists → Denylist" section of Wallarm Console.

This notification was triggered by the "Notify about new denylisted IPs" trigger.
The IP is blocked for the application default.

Client: Your Company
Cloud: EU
Configuring nodes behind load balancers and CDNs to work with IP lists
If Wallarm node is located behind a load balancer or CDN, please make sure to configure your Wallarm node to properly report end-user IP addresses:
-
Instructions for NGINX-based Wallarm nodes (including AWS / GCP images and Docker node container)
-
Instructions for the filtering nodes deployed as the Wallarm Kubernetes Ingress controller
Managing lists via API
You can get any IP list content, populate it with objects and delete objects from it by calling the Wallarm API directly.
IP lists synchronization
The IP lists are formed in a Cloud and then sent to a Node to become effective. This synchronization is a process separate from synching of other entities and performed every minute (not configurable).