Fluentd/Logstash üzerinden Datadog
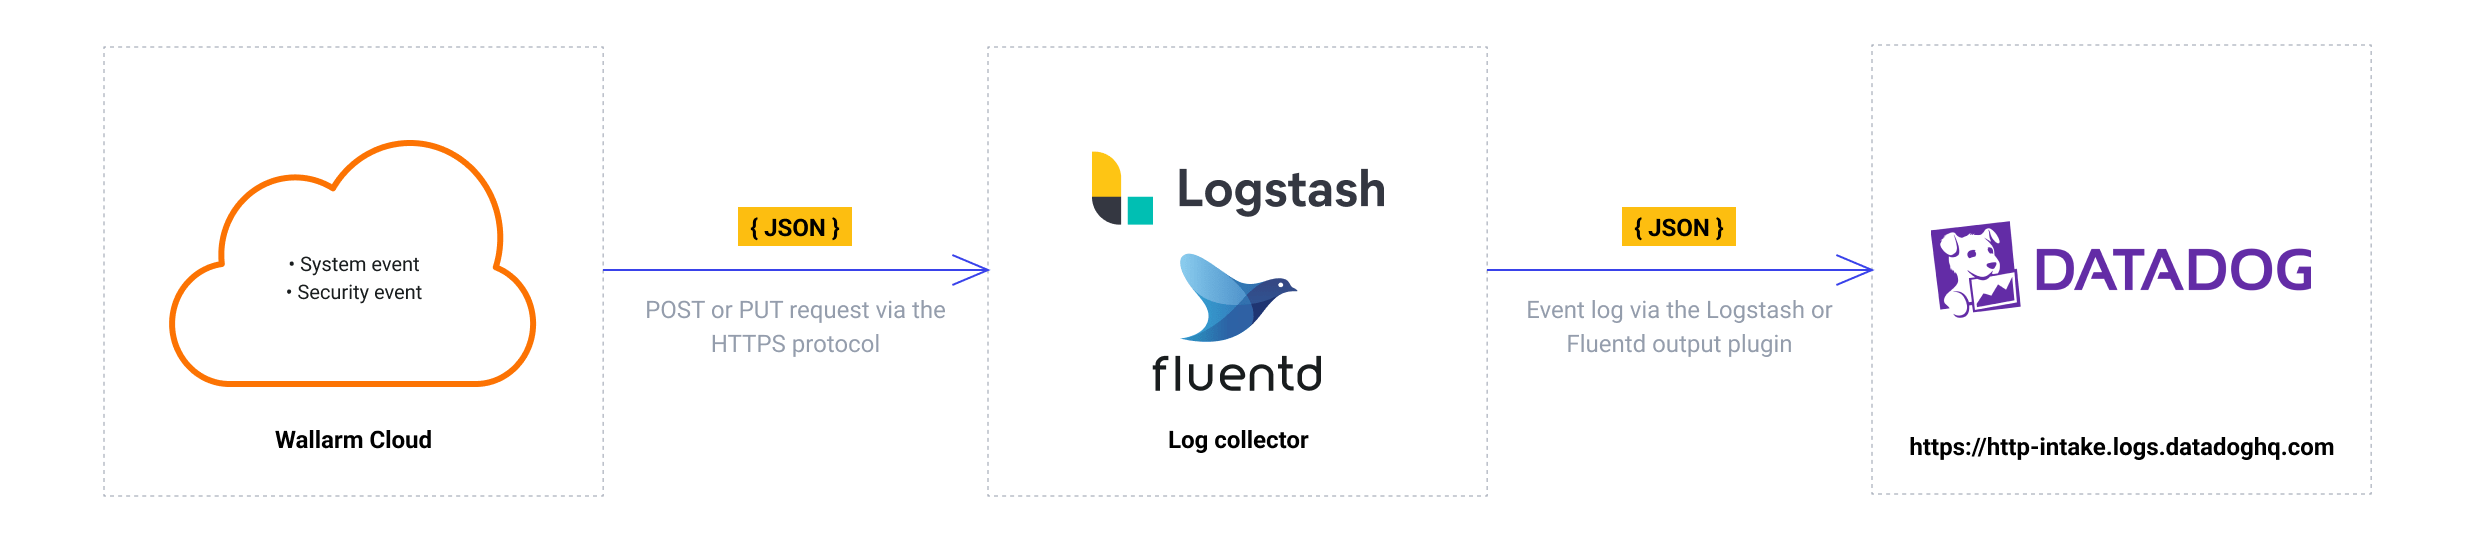
Wallarm’ı, tespit edilen olaylara ilişkin bildirimleri Fluentd veya Logstash ara veri toplayıcısı üzerinden Datadog’a gönderecek şekilde yapılandırabilirsiniz.
The most common logging scheme in complex systems consists of the following components:
-
Data collector: accepts logs from several sources and forwards logs to the SIEM system
-
SIEM system or log management systems: used to analyze logs and monitor the system status
Datadog ile yerel entegrasyon
Wallarm ayrıca Datadog API aracılığıyla Datadog ile yerel entegrasyonu destekler. Yerel entegrasyon, ara veri toplayıcının kullanılmasını gerektirmez.
Kullanılan kaynaklar
-
Genel bir URL üzerinden erişilebilen Fluentd veya Logstash servisi
-
Genel bir URL üzerinden erişilebilen Datadog servisi
-
Fluentd/Logstash entegrasyonunu yapılandırmak için AB bulutu üzerinde Wallarm Console’a yönetici erişimi
Wallarm Cloud IP addresses
To provide Wallarm Cloud access to your system, you may need a list of its public IP addresses:
Gereksinimler
Wallarm, günlükleri webhook’lar aracılığıyla ara veri toplayıcıya gönderdiğinden, Fluentd veya Logstash yapılandırması aşağıdaki gereksinimleri karşılamalıdır:
-
POST veya PUT isteklerini kabul etmelidir
-
HTTPS isteklerini kabul etmelidir
-
Genel bir URL’ye sahip olmalıdır
-
Günlükleri,
datadog_logsLogstash eklentisi veyafluent-plugin-datadogFluentd eklentisi aracılığıyla Datadog’a iletmelidir
- Günlükleri Datadog’a iletmek için
datadog_logseklentisini yükleyin. - Gelen istekleri okumak ve günlükleri Datadog’a iletmek için Logstash’i yapılandırın.
Örnek logstash-sample.conf yapılandırma dosyası:
- Günlükleri Datadog’a iletmek için
fluent-plugin-datadogeklentisini yükleyin. - Gelen istekleri okumak ve günlükleri Datadog’a iletmek için Fluentd’i yapılandırın.
Örnek td-agent.conf yapılandırma dosyası:
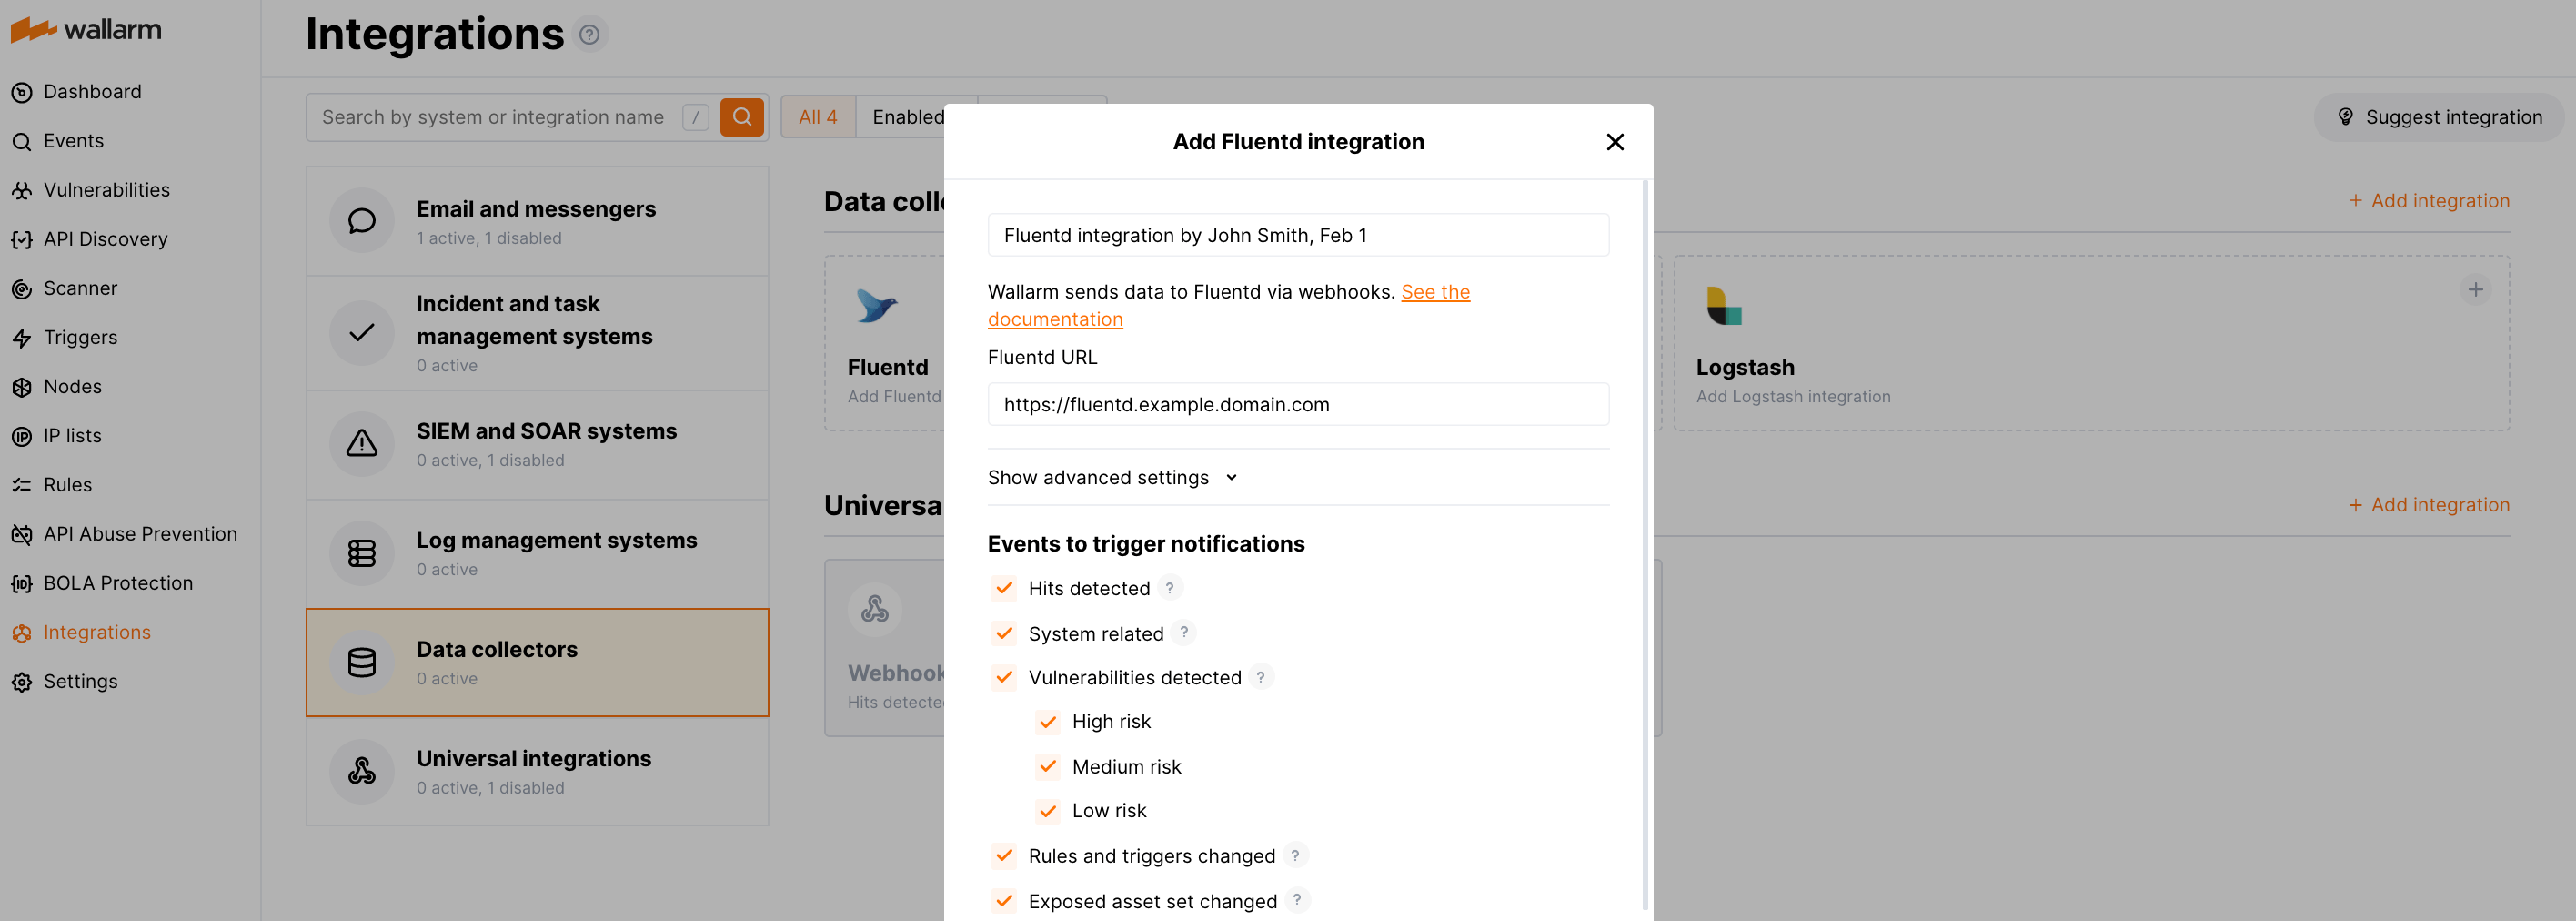
Fluentd veya Logstash ile entegrasyonun yapılandırılması
-
Wallarm Console → Integrations → Fluentd/Logstash içinde Datadog entegrasyonu kurulumuna gidin.
-
Entegrasyon adını girin.
-
Hedef Fluentd veya Logstash URL’sini belirtin (Webhook URL).
-
Gerekirse gelişmiş ayarları yapılandırın:
- Request method:
POSTorPUT. By default, POST requests are sent. - Request header and its value if the server requires a non-standard header to execute the request. The number of headers is not limited.
- CA certificate: certificate of CA that signed a server certificate. If CA is publicly trusted, this field is optional. If a server certificate is self-signed, this field is required and must contain a certificate of your own CA that signed a server certificate.
- Verify TLS certificate: this setting allows to disable verification of the specified server certificate. By default, Wallarm verifies whether a server certificate is signed by a publicly trusted CA. We do not recommend disabling the verification of production server certificates. If your server uses a self-signed TLS certificate, you can add a self-signed CA certificate to allow sending requests to this server.
- Request timeout, in seconds: if the server does not respond to the request within the specified time, the request fails. By default: 15 seconds.
- Connection timeout, in seconds: if the connection to the server cannot be established during the specified time, the request fails. By default: 20 seconds.
- Wallarm data format: either a JSON Array (default) or a New Line Delimited JSON (NDJSON).
- Request method:
-
Belirtilen URL’ye bildirim gönderimini tetikleyecek olay türlerini seçin. Olaylar seçilmezse bildirimler gönderilmez.
-
Entegrasyonu test edin ve ayarların doğru olduğundan emin olun.
-
Add integration’a tıklayın.
Fluentd entegrasyon örneği:
Entegrasyonun test edilmesi
Integration testing allows checking configuration correctness, availability of the Wallarm Cloud, and the notification format. To test the integration, you can use the button Test integration when creating or editing the integration.
The integration is tested as follows:
-
Test notifications with the prefix
[Test message]are sent to the selected system. -
Test notifications cover the following events (each in a single record):
- New user in the company account
- Newly detected hit
- Newly discovered IP in the company scope
- New trigger in the company account
- Newly discovered security vulnerability
-
Test notifications include test data.
Fluentd veya Logstash ara veri toplayıcısındaki test günlüğü:
[
    {
        summary:"[Test message] [Test partner(US)] New vulnerability detected",
        description:"Notification type: vuln

                    New vulnerability was detected in your system.

                    ID:
                    Title: Test
                    Domain: example.com
                    Path:
                    Method:
                    Discovered by:
                    Parameter:
                    Type: Info
                    Threat: Medium

                    More details: https://us1.my.wallarm.com/object/555


                    Client: TestCompany
                    Cloud: US
                    ",
        details:{
            client_name:"TestCompany",
            cloud:"US",
            notification_type:"vuln",
            vuln_link:"https://us1.my.wallarm.com/object/555",
            vuln:{
                domain:"example.com",
                id:null,
                method:null,
                parameter:null,
                path:null,
                title:"Test",
                discovered_by:null,
                threat:"Medium",
                type:"Info"
            }
        }
    }
]
Test Datadog günlüğü:
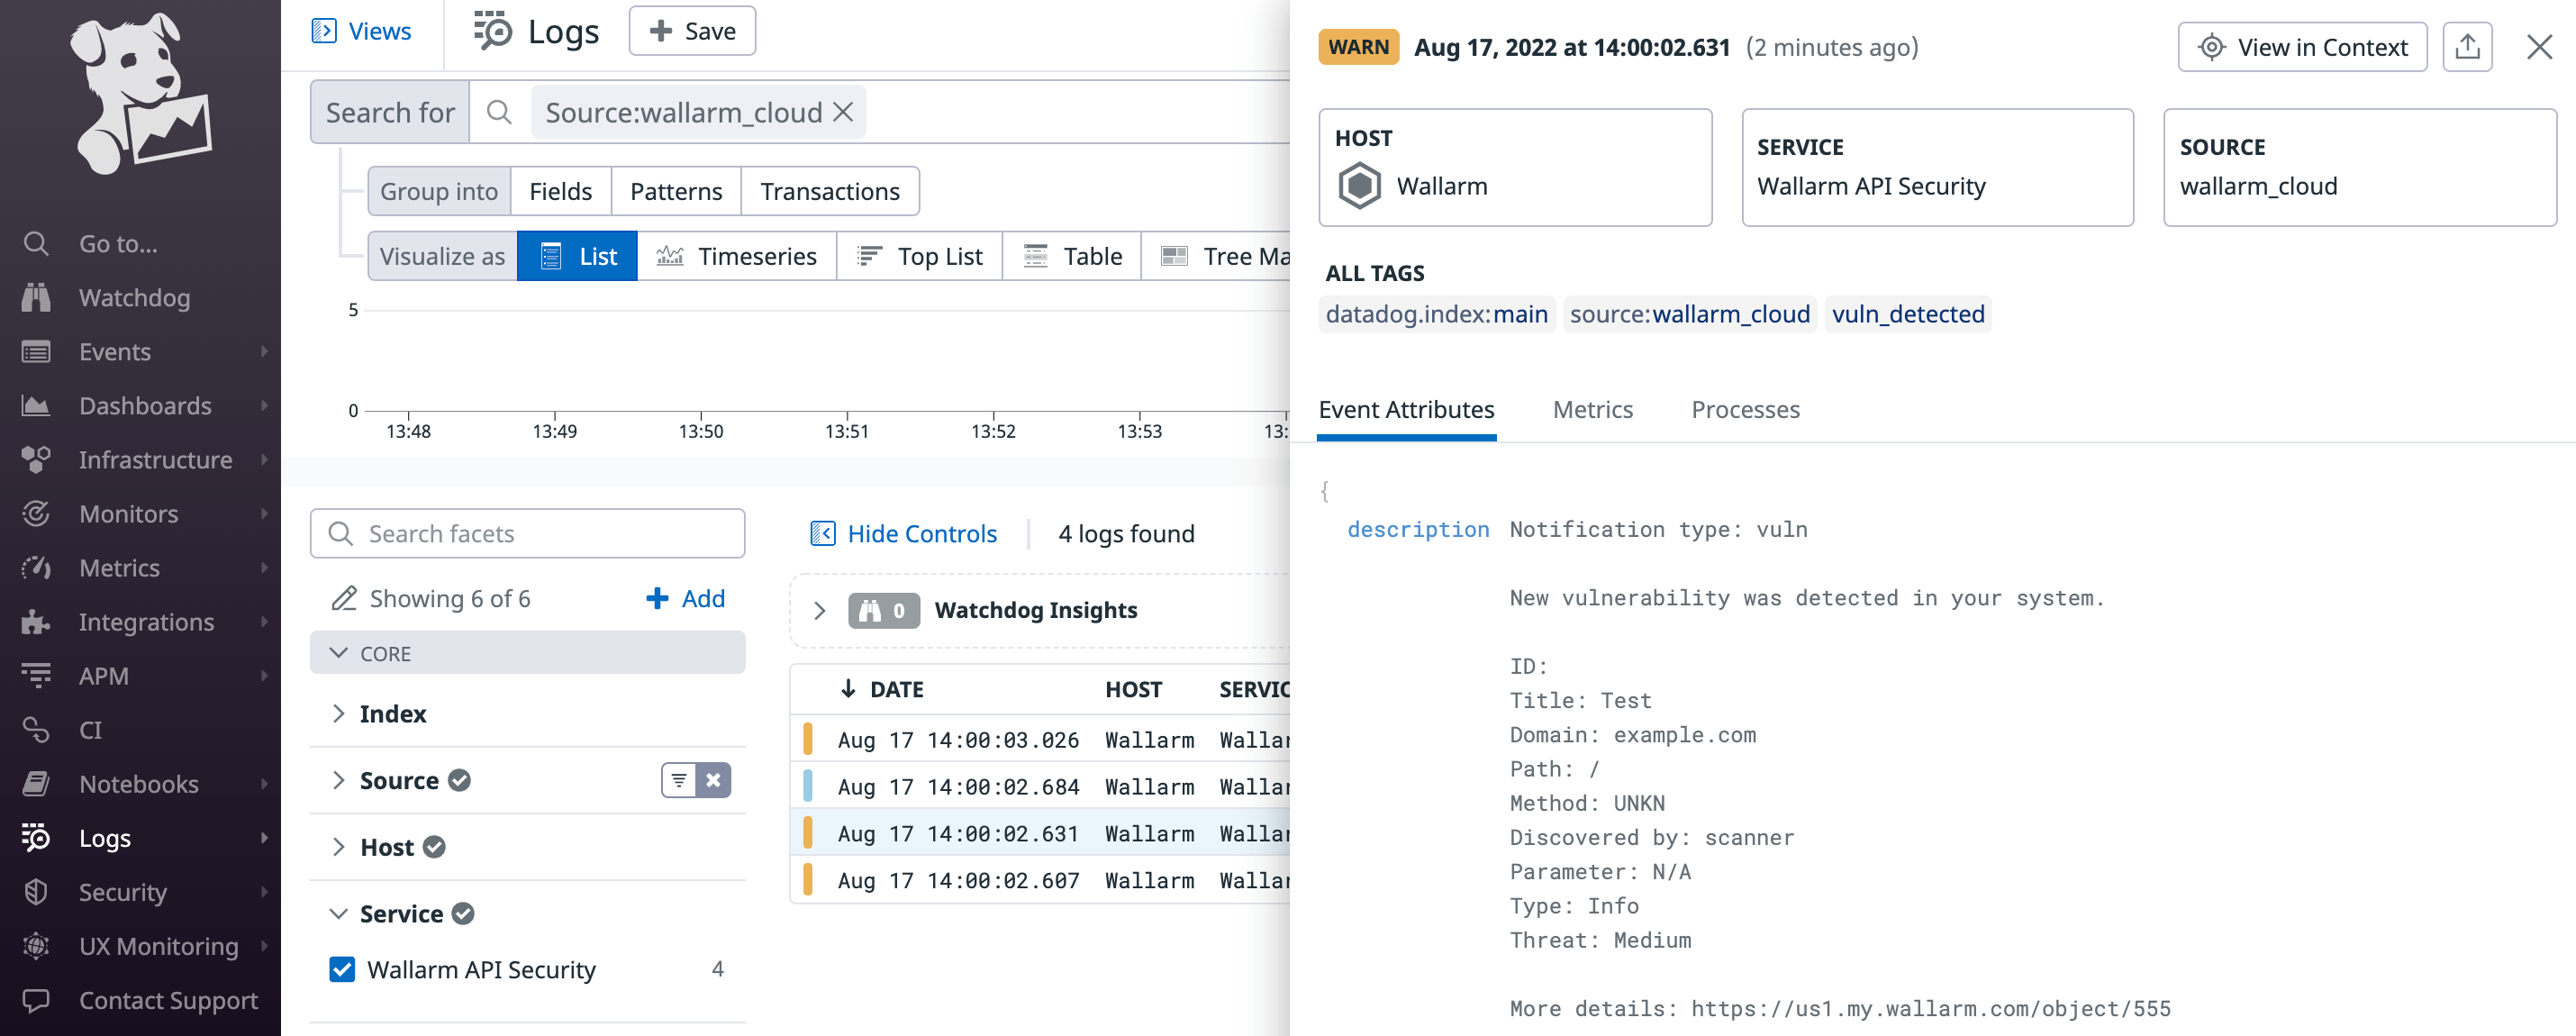
Diğer kayıtlar arasında Wallarm günlüklerini bulmak için Datadog Logs servisinde source:wallarm_cloud arama etiketini kullanabilirsiniz.