Deploying and Configuring Multi-tenant Node
The multi-tenant node protects several independent company infrastructures or isolated environments simultaneously.
Multi-tenant node deployment options
Choose the multi-tenant node deployment option based on your infrastructure and the addressed issue:
-
Deploy one Wallarm node to filter traffic of all clients or isolated environments as follows:

-
One Wallarm node processes the traffic of several tenants (Tenant 1, Tenant 2).
The term "partner client"
Previously, "tenant" was referred to as "partner client". We further use the term "tenant".
-
The Wallarm node identifies the tenant that receives the traffic by the unique identifier of a tenant (
wallarm_partner_client_uuid). - For the domains
https://tenant1.comandhttps://tenant2.com, the DNS A records with the partner or client IP address225.130.128.241are configured. This setting is shown as an example, a different setting can be used on the partner and tenant side. - On the partner's side, proxying of legitimate requests to the addresses of tenant Tenant 1 (
http://upstream1:8080) and Tenant 2 (http://upstream2:8080) is configured. This setting is shown as an example, a different setting can be used on the partner and tenant side.
-
-
Deploy several Wallarm nodes each filtering the traffic of a particular tenant as follows:
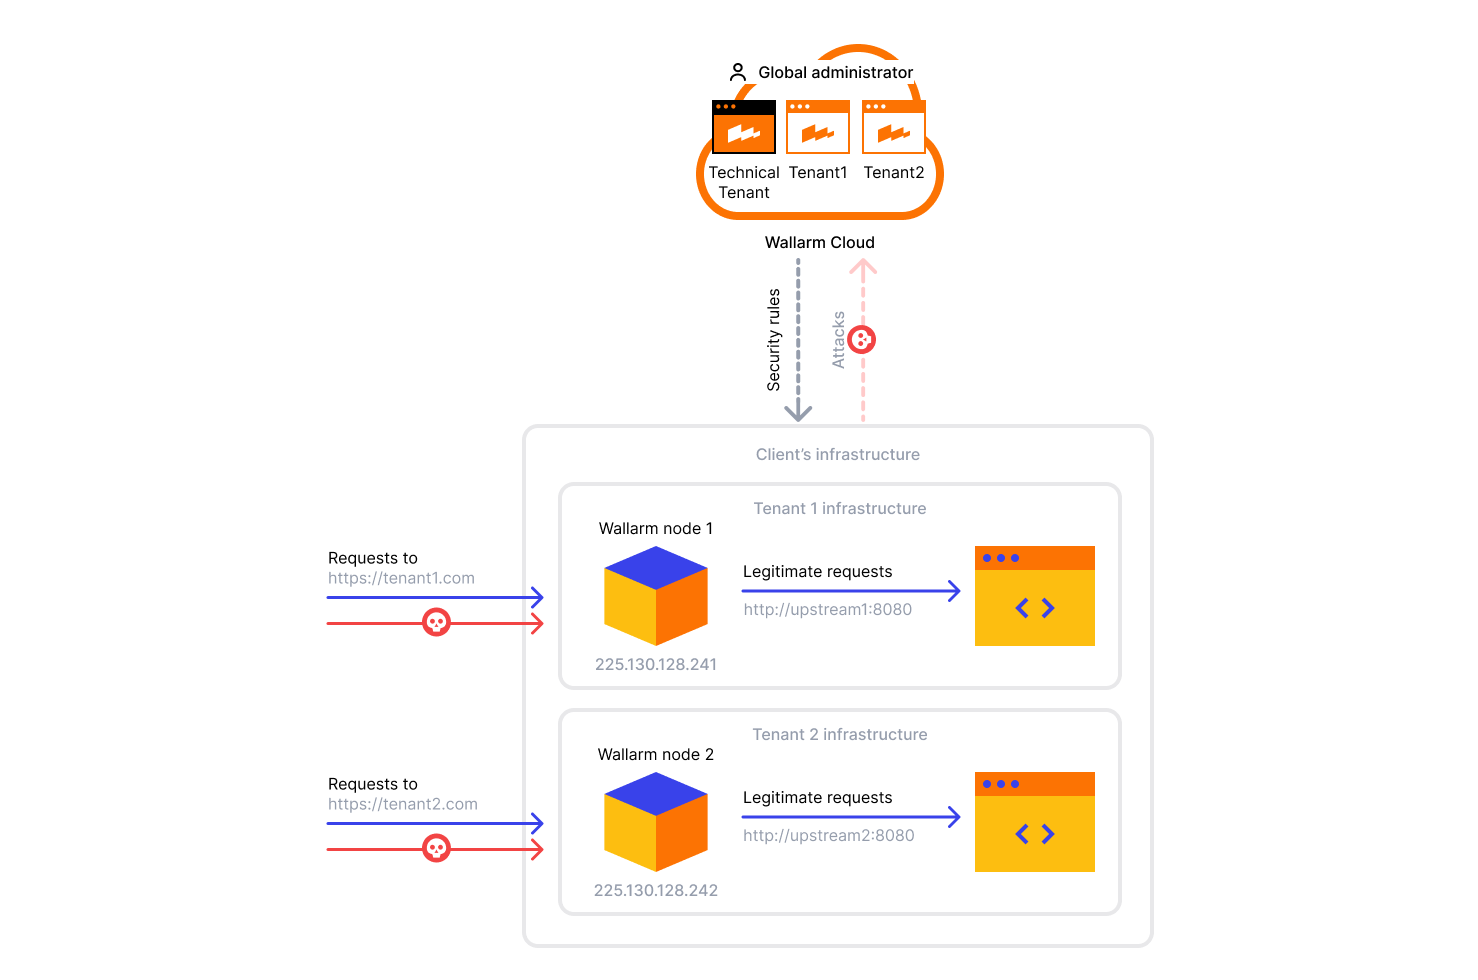
- Several Wallarm nodes each filtering the traffic of a particular tenant (Tenant 1, Tenant 2).
- For the domain https://tenant1.com, the DNS record with the client IP address 225.130.128.241 is configured.
- For the domain https://tenant2.com, the DNS record with the client IP address 225.130.128.242 is configured.
- Each node is proxying the legitimate requests to the addresses of its tenant:
- Node 1 to Tenant 1 (http://upstream1:8080).
- Node 2 to Tenant 2 (http://upstream2:8080).
Multi-tenant node characteristics
Multi-tenant node:
-
Can be installed on the same platforms and using the same instructions as a regular filtering node, except for Security Edge connectors.
Unlike Security Edge connectors, self-hosted nodes deployed with connectors do support multitenancy.
-
Can be installed on the technical tenant or tenant level. If you want to provide a tenant with access to Wallarm Console, the filtering node must be installed at the corresponding tenant level.
-
Can be configured according to the same instructions as a regular filtering node.
-
The
wallarm_partner_client_uuiddirective is used to split traffic by the tenants. -
The
wallarm_applicationdirective is used to split settings by the applications.
Deployment requirements
Recommendations for a multi-tenant node deployment
-
If it is required for the tenant to access Wallarm Console, create the filtering node within an appropriate tenant account.
-
Configure the filtering node via the tenant's NGINX configuration file.
Procedure for a multi-tenant node deployment
Required permissions
Execute further commands as a Global administrator in the technical tenant account.
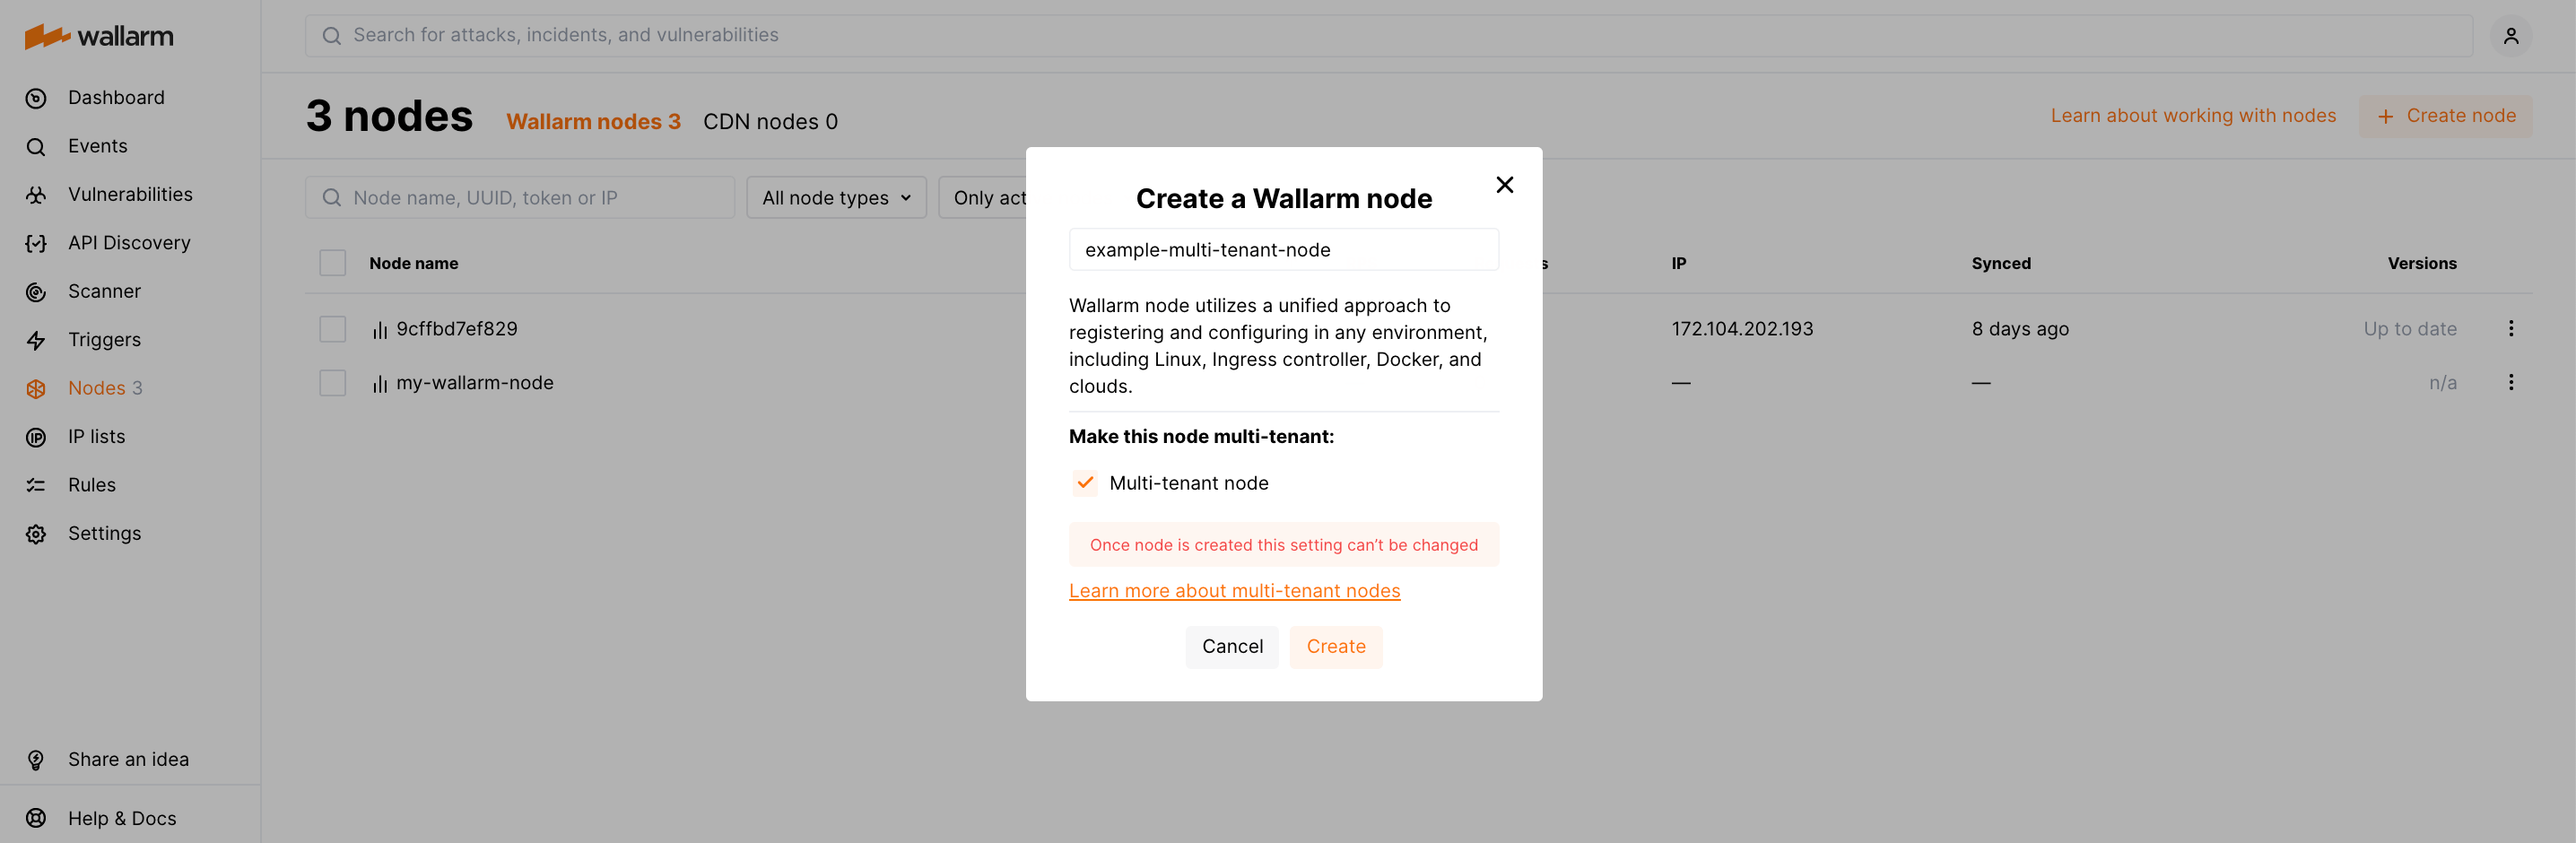
Step 1. Creating a multi-tenant node token and deploying a filtering node
-
In Wallarm Console → Nodes, click Create node and select Wallarm node.
Switching an existing Wallarm node to the multi-tenant mode
If you want to switch an existing Wallarm node to the multi-tenant mode, use the Make it multi-tenant option from the required node menu in the Nodes section.
Once switched and confirmed, proceed to the 4th step.
-
Select the Multi-tenant node option.
-
Set node name and click Create.
-
Copy the filtering node token.
-
Depending on a filtering node deployment form, perform steps from the appropriate instructions.
The next steps differ depending on your filtering node type: NGINX Node or Native Node.
Step 2. (NGINX Node) Splitting traffic between tenants
-
Split traffic between tenants using their unique identifiers.
Open the tenant's NGINX configuration file and split traffic between tenants using the
wallarm_partner_client_uuiddirective. See example below.Use Ingress annotation
nginx.ingress.kubernetes.io/wallarm-partner-client-uuidto set tenant UUID for each Ingress resource. One resource is related to one tenant:kubectl annotate --overwrite ingress <YOUR_INGRESS_NAME> -n <YOUR_INGRESS_NAMESPACE> nginx.ingress.kubernetes.io/wallarm-partner-client-uuid=VALUEStarting from NGINX Node 6.12.1, the annotation accepts an optional human-readable label after the UUID, separated by a space. The label appears alongside the UUID in per-tenant Prometheus metrics and extended logs:
- Open the NGINX configuration file and split traffic between tenants using the
wallarm_partner_client_uuiddirective. See example below. - Run the docker container mounting the configuration file.
- Open the NGINX configuration file and split traffic between tenants using the
wallarm_partner_client_uuiddirective. - Mount an NGINX configuration file to the Wallarm sidecar container.
Example of the NGINX configuration file for the filtering node processing the traffic of two clients:
server {
    listen       80;
    server_name  tenant1.com;
    wallarm_mode block;
    wallarm_partner_client_uuid 11111111-1111-1111-1111-111111111111 Tenant-1;

    location / {
        proxy_pass      http://upstream1:8080;
    }
}

server {
    listen       80;
    server_name  tenant2.com;
    wallarm_mode monitoring;
    wallarm_partner_client_uuid 22222222-2222-2222-2222-222222222222 Tenant-2;

    location / {
        proxy_pass      http://upstream2:8080;
    }
}
The second parameter after the UUID (e.g.
Tenant-1) is an optional human-readable label available starting from NGINX Node 6.12.0 (6.12.1 for the Ingress controller). When set, this label appears in thewallarm_statusoutput alongside the tenant UUID, making it easier to identify tenants in metrics and logs. See thewallarm_partner_client_uuiddirective reference for details.- On the tenant side, the DNS A records with the partner IP address are configured
- On the partner side, proxying of requests to the addresses of tenants (
http://upstream1:8080for the tenant withwallarm_partner_client_uuid 11111111-1111-1111-1111-111111111111andhttp://upstream2:8080for the tenant withwallarm_partner_client_uuid 22222222-2222-2222-2222-222222222222) is configured - All incoming requests are processed on the partner address, legitimate requests are proxied to
http://upstream1:8080for the tenant withwallarm_partner_client_uuid 11111111-1111-1111-1111-111111111111and tohttp://upstream2:8080for the tenant withwallarm_partner_client_uuid 22222222-2222-2222-2222-222222222222
- Open the NGINX configuration file and split traffic between tenants using the
-
If necessary, specify IDs of tenant's applications using the
wallarm_applicationdirective.Example:
server {
    listen       80;
    server_name  tenant1.com;
    wallarm_mode block;
    wallarm_partner_client_uuid 11111111-1111-1111-1111-111111111111 Tenant-1;

    location / {
        proxy_pass      http://upstream1:8080;
    }

    location /login {
        wallarm_application 21;
        ...
    }
    location /users {
        wallarm_application 22;
        ...
    }
}
Two applications belong to the tenant
11111111-1111-1111-1111-111111111111:tenant1.com/loginis the application21tenant1.com/usersis the application22
Step 2. (Native Node) Splitting traffic between tenants
-
Open the tenant's configuration file (
values.yamlfor the Helm chart or/opt/wallarm/etc/wallarm/go-node.yamlfor all other deployment options) and split traffic specifying thewallarm_partner_client_uuiddirective.If necessary, specify IDs of tenant's applications using the
wallarm_applicationdirective.See the examples of the configuration file below, showing a filtering node processing traffic for two clients:
version: 4 mode: connector-server # Other configuration values... route_config: wallarm_mode: monitoring wallarm_partner_client_uuid: 11111111-1111-1111-1111-111111111111 wallarm_application: "-1" routes: - route: /login wallarm_partner_client_uuid: 11111111-1111-1111-1111-111111111111 wallarm_application: 1 - route: /users wallarm_partner_client_uuid: 22222222-2222-2222-2222-222222222222 wallarm_application: 2config: connector: # Other configuration values... route_config: wallarm_mode: monitoring wallarm_partner_client_uuid: 11111111-1111-1111-1111-111111111111 wallarm_application: "-1" routes: - route: /login wallarm_partner_client_uuid: 11111111-1111-1111-1111-111111111111 wallarm_application: 1 - route: /users wallarm_partner_client_uuid: 22222222-2222-2222-2222-222222222222 wallarm_application: 2version: 4 mode: tcp-capture-v2 # Other configuration values... route_config: wallarm_mode: monitoring wallarm_partner_client_uuid: 11111111-1111-1111-1111-111111111111 wallarm_application: "-1" routes: - route: /login wallarm_partner_client_uuid: 11111111-1111-1111-1111-111111111111 wallarm_application: 1 - route: /users wallarm_partner_client_uuid: 22222222-2222-2222-2222-222222222222 wallarm_application: 2version: 4 mode: envoy-external-filter envoy_external_filter: tls_cert: /tls/cert.pem tls_key: /tls/key.pem # Other configuration values... route_config: wallarm_mode: monitoring wallarm_partner_client_uuid: 11111111-1111-1111-1111-111111111111 wallarm_application: "-1" routes: - route: /login wallarm_partner_client_uuid: 11111111-1111-1111-1111-111111111111 wallarm_application: 1 - route: /users wallarm_partner_client_uuid: 22222222-2222-2222-2222-222222222222 wallarm_application: 2 -
Run the following command to apply the changes made to the configuration file:
<RELEASE_NAME>: the name of the existing Helm release<NAMESPACE>: the namespace with the Helm release<PATH_TO_VALUES>: the path to thevalues.yamlfile defining the deployed solution configuration
Step 3. Configuring a multi-tenant node
To customize the filtering node settings, use the available directives.
Common customization options:
-
Using the balancer of the proxy server behind the filtering node
-
Limiting the single request processing time in the directive
wallarm_process_time_limit -
Limiting the server reply waiting time in the NGINX directive
proxy_read_timeout -
Limiting the maximum request size in the NGINX directive
client_max_body_size