Amazon S3
Amazon S3は、Amazon Web Services(AWS)が提供するスケーラブルなクラウドストレージサービスで、正式名称はAmazon Simple Storage Serviceです。データバックアップ、データアーカイブ、コンテンツ配信、ウェブサイトホスティング、アプリケーションデータの保存など、さまざまな用途に利用されます。Wallarmを設定して、検出されたhitsに関する情報を含むファイルをAmazon S3バケットに送信できます。情報は10分ごとにJSON形式のファイルで送信されます。
各hitのデータ項目:
-
time- hit検出日時(Unixタイムスタンプ形式) -
request_id -
ip- 攻撃者のIP -
hitの発生元タイプ:
datacenter、tor、remote_country -
application_id -
domain -
method -
uri -
protocol -
status_code -
attack_type -
block_status -
payload -
point -
tags
ファイルは、命名規則wallarm_hits_{timestamp}.jsonまたはwallarm_hits_{timestamp}.jsonlに従ってS3バケットに保存されます。形式はJSON ArrayまたはNew Line Delimited JSON(NDJSON)のいずれかで、インテグレーション設定時の選択に依存します。
インテグレーションの設定
Amazon S3とのインテグレーションを設定する際は、使用する認証方法を選択します:
-
ロールARN経由(推奨) - リソースへのアクセスを付与する際にexternal IDオプション付きのロールを使用する方法は、セキュリティを高め「confused deputy」攻撃を防ぐ方法としてAWSが推奨しています。Wallarmは組織のアカウント専用の一意なIDを提供します。
-
シークレットアクセスキー経由 - より一般的で簡単な方法で、AWS IAMユーザーの共有アクセスキーを必要とします。この方法を選ぶ場合、インテグレーションで使用するS3バケットへの書き込み権限のみを持つ専用のIAMユーザーのアクセスキーを使用することを推奨します。
Amazon S3インテグレーションを設定するには:
-
手順に従って、Wallarm用のAmazon S3バケットを作成します。
-
選択した認証方法に応じて異なる手順を実行します。
-
AWS UIで、S3 → 対象のバケット → Propertiesタブに移動し、バケットのAWS RegionのコードとAmazon Resource Name (ARN)をコピーします。
例えば、リージョンは
us-west-1、ARNはarn:aws:s3:::test-bucket-jsonです。 -
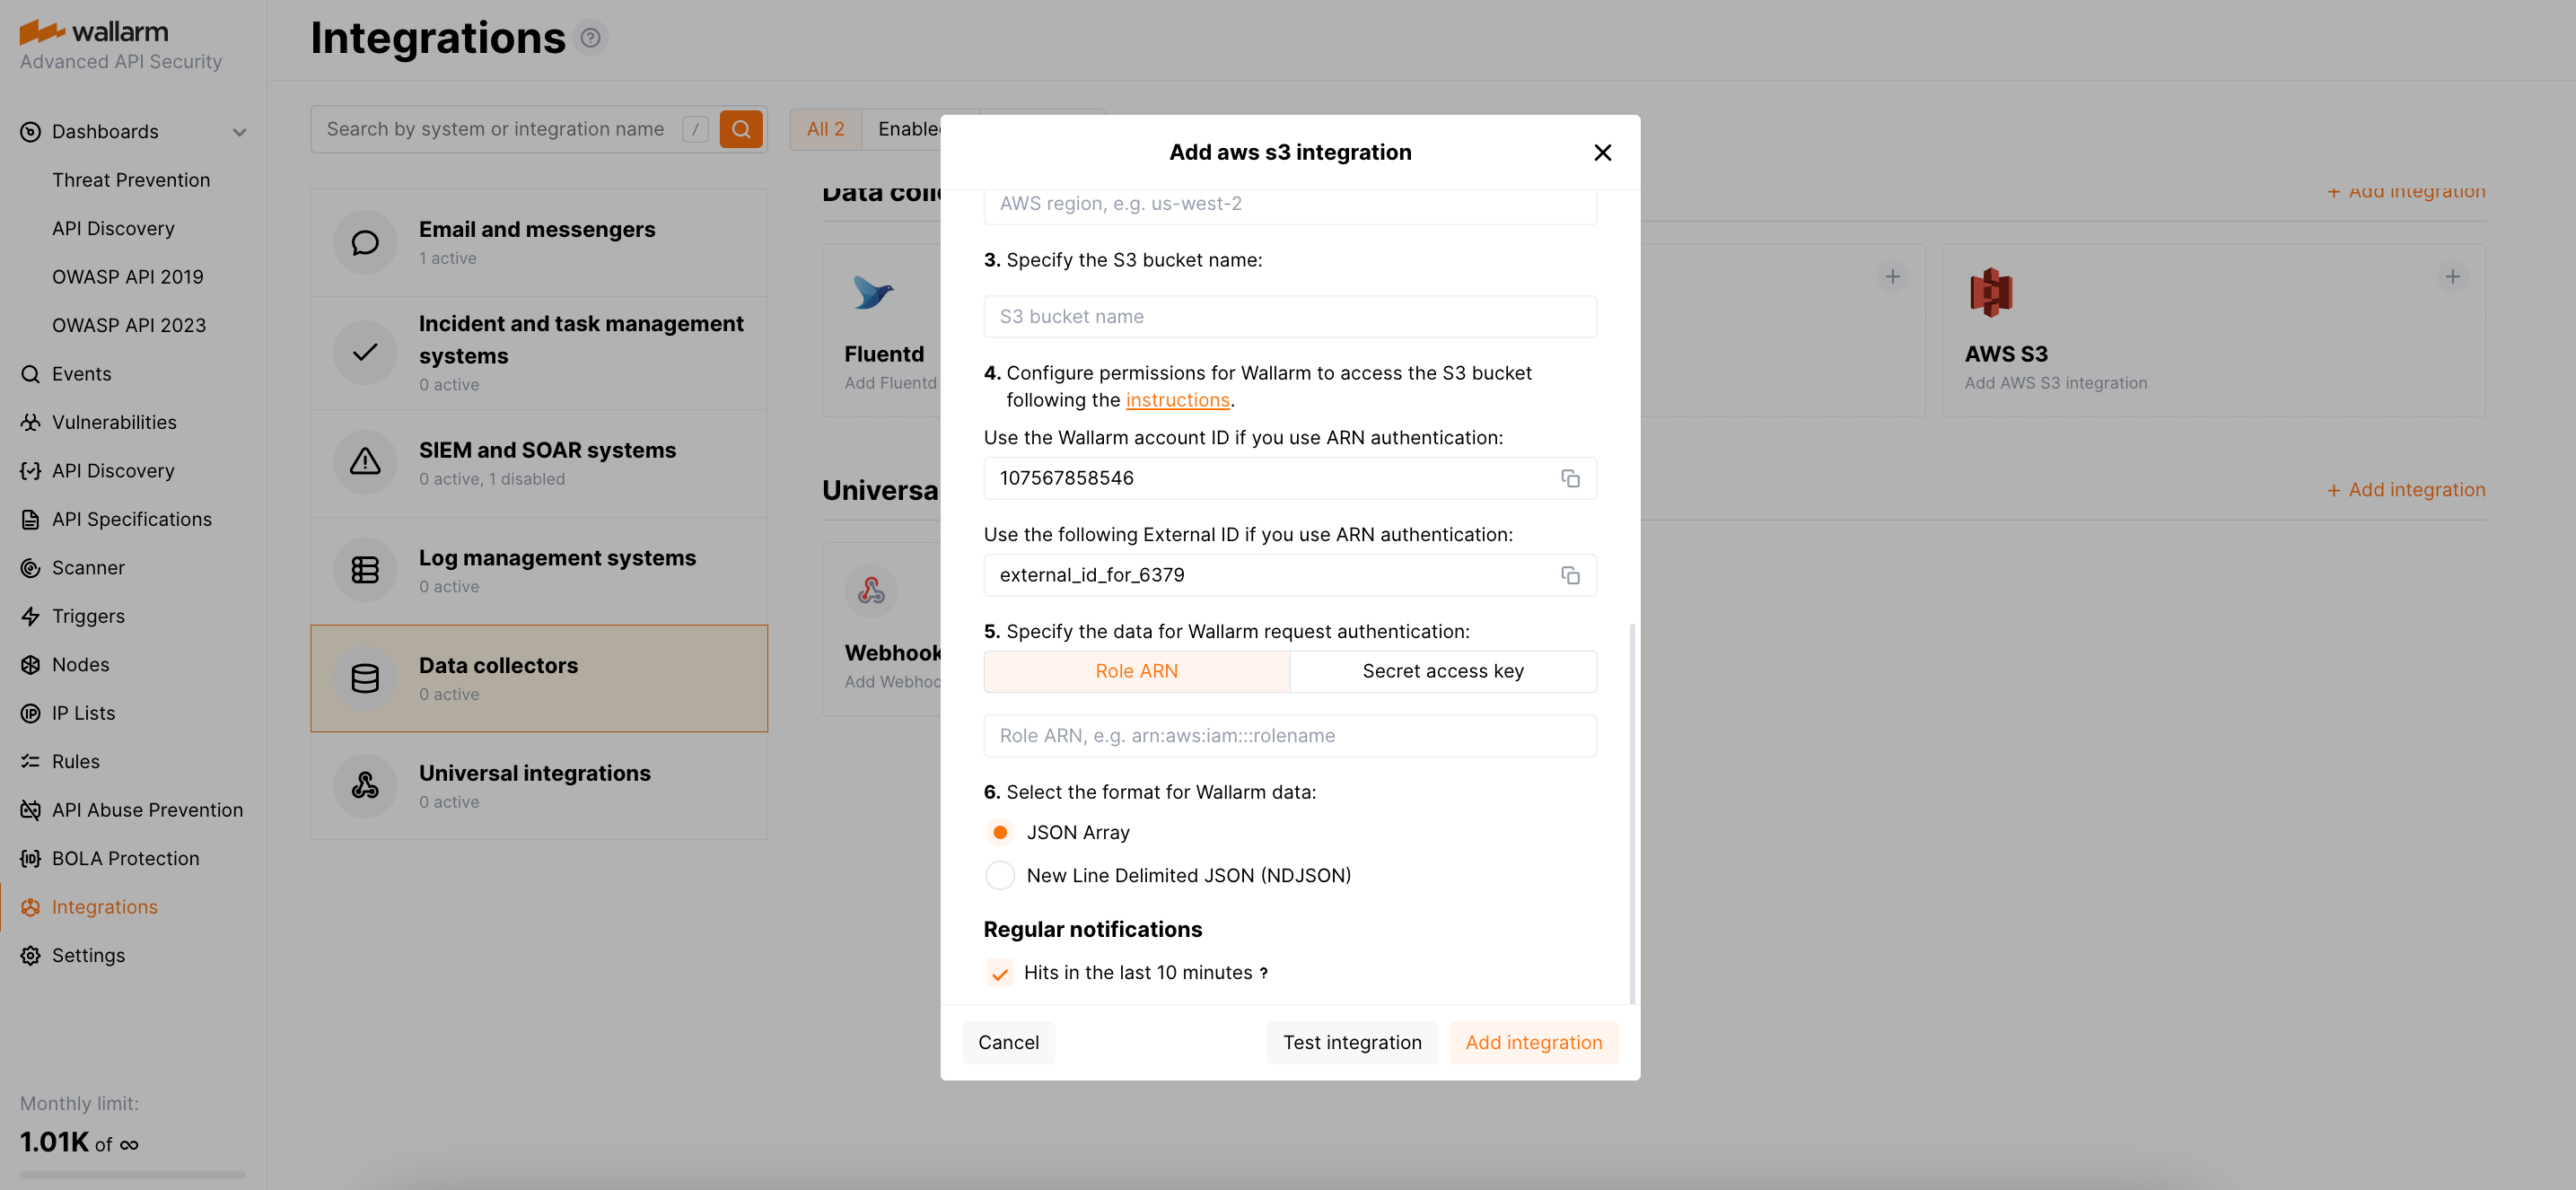
Wallarm Console UIで、Integrationsセクションを開きます。
- AWS S3ブロックをクリックするか、Add integrationボタンをクリックしてAWS S3を選択します。
- インテグレーション名を入力します。
- 先ほどコピーしたS3バケットのAWSリージョンコードを入力します。
- S3バケット名を入力します。
- 表示されたWallarmアカウントIDをコピーします。
- 表示されたexternal IDをコピーします。
- AWS UIで、IAM → Access Management → Rolesから新しいロールの作成を開始します。
- 信頼されるエンティティタイプとしてAWS account → Another AWS Accountを選択します。
- WallarmのAccount IDを貼り付けます。
- Require external IDを選択し、Wallarmが提供するexternal IDを貼り付けます。
-
Nextをクリックし、ロール用のポリシーを作成します:
-
ロールの作成を完了し、そのARNをコピーします。
-
Wallarm Console UIのインテグレーション作成ダイアログのRole ARNタブで、ロールのARNを貼り付けます。
- AWS UIで、S3 → 対象のバケット → Propertiesタブに移動し、バケットのAWS Regionのコードをコピーします。例えば
us-west-1です。 - IAM → Dashboard → Manage access keys → Access keysセクションに進みます。
- 保管しているアクセスキーIDを取得するか、こちらの説明に従って新規作成または紛失したキーの復元を行います。いずれの場合も、有効なキーとそのIDが必要です。
- Wallarm Console UIで、Integrationsセクションを開きます。
- AWS S3ブロックをクリックするか、Add integrationボタンをクリックしてAWS S3を選択します。
- インテグレーション名を入力します。
- 先ほどコピーしたS3バケットのAWSリージョンコードを入力します。
- S3バケット名を入力します。
- Secret access keyタブで、アクセスキーIDとキー本体を入力します。
-
-
Wallarmデータの形式を選択します。JSON ArrayまたはNew Line Delimited JSON(NDJSON)のいずれかです。
-
Regular notificationsセクションで、直近10分のhitsを送信対象として選択していることを確認します。選択していない場合、データはS3バケットに送信されません。
-
Test integrationをクリックして、設定の正しさ、Wallarm Cloudの到達性、および通知フォーマットを確認します。
Amazon S3では、インテグレーションテストによりデータを含むJSONファイルがバケットに送信されます。以下は、直近10分に検出されたhitsのデータを含むJSONファイルの例です。
[ { "time":"1687241470", "request_id":"d2a900a6efac7a7c893a00903205071a", "ip":"127.0.0.1", "datacenter":"unknown", "tor":"none", "remote_country":null, "application_id":[ -1 ], "domain":"localhost", "method":"GET", "uri":"/etc/passwd", "protocol":"none", "status_code":499, "attack_type":"ptrav", "block_status":"monitored", "payload":[ "/etc/passwd" ], "point":[ "uri" ], "tags":{ "lom_id":7, "libproton_version":"4.4.11", "brute_counter":"c188cd2baa2cefb3f3688cb4008a649e", "wallarm_mode":"monitoring", "final_wallarm_mode":"monitoring" } }, { "time":"1687241475", "request_id":"b457fccec9c66cdb07eab7228b34eca6", "ip":"127.0.0.1", "datacenter":"unknown", "tor":"none", "remote_country":null, "application_id":[ -1 ], "domain":"localhost", "method":"GET", "uri":"/etc/passwd", "protocol":"none", "status_code":499, "attack_type":"ptrav", "block_status":"monitored", "payload":[ "/etc/passwd" ], "point":[ "uri" ], "tags":{ "lom_id":7, "libproton_version":"4.4.11", "brute_counter":"c188cd2baa2cefb3f3688cb4008a649e", "wallarm_mode":"monitoring", "final_wallarm_mode":"monitoring" } } ]{"time":"1687241470","request_id":"d2a900a6efac7a7c893a00903205071a","ip":"127.0.0.1","datacenter":"unknown","tor":"none","remote_country":null,"application_id":[-1],"domain":"localhost","method":"GET","uri":"/etc/passwd","protocol":"none","status_code":499,"attack_type":"ptrav","block_status":"monitored","payload":["/etc/passwd"],"point":["uri"],"tags":{"lom_id":7,"libproton_version":"4.4.11","brute_counter":"c188cd2baa2cefb3f3688cb4008a649e","wallarm_mode":"monitoring","final_wallarm_mode":"monitoring"}} {"time":"1687241475","request_id":"b457fccec9c66cdb07eab7228b34eca6","ip":"127.0.0.1","datacenter":"unknown","tor":"none","remote_country":null,"application_id":[-1],"domain":"localhost","method":"GET","uri":"/etc/passwd","protocol":"none","status_code":499,"attack_type":"ptrav","block_status":"monitored","payload":["/etc/passwd"],"point":["uri"],"tags":{"lom_id":7,"libproton_version":"4.4.11","brute_counter":"c188cd2baa2cefb3f3688cb4008a649e","wallarm_mode":"monitoring","final_wallarm_mode":"monitoring"}} -
Add integrationをクリックします。
Wallarm Cloud IP addresses
To provide Wallarm Cloud access to your system, you may need a list of its public IP addresses:
保存データ量を制御するため、こちらに記載のとおり、Amazon S3バケット内の古いオブジェクトの自動削除を設定することを推奨します。
インテグレーションの無効化と削除
You can delete or temporarily disable the integration. While deleting stops sending notificatioins and completely deletes all configuration, disabling just stops sending notifications which you can at any moment re-enable with the same settings.
If for the integration the System related events are selected to trigger notifications, Wallarm will notify about both of these actions.
システムの利用不可およびインテグレーションパラメータの誤り
Notifications to the system are sent via requests. If the system is unavailable or integration parameters are configured incorrectly, the error code is returned in the response to the request.
If the system responds to Wallarm request with any code other than 2xx, Wallarm resends the request with the interval until the 2xx code is received:
-
The first cycle intervals: 1, 3, 5, 10, 10 seconds
-
The second cycle intervals: 0, 1, 3, 5, 30 seconds
-
The third cycle intervals: 1, 1, 3, 5, 10, 30 minutes
If the percentage of unsuccessful requests reaches 60% in 12 hours, the integration is automatically disabled. If you receive system notifications, you will get a message about automatically disabled integration.