攻撃の分析
本記事では、Wallarmノードが検知した攻撃をどのように分析し、それらに対してどのような対応を取れるかを説明します。
攻撃の分析
Wallarmプラットフォームが検知した攻撃は、Wallarm ConsoleのAttacksセクションにすべて表示されます。攻撃日時、種類などの条件でリストをフィルタし、任意の攻撃およびその含まれるリクエストを展開して詳細に分析できます。
検知された攻撃が誤検知であると判明した場合は、将来の同様の誤検知を防ぐために直ちに誤検知としてマークできます。また、検知された攻撃に基づいてルールを作成するなど、Wallarmの設定を実施して今後の同様の脅威を軽減できます。
Wallarmにおいて:
-
Attackは、Hitのグループです
-
Hitは、ノードが付与したメタデータを含む悪意あるリクエストです
-
Malicious payloadは、攻撃の兆候を含むリクエストの一部です
詳細はこちらをご覧ください。
各攻撃の詳細には、攻撃のHitやMalicious payloadの概要など、分析に必要な情報がすべて含まれています。分析を容易にするため、攻撃の詳細には一意のHitのみが保存されます。繰り返しの悪意あるリクエストはWallarm Cloudへのアップロードから除外され、表示されません。この処理はヒットのサンプリングと呼ばれます。
ヒットのサンプリングは攻撃検知の品質に影響せず、有効化されていてもWallarmノードは引き続きアプリケーションやAPIを保護します。
脅威アクター活動の全コンテキスト
Once the malicious request is detected by Wallarm and displayed in the Attacks or Incidents section as the part of some attack, you have an ability to know the full context of this request: to which user session it belongs and what the full sequence of requests in this session is. This allows investigating all activity of the threat actor to understand attack vectors and what resources can be compromised.
To perform this analysis, in Wallarm Console → Attacks or Incidents, access the attack, and then specific request details. In request details, click Explore in API Sessions. Wallarm will open the API Session section filtered: the session, the initial request belongs to is displayed, only the initial request is displayed within this session.
Remove the filter by request ID to see all other requests in the session: now you have the full picture of what was going on within the session the malicious request belongs to.
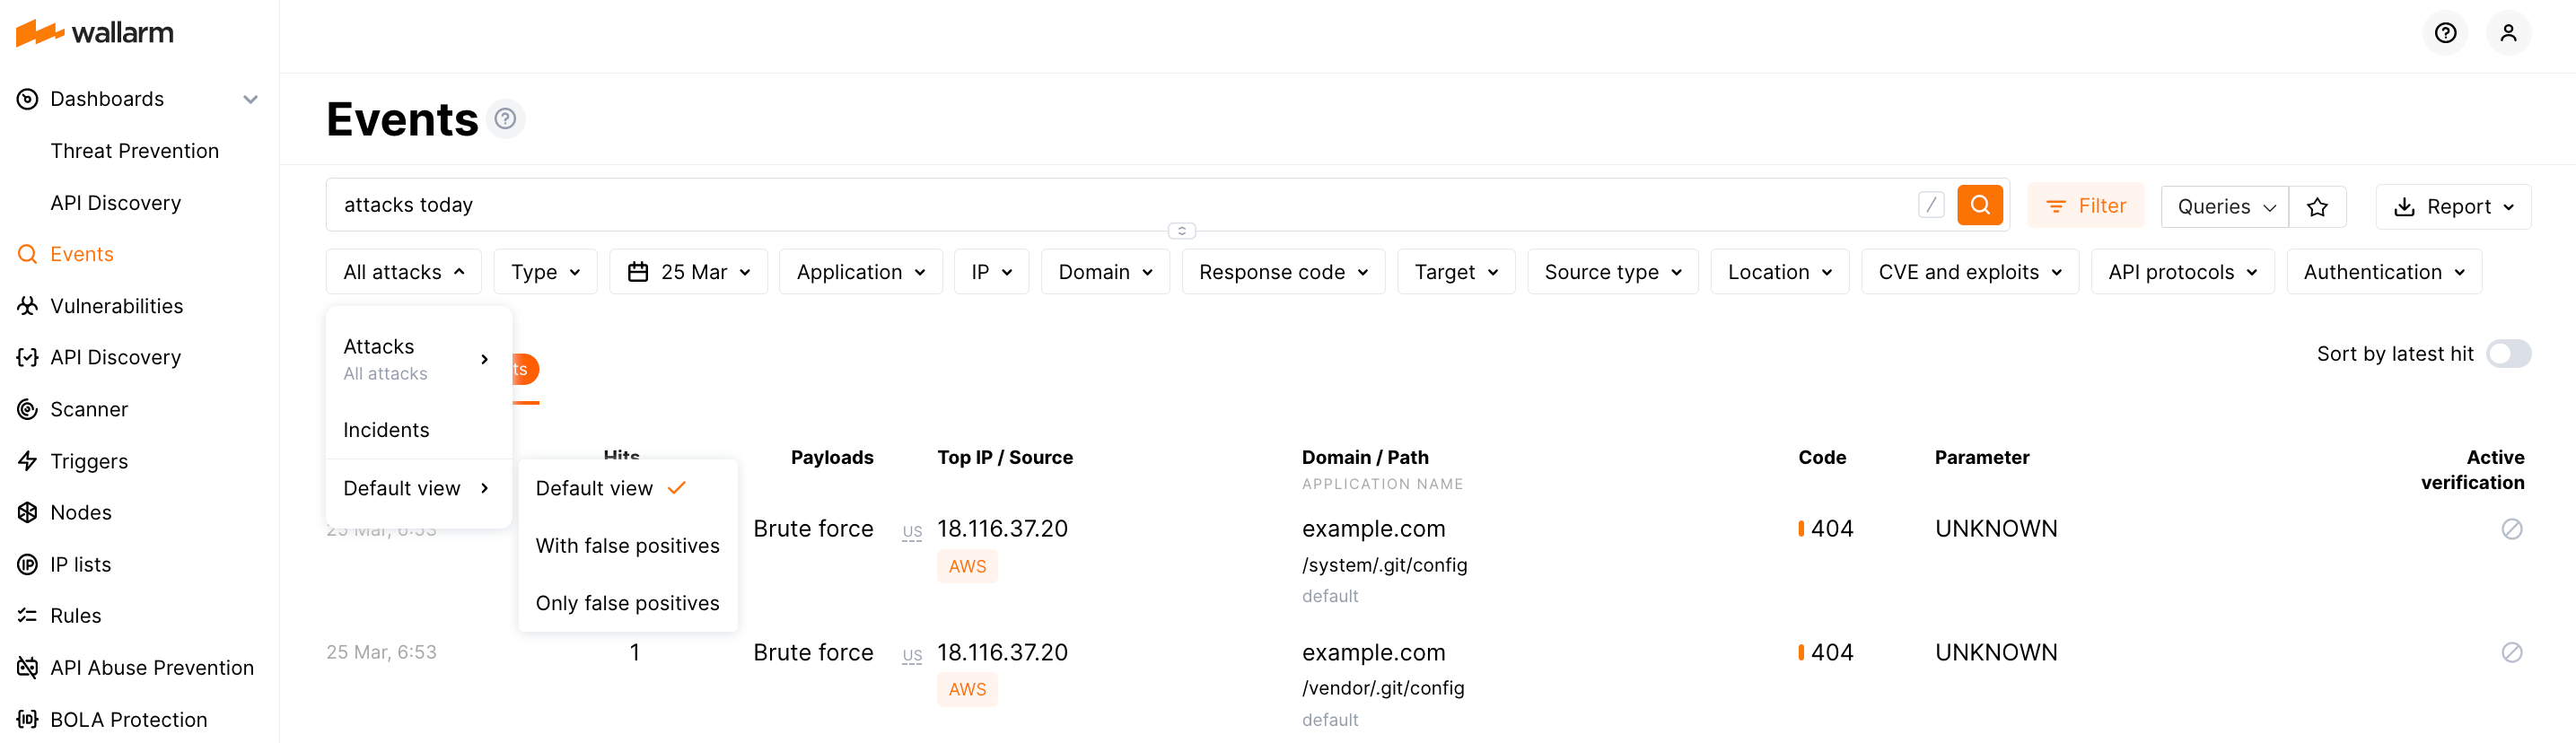
誤検知
誤検知とは、正当なリクエスト内に攻撃の兆候が検出される場合を指します。
将来的にフィルタリングノードがそのようなリクエストを攻撃として認識しないようにするため、攻撃に含まれるすべて、または特定のリクエストを誤検知としてマークできます。これにより、類似のリクエストで類似の攻撃兆候の検出をスキップするルールが自動的に作成されますが、Wallarm Consoleには表示されません。
誤検知としてのマークは、適用後数秒以内のみ取り消せます。後で取り消したい場合は、Wallarmテクニカルサポートへの依頼でのみ対応できます。
攻撃リストのデフォルトビューでは、実際の攻撃(誤検知を除く)のみが表示されます。変更するには、All attacksでDefault viewからWith false positivesまたはOnly false positivesに切り替えます。
攻撃への対応
必要に応じて防御策を調整できるよう、アプリケーションやAPIが攻撃から適切に保護されているかを把握することは重要です。Attacksセクションの情報を用いて状況を把握し、適切に対応できます。
この作業にあたっては、どのタイプの攻撃が発生したのかを特定する必要があります。そうすることで、どのWallarmのメカニズムが防御に寄与したかを理解し、必要に応じてそれらを調整できます。
-
Identify - PayloadフィールドのコンテキストメニューでShow onlyを選択し、Typeフィルタと検索フィールドの内容に注意します。
-
何が防御として行われたかを確認します - Status列を確認します:
Blocked- 攻撃のすべてのHitがフィルタリングノードによりブロックされました。Partially blocked- 一部のHitはブロックされ、他は記録のみされました。Monitoring- すべてのHitが記録されましたが、ブロックはされていません。Bot detected- これはボットです。攻撃内のactionを確認します。
-
任意(推奨)で、攻撃の悪意あるリクエストの全コンテキストを調査します: それらがどのユーザーセッションに属するか、そのセッションにおけるリクエストの完全なシーケンスは何かを確認します。
これにより、脅威アクターの全活動とロジックを把握し、攻撃ベクトルや侵害されうるリソースを理解できます。
-
実際の攻撃ではないと判断した場合は、誤検知としてマークします。
-
Understand - 攻撃を検知し反応したWallarmのメカニズムを把握します。
-
Adjust - Wallarmの振る舞いを調整します(具体的な方法はメカニズムに依存します)。
| 特定 | 理解 | 調整 |
|---|---|---|
sqli, xss, rce, ptrav, crlf, nosqli, ssi など | 攻撃検知の標準ツール(libproton、libdetection、rules) | 攻撃を展開し、攻撃全体のCVEサマリーや各リクエストのCVEを確認します。ノードモード(final_wallarm_modeタグ)に注意し、Rules(USまたはEU)を開いて、攻撃に紐づくアプリケーション名で分析します。必要に応じて、アプリケーションや特定のホスト・エンドポイント単位でルールやフィルタリングモードを調整します。 |
custom_rule | カスタム攻撃検知器 | 攻撃を展開し、Detected by custom rulesリンクをたどります。必要に応じて、ルールを変更したり、特定のブランチに対して部分的に無効化したりします。 |
vpatch | Virtual patch | Rulesセクション(USまたはEU)を開き、「Create virtual patch」ルールを検索します。必要に応じて、該当攻撃に関連するルールを調整します。なお、Virtual patchはフィルタリングモードに関係なく動作します。 |
brute,dirbust,bola,multiple_payloads | TriggerとIP lists: requests from denylisted IPs | 攻撃を展開し、リクエストを分析した後、表示されているトリガー名(表示がある場合)をクリックして、そのパラメータを変更します。トリガーのタグにも留意し、Triggers(USまたはEU)に移動して名前で検索し、必要に応じて調整します。 actionが Blockedの場合はdenylistによるものです。IP Lists(USまたはEU)に移動してIPで検索し、必要に応じてdenylistに留めておく期間を調整します。 |
blocked_source | IP lists: requests from denylisted IPs | 攻撃を展開し、denylistに入っているIPからのリクエストを分析します。その後、表示されているトリガー名をクリックし、必要に応じてトリガー設定を変更します。手動でdenylistに入れたIP(blocked_source)の場合は、IP Lists(USまたはEU)に移動してIPで検索し、必要に応じてdenylistに留めておく期間を調整します。 |
| 特定のモジュールまたは機能: | ||
api_abuse, account_takeover, security_crawlers, scraping, resource_consumption(詳細)- すべてでBot detectedステータスに留意 | API Abuse PreventionとIP lists: requests from denylisted IPs | 攻撃を展開し、ボットであることの確信度を示すヒートマップを分析し、攻撃日時と送信元IPに留意します。 actionが Blockedの場合はdenylistによるものです。IP listsに移動し、日付とIPでフィルタし、Reason列をクリックしてIPアドレスの詳細を確認・精査し、Triggered profileをクリックして内容を確認し、必要に応じて変更します。さらに可能な対応:
|
bola | API DiscoveryによるBOLAの自動防御 | 攻撃を展開し、トリガーへのリンクが含まれていない場合(BOLAに対する手動防御のサインがない場合)は、API Discovery(USまたはEU)モジュールによる自動防御です。必要に応じて、BOLA Protection(USまたはEU)に移動し、この防御を無効化するか、その設定テンプレートを調整します。 |
undefined_endpoint, undefined_parameter, invalid_parameter_value, missing_parameter, missing_auth, invalid_request(すべてを検索するにはapi_specification、詳細) | API Specification Enforcement | 攻撃を展開し、違反した仕様へのリンクをたどります。仕様のダイアログで、API specification enforcementタブを使用して設定を調整し、Specification uploadタブから最新の仕様バージョンのアップロードを検討します。 |
gql_doc_size, gql_value_size, gql_depth, gql_aliases, gql_docs_per_batch, gql_introspection, gql_debug(すべてを検索するにはgraphql_attacks、詳細) | GraphQL API Protection | 攻撃を展開し、GraphQL security policiesリンクをたどります。必要に応じて、既存のDetect GraphQL attacksルールを変更するか、特定のブランチ向けに追加のルールを作成します。 |
credential_stuffing | Credential Stuffing Detection | 攻撃を展開し、試行された漏えい認証情報の一覧を確認します。Credential Stuffing(US、EU Cloud)セクションに移動し、設定、特に監視対象の認証エンドポイントのリストとその推奨、漏えい認証情報に関する通知設定を確認します。 |
ダッシュボード
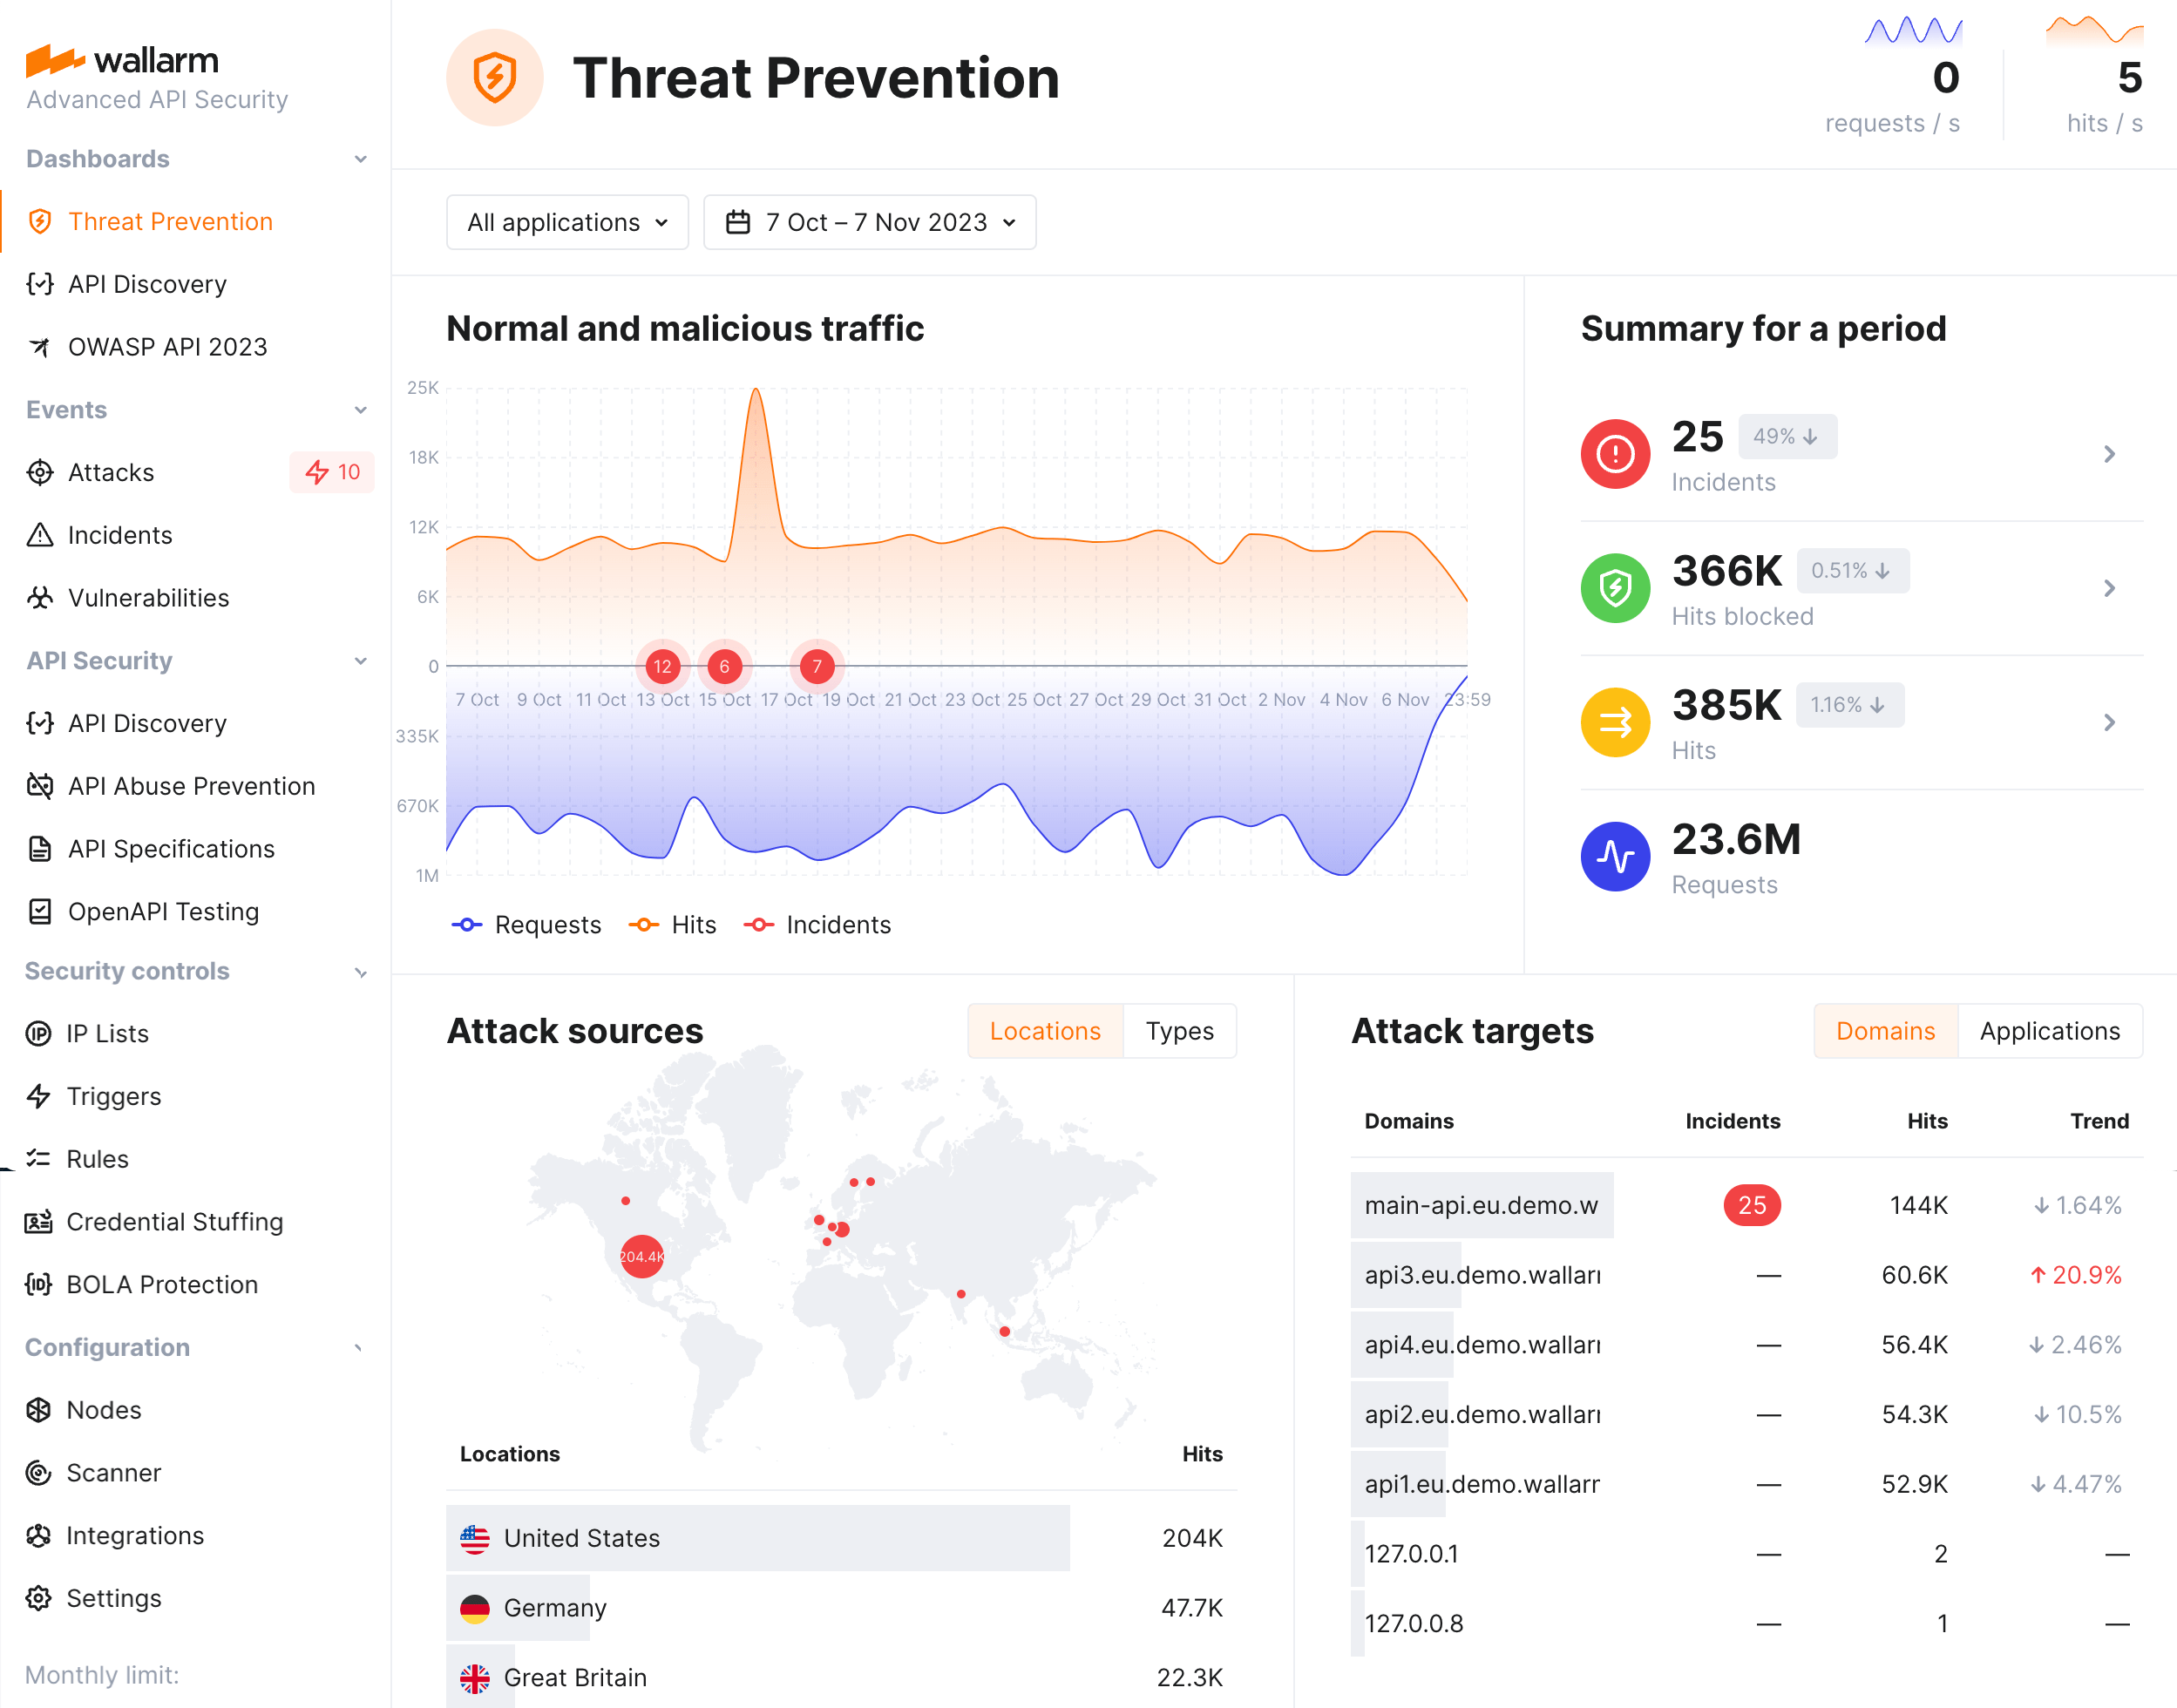
Wallarmは、検知された攻撃の分析に役立つ包括的なダッシュボードを提供します。
WallarmのThreat Preventionダッシュボードは、攻撃の送信元、対象、タイプ、プロトコルなど、多面的な情報を含むシステムのセキュリティ状況に関する一般的な指標を提供します。
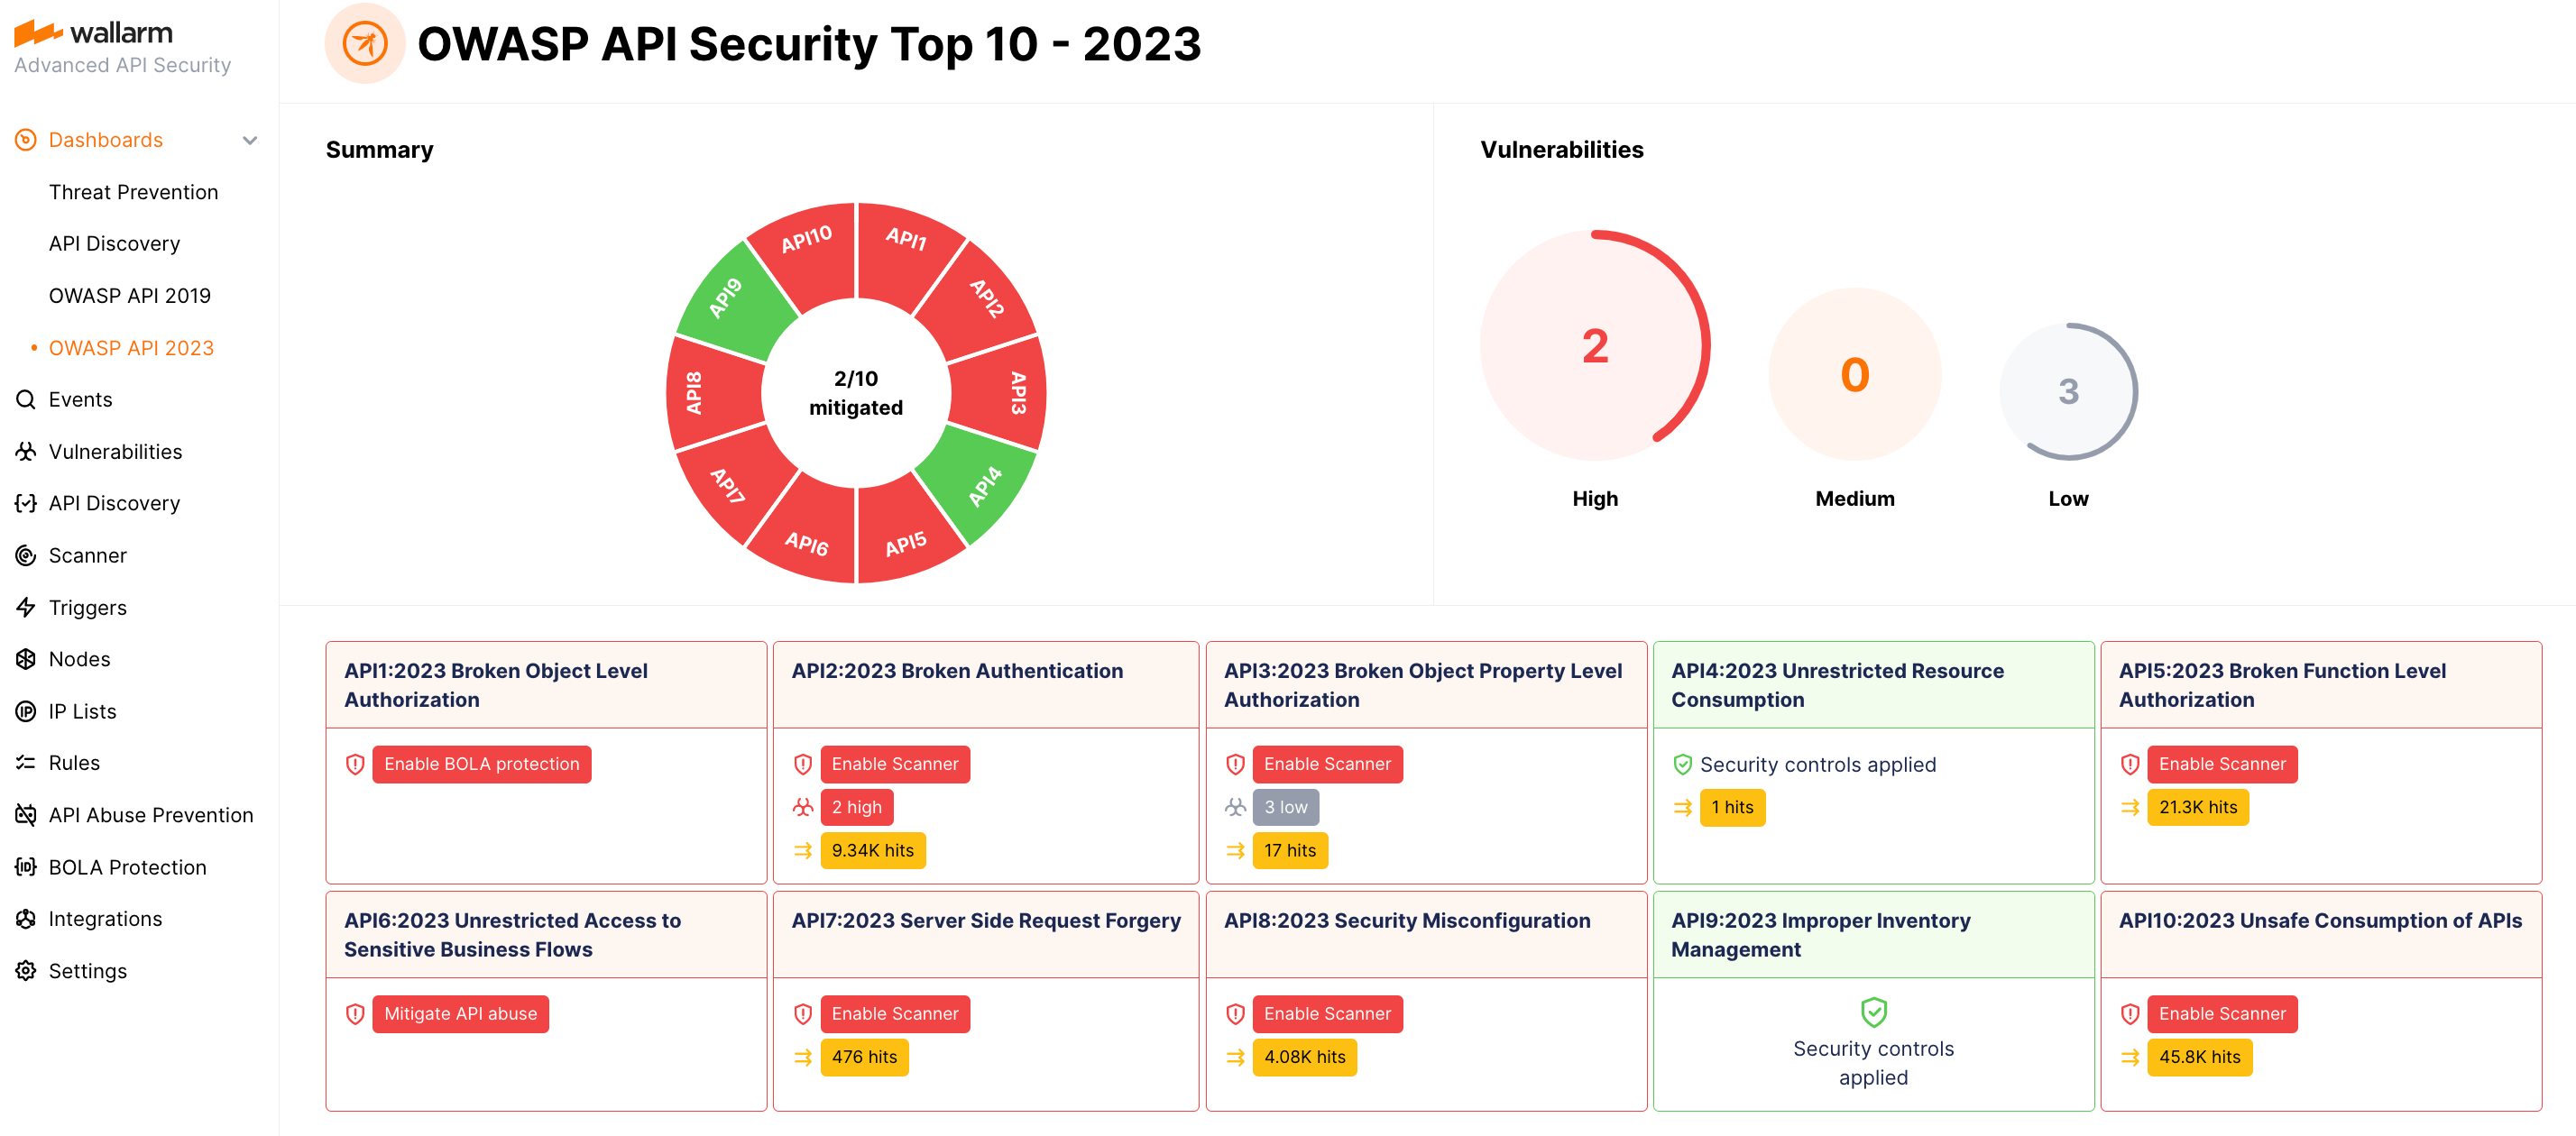
OWASP API Security Top 10ダッシュボードは、攻撃情報を含むOWASP API Top 10の脅威に対するシステムのセキュリティ状況を詳細に可視化します。
通知
Wallarmは、検知された攻撃、Hit、Malicious payloadに関する通知を送信できます。これにより、システムへの攻撃試行を把握し、検知された悪意あるトラフィックを迅速に分析できます。悪意あるトラフィックの分析には、誤検知の報告、正当なリクエストの送信元IPのallowlist追加、攻撃送信元IPのdenylist追加が含まれます。
通知を設定するには:
-
通知送信先となるシステムとのネイティブ連携を設定します(例: PagerDuty、Opsgenie、Splunk、Slack、Telegram)。
-
通知送信の条件を設定します:
-
検知された各Hitについて通知を受け取るには、連携設定で該当オプションを選択します。
Hit検知通知のJSON形式の例
[ { "summary": "[Wallarm] New hit detected", "details": { "client_name": "TestCompany", "cloud": "EU", "notification_type": "new_hits", "hit": { "domain": "www.example.com", "heur_distance": 0.01111, "method": "POST", "parameter": "SOME_value", "path": "/news/some_path", "payloads": [ "say ni" ], "point": [ "post" ], "probability": 0.01, "remote_country": "PL", "remote_port": 0, "remote_addr4": "8.8.8.8", "remote_addr6": "", "tor": "none", "request_time": 1603834606, "create_time": 1603834608, "response_len": 14, "response_status": 200, "response_time": 5, "stamps": [ 1111 ], "regex": [], "stamps_hash": -22222, "regex_hash": -33333, "type": "sqli", "block_status": "monitored", "id": [ "hits_production_999_202010_v_1", "c2dd33831a13be0d_AC9" ], "object_type": "hit", "anomaly": 0 } } } ] -
攻撃・Hit・Malicious payloadの件数にしきい値を設定し、それを超過したときに通知を受け取るには、適切なトリガーを構成します。
-
API呼び出し
攻撃の詳細を取得するには、Wallarm ConsoleのUIを使用する以外に、Wallarm APIを直接呼び出すこともできます。以下は、過去24時間に検知された攻撃のうち最初の50件を取得するAPI呼び出しの例です。
TIMESTAMPは、24時間前の日付をUnixタイムスタンプ形式に変換した値に置き換えてください。
curl -v -X POST "https://us1.api.wallarm.com/v1/objects/attack" -H "X-WallarmApi-Token: <YOUR_TOKEN>" -H "accept: application/json" -H "Content-Type: application/json" -d "{ \"filter\": { \"clientid\": [YOUR_CLIENT_ID], \"time\": [[TIMESTAMP, null]] }, \"offset\": 0, \"limit\": 50, \"order_by\": \"last_time\", \"order_desc\": true}"
curl -v -X POST "https://api.wallarm.com/v1/objects/attack" -H "X-WallarmApi-Token: <YOUR_TOKEN>" -H "accept: application/json" -H "Content-Type: application/json" -d "{ \"filter\": { \"clientid\": [YOUR_CLIENT_ID], \"time\": [[TIMESTAMP, null]] }, \"offset\": 0, \"limit\": 50, \"order_by\": \"last_time\", \"order_desc\": true}"
100件以上の攻撃の取得
攻撃やHitのレコードが100件以上になる場合は、パフォーマンス最適化のため、一度に大きなデータセットを取得するのではなく小分けに取得するのが最適です。該当するリクエスト例をご確認ください