EOL postanalyticsモジュールのアップグレード
この手順では、別サーバーにインストールされているサポート終了のpostanalyticsモジュール(バージョン3.6以下)をアップグレードする手順を説明します。postanalyticsモジュールは、Wallarm NGINXモジュールのアップグレードの前にアップグレードする必要があります。
Wallarm nodes 3.6 and lower are not supported
You are recommended to upgrade the Wallarm nodes 3.6 and lower since these versions are not supported, they are end-of-life.
Node configuration and traffic filtration have been significantly simplified in the Wallarm node of the latest versions. Before upgrading the modules, please carefully review the list of changes and general recommendations. Please note that some settings of the latest node are incompatible with the nodes 3.6 and lower.
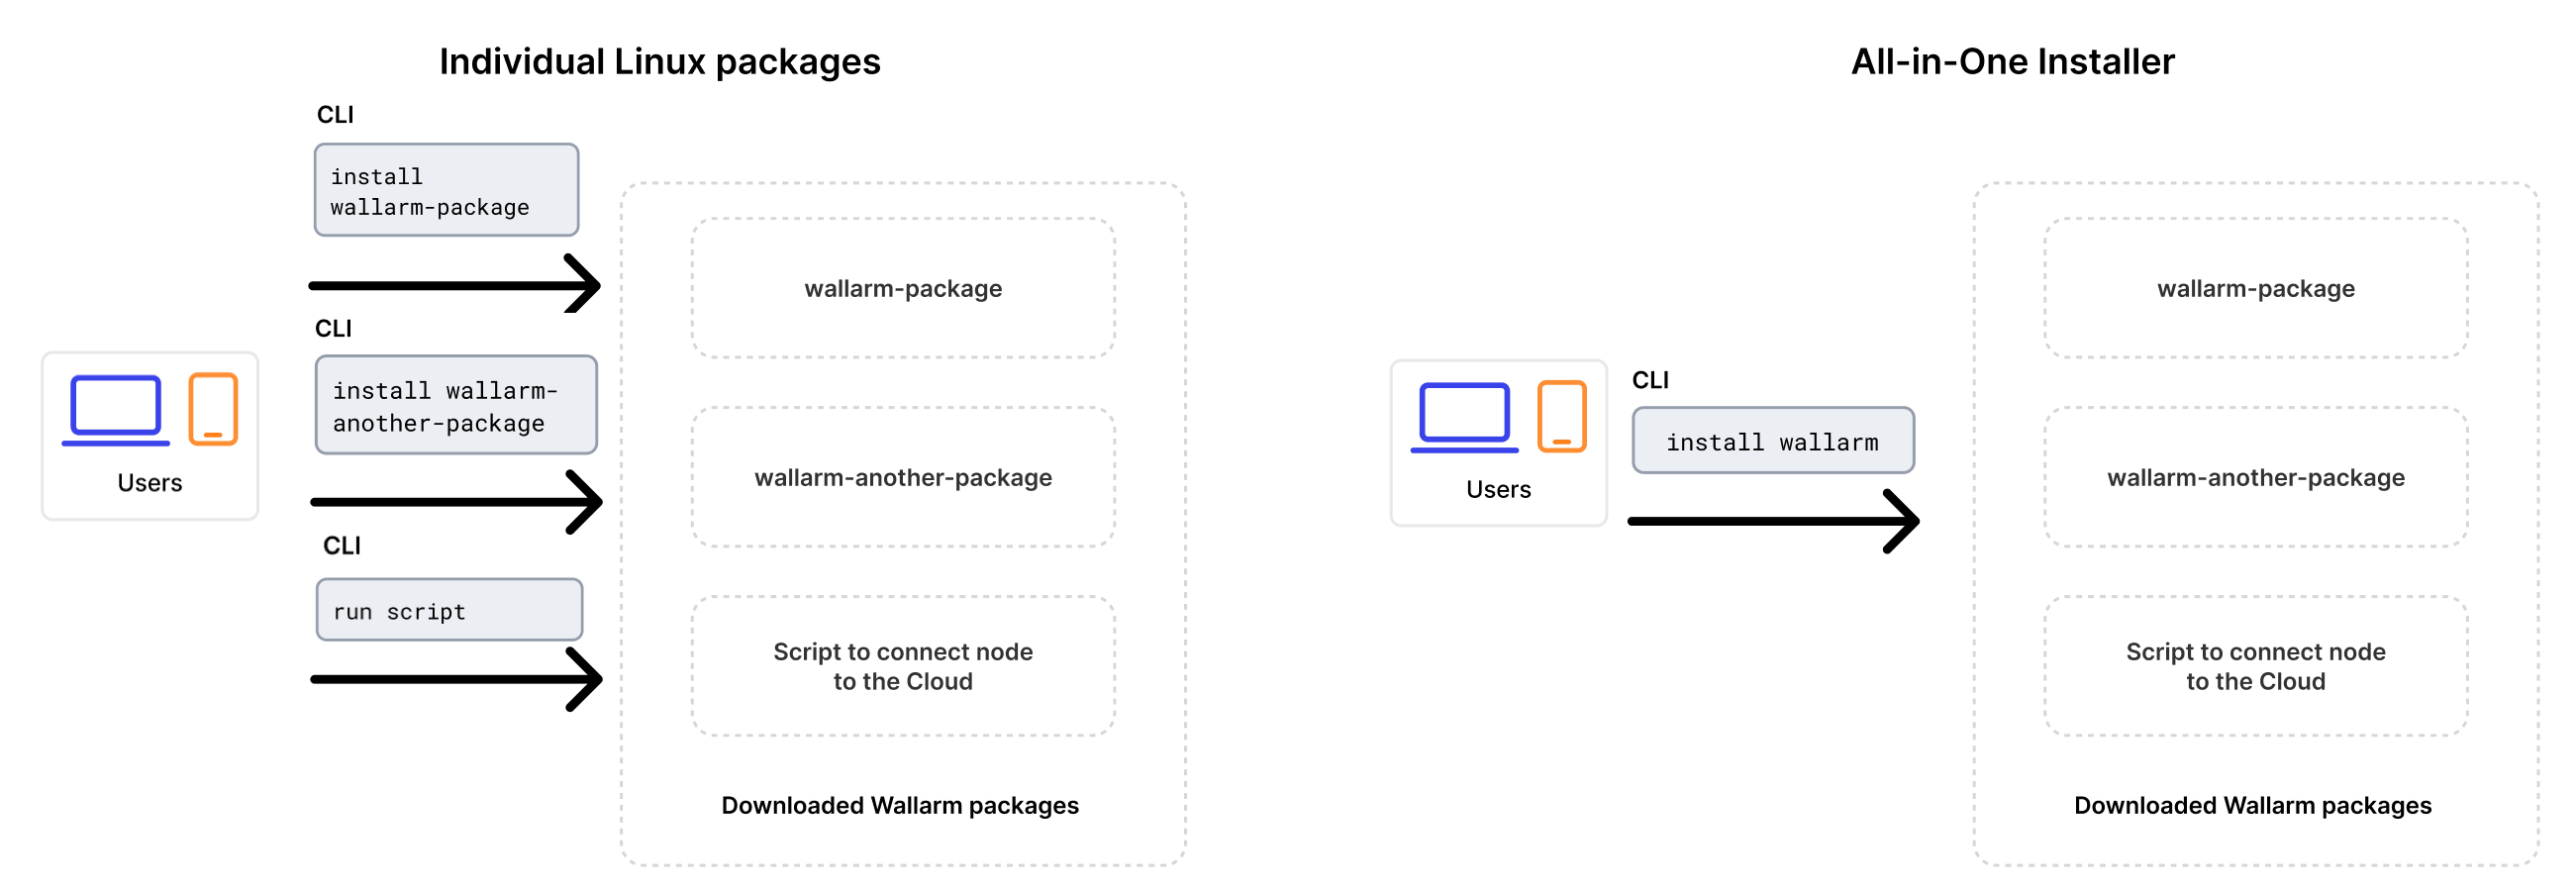
all-in-oneインストーラーでのアップグレード
アップグレードは、個別のLinuxパッケージが非推奨になったため、Wallarmのall-in-oneインストーラーを使用して実行します。この方法は、従来のアプローチと比べて、アップグレード手順と継続的なデプロイの保守を簡素化します。
インストーラーは次の処理を自動で実行します:
- OSとNGINXのバージョンを確認します。
- 検出したOSとNGINXのバージョン用のWallarmリポジトリを追加します。
- これらのリポジトリからWallarmパッケージをインストールします。
- インストールしたWallarmモジュールをNGINXに接続します。
-
提供されたトークンを使用してフィルタリングノードをWallarm Cloudに接続します。
個別のLinuxパッケージによる手動アップグレードはサポートされません。
要件
-
Access to the account with the Administrator role in Wallarm Console for the US Cloud or EU Cloud.
-
Access to
https://meganode.wallarm.comto download all-in-one Wallarm installer. Ensure the access is not blocked by a firewall. -
Access to
https://us1.api.wallarm.comfor working with US Wallarm Cloud or tohttps://api.wallarm.comfor working with EU Wallarm Cloud. If access can be configured only via the proxy server, then use the instructions. -
Executing all commands as a superuser (e.g.
root). -
Access to the IP addresses and their corresponding hostnames (if any) listed below. This is needed for downloading updates to attack detection rules and API specifications, as well as retrieving precise IPs for your allowlisted, denylisted, or graylisted countries, regions, or data centers.
手順1: クリーンなマシンを準備します
When upgrading modules with all-in-one installer, you cannot upgrade an old package installation - instead you need to use a clean machine. Thus, as step 1, prepare a machine with one of the supported OS:
-
Debian 10, 11, 12.x, 13.x
-
Ubuntu LTS 18.04, 20.04, 22.04, 24.04
-
Ubuntu non-LTS 24.10, 25.04, 25.10
-
CentOS 7, 8 Stream, 9 Stream, 10 Stream
-
Alma/Rocky Linux 9
-
AlmaLinux 10
-
RHEL 8.x
-
RHEL 9.x
-
RHEL 10.x
-
Oracle Linux 8.x
-
Oracle Linux 9.x
-
Oracle Linux 10.x
-
Redox
-
SuSe Linux
-
Others (the list is constantly widening, contact Wallarm support team to check if your OS is in the list)
Using new clean machine will lead to that at some moment you will have both old and new node, which is good: you can test the new one working properly without stopping the old one.
手順2: Wallarmトークンを準備します
To install node, you will need a Wallarm token of the appropriate type. To prepare a token:
手順3: all-in-oneのWallarmインストーラーをダウンロードします
Wallarm suggests all-in-one installations for the following processors:
-
x86_64
-
ARM64
To download all-in-one Wallarm installation script, execute the command:
手順4: all-in-oneのWallarmインストーラーを実行してpostanalyticsをインストールします
To install postanalytics separately with all-in-one installer, use:
If using the x86_64 version:
If using the ARM64 version:
The WALLARM_LABELS variable sets group into which the node will be added (used for logical grouping of nodes in the Wallarm Console UI).
手順5: APIポートを更新します
Starting with version 4.0, the filtering node uploads data to the Cloud using the us1.api.wallarm.com:443 (US Cloud) and api.wallarm.com:443 (EU Cloud) API endpoints instead of us1.api.wallarm.com:444 and api.wallarm.com:444.
If you upgrade the node from the version 3.x or lower and your server with the deployed node has a limited access to the external resources and the access is granted to each resource separately, then after upgrade the synchronization between the filtering node and the Cloud will stop.
To restore the synchronization, in your configuration, change port 444 to 443 for API endpoint for each resource.
手順6: 別サーバー上のNGINX-Wallarmモジュールをアップグレードします
postanalyticsモジュールを別サーバーにインストールしたら、別のサーバーで稼働している関連するNGINX-Wallarmモジュールをアップグレードします。
手順7: NGINX-Wallarmモジュールをpostanalyticsモジュールに再接続します
On the machine with the NGINX-Wallarm module, in the NGINX configuration file (typically located at /etc/nginx/nginx.conf), specify the postanalytics module server address:
http {
    # omitted
    upstream wallarm_wstore {
        server <ip1>:3313 max_fails=0 fail_timeout=0 max_conns=1;
        server <ip2>:3313 max_fails=0 fail_timeout=0 max_conns=1;

        keepalive 2;
    }

    wallarm_wstore_upstream wallarm_wstore;

    # omitted
}
-
max_connsvalue must be specified for each of the upstream wstore servers to prevent the creation of excessive connections. -
keepalivevalue must not be lower than the number of the wstore servers. -
The
# wallarm_wstore_upstream wallarm_wstore;string is commented by default - please delete#.
Once the configuration file changed, restart NGINX/NGINX Plus on the NGINX-Wallarm module server:
手順8: NGINX‑Wallarmと別設置のpostanalyticsモジュールの連携を確認します
To check the NGINX‑Wallarm and separate postanalytics modules interaction, you can send the request with test attack to the address of the protected application:
If the NGINX‑Wallarm and separate postanalytics modules are configured properly, the attack will be uploaded to the Wallarm Cloud and displayed in the Attacks section of Wallarm Console:

If the attack was not uploaded to the Cloud, please check that there are no errors in the services operation:
-
Analyze the postanalytics module logs
If there is the record like
SystemError binary: failed to bind: Cannot assign requested address, make sure that the server accepts connection on specified address and port. -
On the server with the NGINX‑Wallarm module, analyze the NGINX logs:
If there is the record like
[error] wallarm: <address> connect() failed, make sure that the address of separate postanalytics module is specified correctly in the NGINX‑Wallarm module configuration files and separate postanalytics server accepts connection on specified address and port. -
On the server with the NGINX‑Wallarm module, get the statistics on processed requests using the command below and make sure that the value of
tnt_errorsis 0Description of all parameters returned by the statistics service →
手順9: 古いpostanalyticsモジュールを削除します
-
Delete old postanalytics module in Wallarm Console → Nodes by selecting your postanalytics module node and clicking Delete.
-
Confirm the action.
When the postanalytics module node is deleted from Cloud, it will stop participation in filtration of requests to your applications. Deleting cannot be undone. The postanalytics module node will be deleted from the list of nodes permanently.
-
Delete machine with the old postanalytics module or just clean it from Wallarm postanalytics module components: