EOLのWallarm NGINXモジュールのアップグレード
本手順では、サポート終了のWallarm NGINXモジュール(バージョン3.6以下)を最新のバージョン6.xにアップグレードする手順を説明します。Wallarm NGINXモジュールとは、以下のいずれかの手順に従ってインストールされたモジュールです。
-
NGINX stable向け個別パッケージ
-
NGINX Plus向け個別パッケージ
-
ディストリビューション提供のNGINX向け個別パッケージ
Wallarm nodes 3.6 and lower are not supported
You are recommended to upgrade the Wallarm nodes 3.6 and lower since these versions are not supported, they are end-of-life.
Node configuration and traffic filtration have been significantly simplified in the Wallarm node of the latest versions. Before upgrading the modules, please carefully review the list of changes and general recommendations. Please note that some settings of the latest node are incompatible with the nodes 3.6 and lower.
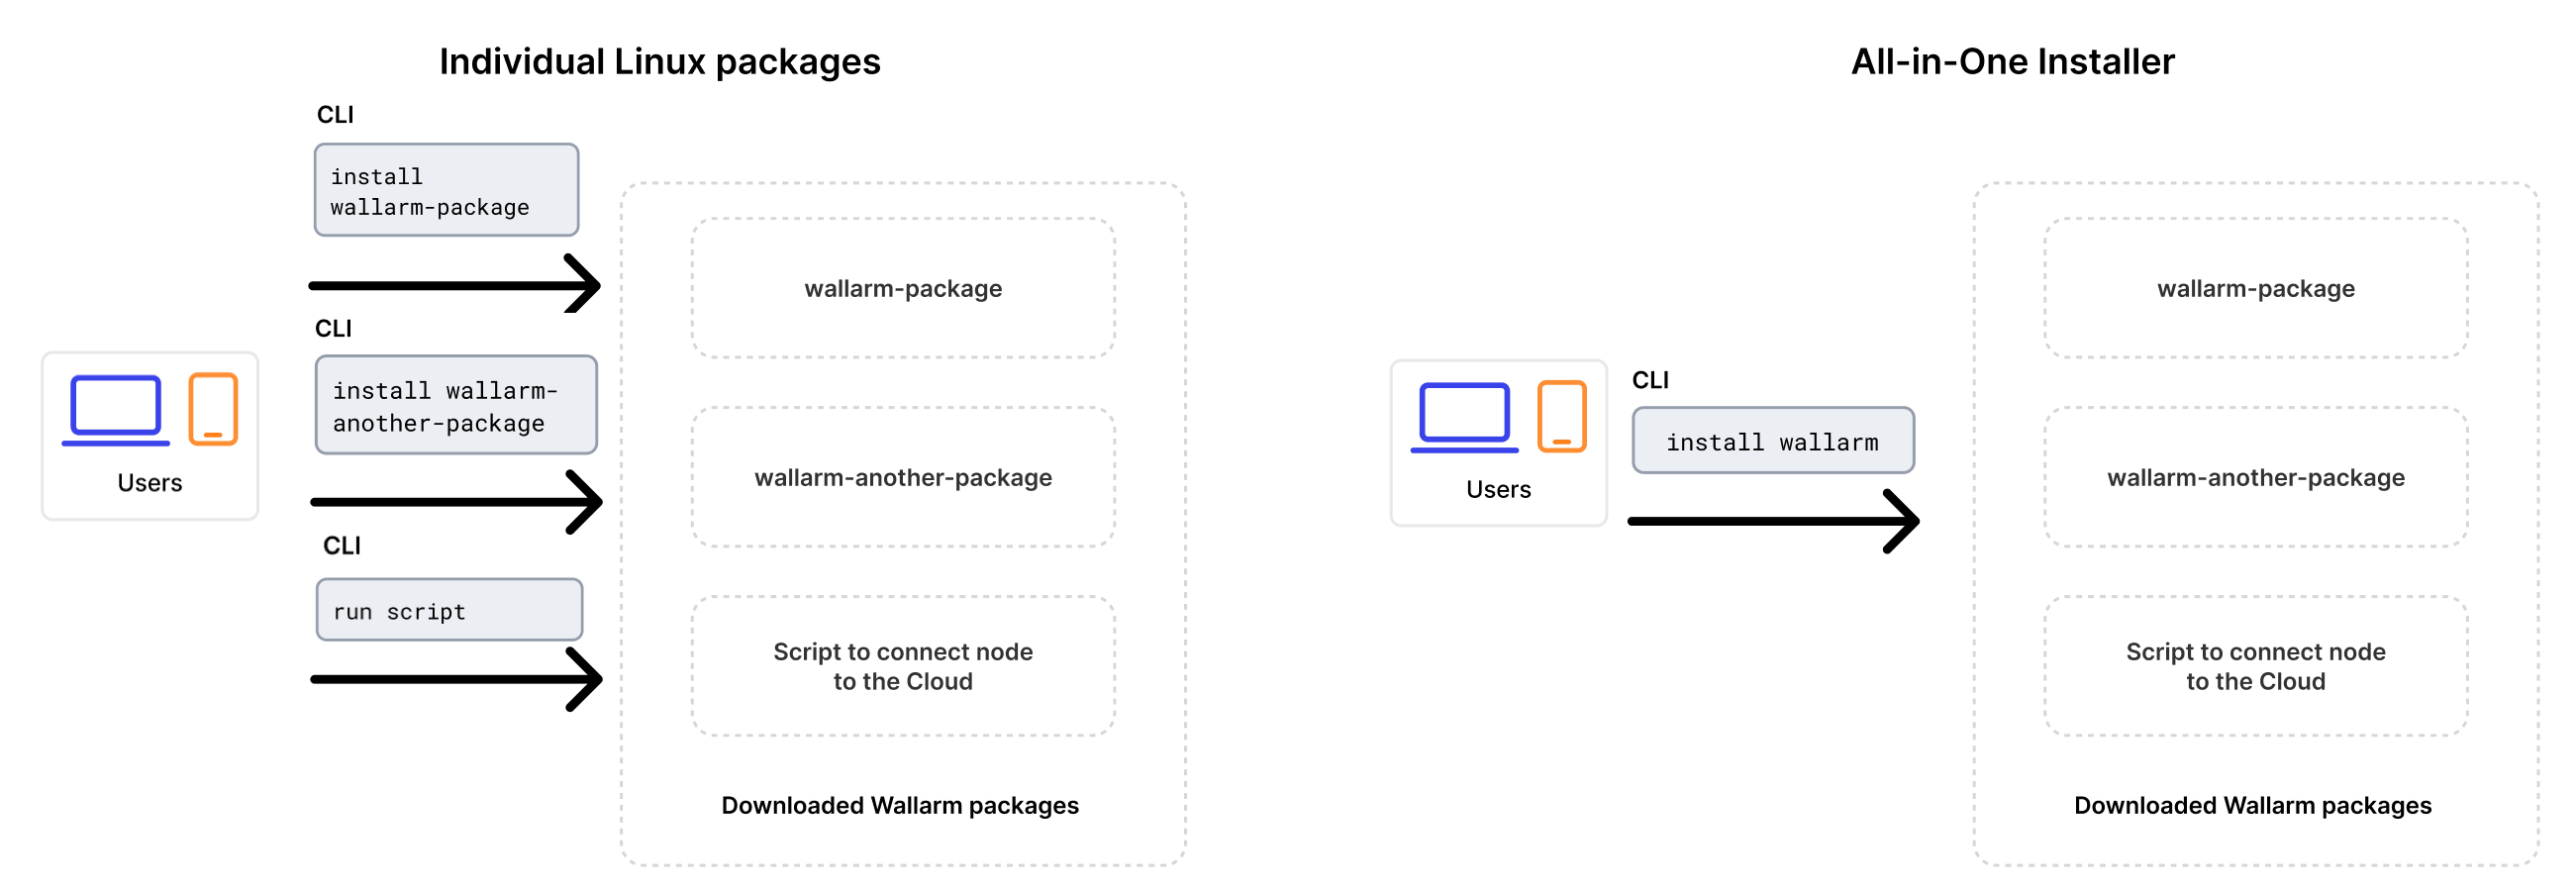
all-in-oneインストーラーでのアップグレード
個別のLinuxパッケージは非推奨となったため、アップグレードはWallarmのall-in-oneインストーラーで実施します。この方法は、以前の方式に比べてアップグレード作業と継続的なデプロイ保守を簡素化します。
インストーラーは以下を自動で実行します。
- OSとNGINXのバージョンを確認します。
- 検出したOSとNGINXバージョン向けのWallarmリポジトリを追加します。
- これらのリポジトリからWallarmパッケージをインストールします。
- インストールしたWallarmモジュールをNGINXに接続します。
-
提供されたトークンを使用してフィルタリングノードをWallarm Cloudに接続します。
個別Linuxパッケージによる手動アップグレードは今後サポートされません。
EOLノードをアップグレードする旨をWallarmテクニカルサポートに連絡してください
サポート終了のWallarm NGINXモジュール(バージョン3.6以下)をバージョン6.xにアップグレードする場合は、Wallarmテクニカルサポートに連絡し、支援を依頼してください。
その他の支援に加えて、アカウントに新しいIP listsロジックを有効化するよう依頼してください。新しいIP listsロジックが有効化されたら、Wallarm Consoleを開き、セクションIP listsが利用可能であることを確認してください。
要件
-
Access to the account with the Administrator role in Wallarm Console for the US Cloud or EU Cloud.
-
Access to
https://meganode.wallarm.comto download all-in-one Wallarm installer. Ensure the access is not blocked by a firewall. -
Access to
https://us1.api.wallarm.comfor working with US Wallarm Cloud or tohttps://api.wallarm.comfor working with EU Wallarm Cloud. If access can be configured only via the proxy server, then use the instructions. -
Executing all commands as a superuser (e.g.
root). -
Access to the IP addresses and their corresponding hostnames (if any) listed below. This is needed for downloading updates to attack detection rules and API specifications, as well as retrieving precise IPs for your allowlisted, denylisted, or graylisted countries, regions, or data centers.
アップグレード手順
-
フィルタリングノードとpostanalyticsモジュールが同一サーバーにインストールされている場合は、以下の手順に従って両方をアップグレードしてください。
クリーンなマシンでall-in-oneインストーラーを使用して新しいバージョンのノードを起動し、動作をテストし、旧ノードを停止して、トラフィックが旧マシンではなく新マシンを経由するように設定する必要があります。
-
フィルタリングノードとpostanalyticsモジュールが別サーバーにインストールされている場合は、最初にpostanalyticsモジュールを、次にフィルタリングモジュールをこれらの手順に従ってアップグレードしてください。
ステップ1: Threat Replay Testingモジュールを無効化します(ノード2.16以下をアップグレードする場合)
Wallarmノード2.16以下をアップグレードする場合は、Wallarm Console → Vulnerabilities → ConfigureでThreat Replay Testingモジュールを無効化してください。
アップグレード中にモジュールの動作が誤検知を引き起こす可能性があります。モジュールを無効化すると、このリスクを最小化できます。
ステップ2: クリーンなマシンを準備します
When upgrading modules with all-in-one installer, you cannot upgrade an old package installation - instead you need to use a clean machine. Thus, as step 1, prepare a machine with one of the supported OS:
-
Debian 10, 11, 12.x, 13.x
-
Ubuntu LTS 18.04, 20.04, 22.04, 24.04
-
Ubuntu non-LTS 24.10, 25.04, 25.10
-
CentOS 7, 8 Stream, 9 Stream, 10 Stream
-
Alma/Rocky Linux 9
-
AlmaLinux 10
-
RHEL 8.x
-
RHEL 9.x
-
RHEL 10.x
-
Oracle Linux 8.x
-
Oracle Linux 9.x
-
Oracle Linux 10.x
-
Redox
-
SuSe Linux
-
Others (the list is constantly widening, contact Wallarm support team to check if your OS is in the list)
Using new clean machine will lead to that at some moment you will have both old and new node, which is good: you can test the new one working properly without stopping the old one.
ステップ3: NGINXと依存関係をインストールします
Install the latest NGINX version of:
-
NGINX
stable(the latest supported version is v1.28.1) - see how to install it in the NGINX documentation. -
NGINX Mainline (the latest supported version is v1.27.5) - see how to install it in the NGINX documentation.
-
NGINX Plus (the latest supported version is NGINX Plus R33) - see how to install it in the NGINX documentation.
-
Distribution-Provided NGINX - to install, use the following commands:
ステップ4: Wallarmトークンを準備します
To install node, you will need a Wallarm token of the appropriate type. To prepare a token:
ステップ5: all-in-oneのWallarmインストーラーをダウンロードします
Wallarm suggests all-in-one installations for the following processors:
-
x86_64
-
ARM64
To download all-in-one Wallarm installation script, execute the command:
ステップ6: all-in-oneのWallarmインストーラーを実行します
フィルタリングノードとpostanalyticsが同一サーバー上にある場合
-
Run downloaded script:
If using the x86_64 version:
If using the ARM64 version:
The
WALLARM_LABELSvariable sets group into which the node will be added (used for logical grouping of nodes in the Wallarm Console UI). -
Enter Wallarm token.
フィルタリングノードとpostanalyticsが別サーバーの場合
フィルタリングノードとpostanalyticsモジュールをアップグレードする手順の順序
フィルタリングノードとpostanalyticsモジュールが別サーバーにインストールされている場合は、フィルタリングノードのパッケージを更新する前にpostanalyticsパッケージをアップグレードする必要があります。
-
これらの手順に従ってpostanalyticsモジュールをアップグレードします。
-
フィルタリングノードをアップグレードします:
ステップ7: 以前のWallarmノードのバージョンから6.xへallowlistとdenylistを移行します(ノード2.18以下をアップグレードする場合のみ)
ノード2.18以下をアップグレードする場合は、以前のWallarmノードバージョンから最新バージョンへallowlist/denylist設定を移行してください。
ステップ8: 旧ノードのマシンから新しいマシンへNGINXおよびpostanalyticsの設定を移行します
必要なディレクティブまたはファイルをコピーして、旧マシンから新マシンへノード関連のNGINXおよびpostanalytics設定を移行します。
-
httpレベルのNGINX設定が記述された/etc/nginx/conf.d/default.confまたは/etc/nginx/nginx.confフィルタリングノードとpostanalyticsノードが別サーバーにある場合は、フィルタリングノードのマシン上の
/etc/nginx/nginx.confのhttpブロックで、wallarm_tarantool_upstreamをwallarm_wstore_upstreamにリネームしてください。 -
トラフィックルーティングのためのNGINXおよびWallarm設定が記述された
/etc/nginx/sites-available/default -
/etc/nginx/conf.d/wallarm-status.conf→ 新しいマシン上の/etc/nginx/wallarm-status.confにコピー詳細説明はリンク内にあります。
-
/etc/wallarm/node.yaml→ 新しいマシン上の/opt/wallarm/etc/wallarm/node.yamlにコピー別のpostanalyticsサーバーでカスタムのホストとポートを使用している場合は、postanalyticsノードのマシン上で、コピーしたファイル内の
tarantoolセクションをwstoreにリネームしてください。
非推奨のNGINXディレクティブをリネームします
設定ファイルで明示的に指定している場合は、以下のNGINXディレクティブをリネームしてください。
-
wallarm_instance→wallarm_application -
wallarm_local_trainingset_path→wallarm_custom_ruleset_path -
wallarm_global_trainingset_path→wallarm_protondb_path -
wallarm_ts_request_memory_limit→wallarm_general_ruleset_memory_limit -
wallarm_tarantool_upstream→wallarm_wstore_upstream
ディレクティブ名のみを変更しており、ロジックは変わりません。旧名称のディレクティブはまもなく非推奨になりますので、事前にリネームしておくことをおすすめします。
ノードのログ変数を更新します
新しいノードバージョンでは、ノードのログ変数に以下の変更が加えられています。
-
変数
wallarm_request_timeはwallarm_request_cpu_timeにリネームされました。変数名のみを変更しており、ロジックは変わりません。旧名も一時的にサポートされますが、変数のリネームを推奨します。
-
変数
wallarm_request_mono_timeが追加されました。以下の合計である総時間に関するログ情報が必要な場合は、ログフォーマットの設定に含めてください。- キュー内の時間
- CPUがリクエスト処理に費やした秒数
最新バージョンで提供された変更に合わせてWallarmノードのフィルタリングモード設定を調整します
-
以下の設定の期待される動作が、「off」と「monitoring」フィルタリングモードの変更されたロジックに合致していることを確認してください。
-
期待される動作が変更後のフィルタリングモードのロジックに一致しない場合は、手順に従って設定を調整してください。
overlimit_res攻撃検出の設定をディレクティブからルールへ移行します
Starting from the version 3.6, you can fine-tune the overlimit_res attack detection using the rule in Wallarm Console.
Earlier, the wallarm_process_time_limit and wallarm_process_time_limit_block NGINX directives have been used. The listed directives are considered to be deprecated with the new rule release and will be deleted in future releases.
If the overlimit_res attack detection settings are customized via the listed directives, it is recommended to transfer them to the rule as follows:
-
Open Wallarm Console → Rules and proceed to the Limit request processing time rule setup.
-
Configure the rule as done via the NGINX directives:
- The rule condition should match the NGINX configuration block with the
wallarm_process_time_limitandwallarm_process_time_limit_blockdirectives specified. -
The time limit for the node to process a single request (milliseconds): the value of
wallarm_process_time_limit.Risk of running out of system memory
The high time limit and/or continuation of request processing after the limit is exceeded can trigger memory exhaustion or out-of-time request processing.
-
The node will either block or pass the
overlimit_resattack depending on the node filtration mode:- In the monitoring mode, the node forwards the original request to the application address. The application has the risk to be exploited by the attacks included in both processed and unprocessed request parts.
- In the safe blocking mode, the node blocks the request if it is originated from the graylisted IP address. Otherwise, the node forwards the original request to the application address. The application has the risk to be exploited by the attacks included in both processed and unprocessed request parts.
- In the block mode, the node blocks the request.
- The rule condition should match the NGINX configuration block with the
-
Delete the
wallarm_process_time_limitandwallarm_process_time_limit_blockNGINX directives from the NGINX configuration file.If the
overlimit_resattack detection is fine-tuned using both the directives and the rule, the node will process requests as the rule sets.
wallarm-status.confファイルの内容を更新します
/etc/nginx/conf.d/wallarm-status.confの内容を次のように更新してください。
server {
  listen 127.0.0.8:80;
  server_name localhost;

  allow 127.0.0.8/8;   # フィルタリングノードサーバーのループバックアドレスからのみアクセス可能
  deny all;

  wallarm_mode off;
  disable_acl "on";   # リクエスト送信元のチェックを無効化します。denylist上のIPでもwallarm-statusサービスへのリクエストが許可されます。 https://docs.wallarm.com/admin-en/configure-parameters-en/#disable_acl
  wallarm_enable_apifw off;
  access_log off;

  location ~/wallarm-status$ {
    wallarm_status on;
  }
}
Wallarmのブロッキングページを更新します
新しいノードバージョンでは、Wallarmのサンプルブロッキングページが変更されました。ページ上のロゴとサポートメールはデフォルトで空になりました。
&/usr/share/nginx/html/wallarm_blocked.htmlのページをブロック時のレスポンスとして返すように設定している場合は、新しいサンプルページをコピーしてカスタマイズしてください。
ステップ9: APIポートを更新します
Starting with version 4.0, the filtering node uploads data to the Cloud using the us1.api.wallarm.com:443 (US Cloud) and api.wallarm.com:443 (EU Cloud) API endpoints instead of us1.api.wallarm.com:444 and api.wallarm.com:444.
If you upgrade the node from the version 3.x or lower and your server with the deployed node has a limited access to the external resources and the access is granted to each resource separately, then after upgrade the synchronization between the filtering node and the Cloud will stop.
To restore the synchronization, in your configuration, change port 444 to 443 for API endpoint for each resource.
ステップ10: Threat Replay Testingモジュールを再有効化します(ノード2.16以下をアップグレードする場合のみ)
Threat Replay Testingモジュールの設定に関する推奨を確認し、必要に応じて再有効化してください。
しばらくしてから、モジュールの動作で誤検知が発生していないことを確認してください。誤検知が発生する場合は、Wallarmテクニカルサポートにご連絡ください。
ステップ11: NGINXを再起動します
Restart NGINX using the following command:
ステップ12: Wallarmノードの動作をテストします
新しいノードの動作をテストするには、次を実施します。
-
US CloudまたはEU CloudのWallarm Console → Attacksセクションを開き、攻撃が一覧に表示されていることを確認します。
-
Cloudに保存されているデータ(ルール、IP lists)が新しいノードに同期されたら、いくつかテスト攻撃を行い、ルールが期待どおりに動作することを確認します。
ステップ13: トラフィックをWallarmノードへ送信するように構成します
ロードバランサーの転送先を更新して、トラフィックをWallarmインスタンスに送信するようにします。詳細はご使用のロードバランサーのドキュメントを参照してください。
トラフィックを新しいノードへ完全に切り替える前に、まずは一部のみを切り替え、新しいノードが期待どおりに動作することを確認することを推奨します。
ステップ14: 旧ノードを削除します
-
Wallarm Console → Nodesで対象のノードを選択し、Deleteをクリックして旧ノードを削除します。
-
操作を確認します。
ノードがCloudから削除されると、アプリケーションへのリクエストのフィルタリングは停止します。フィルタリングノードの削除は元に戻せません。ノードはノード一覧から完全に削除されます。
-
旧ノードのマシンを削除するか、そのマシンからWallarmノードコンポーネントを削除します。
設定のカスタマイズ
Wallarmモジュールはバージョン6.xに更新されます。以前のフィルタリングノードの設定は新しいバージョンに自動的に適用されます。追加の設定が必要な場合は、利用可能なディレクティブを使用してください。
Common customization options:
-
Using the balancer of the proxy server behind the filtering node
-
Limiting the single request processing time in the directive
wallarm_process_time_limit -
Limiting the server reply waiting time in the NGINX directive
proxy_read_timeout -
Limiting the maximum request size in the NGINX directive
client_max_body_size