Wallarm NGINXモジュールのアップグレード
本手順では、個別パッケージからインストールされたWallarm NGINXモジュール4.xをバージョン6.xにアップグレードする手順を説明します。以下のいずれかの手順に従ってインストールされたモジュールが対象です:
-
NGINX stable向けの個別パッケージ
-
NGINX Plus向けの個別パッケージ
-
ディストリビューション提供のNGINX向けの個別パッケージ
all-in-one installerでのアップグレード
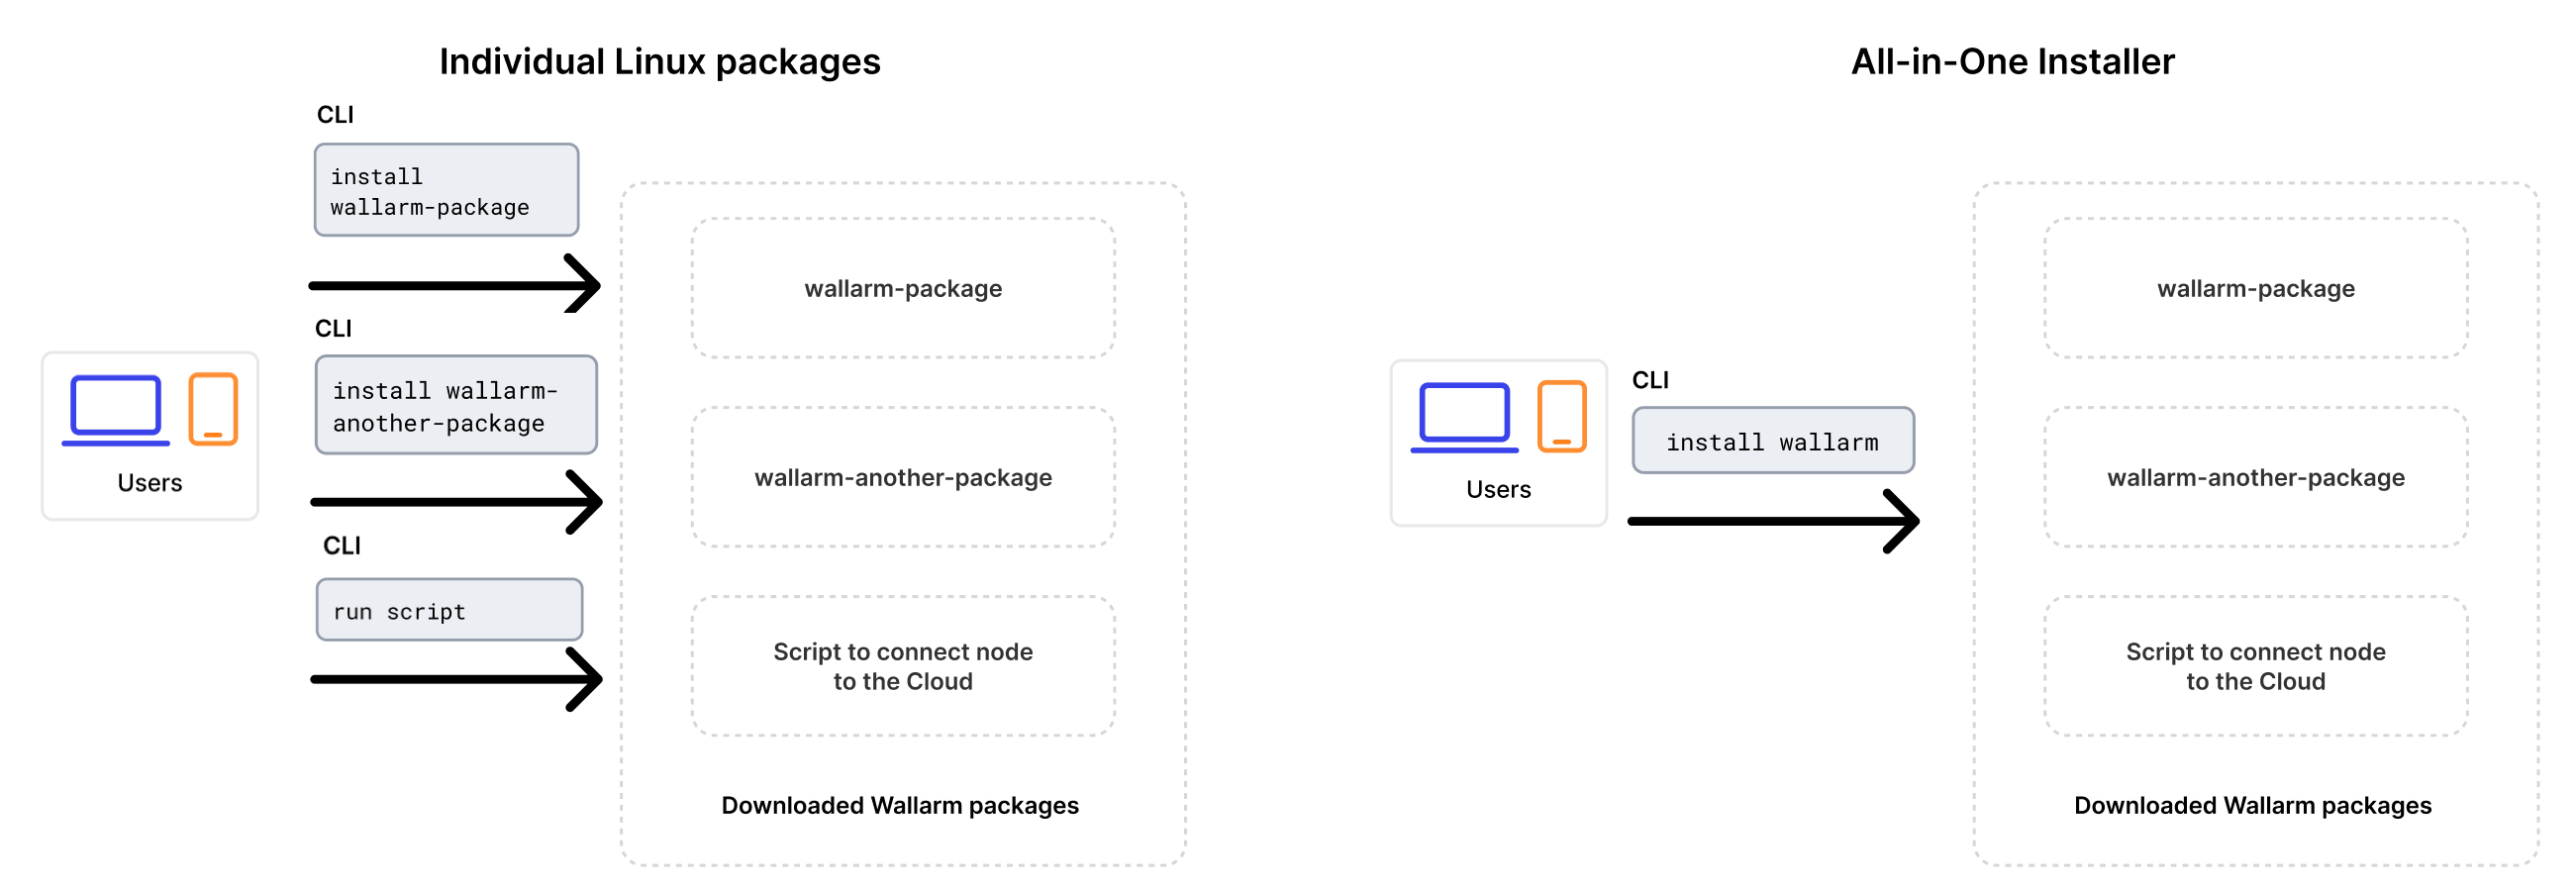
バージョン4.10以降、個別のLinuxパッケージは非推奨となり、Wallarmのall-in-one installerを使用してアップグレードします。この方法は、以前のアプローチと比べて、アップグレード作業と継続的なデプロイ運用を簡素化します。
インストーラーは次の処理を自動で実行します:
- OSとNGINXのバージョンを確認します。
- 検出されたOSおよびNGINXのバージョンに対応するWallarmリポジトリを追加します。
- これらのリポジトリからWallarmパッケージをインストールします。
- インストール済みのWallarmモジュールをNGINXに接続します。
- 提供されたトークンを使用してフィルタリングノードをWallarm Cloudに接続します。
サポート終了のノード(3.6以下)をアップグレードする場合は、別の手順を使用してください。
要件
-
Access to the account with the Administrator role in Wallarm Console for the US Cloud or EU Cloud.
-
Access to
https://meganode.wallarm.comto download all-in-one Wallarm installer. Ensure the access is not blocked by a firewall. -
Access to
https://us1.api.wallarm.comfor working with US Wallarm Cloud or tohttps://api.wallarm.comfor working with EU Wallarm Cloud. If access can be configured only via the proxy server, then use the instructions. -
Executing all commands as a superuser (e.g.
root). -
Access to the IP addresses and their corresponding hostnames (if any) listed below. This is needed for downloading updates to attack detection rules and API specifications, as well as retrieving precise IPs for your allowlisted, denylisted, or graylisted countries, regions, or data centers.
アップグレード手順
-
フィルタリングノードとpostanalyticsモジュールが同一サーバーにインストールされている場合は、以下の手順に従って両方をアップグレードしてください。
クリーンなマシンでall-in-one installerを使用して新しいバージョンのノードを起動し、動作をテストしたうえで、旧ノードを停止し、トラフィックが旧マシンではなく新マシンを経由するように構成する必要があります。
-
フィルタリングノードとpostanalyticsモジュールが別サーバーにインストールされている場合は、こちらの手順に従い、最初にpostanalyticsモジュールを、次にフィルタリングモジュールをアップグレードしてください。
手順1: クリーンなマシンを準備する
When upgrading modules with all-in-one installer, you cannot upgrade an old package installation - instead you need to use a clean machine. Thus, as step 1, prepare a machine with one of the supported OS:
-
Debian 10, 11, 12.x, 13.x
-
Ubuntu LTS 18.04, 20.04, 22.04, 24.04
-
Ubuntu non-LTS 24.10, 25.04, 25.10
-
CentOS 7, 8 Stream, 9 Stream, 10 Stream
-
Alma/Rocky Linux 9
-
AlmaLinux 10
-
RHEL 8.x
-
RHEL 9.x
-
RHEL 10.x
-
Oracle Linux 8.x
-
Oracle Linux 9.x
-
Oracle Linux 10.x
-
Redox
-
SuSe Linux
-
Others (the list is constantly widening, contact Wallarm support team to check if your OS is in the list)
Using new clean machine will lead to that at some moment you will have both old and new node, which is good: you can test the new one working properly without stopping the old one.
手順2: 最新のNGINXと依存関係をインストールする
Install the latest NGINX version of:
-
NGINX
stable(the latest supported version is v1.28.1) - see how to install it in the NGINX documentation. -
NGINX Mainline (the latest supported version is v1.27.5) - see how to install it in the NGINX documentation.
-
NGINX Plus (the latest supported version is NGINX Plus R33) - see how to install it in the NGINX documentation.
-
Distribution-Provided NGINX - to install, use the following commands:
手順3: Wallarmトークンを準備する
To install node, you will need a Wallarm token of the appropriate type. To prepare a token:
手順4: Wallarmのall-in-one installerをダウンロードする
Wallarm suggests all-in-one installations for the following processors:
-
x86_64
-
ARM64
To download all-in-one Wallarm installation script, execute the command:
手順5: Wallarmのall-in-one installerを実行する
同一サーバー上のフィルタリングノードとpostanalytics
-
Run downloaded script:
If using the x86_64 version:
If using the ARM64 version:
The
WALLARM_LABELSvariable sets group into which the node will be added (used for logical grouping of nodes in the Wallarm Console UI). -
Enter Wallarm token.
別サーバー上のフィルタリングノードとpostanalytics
フィルタリングノードとpostanalyticsモジュールをアップグレードする手順の順序
フィルタリングノードとpostanalyticsモジュールが別サーバーにインストールされている場合は、フィルタリングノードのパッケージを更新する前に、postanalyticsのパッケージをアップグレードする必要があります。
-
こちらの手順に従ってpostanalyticsモジュールをアップグレードします。
-
フィルタリングノードをアップグレードします:
手順6: 旧ノードのマシンから新しいマシンへNGINXとpostanalyticsの設定を移行する
必要なディレクティブやファイルをコピーして、旧マシンから新マシンへノード関連のNGINXおよびpostanalyticsの設定を移行します:
-
/etc/nginx/conf.d/default.confまたは/**etc/nginx/nginx.conf**のhttpレベルに関するNGINX設定フィルタリングノードとpostanalyticsノードが別サーバーにある場合は、フィルタリングノードのマシン上の
/etc/nginx/nginx.confのhttpブロック内で、wallarm_tarantool_upstreamをwallarm_wstore_upstreamにリネームします。 -
/etc/nginx/sites-available/defaultトラフィックルーティングのためのNGINXおよびWallarm設定 -
/etc/nginx/conf.d/wallarm-status.conf→ 新しいマシン上の/etc/nginx/wallarm-status.confにコピーします詳細はリンク内にあります。
-
/etc/wallarm/node.yaml→ 新しいマシン上の/opt/wallarm/etc/wallarm/node.yamlにコピーします別のpostanalyticsサーバーでカスタムのホストとポートを使用している場合は、postanalyticsノードのマシン上でコピーしたファイル内の
tarantoolセクションをwstoreにリネームします。
手順7: NGINXを再起動する
Restart NGINX using the following command:
手順8: Wallarmノードの動作をテストする
新しいノードの動作をテストするには、次を実行します:
-
テスト用のSQLインジェクションおよびクロスサイトスクリプティング(XSS)を含むリクエストを保護対象のリソースアドレスに送信します:
-
US CloudまたはEU CloudのWallarm Console → Attacksセクションを開き、攻撃が一覧に表示されていることを確認します。
-
Cloudに保存されているデータ(ルール、IP lists)が新しいノードと同期されたら、いくつかテスト攻撃を実行してルールが期待どおりに動作することを確認します。
手順9: トラフィックをWallarmノードへ送信するよう構成する
ロードバランサーの転送先を更新して、トラフィックをWallarmインスタンスへ送信するようにします。詳細は、使用しているロードバランサーのドキュメントを参照してください。
トラフィックを新しいノードへ完全に切り替える前に、まず一部のみをリダイレクトし、新しいノードが期待どおりに動作することを確認することを推奨します。
手順10: 旧ノードを削除する
-
Wallarm Console → Nodesで対象のノードを選択し、Deleteをクリックして旧ノードを削除します。
-
操作を確認します。
Cloudからノードを削除すると、アプリケーションへのリクエストのフィルタリングは停止します。フィルタリングノードの削除は元に戻せません。ノードはノード一覧から完全に削除されます。
-
旧ノードが動作しているマシンを削除するか、Wallarmノードのコンポーネントのみを削除します: