Wallarmオンプレミスソリューションのデプロイ
本ガイドでは、オンプレミス環境にWallarm CloudおよびWallarm Filtering Nodeをデプロイするための高レベルな手順を説明します。
必要なスキル
オンプレミスでWallarmをデプロイおよび管理するには、以下への習熟を推奨します。
-
Linuxシステム管理(UbuntuまたはRHEL)
-
Kubernetesの基本的な管理(Helm、StatefulSet、PVC、CronJobなど)
-
GrafanaやAlertmanagerなどのサービスを用いたシステム監視
高レベルのデプロイプロセス
以下は、Wallarmオンプレミスの計画およびデプロイプロセスの高レベルな概要です。
-
Wallarmの詳細なオンプレミスドキュメントおよびWallarmチームからの支援を活用して、デプロイ計画を策定します。
-
前提条件を準備します:SSL証明書、サーバー認証情報、config.yamlなど。
-
wctlツールと必要な設定ファイルを使用して管理用ワークステーションをセットアップします。
-
wctlを使用してWallarm Cloudノードをプロビジョニングし、インスタンスをデプロイします。
-
ロードバランサーを構成します(本番クラスターの場合)。
-
オンプレミスのWallarm Cloudライセンスキーを構成します。
-
Wallarm Cloudインスタンスの必要な設定(ユーザー、Wallarmの各機能、トリガー、ルール、インテグレーションなど)を実施します。攻撃防止のベストプラクティスが参考になります。
-
サポートされているセルフホストのデプロイオプションのいずれかを使用してWallarm Filtering Nodeをデプロイおよび構成します。
Wallarm Cloudアドレス
NodeをWallarm管理のクラウドではなくローカルのWallarm Cloudに接続するよう構成します。次の接続パラメータを使用します。
- ローカルのWallarm Cloudホスト名(例:
api.wallarm-prod.mycompany.com) - ローカルのWallarm Cloudポート:
443/TCP - NodeトークンまたはAPIキー:ドキュメントの説明に従い、ローカルのWallarm Consoleで生成します
docker runコマンドの例: - ローカルのWallarm Cloudホスト名(例:
-
ヘルスチェックシナリオを用いてトラフィックフローとWallarm Cloudの機能をテストします。
-
データバックアップノードをデプロイして構成します。
-
Wallarm CloudインスタンスおよびWallarm Filtering Nodeの監視を構成します。
-
システム全体の詳細なテストを実施し、顧客要件を満たしていることを確認します。
-
保守作業を含め、Wallarm CloudおよびWallarm Filtering Nodeの各コンポーネントを文書化します。
-
システム全体の運用に関するWallarmからのトレーニングを受講します。
オンプレミスにおけるWallarm Cloudのシステム要件
Wallarm Cloudコンポーネントには、以下のハードウェア、ネットワーク、およびシステム要件があります。
管理用ワークステーション
管理用ワークステーションは、wctlツールを介してWallarm Cloudをインストールおよび運用するために使用します。
多くのWallarm顧客はこの目的に業務用のノートPCまたはデスクトップを使用しています。ハードウェア要件は最小で、一般的なオフィス用マシンで十分です。
代わりに専用サーバーを使用することも可能です。その場合は、次の要件を満たす必要があります。
-
Windows、macOS、またはLinuxオペレーティングシステム
-
Intel(AMD64)またはARM64のCPUアーキテクチャ
-
RAMは2GB以上
-
ディスク空き容量は50GB以上
-
Dockerをインストール済み(wctlツールを実行するため)
-
Wallarm CloudのWebインターフェースにアクセスするためのGoogle Chrome
Wallarm Cloudインスタンスへアクセス可能であれば、別のマシン上のChromeを使用しても差し支えありません。
-
Wallarm CloudサーバーへのパスワードなしSSHアクセス
-
適切なネットワーク接続
Wallarm Cloudサーバー
Wallarm Cloudサーバーは次の要件を満たす必要があります。
-
サポート対象のオペレーティングシステム:
- Ubuntu LTS 22.04(Ubuntu LTS 24.04は未サポート)
- Red Hat Enterprise Linux 8.xまたは9.x
-
Intel(AMD64)CPUアーキテクチャ(ARM64は未サポート)
-
管理用ワークステーションからパスワードなしSSHでアクセスでき、かつパスワードなしで
sudoを実行できる通常のSSHユーザーアカウントパスワードなしのSSHログインは公開鍵暗号方式に依存します。公開鍵はサーバーに格納され、クライアントは対応する秘密鍵を提示して認証します。
-
内部および外部のドメイン名(例:
onprem.wallarm.com)の両方を解決できるDNSリゾルバー -
I/Oが少なくとも350MB/sのSSDまたはNVMe(ディスクI/O性能が低いためHDDはサポート対象外)
-
ext4またはXFSファイルシステム
-
少なくとも1GbpsのNIC接続
-
静的IPアドレス(プライベート、パブリック、またはその両方)
-
本番デプロイの場合:
- 冗長ディスクストレージ(ハードウェアまたはソフトウェアのRAID⅕/6)
- サーバーの冗長電源
- 冗長ネットワークインターフェース(インターフェースボンディング)
-
適切なネットワーク接続
Wallarmデータバックアップサーバー
データバックアップサーバーのS3互換オブジェクトストレージとして、オープンソースソフトウェアのMinIOを使用することを推奨します。ソフトウェアは単一ノード・単一ドライブモードでインストールできます。
MinIOは次のシステム構成をサポートします。
-
Intel(AMD64)CPUアーキテクチャ
-
CPUコアは2以上
-
RAMは32GB以上
-
サポート対象のオペレーティングシステム:
- Ubuntu/Debian(MinIOがサポートする任意のバージョン)
- Red Hat Enterprise Linux
-
XFSファイルシステム
推奨ディスクサイズは2TBです。
SMTPサーバー
Wallarm Cloudは、ユーザー招待、パスワードリセット、アラート、レポートにメールを使用します。
デフォルトでは、インスタンスにはWebインターフェース付きの組み込みテスト用メールサーバーが含まれています。これは送信メッセージをすべて捕捉し、確認のために表示します。この構成はテスト用途にのみ推奨します。
本番利用では、Wallarm Cloudを顧客提供のSMTPサーバーを使用するよう構成する必要があります。必要なSMTPサーバーパラメータは次のとおりです。
-
送信メールで使用するドメイン名(Wallarmソフトウェアは、このドメイン名と
no-replyのようなユーザー名を用いてFromメールアドレスを生成します) -
SMTPサーバーのホスト名またはIPアドレス
-
SMTPサービスのポート
-
SMTPサーバーがTLS暗号化をサポートするかどうか
-
認証情報(ユーザー名とパスワード)
ドメイン名とDNSレコード
Wallarm Cloudコンポーネントには、企業のプライマリドメイン内で独立したドメインまたはサブドメインを割り当てる必要があります。Wallarm Cloudコンポーネントを複数インスタンス(例:本番とステージング)でデプロイする場合、各インスタンスに固有のドメイン名を割り当てるべきです。
たとえば、会社のプライマリドメインがmycompany.comの場合、使用するWallarm Cloudインスタンスには次のサブドメインを割り当てられます。
-
本番環境:
wallarm-prod.mycompany.com -
ステージング環境:
wallarm-staging.mycompany.com -
ディザスタリカバリ(DR)環境:
wallarm-dr.mycompany.com
SSL証明書
計画中のWallarm Cloudインスタンスに選定したドメイン名に対して、適切な公開または自己署名のSSL証明書を用意する必要があります。証明書は、次のネットワーク通信の保護に使用します。
-
Wallarm Filtering NodeからWallarm Cloudインスタンスへの通信
-
Wallarm管理者(ワークステーション)からWallarm Cloud Console UIおよびAPIへの通信
お客様環境でWallarm Cloudのテストインスタンスのデプロイを迅速化するために、Wallarmのエンジニアが、ワイルドカード名*.onprem.wallarm.tools用の一時的なSSL証明書と秘密鍵を提供できます。これは、Wallarm Cloudインスタンスのドメイン名onprem.wallarm.toolsと組み合わせて使用します。
ネットワーク
Wallarm Cloudインスタンスのサーバーは同一のLANおよびネットワークサブネット内に配置し、インターネットおよび社内ネットワークの他のセグメントから分離する必要があります。
サーバーには次のネットワーク接続(ファイアウォール)許可が必要です。
-
ローカル(ホストベース)ファイアウォールを完全に無効化
-
送信方向のネットワーク接続:
送信元 宛先 宛先ポート 業務上の理由 すべてのWallarm Cloudノード https://hibp.onprem.wallarm.com; https://scripts.onprem.wallarm.com; https://packages-versions.onprem.wallarm.com; https://repo.onprem.wallarm.com; https://registry.onprem.wallarm.com; https://configs.onprem.wallarm.com/; (固定IPアドレス 34.90.162.10) 443/TCP Wallarmオンプレミスのソフトウェアパッケージおよびコンテナのダウンロード すべてのWallarm Cloudノード WallarmデータバックアップサーバーまたはS3互換オブジェクトストレージサービス 443/TCP(使用するS3互換ストレージサービスの使用ポートに応じて) データバックアップの保存のため 管理用ワークステーション WallarmデータバックアップサーバーまたはS3互換オブジェクトストレージサービス 443/TCP(使用するS3互換ストレージサービスの使用ポートに応じて) データバックアップへのアクセスおよびデータ復旧に必要な一部データの保存のため すべてのWallarm Cloudノード 企業のSMTPサーバー 通常はポート587/TCP(TLS上のSecure SMTP) メールメッセージの送信のため すべてのWallarm Cloudノード SIEM、ログ収集、メッセージングなどの社内外のサードパーティ連携/サービス アプリケーション固有のポート 設定済みのサードパーティ連携の利用 -
受信方向のネットワーク接続:
送信元 宛先 宛先ポート 業務上の理由 すべてのWallarm Filtering Node Wallarm Cloudクラスターノードの前段にあるロードバランサーのIPアドレス;スタンドアロンのWallarm CloudサーバーのIPアドレス 443/TCP Filtering NodeからWallarm Cloudインスタンスへの通信(登録、構成、攻撃/セッションデータのアップロードなど) 管理用ワークステーション すべてのWallarm Cloudノード 6443/TCP(K8s API) Kubernetes APIへのアクセス 管理用ワークステーション Wallarm Cloudクラスターノードの前段にあるロードバランサーのIPアドレス;スタンドアロンのWallarm CloudサーバーのIPアドレス 443/TCP Wallarm Cloud Console UIへのアクセス 社内DNSリゾルバー Wallarm Cloudクラスターノードの前段にあるロードバランサーのIPアドレス 53/UDP 顧客のアプリケーションステージング環境において、WallarmのThreat Replay Testing機能が実施するDNSベースの脆弱性検証のため すべてのWallarm Cloudノード すべてのWallarm Cloudノード すべてのIPプロトコル、すべてのTCPおよびUDPポート クラスターノード間の内部通信 -
インターネット発のトラフィックをWallarm Cloudサーバーおよびロードバランサーに対してすべて遮断することを強く推奨します。
-
Wallarm Cloudクラスターインスタンス内のサーバー間にはネットワーク接続制限を設けないでください。
クラスターモードのデプロイでスタンドアロンのネットワークロードバランサーを使用する場合は、ロードバランサーを考慮するよう、上記の受信方向のネットワーク接続ルールを再構成する必要があります。
エアギャップネットワークはまだサポートされていません
現在のところ、Wallarm Cloudインスタンスを完全なエアギャップネットワークにデプロイすることはできませんのでご注意ください。
キャパシティプランニング
Wallarm Cloudコンポーネントのデプロイにおけるキャパシティプランニングには、次の要因が影響します。
-
テストか本番かのデプロイ種別
-
WallarmのAPI SessionsおよびAPI Abuse Prevention機能を使用するかどうか(これらの機能は大量のディスクストレージを必要とします)
-
保護対象APIサービスのトラフィックパターン(トラフィックレベルは24時間を通じて一定か、曜日やホリデーシーズンに特定のピークがあるか)
各Wallarm Cloudノードの最小ハードウェア要件は次のとおりです。
-
CPUコア数:16以上
-
RAM:64GB以上
-
SSDディスク容量とパーティショニング:
/(root)ボリューム:200GB以上/var/lib/wallarm-storageボリューム:2.5TB以上(ルートパーティションの一部でも可)
テスト(スタンドアロン)デプロイでは、上記構成のサーバー1台で十分です。
本番(クラスター)デプロイでは、同構成のサーバーを少なくとも3台必要とします。
上記の最小構成で、3ノードの本番クラスターは月間最大10億件のAPIリクエスト(RPM)を処理できます。
より高いキャパシティが必要な場合は、追加の50億RPMごとに各ノードへ以下を増設してスケールしてください。
-
CPUコア:+2
-
RAM:+2GB
-
追加ディスク容量:+100GB
データバックアップとディザスタリカバリ計画
Wallarm Cloudはデフォルトでは定期バックアップを実行しません。本番デプロイでは、データバックアップの構成を強く推奨します。
Wallarm Cloudデプロイをバックアップする方法は次のとおりです。
-
単発バックアップの場合、サーバーがVMWareなどの仮想化プラットフォームでプロビジョニングされていれば、サーバーを安全に停止し、そのプラットフォームが提供するツールでディスクスナップショット/バックアップを取得できます。
-
提供されているMinIOのインストール手順に従ってスタンドアロンのWallarm Data Backup Server(WDBS)をデプロイし、Wallarm Cloudインスタンスがバックアップサーバーに対して日次バックアップを実行するよう構成します。別案として、Amazon S3互換の任意のオブジェクトストレージを使用できます。
Wallarm CloudのデータがData Backup Serverに保存されると、バックアップは10回分で自動的にローテーションします(顧客側で変更可能です)。必要に応じて、企業のデータバックアップシステム(ディスクまたはテープベースのバックアップジュークボックスなど)を使用して、長期保管やオフサイト保管向けの追加バックアップを作成できます。
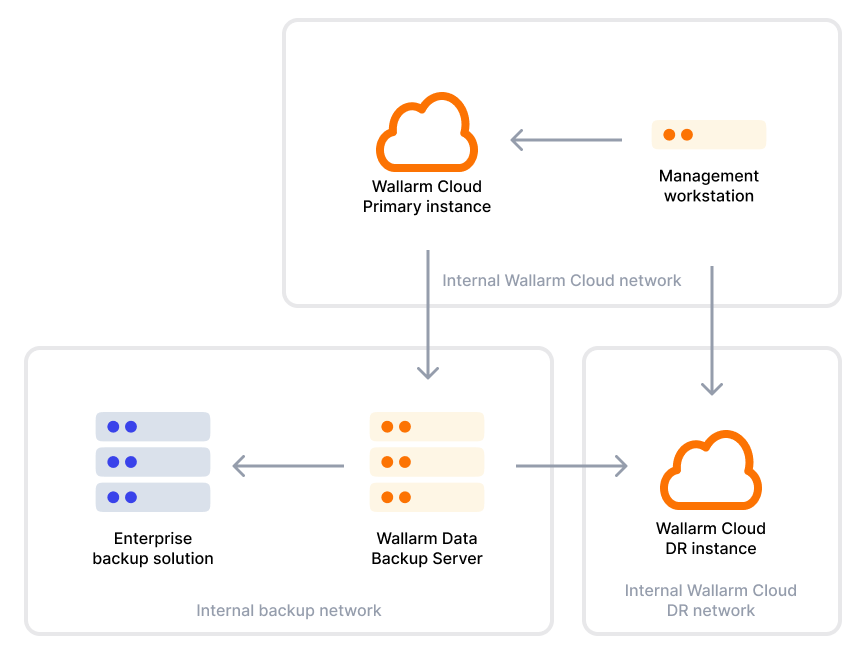
ディザスタリカバリ計画においては、以下のアーキテクチャを実装することをWallarmは推奨します。
-
プライマリのWallarm Cloudインスタンスと同じスタンドアロンまたはクラスターモードで、追加のWallarm Cloud Disaster Recoveryインスタンスをデプロイし、DRモードフラグを
trueに設定します。 -
DRモードでは、Wallarm Cloudインスタンスは、プライマリのWallarm Cloudインスタンスが日次で作成してWallarm Data Backup Serverに送信した最新のデータバックアップを自動的にインスタンス上へ復元します。
なお、プライマリのWallarm CloudインスタンスがDRのWallarm Cloudインスタンスへデータを直接送信することはありません。すべてのデータ転送はデータバックアップサーバー経由で行われます。
-
データはDRサイトへ定期的(少なくとも日次)に複製されますが、リアルタイム複製ではありません。
-
通常、DRサイトではブロックストレージシステムのみを稼働させ、データベースやWallarm Cloudのソフトウェアコンポーネントは稼働させません。そのため、追加の再構成手順なしにDRインスタンスがサービスを提供することはできません。
現在、Wallarm Cloudソフトウェアはプライマリサイト障害時のDRサイトへの自動フェイルオーバーをサポートしていません。以下は手動によるDRフェイルオーバー手順の高レベルな概要です。
-
プライマリのWallarm Cloudインスタンスが利用不可であることを確認し、必要に応じて関連サーバーインスタンスをシャットダウンします。
-
DRインスタンス上で、直近のバックアップ実行についてData Backup Serverからのデータバックアップのレプリケーションが正常完了していることを確認します。
-
wctl管理ツールを使用して、DRインスタンスをDRモードからプライマリモードへ切り替えます。この手順により、DRインスタンスの構成には次の変更が行われます。
- Data Backup ServerからDRインスタンスへのデータレプリケーション処理を停止します。
- 必要なデータストアおよびWallarmアプリケーションコンポーネントを起動し、最終的にDRインスタンスをプライマリモードへ移行します。
-
復旧したWallarm Cloudインスタンスを使用するよう、Wallarm Filtering Nodeを再構成します。次のいずれかの方法で実施できます。
- 該当するDNSレコードをすべて変更し、IPアドレスの参照先を旧(破棄された)Wallarm Cloudインスタンスから新たに復旧したインスタンスへ切り替えます。
- Filtering Nodeを再構成し、復旧したWallarm Cloudインスタンスに紐づくDNS名を使用させます。
綿密に計画され定期的に検証されたWallarm Cloudのディザスタリカバリ戦略により、次のRTOおよびRPOを達成できます。
-
RPO(目標復旧時点):25時間以下
-
RTO(目標復旧時間):1時間以下
セキュリティハードニング
Wallarm Cloudインスタンスの設計、デプロイ、管理に際しては、企業のセキュリティポリシーと実務に従うことを推奨します。
Wallarm Cloudインスタンスの安全性を維持するため、次の点に留意することを推奨します。
-
デプロイ済みのすべてのWallarm Cloudインスタンス(本番、ステージング、ディザスタリカバリ等)およびWallarmデータバックアップサーバーへのインターネットからの受信アクセスを無効化します。
-
関係するすべてのサーバーに対し、OSのセキュリティパッチを適時適用します。なお、OSパッチはWallarmではなくOSベンダー(RedHat、Ubuntu)から提供されます。
-
Wallarmが提供する新しいWallarm Cloudソフトウェアリリースを適時適用します。
-
既存の企業向けセキュリティ監視システム(エージェント)を用いて、関係するすべてのサーバーの不審な活動を監視します。
-
Wallarm Cloudサービスを企業のSIEMおよび通知エスカレーションサービスと連携させ、Wallarmソフトウェアが生成する重要なセキュリティイベントを迅速に収集・処理します。
-
WallarmノードサーバーおよびConsole UIへのアクセス権限の付与状況を管理し、定期的にレビューします。