Fastly向けWallarmコネクタ
Fastlyは、CDNサービス、リアルタイムアプリケーション配信、キャッシュ、エッジでカスタムロジックを実行するCompute@Edgeを提供する強力なエッジクラウドプラットフォームです。Wallarmコネクタを使用すると、Fastly上で稼働するAPIを保護できます。
WallarmをFastlyコネクタとして使用するには、Wallarm Nodeを外部にデプロイし、Wallarmが提供するバイナリを使用してFastlyのComputeサービスを実行し、トラフィックを解析のためにWallarm Nodeへルーティングする必要があります。
Fastlyコネクタは、インラインおよびアウトオブバンドのトラフィックフローの両方をサポートします。
ユースケース
このソリューションは、トラフィックをFastly経由で配信している場合に推奨されます。
制限事項
-
Helm chartを使用して
LoadBalancerタイプでWallarmサービスをデプロイする場合、Nodeインスタンスのドメインには信頼されたSSL/TLS証明書が必要です。自己署名証明書はまだサポートされていません。 -
Wallarmルールによるレート制限はサポートされません。
-
マルチテナンシーにはまだ対応していません。
前提条件
デプロイを進める前に、以下の要件を満たしていることを確認してください。
-
Fastlyのテクノロジーへの理解があること。
-
Fastly経由でAPIやトラフィックを配信していること。
デプロイ
1. Wallarm Nodeをデプロイする
Wallarm NodeはWallarmプラットフォームの中核コンポーネントで、受信トラフィックを検査し、悪意のあるアクティビティを検出し、脅威を緩和するように構成できます。
必要なコントロールの度合いに応じて、Wallarmがホストするか、ご自身のインフラストラクチャにデプロイできます。
コネクタ向けにWallarmホストのノードをデプロイするには、手順に従います。
セルフホストノードのデプロイ用アーティファクトを選択し、記載の手順に従います。
- ベアメタルまたはVM上のLinuxインフラ向けのAll-in-one installer
- コンテナ化デプロイを使用する環境向けのDocker image
- AWSインフラ向けのAWS AMI
- Kubernetesを利用するインフラ向けのHelm chart
2. FastlyにWallarmコードをデプロイする
FastlyからWallarm Nodeへトラフィックをルーティングするには、対応するWallarmロジックを組み込んだFastlyのComputeサービスをデプロイする必要があります。
-
Wallarm Console → Security Edge → Connectors → Download code bundleに進み、Wallarmパッケージをダウンロードします。
セルフホストノードを実行している場合は、パッケージを入手するためにsales@wallarm.comに連絡してください。
-
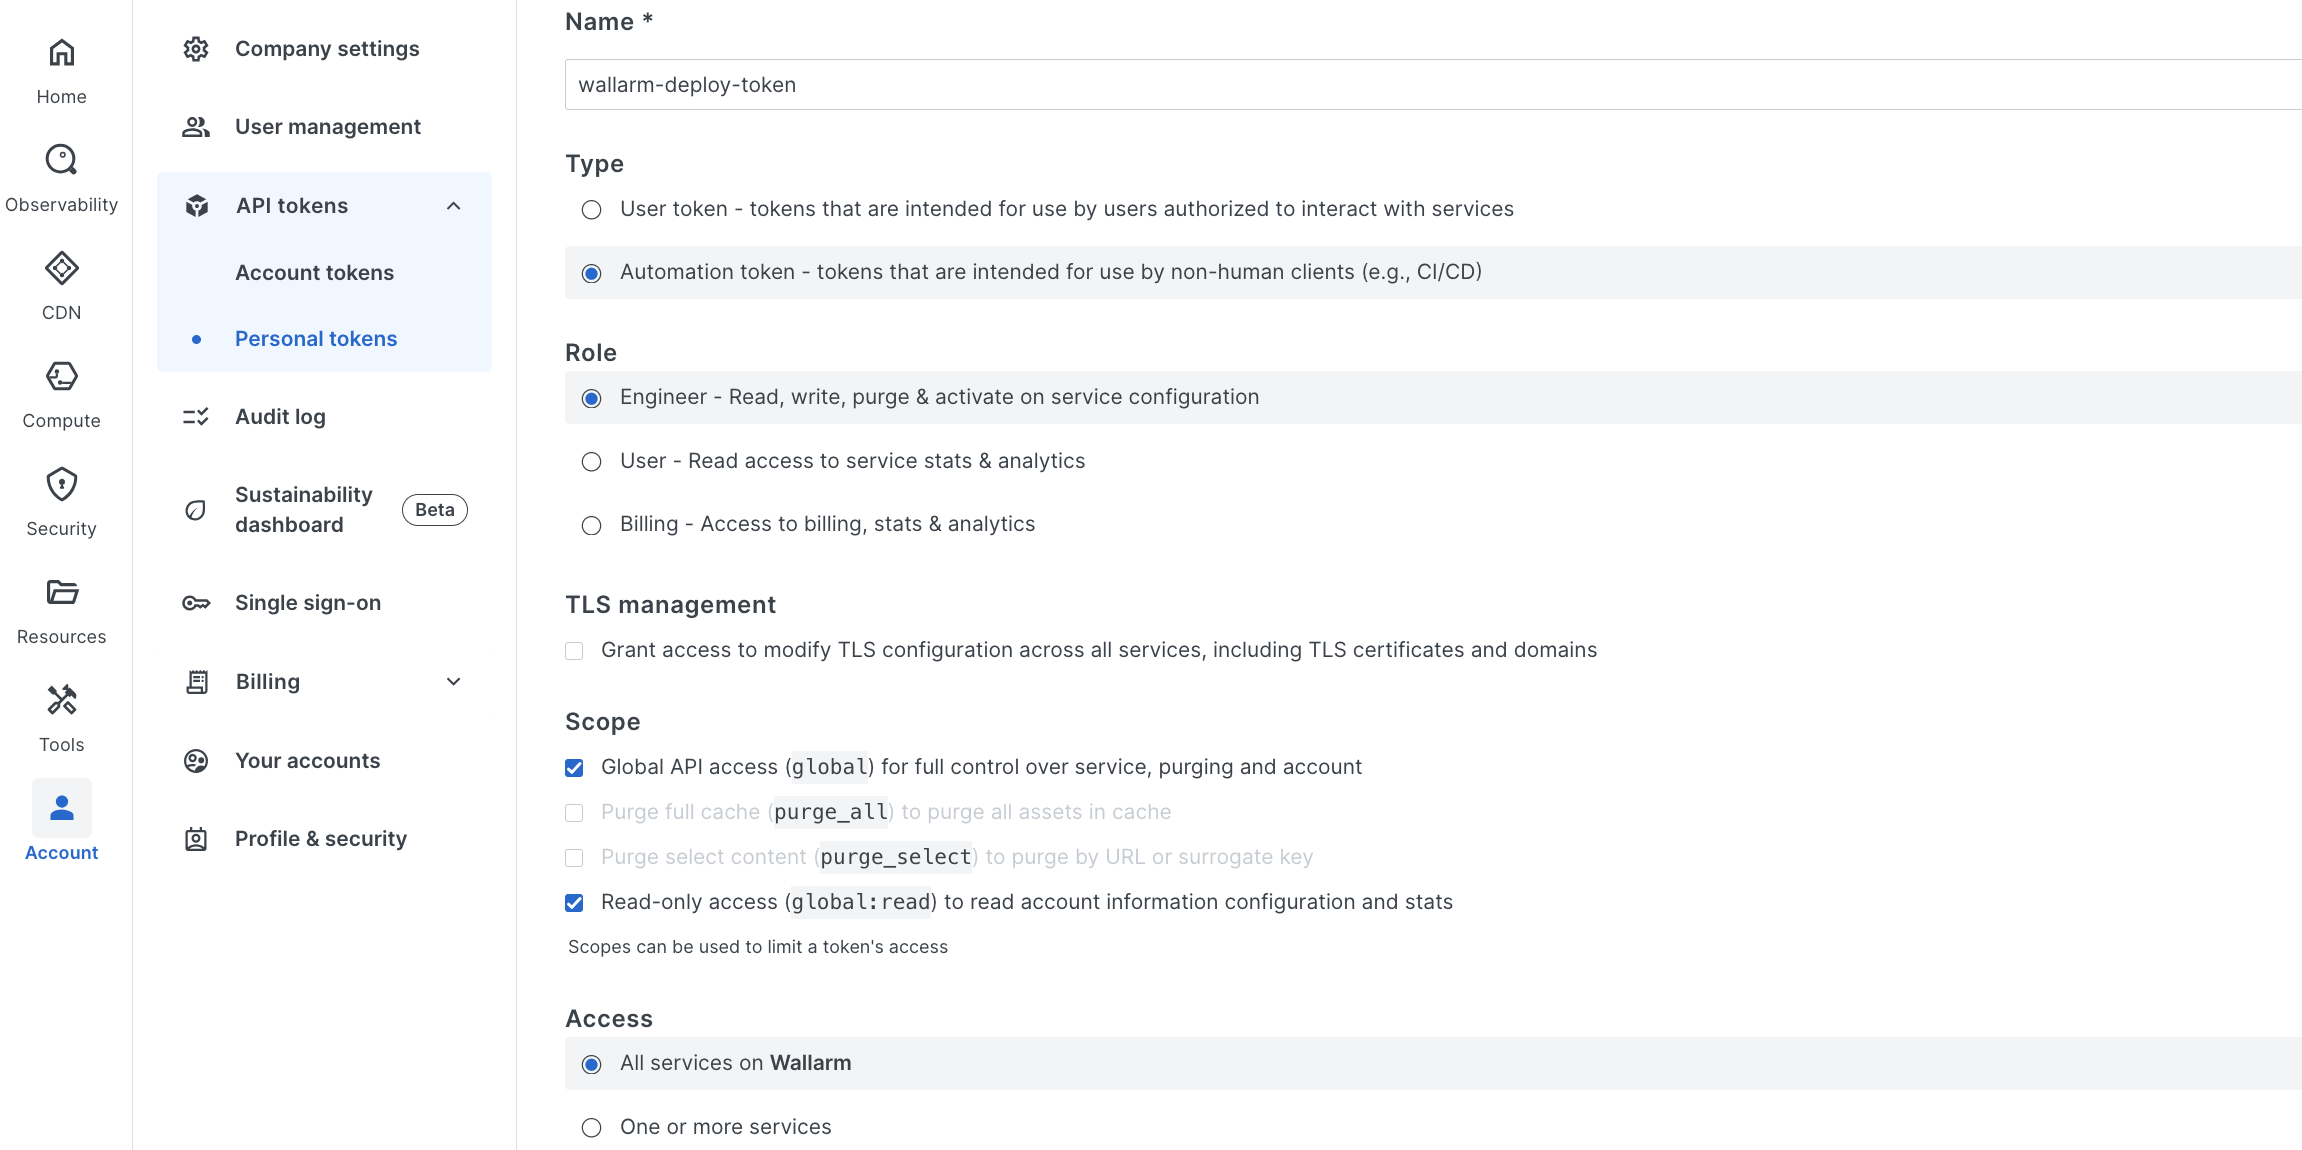
Fastly UI → Account → API tokens → Personal tokens → Create tokenに進みます。
- Type: Automation token
- Scope: Global API access
- 特別な変更が必要でない限り、他の設定はデフォルトのままにします
-
Fastly UI → Compute → Compute services → Create service → Use a local projectに進み、Wallarm用のインスタンスを作成します。
作成後、生成された
--service-idを控えます。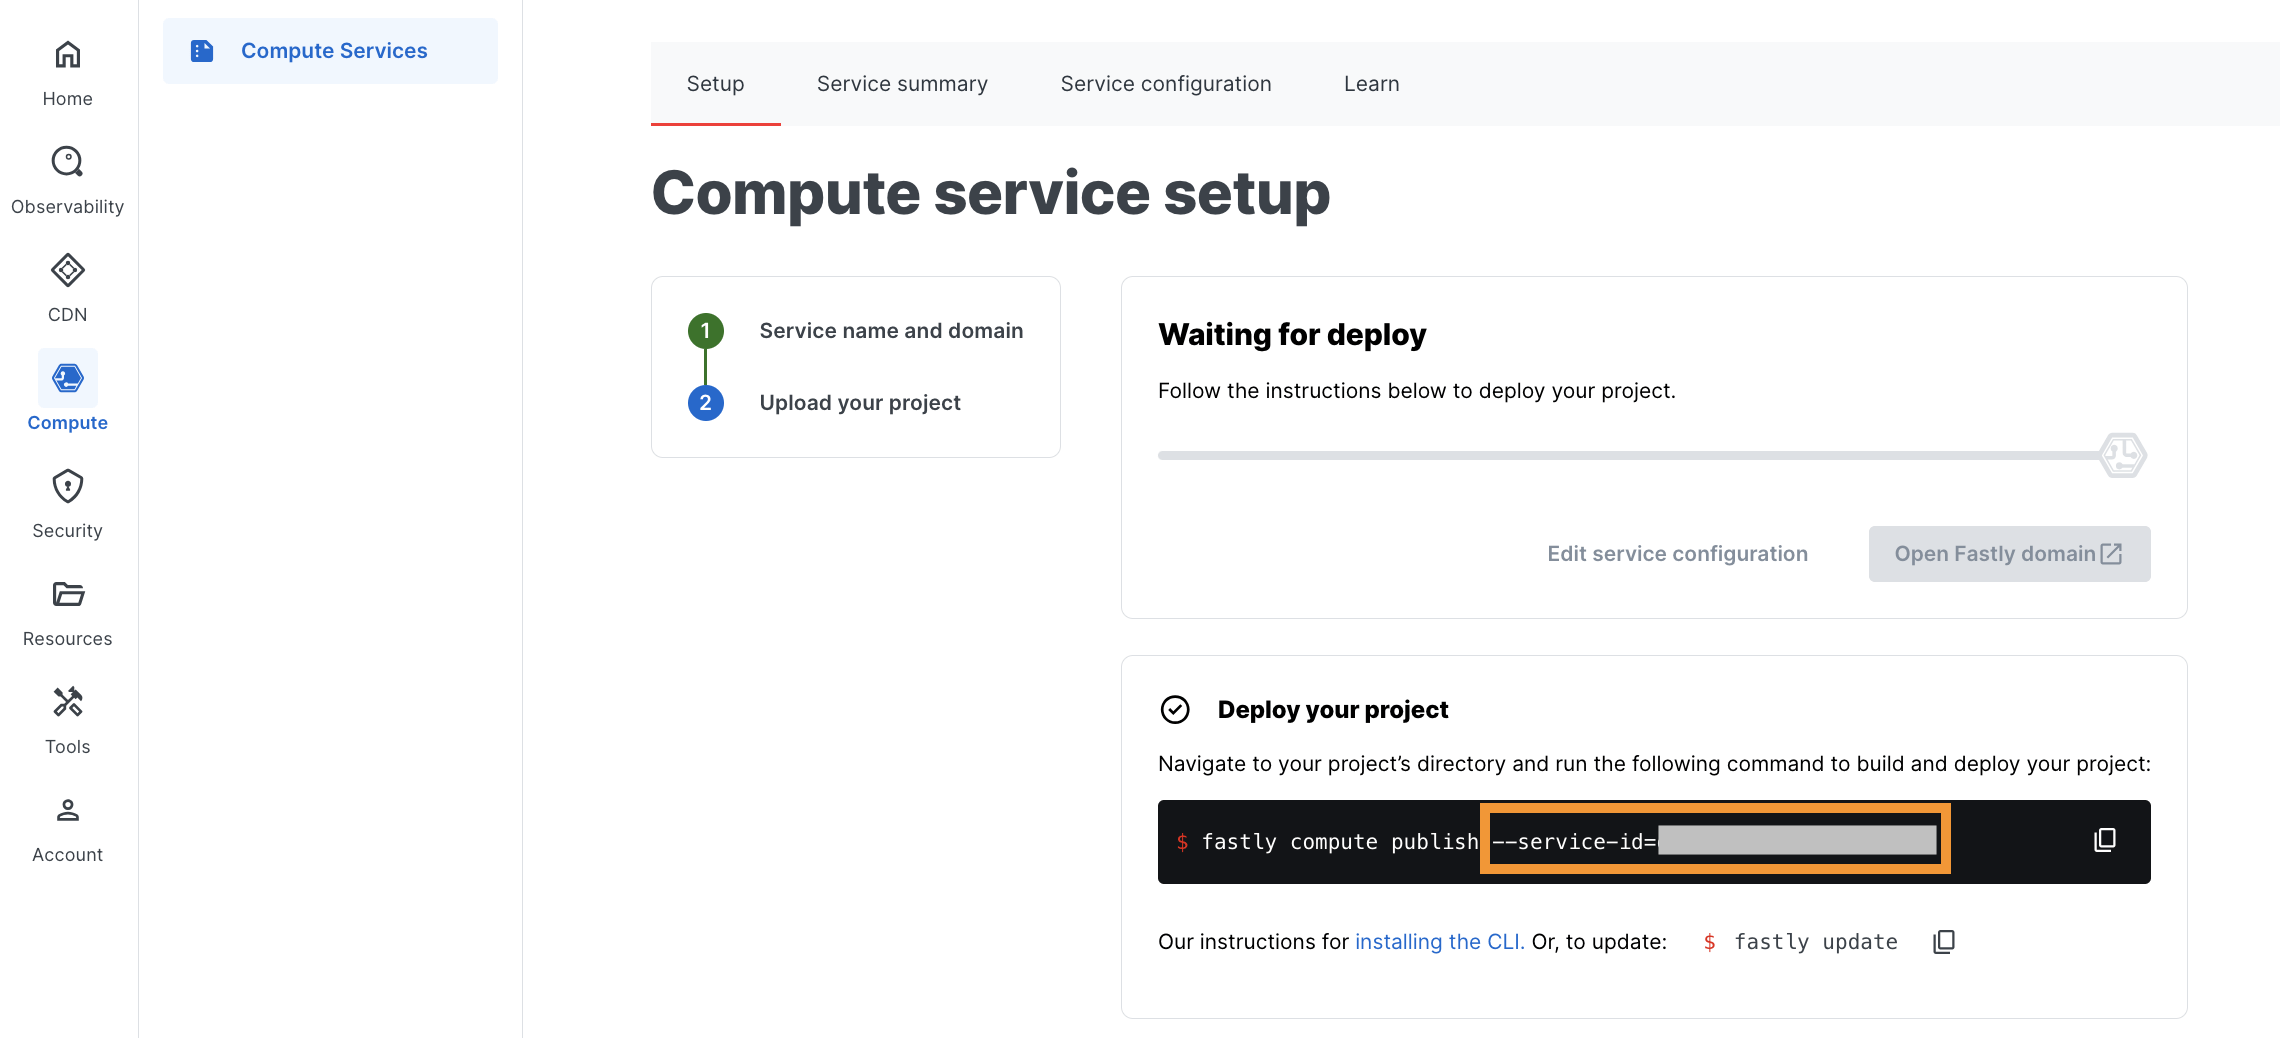
-
Wallarmパッケージを含むローカルディレクトリに移動し、デプロイします。
fastly compute deploy --service-id=<SERVICE_ID> --package=wallarm-api-security.tar.gz --token=<FASTLY_TOKEN>成功時のメッセージ:
3. Wallarm Nodeとバックエンドのホストを指定する
解析および転送のために適切にトラフィックをルーティングするには、Fastlyのサービス構成でWallarm Nodeとバックエンドの各ホストを定義する必要があります。
-
Fastly UI → Compute → Compute services → Wallarmサービス → Edit configurationに進みます。
-
Originsに移動し、Create hostsを選択します。
- 解析のためにトラフィックをWallarm Nodeへルーティングできるよう、
wallarm-nodeホストとしてWallarm NodeのURLを追加します。 - ノードからオリジンバックエンドへトラフィックを転送できるよう、別のホストとしてバックエンドのアドレス(例:
backend)を追加します。
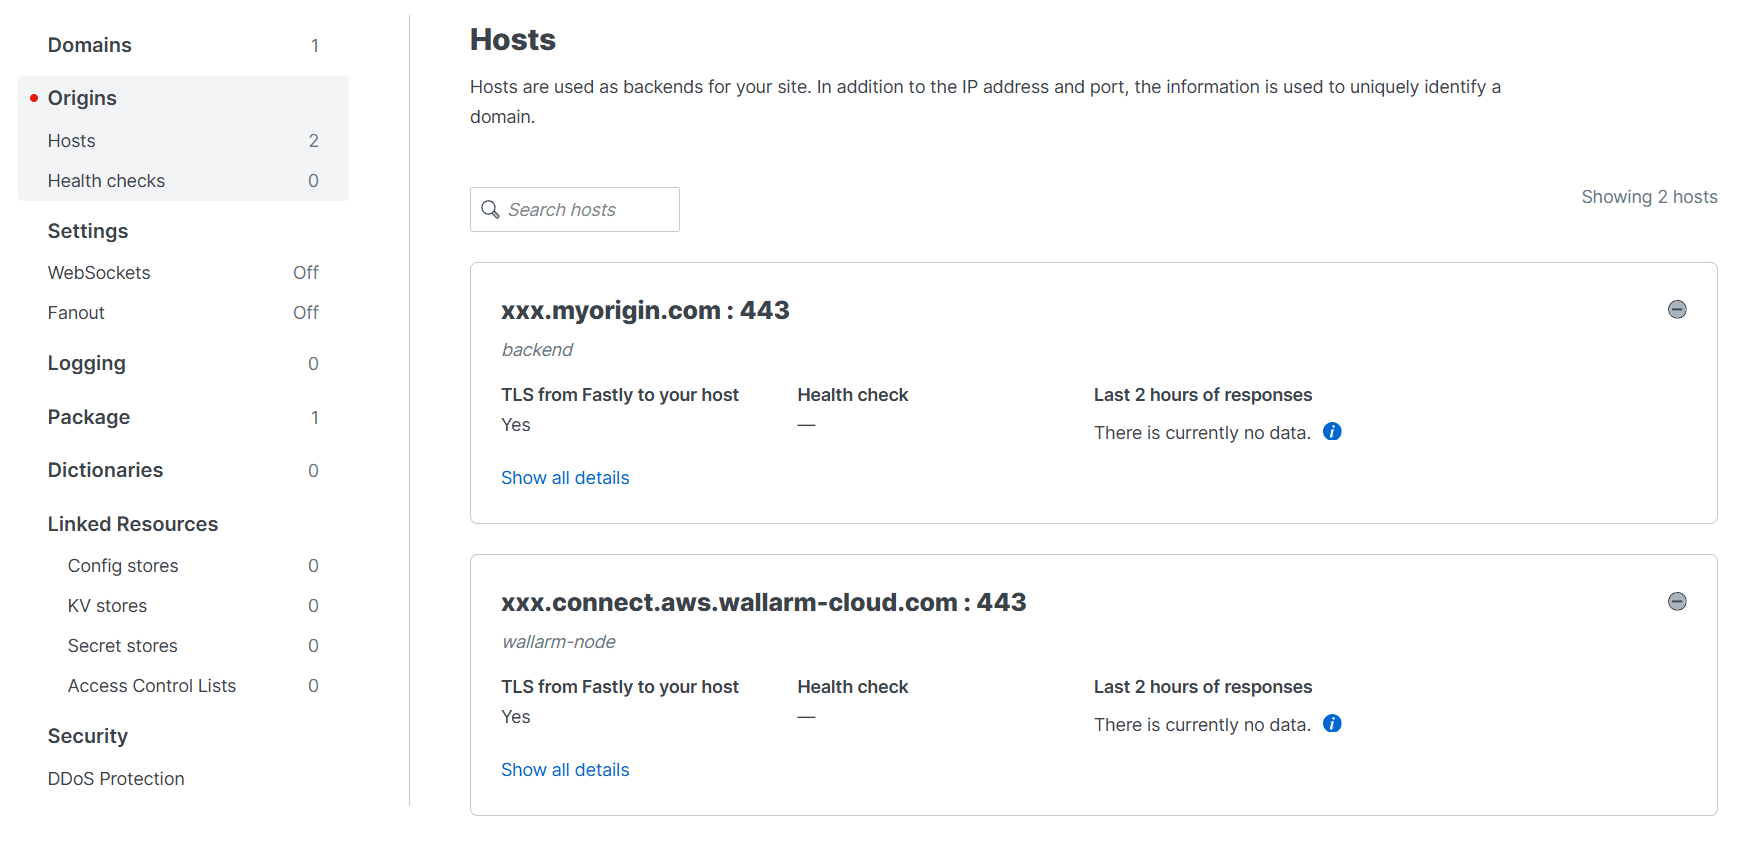
- 解析のためにトラフィックをWallarm Nodeへルーティングできるよう、
-
新しいサービスバージョンをActivateします。
4. Wallarmのconfig storeを作成する
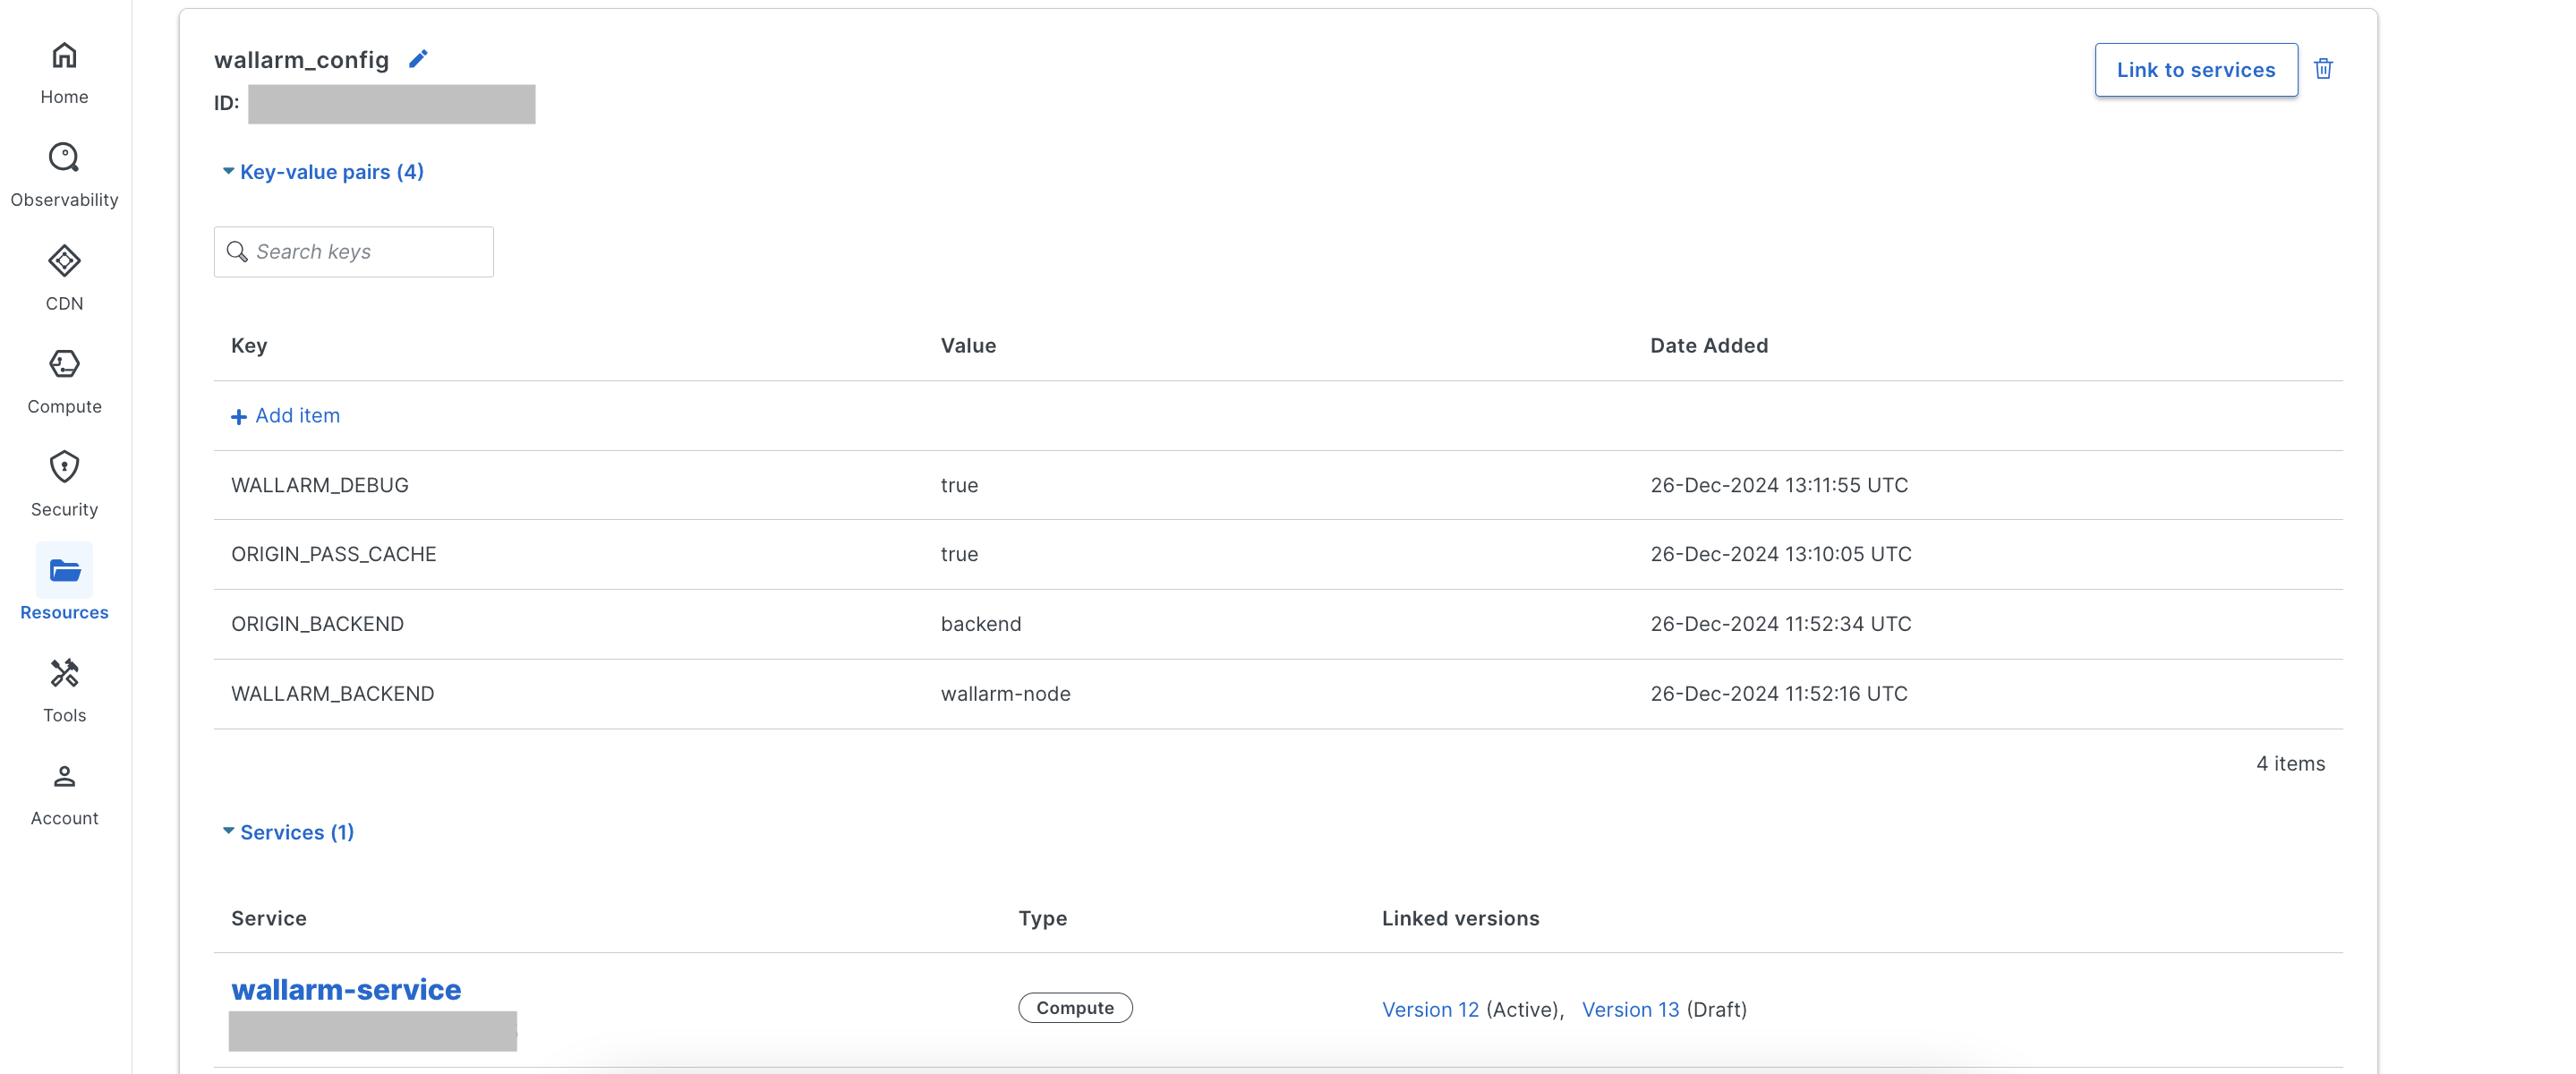
Wallarm固有の設定を定義するwallarm_configのconfigを作成します。
-
Fastly UI → Resources → Config stores → Create a config storeに進み、以下のキーと値の項目で
wallarm_configストアを作成します。パラメータ 説明 必須? WALLARM_BACKENDComputeサービス設定で指定したWallarm Nodeインスタンスのホスト名。 はい ORIGIN_BACKENDComputeサービス設定で指定したバックエンドのホスト名。 はい WALLARM_MODE_ASYNC元のフローに影響を与えずにトラフィックのコピーを解析する( true)か、インラインで解析する(false、デフォルト)かを切り替えます。いいえ -
作成したconfig storeをWallarmのComputeサービスにリンクします。
複数サービス向けのConfig store
Wallarm向けのComputeサービスを複数実行する場合は、次のいずれかを実施できます。
- 異なる構成のconfig storeを複数作成し、それぞれを対応するサービスにリンクします。
- 同じconfig store(例:
wallarm_config)を複数のサービスで共有します。なお、すべてのサービスは同一のオリジンバックエンド名を使用する必要がありますが、実際のバックエンド値は各サービスの設定でカスタマイズできます。
5.(オプション)カスタムブロックページを設定する
Wallarm Nodeがインラインモードで動作しブロックする場合、悪意のあるリクエストにはHTTP 403ステータスコードで応答します。応答をカスタマイズするには、FastlyのKV storeを使用してカスタムHTMLブロックページを設定できます。
-
Fastly UI → Resources → KV stores → Create a KV storeに進み、
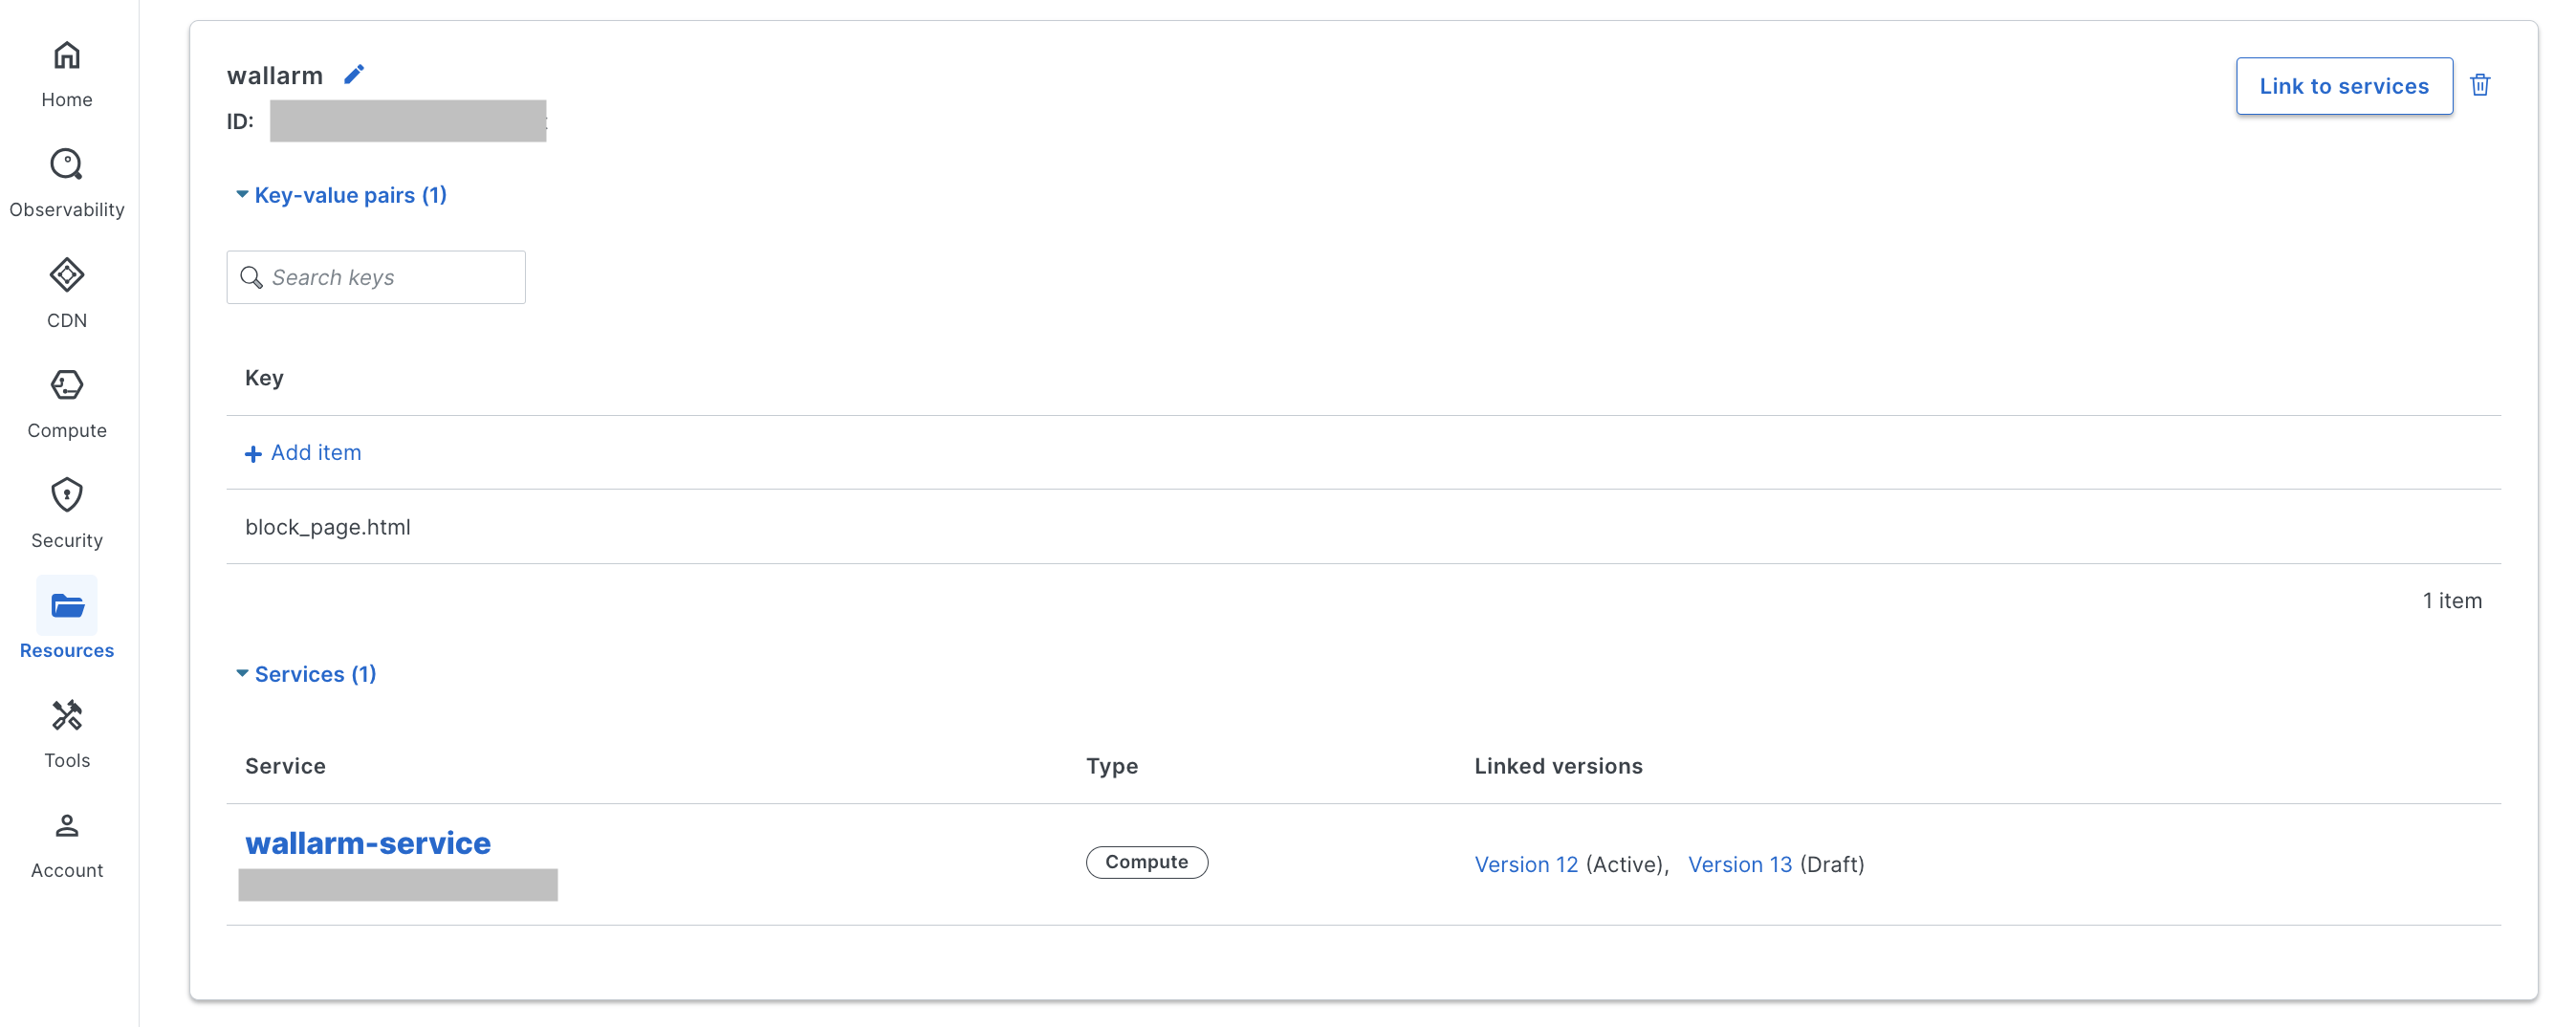
wallarmという名前のストアを作成します。 -
block_page.htmlというキーを追加し、カスタムHTMLブロックページをアップロードします。このページはブロックされたリクエストに返されます。 -
KV storeをWallarmのComputeサービスにリンクします。
カスタムブロックページ用のWallarmテンプレートを表示
開始点として、以下のWallarm提供テンプレートをカスタムブロックページに使用できます。必要に応じて調整し、ユーザーに表示したい情報やデザインに合わせてください。
<!DOCTYPE html>
<html lang="en">

<head>
    <meta charset="UTF-8">
    <meta name="viewport" content="width=device-width, initial-scale=1.0">
    <meta http-equiv="X-UA-Compatible" content="ie=edge">
    <title>You are blocked</title>
    <link href="https://fonts.googleapis.com/css?family=Poppins:700|Roboto|Roboto+Mono&display=swap" rel="stylesheet">
    <style>
        html {
            font-family: 'Roboto', sans-serif;
        }

        body {
            margin: 0;
            height: 100vh;
        }

        .content {
            display: flex;
            flex-direction: column;
            justify-content: space-between;
            align-items: center;
            min-height: 100%;
        }

        .logo {
            margin-top: 32px;
        }

        .message {
            display: flex;
            margin-bottom: 100px;
        }

        .alert {
            padding-top: 20px;
            width: 246px;
            text-align: center;
        }

        .alert-title {
            font-family: 'Poppins', sans-serif;
            font-weight: bold;
            font-size: 24px;
            line-height: 32px;
        }

        .alert-desc {
            font-size: 14px;
            line-height: 20px;
        }

        .info {
            margin-left: 76px;
            border-left: 1px solid rgba(149, 157, 172, 0.24);
            padding: 20px 0 20px 80px;
            width: 340px;
        }

        .info-title {
            font-weight: bold;
            font-size: 20px;
            line-height: 28px;
        }

        .info-text {
            margin-top: 8px;
            font-size: 14px;
            line-height: 20px;
        }

        .info-divider {
            margin-top: 16px;
        }

        .info-data {
            margin-top: 12px;
            border: 1px solid rgba(149, 157, 172, 0.24);
            border-radius: 4px;
            padding: 9px 12px;
            font-size: 14px;
            line-height: 20px;
            font-family: 'Roboto Mono', monospace;
        }

        .info-copy {
            margin-top: 12px;

            padding: 6px 12px;
            border: none;
            outline: none;
            background: rgba(149, 157, 172, 0.08);
            cursor: pointer;
            transition: 0.24s cubic-bezier(0.24, 0.1, 0.24, 1);
            border-radius: 4px;

            font-size: 14px;
            line-height: 20px;
        }

        .info-copy:hover {
            background-color: rgba(149, 157, 172, 0.24);
        }

        .info-copy:active {
            background-color: rgba(149, 157, 172, 0.08);
        }

        .info-mailto,
        .info-mailto:visited {
            color: #fc7303;
        }
    </style>
    <script>
        // サポート用メールアドレスをここに設定してください
        const SUPPORT_EMAIL = "";
    </script>
</head>

<body>
    <div class="content">
        <div id="logo" class="logo">
            <!--
                ここにロゴを配置してください。
                外部画像を使用できます:
                <img src="https://example.com/logo.png" width="160" alt="Company Name" />
                またはロゴのソースコード(SVGなど)をここに直接記述できます:
                <svg width="160" height="80"> ... </svg>
            -->
        </div>

        <div class="message">
            <div class="alert">
                <svg width="207" height="207" viewBox="0 0 207 207" fill="none" xmlns="http://www.w3.org/2000/svg">
                    <path
                        d="M88.7512 33.2924L15.6975 155.25C14.1913 157.858 13.3943 160.816 13.3859 163.828C13.3775 166.84 14.1579 169.801 15.6494 172.418C17.141 175.035 19.2918 177.216 21.8877 178.743C24.4837 180.271 27.4344 181.092 30.4462 181.125H176.554C179.566 181.092 182.516 180.271 185.112 178.743C187.708 177.216 189.859 175.035 191.351 172.418C192.842 169.801 193.623 166.84 193.614 163.828C193.606 160.816 192.809 157.858 191.303 155.25L118.249 33.2924C116.711 30.7576 114.546 28.6618 111.963 27.2074C109.379 25.7529 106.465 24.9888 103.5 24.9888C100.535 24.9888 97.6206 25.7529 95.0372 27.2074C92.4538 28.6618 90.2888 30.7576 88.7512 33.2924V33.2924Z"
                        stroke="#F24444" stroke-width="16" stroke-linecap="round" stroke-linejoin="round" />
                    <path d="M103.5 77.625V120.75" stroke="#F24444" stroke-width="16" stroke-linecap="round"
                        stroke-linejoin="round" />
                    <path d="M103.5 146.625V146.668" stroke="#F24444" stroke-width="16" stroke-linecap="round"
                        stroke-linejoin="round" />
                </svg>
                <div class="alert-title">Malicious activity blocked</div>
                <div class="alert-desc">Your request is blocked since it was identified as a malicious one.</div>
            </div>
            <div class="info">
                <div class="info-title">Why it happened</div>
                <div class="info-text">
                    You might have used symbols similar to a malicious code sequence, or uploaded a specific file.
                </div>

                <div class="info-divider"></div>

                <div class="info-title">What to do</div>
                <div class="info-text">
                    If your request is considered to be legitimate, please <a id="mailto" href="" class="info-mailto">contact us</a> and provide your last action description and the following data:
                </div>

                <div id="data" class="info-data">
                    IP ${remote_addr}<br />
                    Blocked on ${time_iso8601}<br />
                    UUID ${request_id}
                </div>

                <button id="copy-btn" class="info-copy">
                    Copy details
                </button>
            </div>
        </div>
        <div></div>
    </div>
    <script>
        // 注意: ES5コードのみ

        function writeText(str) {
            const range = document.createRange();

            function listener(e) {
                e.clipboardData.setData('text/plain', str);
                e.preventDefault();
            }

            range.selectNodeContents(document.body);
            document.getSelection().addRange(range);
            document.addEventListener('copy', listener);
            document.execCommand('copy');
            document.removeEventListener('copy', listener);
            document.getSelection().removeAllRanges();
        }

        function copy() {
            const text = document.querySelector('#data').innerText;

            if (navigator.clipboard && navigator.clipboard.writeText) {
                return navigator.clipboard.writeText(text);
            }

            return writeText(text);
        }

        document.querySelector('#copy-btn').addEventListener('click', copy);

        const mailto = document.getElementById('mailto');
        if (SUPPORT_EMAIL) mailto.href = `mailto:${wallarm_dollar}{SUPPORT_EMAIL}`;
        else mailto.replaceWith(mailto.textContent);
    </script>
</body>
テスト
デプロイ済みソリューションの機能をテストするには、次の手順に従います。
-
テスト用のパストラバーサル攻撃を含むリクエストをWallarmのComputeサービスのドメインへ送信します。
-
Wallarm Console → AttacksセクションをUS CloudまたはEU Cloudで開き、攻撃が一覧に表示されていることを確認します。

Wallarm Nodeのモードがブロックに設定され、トラフィックがインラインで流れている場合は、そのリクエストもブロックされます。
構成オプション
Wallarmのconfig storeでは、次のキーと値の項目を指定できます。
| パラメータ | 説明 | 必須? |
|---|---|---|
WALLARM_BACKEND | Computeサービス設定で指定したWallarm Nodeインスタンスのホスト名。 | はい |
ORIGIN_BACKEND | Computeサービス設定で指定したバックエンドのホスト名。 | はい |
WALLARM_MODE_ASYNC | 元のフローに影響を与えずにトラフィックのコピーを解析する(true)か、インラインで解析する(false、デフォルト)かを切り替えます。 | いいえ |
WALLARM_DEBUG | デバッグ情報をテーリングログに出力します(true)。無効にするにはfalse(デフォルト)。 | いいえ |
WALLARM_RESPONSE_BODY_SIZE_LIMIT | Nodeが解析できるレスポンスボディサイズの上限(バイト単位)。none(デフォルト)のような数値以外の値は無制限を意味します。 | いいえ |
ORIGIN_PASS_CACHE | オリジンバックエンドへ送信されるリクエストをFastlyのキャッシュレイヤーを経由せずに透過的に通過させます(true)。デフォルトではFastlyのキャッシュレイヤーを使用します(false)。 | いいえ |
ORIGIN_PRESERVE_HOST | オリジンバックエンドのホスト名でX-Forwarded-Hostヘッダーに置き換える代わりに、クライアントリクエストの元のHostヘッダーを保持します。元のHostに依存してルーティングやログ記録を行うバックエンドに有用です。デフォルト: false。 | いいえ |
LOGGING_ENDPOINT | コネクタのlogging endpointを設定します。デフォルトはテーリングログ(stderr)。 | いいえ |
Fastly上のWallarm Computeサービスをアップグレードする
デプロイ済みのFastly Computeサービスを新しいバージョンへアップグレードするには:
-
Wallarm Console → Security Edge → Connectors → Download code bundleに進み、更新されたコードバンドルをダウンロードします。
セルフホストノードを実行している場合は、更新されたコードバンドルを入手するためにsales@wallarm.comに連絡してください。
-
更新された
wallarm-api-security.tar.gzのWallarmパッケージアーカイブを含むディレクトリへ移動し、次を実行します。fastly compute deploy --service-id=<SERVICE_ID> --package=wallarm-api-security.tar.gz --token=<FASTLY_TOKEN><SERVICE_ID>は、デプロイ済みのWallarmサービスのIDです。<FASTLY_TOKEN>は、デプロイに使用するFastlyのAPIトークンです。
-
Fastly UIで新しいサービスバージョンをActivateします。
Computeサービスのアップグレードでは、特にメジャーバージョン更新時にWallarm Nodeのアップグレードが必要になる場合があります。セルフホストNodeのリリースノートとアップグレード手順はNative Nodeの変更履歴を参照するか、Edgeコネクタのアップグレード手順を参照してください。非推奨を避け、将来のアップグレードを容易にするために、Nodeを定期的に更新することを推奨します。