Wallarmサービス統合版NGINX Ingress Controllerのデプロイ
本手順では、WallarmのNGINXベースIngress controllerをK8sクラスターにデプロイする手順を説明します。ソリューションはWallarmのHelmチャートからデプロイします。
本ソリューションは、Wallarmサービスを統合したCommunity Ingress NGINX Controller上に構築されています。最新バージョンはCommunity Ingress NGINX Controller 1.11.5およびNGINX stable 1.25.5を使用します。
Warning
The Kubernetes community will retire the Community Ingress NGINX in March 2026. The Wallarm NGINX Ingress Controller based on this project will be supported through the same date. You can continue using it until then, and it will remain fully functional during the support window.
Wallarm will provide alternative deployment options and migration guidance as they become available. Details
An Envoy/Istio-based connector is also available today for environments already using Envoy.
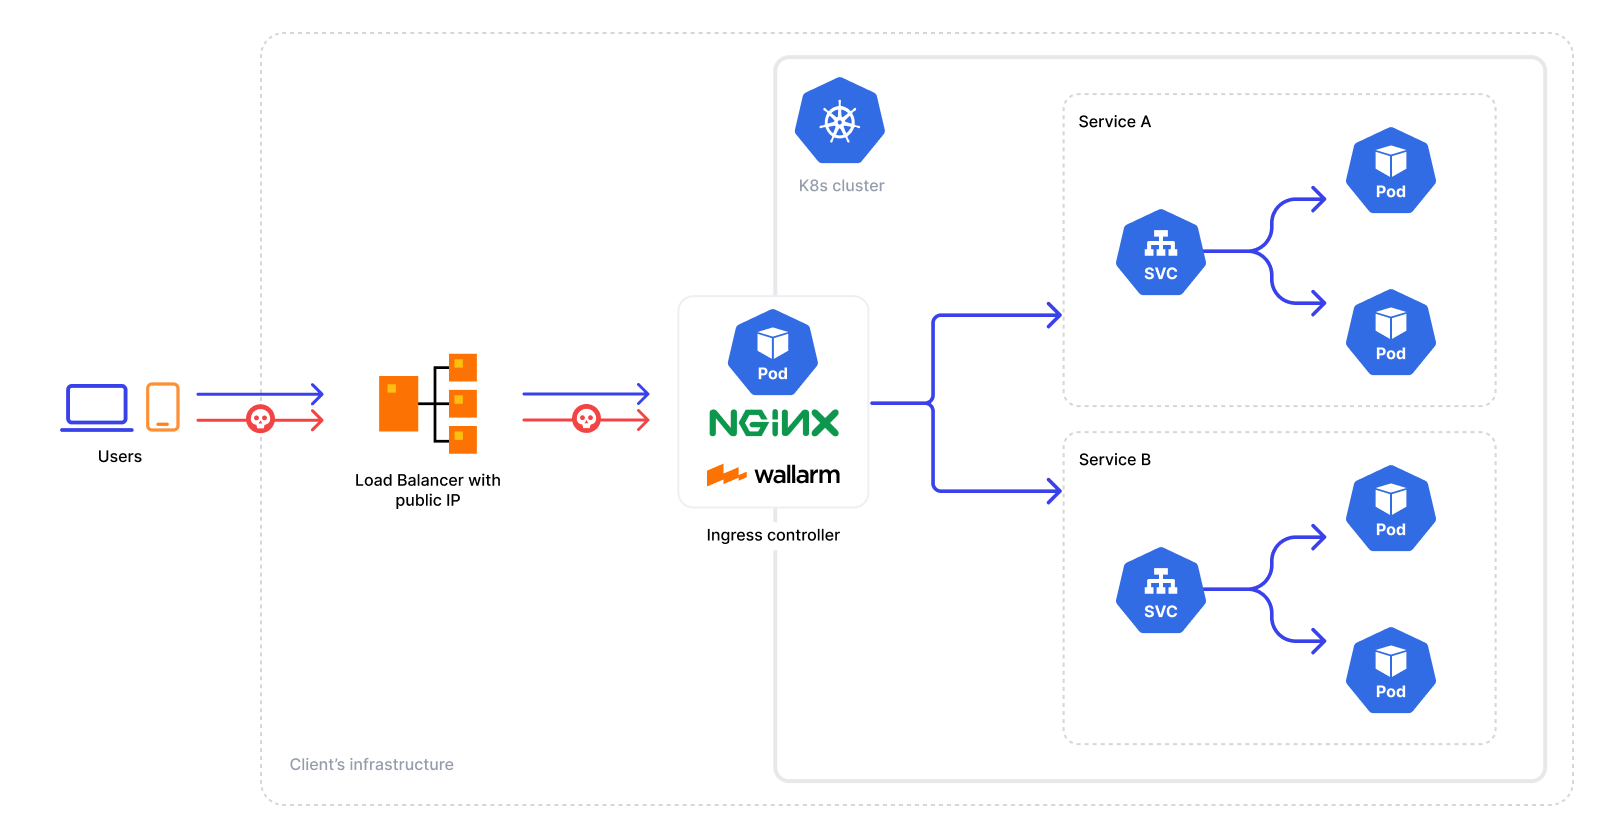
アーキテクチャは次のとおりです:
ユースケース
サポートされるWallarmのデプロイオプションの中でも、本ソリューションは以下のユースケースに推奨されます:
-
Ingress controllerが存在せず、Community Ingress NGINX Controllerと互換性のあるIngressリソースへトラフィックをルーティングするセキュリティレイヤーもない場合。
-
現在Community Ingress NGINX Controllerを使用しており、標準のコントローラー機能に加えて強化されたセキュリティ機能を提供するセキュリティソリューションを探している場合。この場合は、本手順で説明しているWallarm-NGINX Ingress Controllerへ容易に切り替えできます。既存の構成を新しいデプロイに移行するだけで置き換えが完了します。
既存のIngress controllerとWallarm controllerを同時に使用するには、Ingress Controllerのチェイニングガイドの設定情報を参照してください。
要件
-
Kubernetes platform version 1.31-1.35
-
Helm package manager
-
Compatibility of your services with the Community Ingress NGINX Controller version 1.15.0
-
Access to the account with the Administrator role in Wallarm Console for the US Cloud or EU Cloud
-
Access to
https://us1.api.wallarm.comfor working with US Wallarm Cloud or tohttps://api.wallarm.comfor working with EU Wallarm Cloud -
Access to
https://charts.wallarm.comto add the Wallarm Helm charts. Ensure the access is not blocked by a firewall -
Access to the Wallarm repositories on Docker Hub
https://hub.docker.com/r/wallarm. Make sure the access is not blocked by a firewall -
Access to the IP addresses and their corresponding hostnames (if any) listed below. This is needed for downloading updates to attack detection rules and API specifications, as well as retrieving precise IPs for your allowlisted, denylisted, or graylisted countries, regions, or data centers
関連情報
既知の制限
-
postanalyticsモジュールなしでの稼働はサポートしていません。
-
postanalyticsモジュールをスケールダウンすると、攻撃データの一部が失われる可能性があります。
インストール
-
インストール: Wallarm Ingress controllerをインストールします。
-
有効化: Ingressのトラフィック解析を有効化します。
-
確認: Wallarm Ingress controllerの動作を確認します。
手順1: Wallarm Ingress Controllerのインストール
Wallarm Ingress Controllerをインストールするには:
-
適切な種類のフィルタリングノードトークンを生成します:
-
Wallarm Ingress controllerのHelmチャートをデプロイするためのKubernetesのNamespaceを作成します:
-
Wallarmのチャートリポジトリを追加します:
-
Wallarmの設定を含む
values.yamlファイルを作成します。最小構成の例は以下のとおりです。API tokenを使用する場合は、
nodeGroupパラメーターにノードグループ名を指定します。ノードはWallarm ConsoleのNodesセクションに表示されるこのグループに割り当てられます。既定のグループ名はdefaultIngressGroupです。WallarmノードトークンをKubernetesのSecretに保存し、Helmチャートで参照することもできます。詳細はこちら
独自のレジストリからのデプロイ
values.yamlの要素を上書きし、独自のレジストリに保存されたイメージからWallarm Ingress controllerをインストールできます。 -
Wallarmパッケージをインストールします:
helm install --version 6.4.0 <RELEASE_NAME> wallarm/wallarm-ingress -n <KUBERNETES_NAMESPACE> -f <PATH_TO_VALUES><RELEASE_NAME>はIngress controllerチャートのHelmリリース名です<KUBERNETES_NAMESPACE>はWallarm Ingress controllerのHelmチャート用に作成したKubernetesのNamespaceです<PATH_TO_VALUES>はvalues.yamlファイルへのパスです
手順2: Ingressのトラフィック解析を有効化する
kubectl annotate ingress <YOUR_INGRESS_NAME> -n <YOUR_INGRESS_NAMESPACE> nginx.ingress.kubernetes.io/wallarm-mode=monitoring
kubectl annotate ingress <YOUR_INGRESS_NAME> -n <YOUR_INGRESS_NAMESPACE> nginx.ingress.kubernetes.io/wallarm-application="<APPLICATION_ID>"
-
<YOUR_INGRESS_NAME>は対象のIngress名です -
<YOUR_INGRESS_NAMESPACE>は対象のIngressのNamespaceです -
<APPLICATION_ID>は各アプリケーションまたはアプリケーショングループに固有の正の数値です。これにより、個別の統計を取得し、対応するアプリケーションを狙った攻撃を区別できます
手順3: Wallarm Ingress Controllerの動作確認
-
Podの一覧を取得します:
WallarmのPodのステータスはSTATUS: Running、かつREADY: N/Nである必要があります:
-
Ingress ControllerのServiceにテスト用のパストラバーサル攻撃リクエストを送信します:
フィルタリングノードが
blockモードで動作している場合、レスポンスは403 Forbiddenとなり、攻撃はWallarm Console → Attacksに表示されます。
ARM64デプロイ
NGINX Ingress controllerのHelmチャートバージョン4.8.2から、ARM64プロセッサに対応しています。初期設定はx86アーキテクチャ向けのため、ARM64ノードにデプロイする場合はHelmチャートのパラメーターを調整します。
ARM64環境では、Kubernetesノードにarm64ラベルが付与されていることがよくあります。KubernetesスケジューラーがWallarmのワークロードを適切なノードタイプに割り当てられるよう、WallarmのHelmチャート設定でnodeSelector、tolerations、またはaffinityルールを使用してこのラベルを参照します。
以下はGoogle Kubernetes Engine(GKE)向けのWallarm Helmチャート例で、対象ノードにkubernetes.io/arch: arm64ラベルを利用します。他のクラウド環境でも、それぞれのARM64ラベリング規約に合わせて調整できます。
controller:
  nodeSelector:
    kubernetes.io/arch: arm64
  admissionWebhooks:
    nodeSelector:
      kubernetes.io/arch: arm64
    patch:
      nodeSelector:
        kubernetes.io/arch: arm64
  wallarm:
    postanalytics:
      nodeSelector:
        kubernetes.io/arch: arm64
    enabled: true
    token: "<NODE_TOKEN>"
    apiHost: "us1.api.wallarm.com" # EU Cloudを使用する場合は、この行をコメントアウトしてください
    # API tokenを使用する場合は、次の行のコメントを外し、ノードグループ名を指定してください
    # nodeGroup: defaultIngressGroup
controller:
  tolerations:
    - key: kubernetes.io/arch
      operator: Equal
      value: arm64
      effect: NoSchedule
  admissionWebhooks:
    patch:
      tolerations:
        - key: kubernetes.io/arch
          operator: Equal
          value: arm64
          effect: NoSchedule
  wallarm:
    postanalytics:
      tolerations:
        - key: kubernetes.io/arch
          operator: Equal
          value: arm64
          effect: NoSchedule
    enabled: true
    token: "<NODE_TOKEN>"
    apiHost: "us1.api.wallarm.com" # EU Cloudを使用する場合は、この行をコメントアウトしてください
    # API tokenを使用する場合は、次の行のコメントを外し、ノードグループ名を指定してください
    # nodeGroup: defaultIngressGroup
独自のレジストリからのデプロイ
たとえば貴社のセキュリティポリシーで外部リソースの使用が制限されているなどの理由により、WallarmのパブリックリポジトリからDockerイメージをpullできない場合は、代わりに次を実施できます:
-
それらのイメージをプライベートレジストリへ複製します。
-
それらを使用してWallarmのNGINXベースIngress controllerをインストールします。
NGINXベースIngress Controllerのデプロイで、Helmチャートは以下のDockerイメージを使用します:
レジストリに保存したイメージを使用してWallarmのNGINXベースIngress controllerをインストールするには、Wallarm Ingress controllerのHelmチャートのvalues.yamlを上書きします:
controller:
  image:
    ## Wallarm NGINX Ingress Controller用のイメージとタグ
    ##
    registry: <YOUR_REGISTRY>
    image: wallarm/ingress-controller
    tag: <IMAGE_TAG>
  wallarm:
    helpers:
      ## ヘルパー用イメージとタグ
      ##
      image: <YOUR_REGISTRY>/wallarm/node-helpers
      tag: <IMAGE_TAG>
その後、変更したvalues.yamlを使用してインストールを実行します。
OpenShiftにおけるSecurity Context Constraints(SCC)
OpenShiftにNGINX Ingress Controllerをデプロイする際は、プラットフォームのセキュリティ要件に適合するカスタムSecurity Context Constraint(SCC)を定義する必要があります。既定の制約ではWallarmの要件を満たさず、エラーになる可能性があります。
以下はWallarm NGINX Ingress Controller向けの推奨カスタムSCCです。
コントローラーをデプロイする前にSCCを適用してください
Wallarm NGINX Ingress controllerをデプロイする前に、必ずSCCを適用してください。
-
wallarm-scc.yamlファイルに以下のとおりカスタムSCCを定義します:--- allowHostDirVolumePlugin: false allowHostIPC: false allowHostNetwork: false allowHostPID: false allowHostPorts: false allowPrivilegeEscalation: false allowPrivilegedContainer: false allowedCapabilities: - NET_BIND_SERVICE apiVersion: security.openshift.io/v1 defaultAddCapabilities: null fsGroup: type: MustRunAs groups: [] kind: SecurityContextConstraints metadata: annotations: kubernetes.io/description: wallarm-ingress-admission provides features similar to restricted-v2 SCC but pins user id to 65532 and is more restrictive for volumes name: wallarm-ingress-admission priority: null readOnlyRootFilesystem: false requiredDropCapabilities: - ALL runAsUser: type: MustRunAs uid: 65532 seLinuxContext: type: MustRunAs seccompProfiles: - runtime/default supplementalGroups: type: RunAsAny users: [] volumes: - projected --- allowHostDirVolumePlugin: false allowHostIPC: false allowHostNetwork: false allowHostPID: false allowHostPorts: false allowPrivilegeEscalation: false allowPrivilegedContainer: false allowedCapabilities: - NET_BIND_SERVICE apiVersion: security.openshift.io/v1 defaultAddCapabilities: null fsGroup: type: MustRunAs groups: [] kind: SecurityContextConstraints metadata: annotations: kubernetes.io/description: wallarm-ingress-controller provides features similar to restricted-v2 SCC but pins user id to 101 and is a little more restrictive for volumes name: wallarm-ingress-controller priority: null readOnlyRootFilesystem: false requiredDropCapabilities: - ALL runAsUser: type: MustRunAs uid: 101 seLinuxContext: type: MustRunAs seccompProfiles: - runtime/default supplementalGroups: type: RunAsAny users: [] volumes: - configMap - secret - emptyDir -
このポリシーをクラスターに適用します:
-
NGINX Ingress controllerをデプロイするKubernetesのNamespaceを作成します(例):
-
Wallarm Ingress controllerのワークロードにこのSCCポリシーの使用を許可します:
oc adm policy add-scc-to-user wallarm-ingress-admission \ -z <RELEASE_NAME>-wallarm-ingress-admission -n wallarm-ingress oc adm policy add-scc-to-user wallarm-ingress-controller \ -z <RELEASE_NAME>-wallarm-ingress -n wallarm-ingress oc adm policy add-scc-to-user wallarm-ingress-controller \ -z default -n wallarm-ingress<RELEASE_NAME>:helm installで使用するHelmリリース名-n wallarm-ingress: NGINX Ingress controllerをデプロイするNamespace(上で作成)
例: Namespaceが
wallarm-ingress、Helmリリース名がwlrm-ingressの場合:oc adm policy add-scc-to-user wallarm-ingress-admission \ -z wlrm-ingress-wallarm-ingress-admission -n wallarm-ingress oc adm policy add-scc-to-user wallarm-ingress-controller \ -z wlrm-ingress-wallarm-ingress -n wallarm-ingress oc adm policy add-scc-to-user wallarm-ingress-controller \ -z default -n wallarm-ingress -
上記と同じNamespaceとHelmリリース名を指定してWallarm NGINX Ingress controllerをデプロイします。
-
WallarmのPodに正しいSCCが適用されていることを確認します:
WALLARM_INGRESS_NAMESPACE="<WALLARM_INGRESS_NAMESPACE>"
POD=$(kubectl -n ${WALLARM_INGRESS_NAMESPACE} get pods -o name -l "app.kubernetes.io/component=controller" | cut -d '/' -f 2)
kubectl -n ${WALLARM_INGRESS_NAMESPACE} get pod ${POD} -o jsonpath='{.metadata.annotations.openshift\.io\/scc}{"\n"}'

WALLARM_INGRESS_NAMESPACE="<WALLARM_INGRESS_NAMESPACE>"
POD=$(kubectl -n ${WALLARM_INGRESS_NAMESPACE} get pods -o name -l "app.kubernetes.io/component=controller-wallarm-wstore" | cut -d '/' -f 2)
kubectl -n ${WALLARM_INGRESS_NAMESPACE} get pod ${POD} -o jsonpath='{.metadata.annotations.openshift\.io\/scc}{"\n"}'
期待される出力は
wallarm-ingress-controllerです。
設定
Wallarm Ingress controllerのインストールと確認が完了したら、次のような高度な設定を行うことができます:
高度な設定で使用するパラメーターと手順は、こちらをご確認ください。