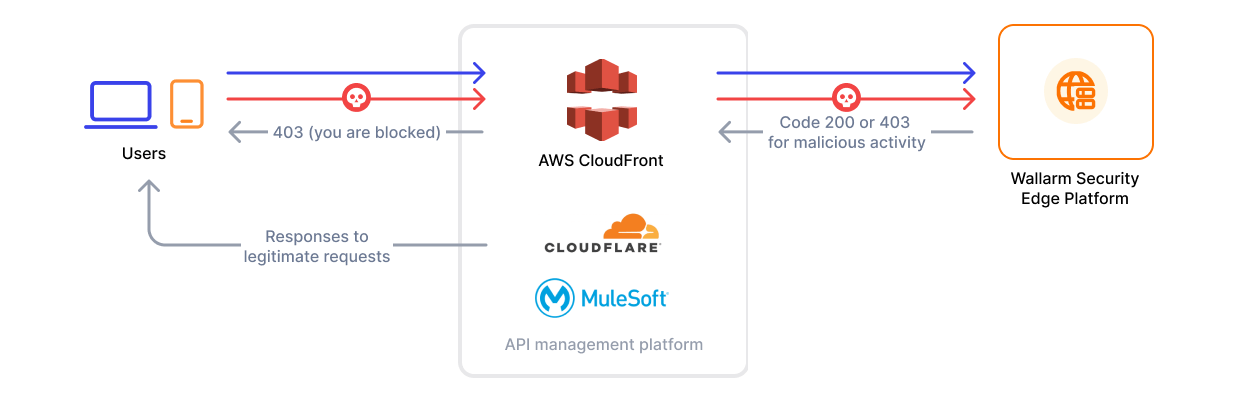
# Security Edge Connectors  The [**Security Edge**](https://docs.wallarm.com/installation/security-edge/overview.md) platform provides a managed service for deploying Wallarm Nodes across geographically distributed locations within a Wallarm-hosted environment. One of its key deployment options is the [**connector**](https://docs.wallarm.com/installation/connectors/overview.md) Node deployment, offering robust protection for your entire API landscape without the need for any onsite installation.
!!! info "Supported platforms"
Currently, Edge connectors are available for MuleSoft Mule Gateway, MuleSoft Flex Gateway, Apigee, Akamai, CloudFront, Cloudflare, Fastly, IBM DataPower and Azure API Management.
## Requirements
* [Security Edge subscription](https://docs.wallarm.com/about-wallarm/subscription-plans.md) (free or paid)
* API running on one of the following API management platforms:
* MuleSoft Mule Gateway
* MuleSoft Flex Gateway
* Apigee
* Akamai
* CloudFront
* Cloudflare
* Fastly
* IBM DataPower
* Azure API Management
## Running Security Edge Connectors
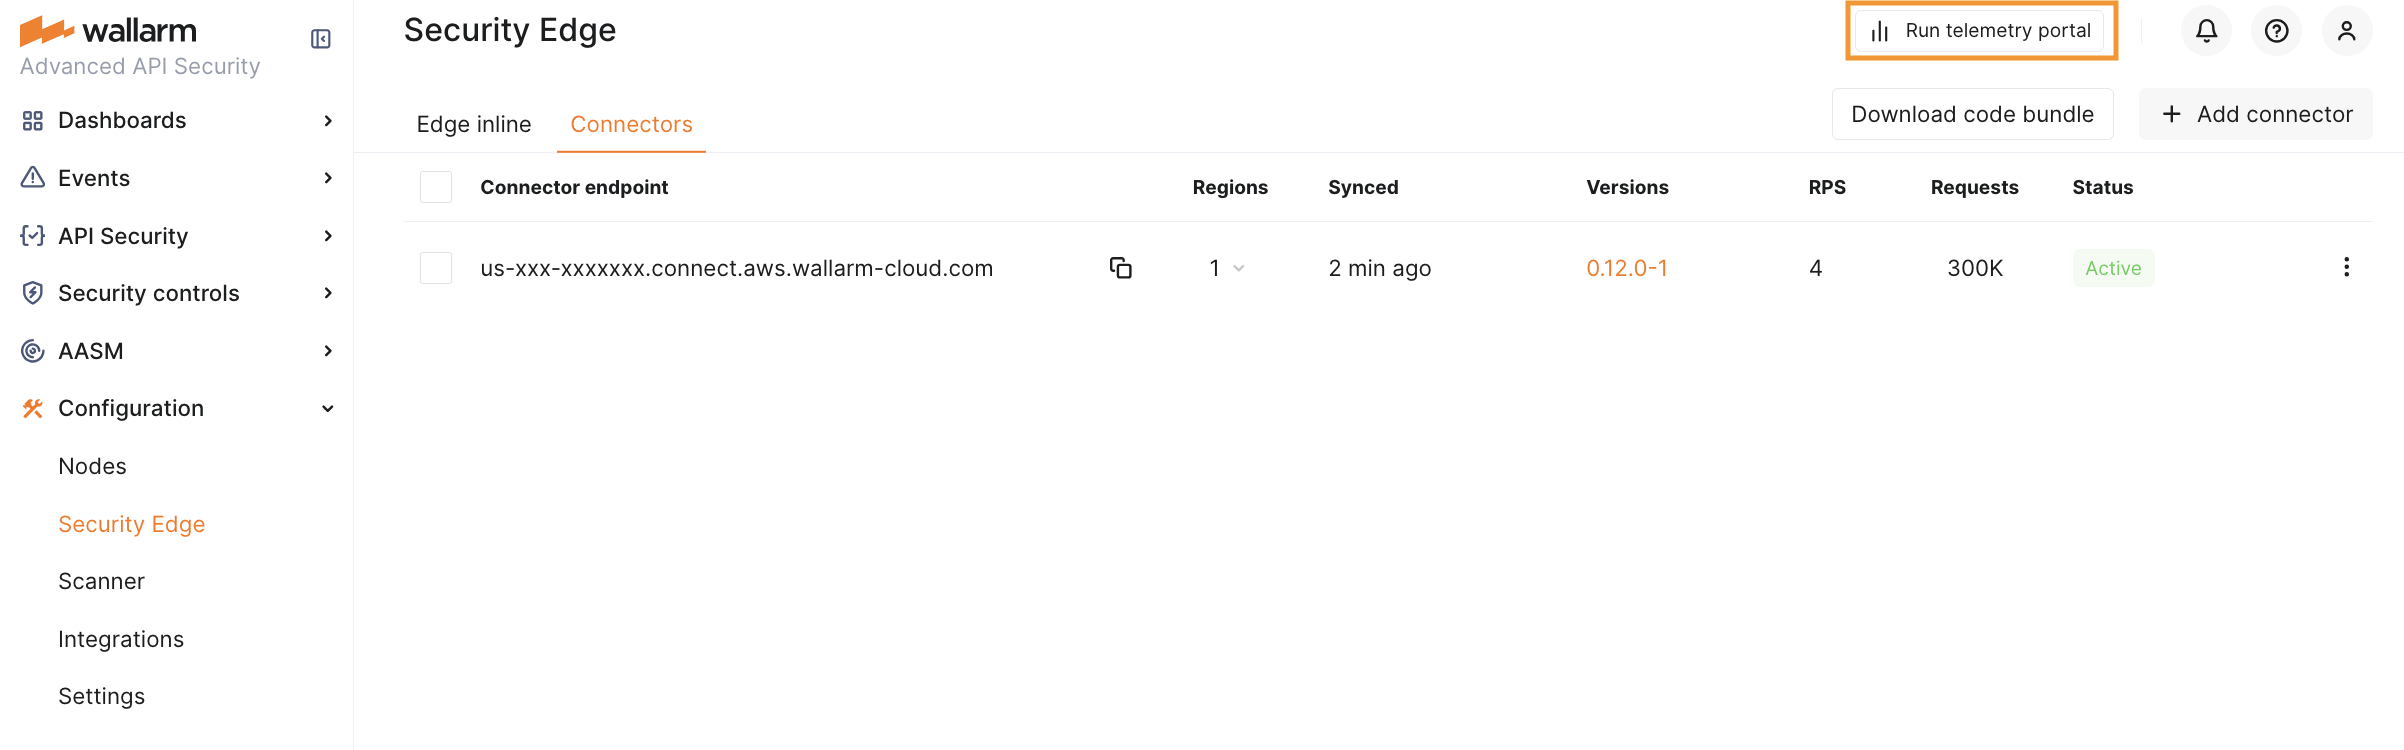
To run the Security Edge Connector, go to the Wallarm Console → **Security Edge** → **Connectors** → **Add connector**. If this section is unavailable, contact sales@wallarm.com to access the required subscription.
On the Free Tier, after deploying Edge Nodes via [Quick setup](https://docs.wallarm.com/installation/security-edge/free-tier.md), the **Security Edge** section lets you adjust settings.
### 1. Deploying the Edge Node for a connector
Only the connector settings need to be specified. Wallarm handles the deployment and provides an endpoint for routing traffic from the platform.
One endpoint can handle multiple connections from different hosts.
1. Proceed to Wallarm Console → **Security Edge** → **Connectors** → **Add connector**.
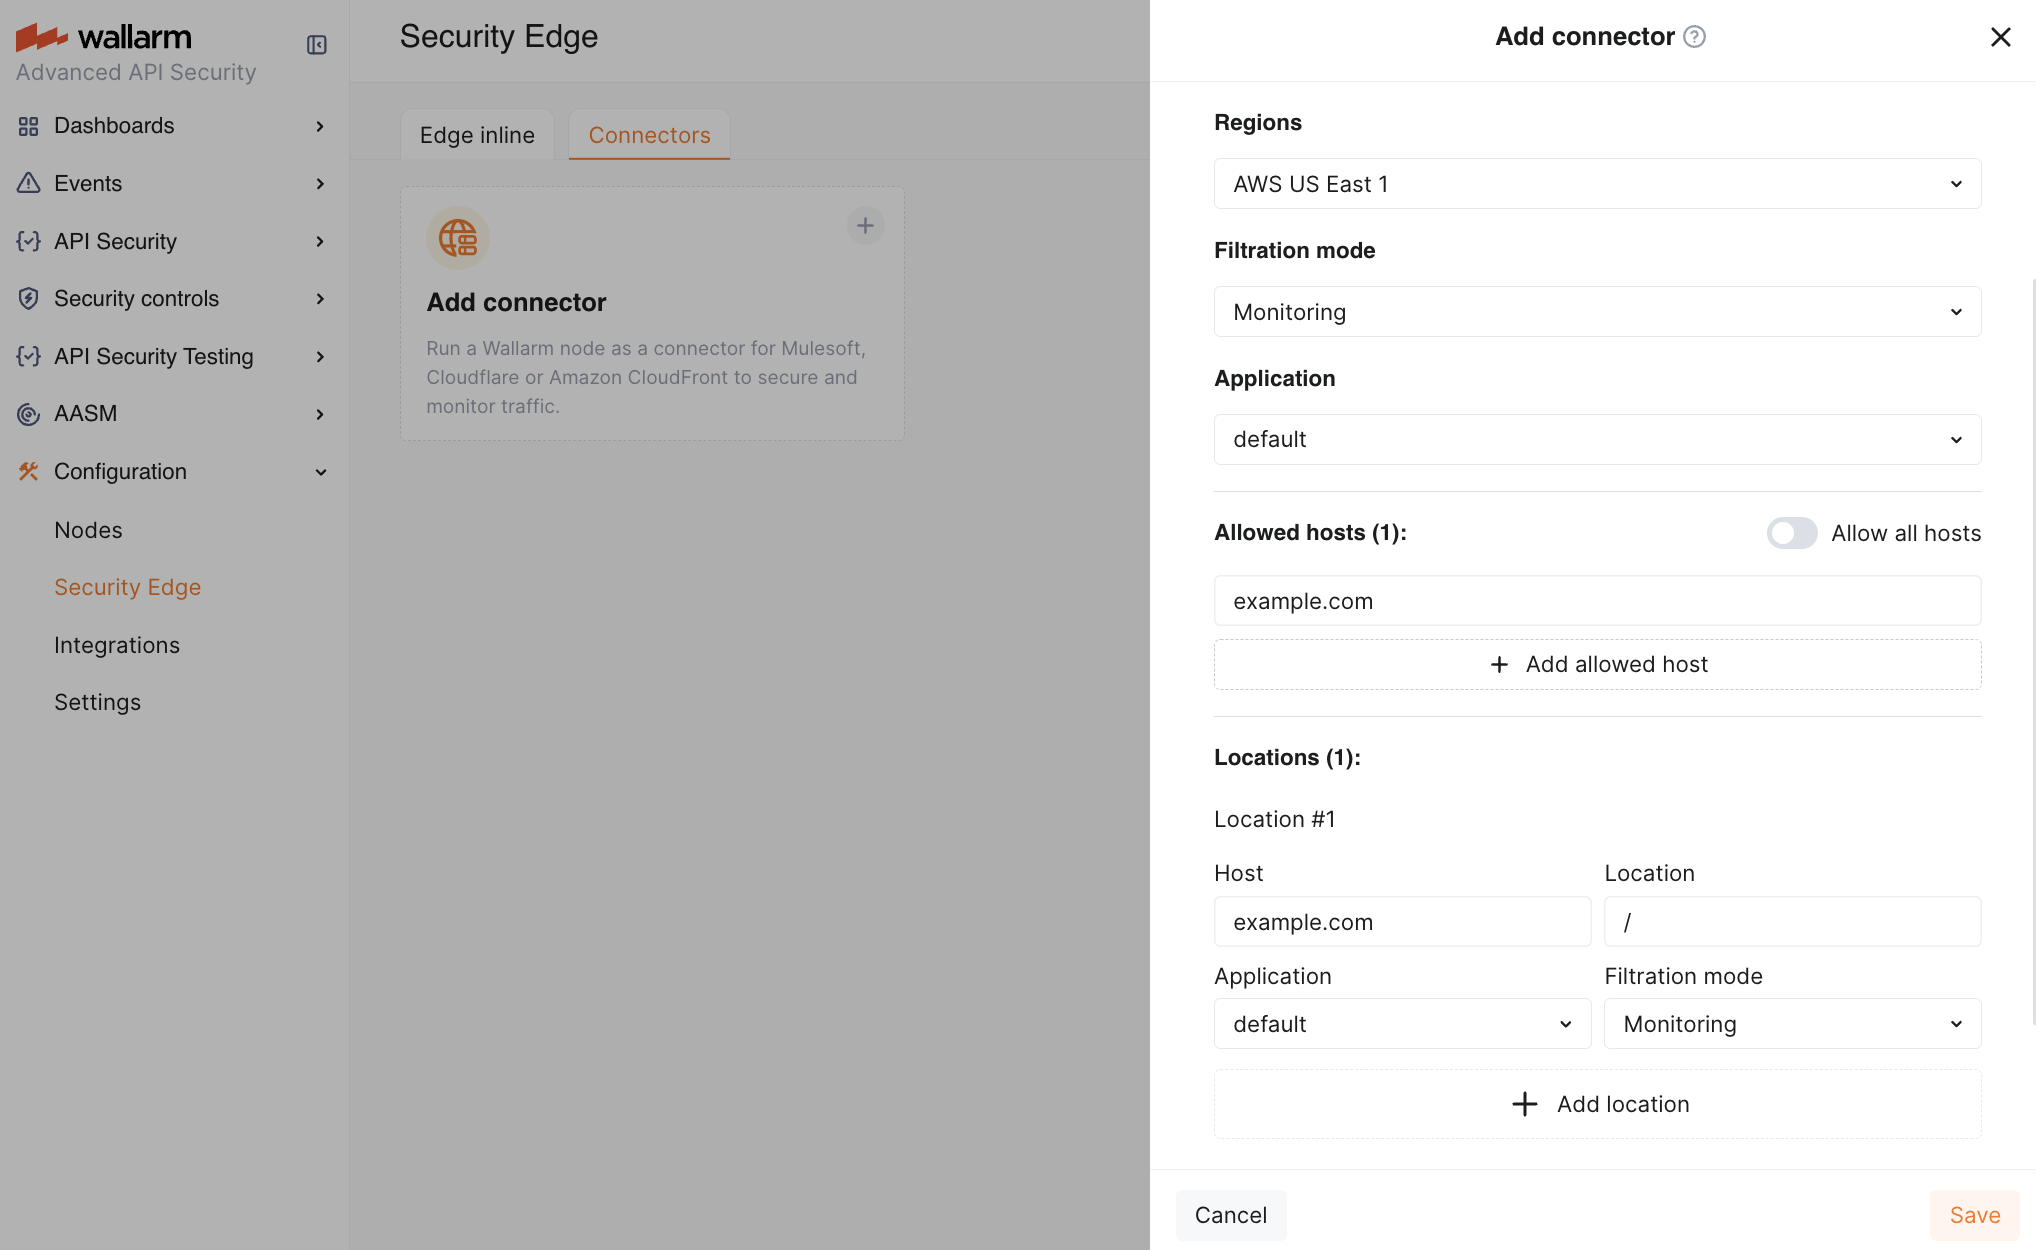
1. Specify the Node deployment settings:
* **Regions**: select one or more regions to deploy the Wallarm Node for the connector. We recommend choosing regions close to where your APIs or applications are deployed. Multiple regions improve geo-redundancy by balancing the load if an instance becomes unavailable.
You can choose regions in **AWS** or **Azure**.
* **Filtration mode**: [traffic analysis mode](https://docs.wallarm.com/admin-en/configure-wallarm-mode.md).
* **Application**: general application ID. In Wallarm, [applications](https://docs.wallarm.com/user-guides/settings/applications.md) help identify and organize parts of your infrastructure (e.g., domains, locations, instances).
Each Node requires a general application ID, with the option to assign specific IDs for locations or instances.
* **Allowed hosts**: specify which hosts the Node will accept and analyze traffic from.
If a specified host does not exist or is unreachable, the 415 error will be returned, and the traffic will not be processed.
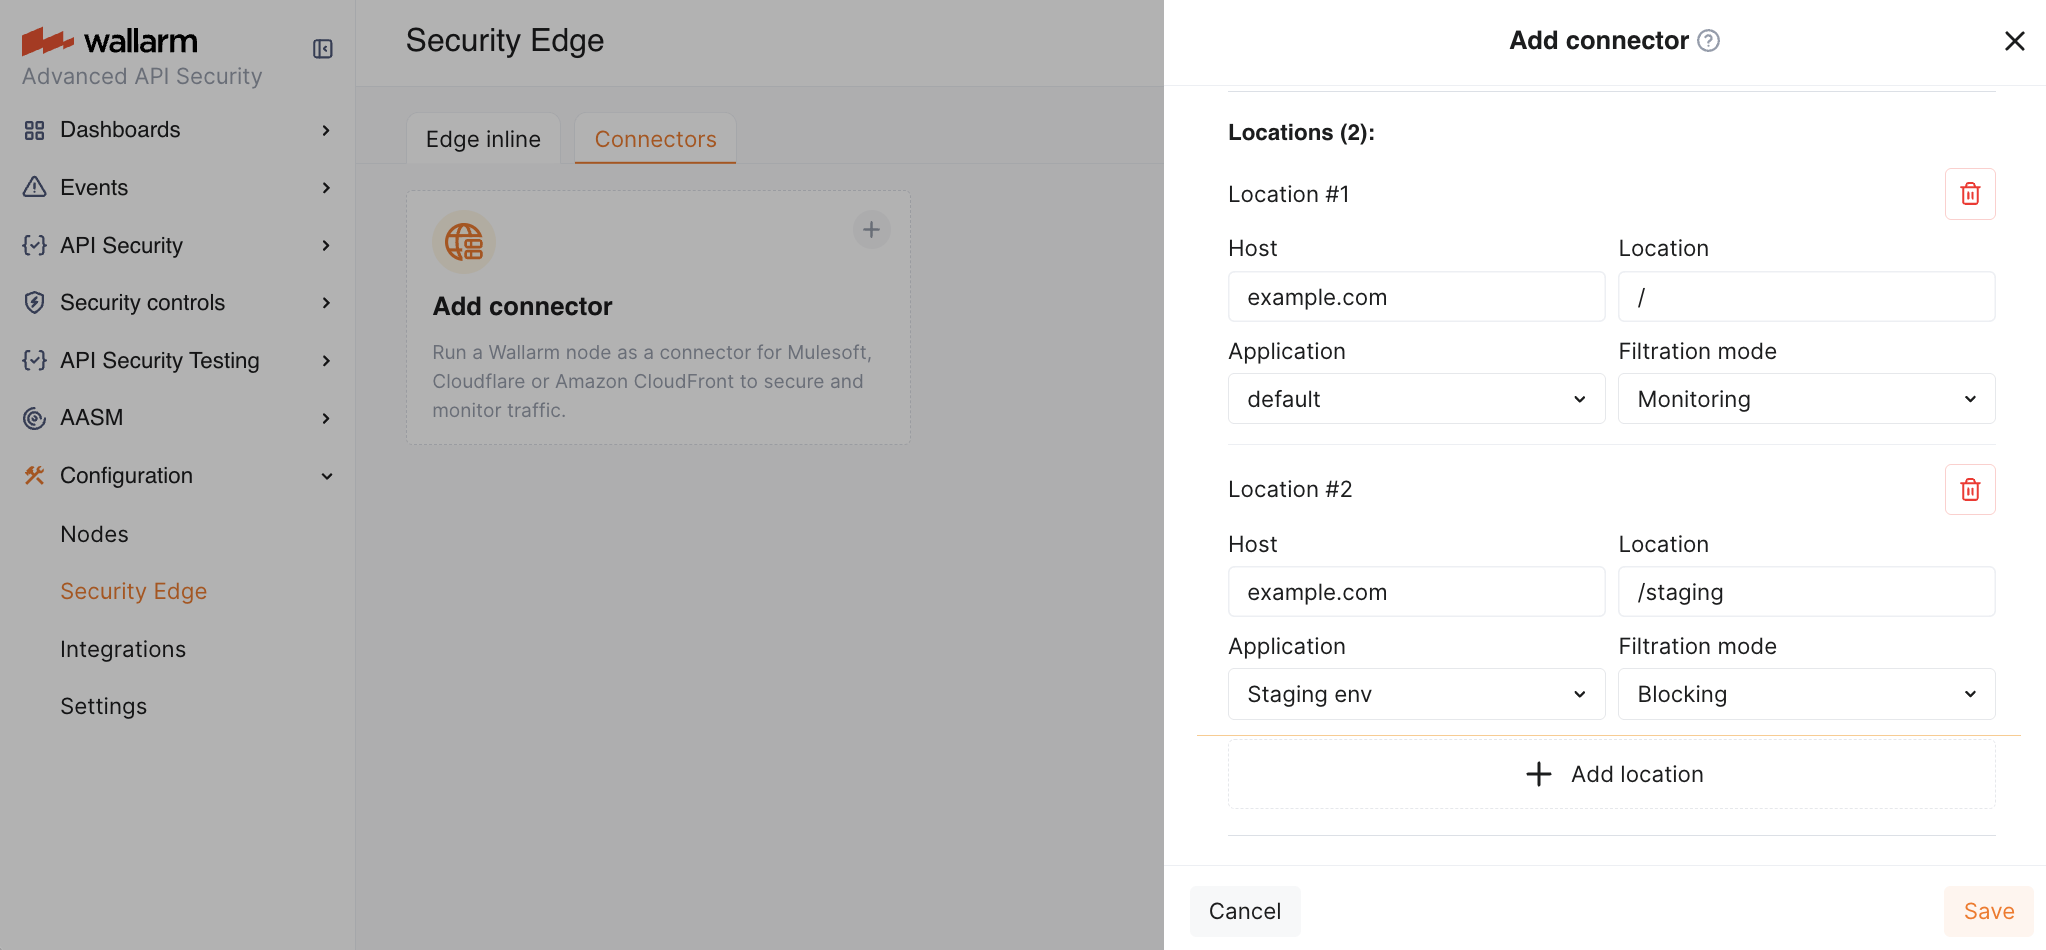
* **Location configuration**: assign unique application IDs and traffic analysis mode to specific hosts and locations, if needed.
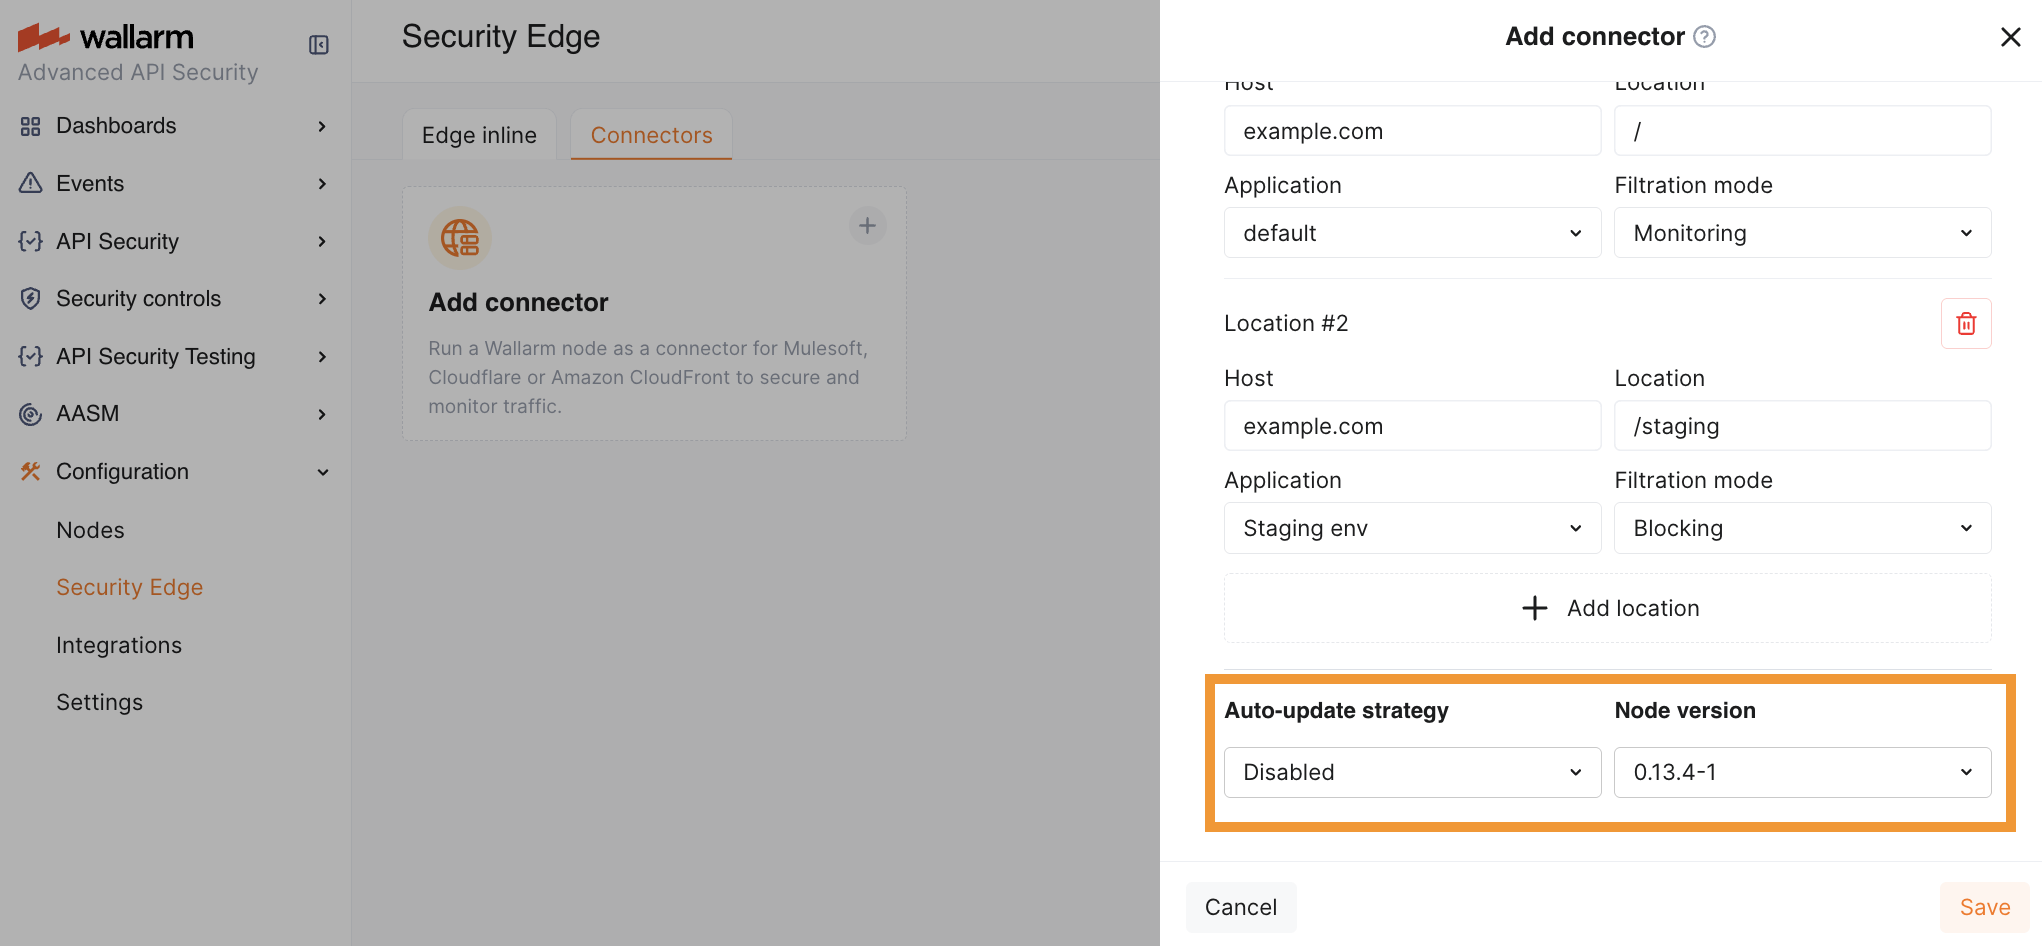
1. In the **Auto-update strategy** settings, you can select an [Edge Node version](https://docs.wallarm.com/updating-migrating/native-node/node-artifact-versions.md#all-in-one-installer) and enable [Auto update](#upgrading-the-edge-node) if needed. If no version is explicitly selected, the latest version is automatically deployed.
1. Once saved, it will take 3-5 minutes for Wallarm to deploy and configure the Node for the connector.
The status will change from **Pending** to **Active** when deployment is complete.
1. Copy the Node endpoint as you will need it later to route traffic from your platform.

You can change the Edge Node deployment settings at any time while the Node is in **Active** status. The Node will be re-deployed, starting from the **Pending** status to **Active**. The endpoint will not change, but it will be unavailable during the re-deployment process.
### 2. Injecting Wallarm code on a platform running your APIs
After deploying the Edge Node, you will need to inject Wallarm code into your platform to route traffic to the deployed Node.
1. Download a code bundle for your platform from the Wallarm Console UI.
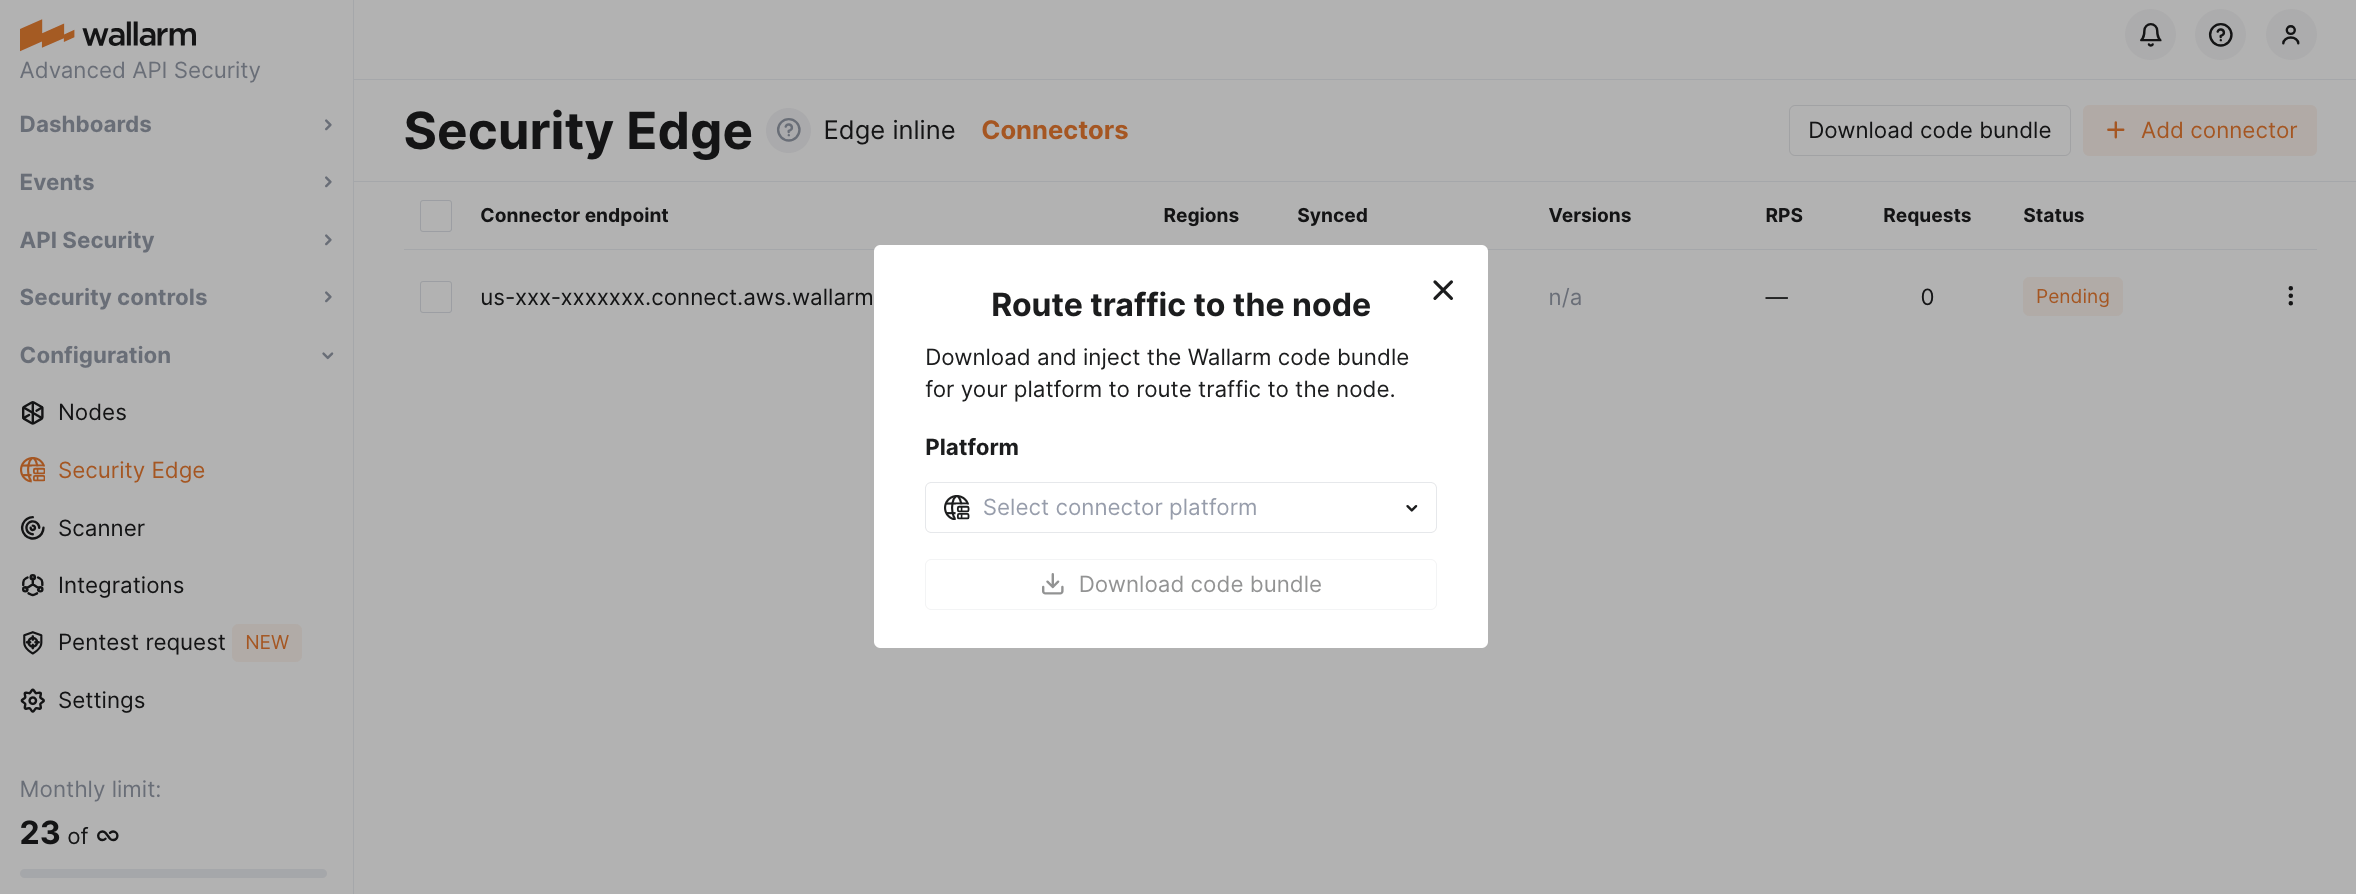
1. Apply the bundle on your API management platform following the instructions:
* [MuleSoft Mule Gateway](https://docs.wallarm.com/installation/connectors/mulesoft.md#2-obtain-and-upload-the-wallarm-policy-to-mulesoft-exchange)
* [MuleSoft Flex Gateway](https://docs.wallarm.com/installation/connectors/mulesoft-flex.md#2-obtain-and-upload-the-wallarm-policy-to-mulesoft-exchange)
* [Apigee](https://docs.wallarm.com/installation/connectors/apigee.md#2-obtain-the-connector-code-bundle)
* [Akamai](https://docs.wallarm.com/installation/connectors/akamai-edgeworkers.md#2-obtain-the-wallarm-code-bundle-and-create-edgeworkers)
* [CloudFront](https://docs.wallarm.com/installation/connectors/aws-lambda.md#2-obtain-and-deploy-the-wallarm-lambdaedge-functions)
* [Amazon API Gateway](https://docs.wallarm.com/installation/connectors/aws-api-gateway.md)
* [Cloudflare](https://docs.wallarm.com/installation/connectors/cloudflare.md#2-obtain-and-deploy-the-wallarm-worker-code)
* [Standalone Kong API Gateway](https://docs.wallarm.com/installation/connectors/standalone-kong-api-gateway.md#2-prepare-the-wallarm-lua-plugin)
* [Fastly](https://docs.wallarm.com/installation/connectors/fastly.md#2-deploy-wallarm-code-on-fastly)
* [IBM DataPower](https://docs.wallarm.com/installation/connectors/ibm-api-connect.md#2-obtain-and-apply-the-wallarm-policies-to-apis-in-ibm-api-connect)
* [Azure API Management](https://docs.wallarm.com/installation/connectors/azure-api-management.md#2-create-named-values-in-azure)
## Telemetry portal
The telemetry portal for Security Edge Connectors provides a Grafana dashboard with real-time insights into metrics on traffic processed by Wallarm.
The dashboard displays key metrics such as total processed requests, RPS, detected and blocked attacks, deployed Edge Node number, resource consumption, number of 5xx responses, etc.
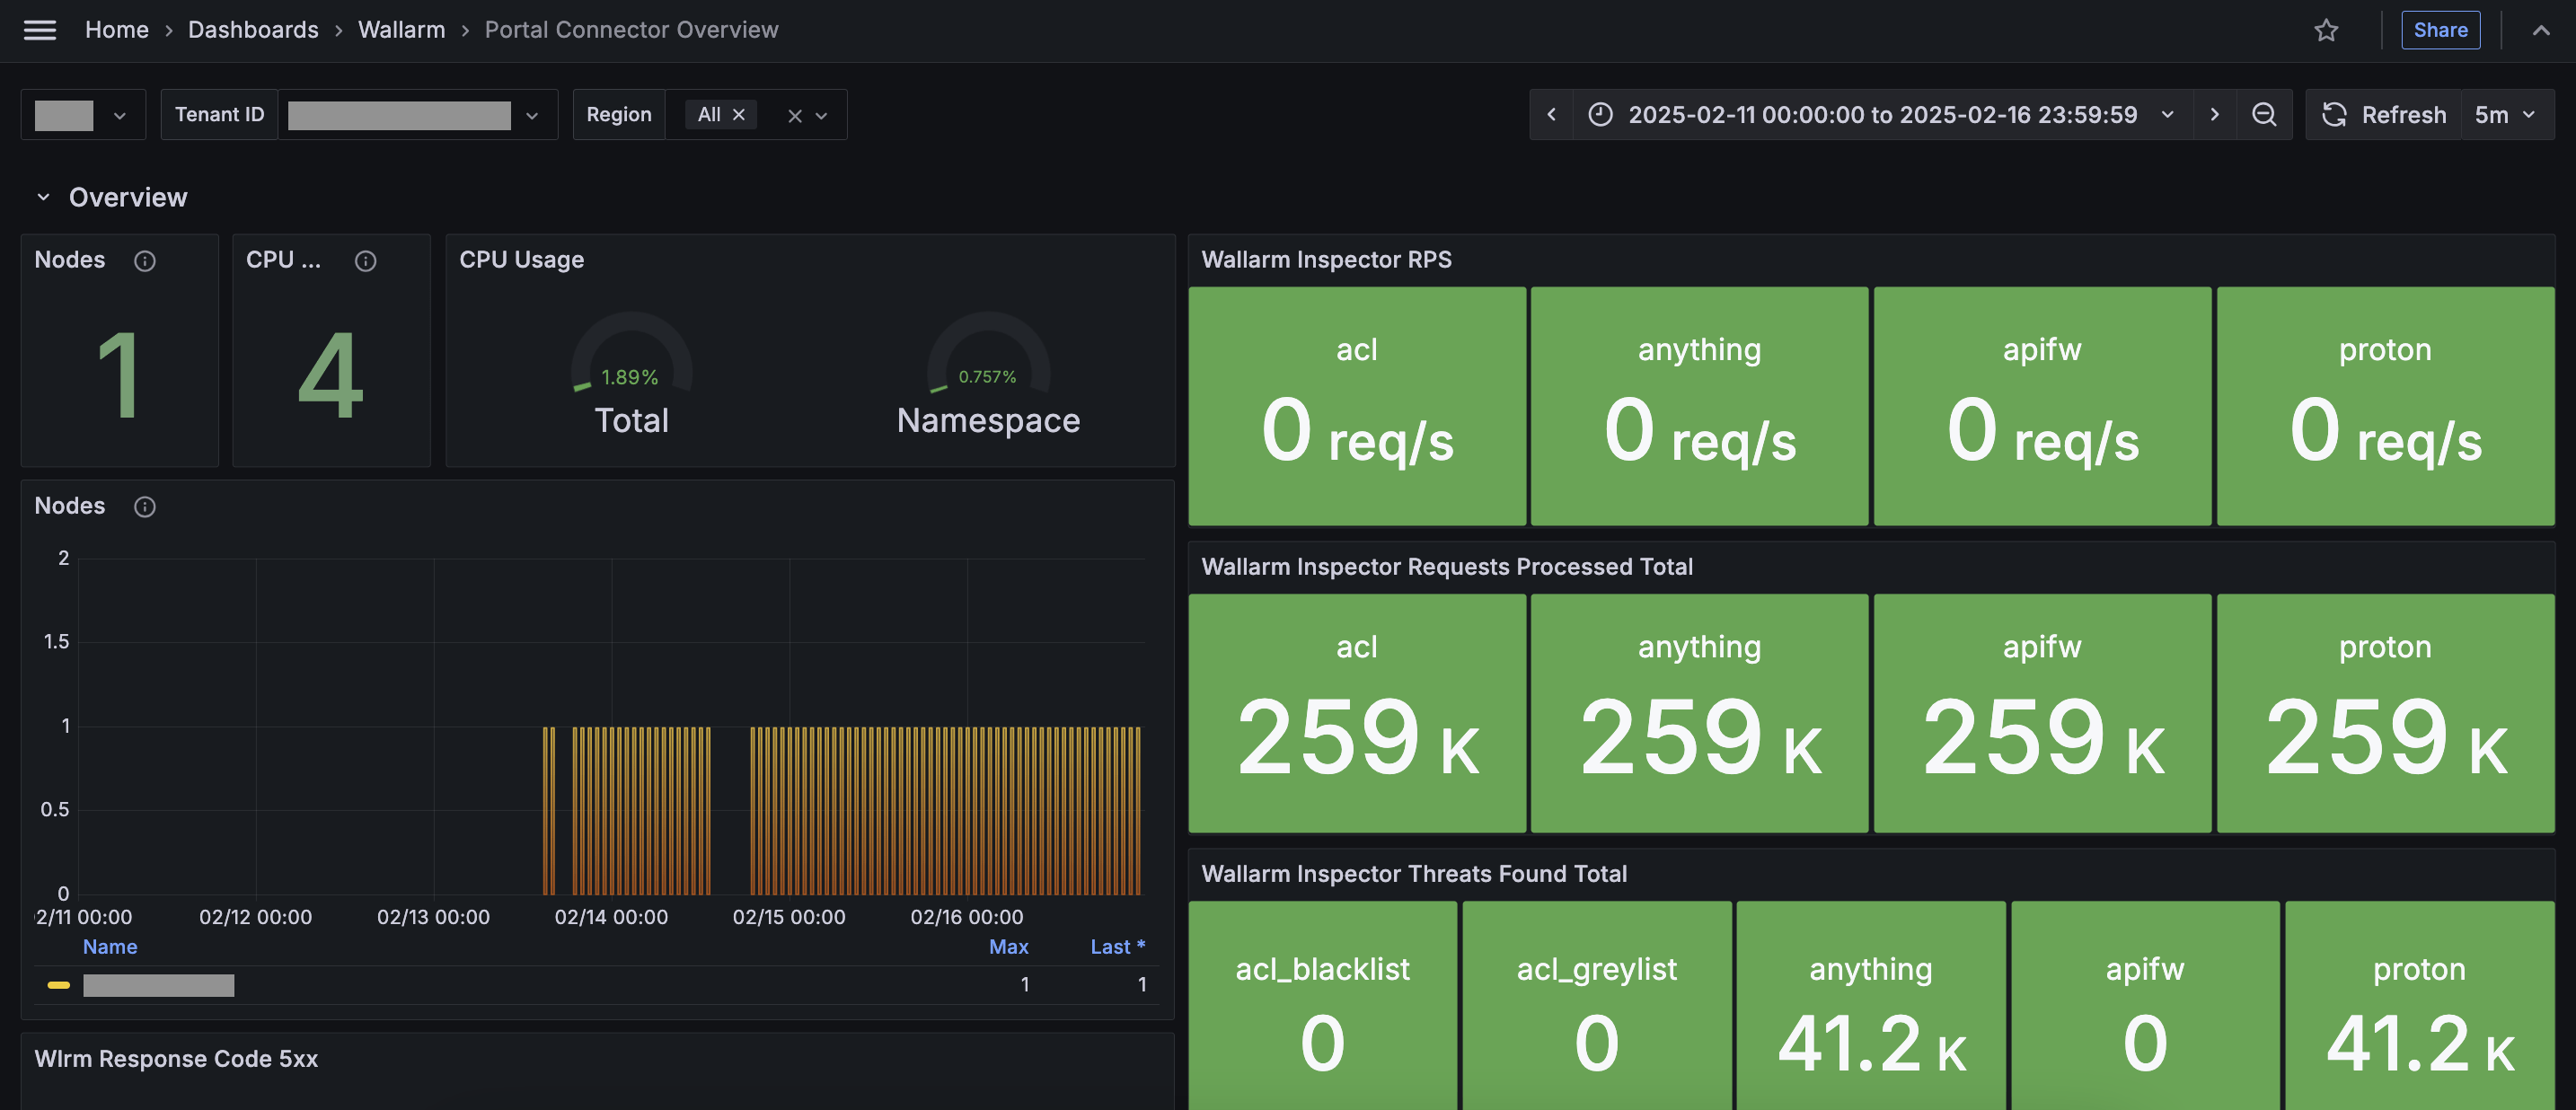
**Run telemetry portal** once the Node reaches the **Active** status. It becomes accessible via a direct link from the Security Edge section ~5 minutes after initiation.
From the Grafana home page, to reach the dashboard, navigate to **Dashboards** → **Wallarm** → **Portal Connector Overview**. For multiple Nodes, switch the **Tenant ID** corresponding to the connector endpoint to view each dashboard.
## Upgrading the Edge Node
When **Auto update** is enabled, the Edge Node is automatically upgraded as soon as a new minor or patch version is released (depending on the selected option). All your initial settings are preserved. Auto update is off by default.
To manually upgrade the Edge Node, open your Node for editing and select a version in the **Auto update** section. Using the latest version is recommended for optimal performance and security.
Upgrading to a new major version can only be done manually.
* For the changelog of versions, refer to the [article](https://docs.wallarm.com/updating-migrating/native-node/node-artifact-versions.md#all-in-one-installer).
The Edge Node version follows the `..` format, corresponding to the same version in the linked article. The build number in the Edge Node version indicates minor changes.
* Additionally, you might need to upgrade your connector code bundle. For the changelog and upgrade instructions, see the [Connector Code Bundle Changelog](https://docs.wallarm.com/installation/connectors/code-bundle-inventory.md).
* The versioning policy and release cycle are described [here](https://docs.wallarm.com/updating-migrating/versioning-policy.md).
## Rolling back to an older version of the Edge Node
Rollback is possible within minor and patch versions. Downgrading to an earlier major version is not supported.
To roll back the Edge Node:
1. Go to your Edge Connector settings and select a version you want to roll back to from the list.
1. Confirm the rollback by clicking **Save**.
1. Wait until the deployment reaches the **Active** status. Once it does, the Edge Node with the selected version is deployed and ready to inspect your traffic.
## Deleting the Edge Node
If you delete the Edge Node, its endpoint becomes unavailable, and you will no longer be able to redirect traffic through it for security analysis.
The Wallarm code bundle injected into your platform will still try to reach the Node endpoint specified in the bundle settings. However, it will fail with the `failed: Couldn't resolve address` error, and traffic will continue to flow to its target without passing through the Edge Node.
If your subscription expires, the Edge Node will be automatically deleted after 14 days.
## Troubleshooting
* If the Wallarm-hosted node status in the Wallarm Console is **Failed**, something went wrong with the deployment. Please report it on the [Wallarm Support portal](https://support.wallarm.com/), and we will investigate.
* For any other issues or assistance, please also leave a request on the [Wallarm Support portal](https://support.wallarm.com/). We are available to help with any deployment problems.
The [**Security Edge**](https://docs.wallarm.com/installation/security-edge/overview.md) platform provides a managed service for deploying Wallarm Nodes across geographically distributed locations within a Wallarm-hosted environment. One of its key deployment options is the [**connector**](https://docs.wallarm.com/installation/connectors/overview.md) Node deployment, offering robust protection for your entire API landscape without the need for any onsite installation.

!!! info "Supported platforms"
Currently, Edge connectors are available for MuleSoft Mule Gateway, MuleSoft Flex Gateway, Apigee, Akamai, CloudFront, Cloudflare, Fastly, IBM DataPower and Azure API Management.
## Requirements
* [Security Edge subscription](https://docs.wallarm.com/about-wallarm/subscription-plans.md) (free or paid)
* API running on one of the following API management platforms:
* MuleSoft Mule Gateway
* MuleSoft Flex Gateway
* Apigee
* Akamai
* CloudFront
* Cloudflare
* Fastly
* IBM DataPower
* Azure API Management
## Running Security Edge Connectors
To run the Security Edge Connector, go to the Wallarm Console → **Security Edge** → **Connectors** → **Add connector**. If this section is unavailable, contact sales@wallarm.com to access the required subscription.
On the Free Tier, after deploying Edge Nodes via [Quick setup](https://docs.wallarm.com/installation/security-edge/free-tier.md), the **Security Edge** section lets you adjust settings.
### 1. Deploying the Edge Node for a connector
Only the connector settings need to be specified. Wallarm handles the deployment and provides an endpoint for routing traffic from the platform.
One endpoint can handle multiple connections from different hosts.
1. Proceed to Wallarm Console → **Security Edge** → **Connectors** → **Add connector**.

1. Specify the Node deployment settings:
* **Regions**: select one or more regions to deploy the Wallarm Node for the connector. We recommend choosing regions close to where your APIs or applications are deployed. Multiple regions improve geo-redundancy by balancing the load if an instance becomes unavailable.
You can choose regions in **AWS** or **Azure**.
* **Filtration mode**: [traffic analysis mode](https://docs.wallarm.com/admin-en/configure-wallarm-mode.md).
* **Application**: general application ID. In Wallarm, [applications](https://docs.wallarm.com/user-guides/settings/applications.md) help identify and organize parts of your infrastructure (e.g., domains, locations, instances).
Each Node requires a general application ID, with the option to assign specific IDs for locations or instances.
* **Allowed hosts**: specify which hosts the Node will accept and analyze traffic from.
If a specified host does not exist or is unreachable, the 415 error will be returned, and the traffic will not be processed.
* **Location configuration**: assign unique application IDs and traffic analysis mode to specific hosts and locations, if needed.

1. In the **Auto-update strategy** settings, you can select an [Edge Node version](https://docs.wallarm.com/updating-migrating/native-node/node-artifact-versions.md#all-in-one-installer) and enable [Auto update](#upgrading-the-edge-node) if needed. If no version is explicitly selected, the latest version is automatically deployed.

1. Once saved, it will take 3-5 minutes for Wallarm to deploy and configure the Node for the connector.
The status will change from **Pending** to **Active** when deployment is complete.
1. Copy the Node endpoint as you will need it later to route traffic from your platform.

You can change the Edge Node deployment settings at any time while the Node is in **Active** status. The Node will be re-deployed, starting from the **Pending** status to **Active**. The endpoint will not change, but it will be unavailable during the re-deployment process.
### 2. Injecting Wallarm code on a platform running your APIs
After deploying the Edge Node, you will need to inject Wallarm code into your platform to route traffic to the deployed Node.
1. Download a code bundle for your platform from the Wallarm Console UI.

1. Apply the bundle on your API management platform following the instructions:
* [MuleSoft Mule Gateway](https://docs.wallarm.com/installation/connectors/mulesoft.md#2-obtain-and-upload-the-wallarm-policy-to-mulesoft-exchange)
* [MuleSoft Flex Gateway](https://docs.wallarm.com/installation/connectors/mulesoft-flex.md#2-obtain-and-upload-the-wallarm-policy-to-mulesoft-exchange)
* [Apigee](https://docs.wallarm.com/installation/connectors/apigee.md#2-obtain-the-connector-code-bundle)
* [Akamai](https://docs.wallarm.com/installation/connectors/akamai-edgeworkers.md#2-obtain-the-wallarm-code-bundle-and-create-edgeworkers)
* [CloudFront](https://docs.wallarm.com/installation/connectors/aws-lambda.md#2-obtain-and-deploy-the-wallarm-lambdaedge-functions)
* [Amazon API Gateway](https://docs.wallarm.com/installation/connectors/aws-api-gateway.md)
* [Cloudflare](https://docs.wallarm.com/installation/connectors/cloudflare.md#2-obtain-and-deploy-the-wallarm-worker-code)
* [Standalone Kong API Gateway](https://docs.wallarm.com/installation/connectors/standalone-kong-api-gateway.md#2-prepare-the-wallarm-lua-plugin)
* [Fastly](https://docs.wallarm.com/installation/connectors/fastly.md#2-deploy-wallarm-code-on-fastly)
* [IBM DataPower](https://docs.wallarm.com/installation/connectors/ibm-api-connect.md#2-obtain-and-apply-the-wallarm-policies-to-apis-in-ibm-api-connect)
* [Azure API Management](https://docs.wallarm.com/installation/connectors/azure-api-management.md#2-create-named-values-in-azure)
## Telemetry portal
The telemetry portal for Security Edge Connectors provides a Grafana dashboard with real-time insights into metrics on traffic processed by Wallarm.
The dashboard displays key metrics such as total processed requests, RPS, detected and blocked attacks, deployed Edge Node number, resource consumption, number of 5xx responses, etc.

**Run telemetry portal** once the Node reaches the **Active** status. It becomes accessible via a direct link from the Security Edge section ~5 minutes after initiation.

From the Grafana home page, to reach the dashboard, navigate to **Dashboards** → **Wallarm** → **Portal Connector Overview**. For multiple Nodes, switch the **Tenant ID** corresponding to the connector endpoint to view each dashboard.
## Upgrading the Edge Node
When **Auto update** is enabled, the Edge Node is automatically upgraded as soon as a new minor or patch version is released (depending on the selected option). All your initial settings are preserved. Auto update is off by default.
To manually upgrade the Edge Node, open your Node for editing and select a version in the **Auto update** section. Using the latest version is recommended for optimal performance and security.
Upgrading to a new major version can only be done manually.
* For the changelog of versions, refer to the [article](https://docs.wallarm.com/updating-migrating/native-node/node-artifact-versions.md#all-in-one-installer).
The Edge Node version follows the `..` format, corresponding to the same version in the linked article. The build number in the Edge Node version indicates minor changes.
* Additionally, you might need to upgrade your connector code bundle. For the changelog and upgrade instructions, see the [Connector Code Bundle Changelog](https://docs.wallarm.com/installation/connectors/code-bundle-inventory.md).
* The versioning policy and release cycle are described [here](https://docs.wallarm.com/updating-migrating/versioning-policy.md).
## Rolling back to an older version of the Edge Node
Rollback is possible within minor and patch versions. Downgrading to an earlier major version is not supported.
To roll back the Edge Node:
1. Go to your Edge Connector settings and select a version you want to roll back to from the list.
1. Confirm the rollback by clicking **Save**.
1. Wait until the deployment reaches the **Active** status. Once it does, the Edge Node with the selected version is deployed and ready to inspect your traffic.
## Deleting the Edge Node
If you delete the Edge Node, its endpoint becomes unavailable, and you will no longer be able to redirect traffic through it for security analysis.
The Wallarm code bundle injected into your platform will still try to reach the Node endpoint specified in the bundle settings. However, it will fail with the `failed: Couldn't resolve address` error, and traffic will continue to flow to its target without passing through the Edge Node.
If your subscription expires, the Edge Node will be automatically deleted after 14 days.
## Troubleshooting
* If the Wallarm-hosted node status in the Wallarm Console is **Failed**, something went wrong with the deployment. Please report it on the [Wallarm Support portal](https://support.wallarm.com/), and we will investigate.
* For any other issues or assistance, please also leave a request on the [Wallarm Support portal](https://support.wallarm.com/). We are available to help with any deployment problems.