Deploying the Node for TCP Traffic Mirror Analysis
Wallarm provides an artifact for deploying its filtering node, specifically designed for TCP traffic mirror analysis. This guide explains how to deploy and configure the Wallarm filtering node in this form-factor.
Use cases
Among all supported out-of-band deployment options, this solution is recommended for the following scenarios:
-
You prefer to capture TCP traffic mirrored at the network layer and require a security solution to analyze this specific traffic.
-
NGINX-based deployment artifacts are unavailable, too slow, or consume too many resources. In this case, implementing HTTP traffic mirror analysis can be resource-intensive. The TCP traffic mirror analysis runs independently from web servers, avoiding these issues.
-
You require a security solution that also parses responses, enabling features like vulnerability detection and API discovery, which rely on response data.
How does it work
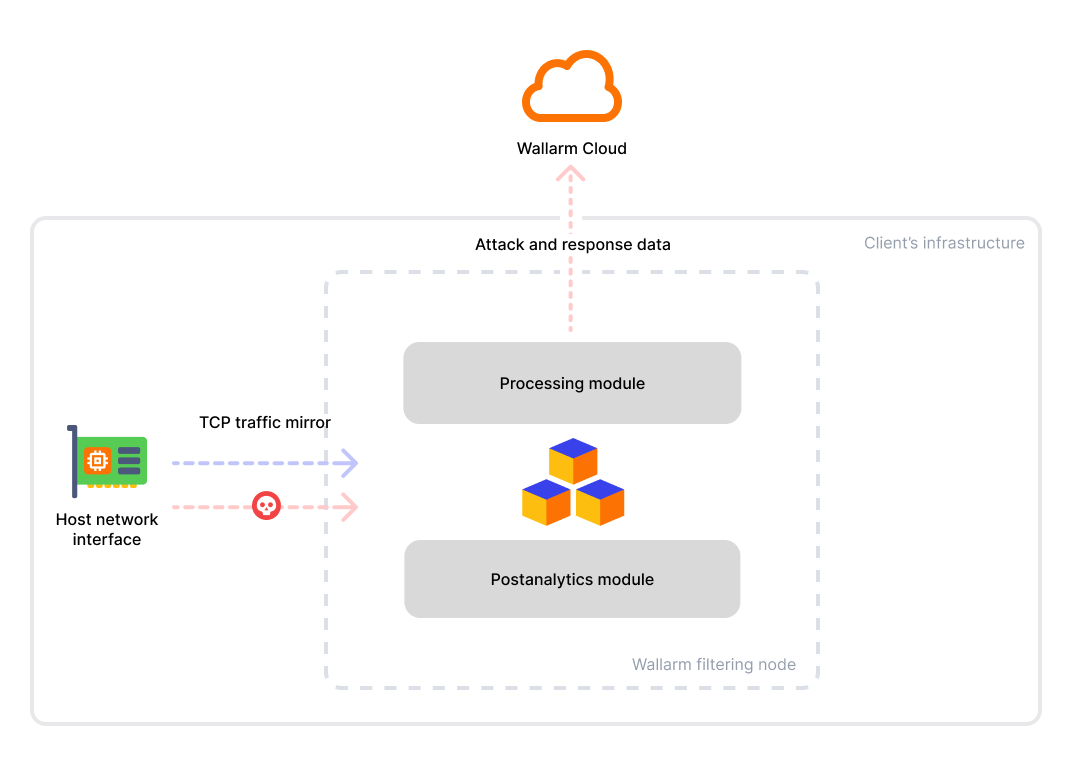
This solution operates in out-of-band (OOB) mode, capturing mirrored TCP traffic directly from the network interface, independent of web servers like NGINX. The captured traffic is then parsed, reassembled, and analyzed for threats.
It functions as a mirror target, seamlessly switching between multiple traffic sources. The solution supports traffic tagged with VLAN (802.1q), VXLAN, or SPAN.
Additionally, the solution enables response mirror parsing, providing Wallarm features that rely on response data. These features include vulnerability detection, API discovery and more.
Requirements
-
Access to the account with the Administrator role in Wallarm Console for the US Cloud or EU Cloud.
-
The machine intended for running the node must meet the following criteria:
- Linux OS
- x86_64/ARM64 architecture
- Executing all commands as a superuser (e.g.
root). - Allowed outgoing connections to
https://meganode.wallarm.comto download the Wallarm installer - Allowed outgoing connections to
https://us1.api.wallarm.comfor working with US Wallarm Cloud or tohttps://api.wallarm.comfor working with EU Wallarm Cloud -
Allowed outgoing connections to the IP addresses below for downloading updates to attack detection rules and API specifications, as well as retrieving precise IPs for your allowlisted, denylisted, or graylisted countries, regions, or data centers
-
Traffic and response mirroring must be configured with both source and target set up, and the prepared instance chosen as a mirror target. Specific environment requirements must be met, such as allowing specific protocols for traffic mirroring configurations.
-
Mirrored traffic is tagged with either VLAN (802.1q), VXLAN, or SPAN.
Step 1: Prepare Wallarm token
To install node, you will need a token for registering the node in the Wallarm Cloud. To prepare a token:
-
Open Wallarm Console → Settings → API tokens in the US Cloud or EU Cloud.
-
Find or create API token with the
Node deployment/Deploymentusage type. -
Copy this token.
Step 2: Download Wallarm installer
Wallarm suggests installations for the following processors:
-
x86_64
-
ARM64
To download Wallarm installation script and make it executable, use the following commands:
Step 3: Prepare the configuration file
Create the wallarm-node-conf.yaml file on the instance. The solution requires proper configuration to identify the network interface and the traffic format (e.g., VLAN, VXLAN). The example content of the file:
In the article, you will find the list of more supported configuration parameters.
Setting the mode (required)
It is required to specify the tcp-capture mode in the corresponding parameter to run the solution for the TCP traffic mirror analysis.
Choosing a network interface for listening
To specify the network interface to capture traffic from:
-
Check network interfaces available on the host:
-
Specify the network interface in the
filterparameter.Note that the value should be the network interface and port separated by a colon (
:). Examples of filters includeeth0:,eth0:80, or:80(to intercept a specific port on all interfaces), e.g.:
Capturing VLAN
If mirrored traffic is wrapped in VLAN, provide additional arguments:
version: 4

mode: tcp-capture

goreplay:
  filter: <your network interface and port, e.g. 'lo:' or 'enp7s0:'>
  extra_args:
    - -input-raw-vlan
    - -input-raw-vlan-vid
    # VID of your VLAN, e.g.:
    # - 42
Capturing VXLAN
If mirrored traffic is wrapped in VXLAN (common in AWS), provide additional arguments:
version: 4

mode: tcp-capture

goreplay:
  filter: <your network interface and port, e.g. 'lo:' or 'enp7s0:'>
  extra_args:
    - -input-raw-engine
    - vxlan
    # Custom VXLAN UDP port, e.g.:
    # - -input-raw-vxlan-port
    # - 4789
    # Specific VNI (by default, all VNIs are captured), e.g.:
    # - -input-raw-vxlan-vni
    # - 1
Identifying the original client IP and host headers
When traffic passes through proxies or load balancers, they often replace the original client IP address and Host header with their own values. To preserve the original information, such intermediaries typically add HTTP headers like X-Forwarded-For, X-Real-IP, or X-Forwarded-Host.
To ensure the Native Node correctly identifies the original client and target host, use the proxy_headers configuration block, e.g.:
version: 4

mode: tcp-capture

proxy_headers:
  # Rule 1: Internal company proxies
  - trusted_networks:
      - 10.0.0.0/8
      - 192.168.0.0/16
    original_host:
      - X-Forwarded-Host
    real_ip:
      - X-Forwarded-For

  # Rule 2: External edge proxies (e.g., CDN, reverse proxy)
  - trusted_networks:
      - 203.0.113.0/24
    original_host:
      - X-Real-Host
    real_ip:
      - X-Real-IP
Step 4: Run the Wallarm installer
To install the Wallarm node for TCP traffic mirror analysis, run the following command:
# US Cloud
sudo env WALLARM_LABELS='group=<GROUP>' ./aio-native-0.15.1.x86_64.sh -- --batch --token <API_TOKEN> --mode=tcp-capture --go-node-config=<PATH_TO_CONFIG> --host us1.api.wallarm.com

# EU Cloud
sudo env WALLARM_LABELS='group=<GROUP>' ./aio-native-0.15.1.x86_64.sh -- --batch --token <API_TOKEN> --mode=tcp-capture --go-node-config=<PATH_TO_CONFIG> --host api.wallarm.com
# US Cloud
sudo env WALLARM_LABELS='group=<GROUP>' ./aio-native-0.15.1.aarch64.sh -- --batch --token <API_TOKEN> --mode=tcp-capture --go-node-config=<PATH_TO_CONFIG> --host us1.api.wallarm.com

# EU Cloud
sudo env WALLARM_LABELS='group=<GROUP>' ./aio-native-0.15.1.aarch64.sh -- --batch --token <API_TOKEN> --mode=tcp-capture --go-node-config=<PATH_TO_CONFIG> --host api.wallarm.com
-
The
WALLARM_LABELSvariable sets group into which the node will be added (used for logical grouping of nodes in the Wallarm Console UI). -
<API_TOKEN>specifies the generated API token for theNode deployment/Deploymentusage type. -
<PATH_TO_CONFIG>specifies the path to the configuration file prepared before.
The provided configuration file will be copied to the path: /opt/wallarm/etc/wallarm/go-node.yaml.
If needed, you can change the copied file after the installation is finished. To apply the changes, you will need to restart the Wallarm service with sudo systemctl restart wallarm.
Step 5: Test the solution
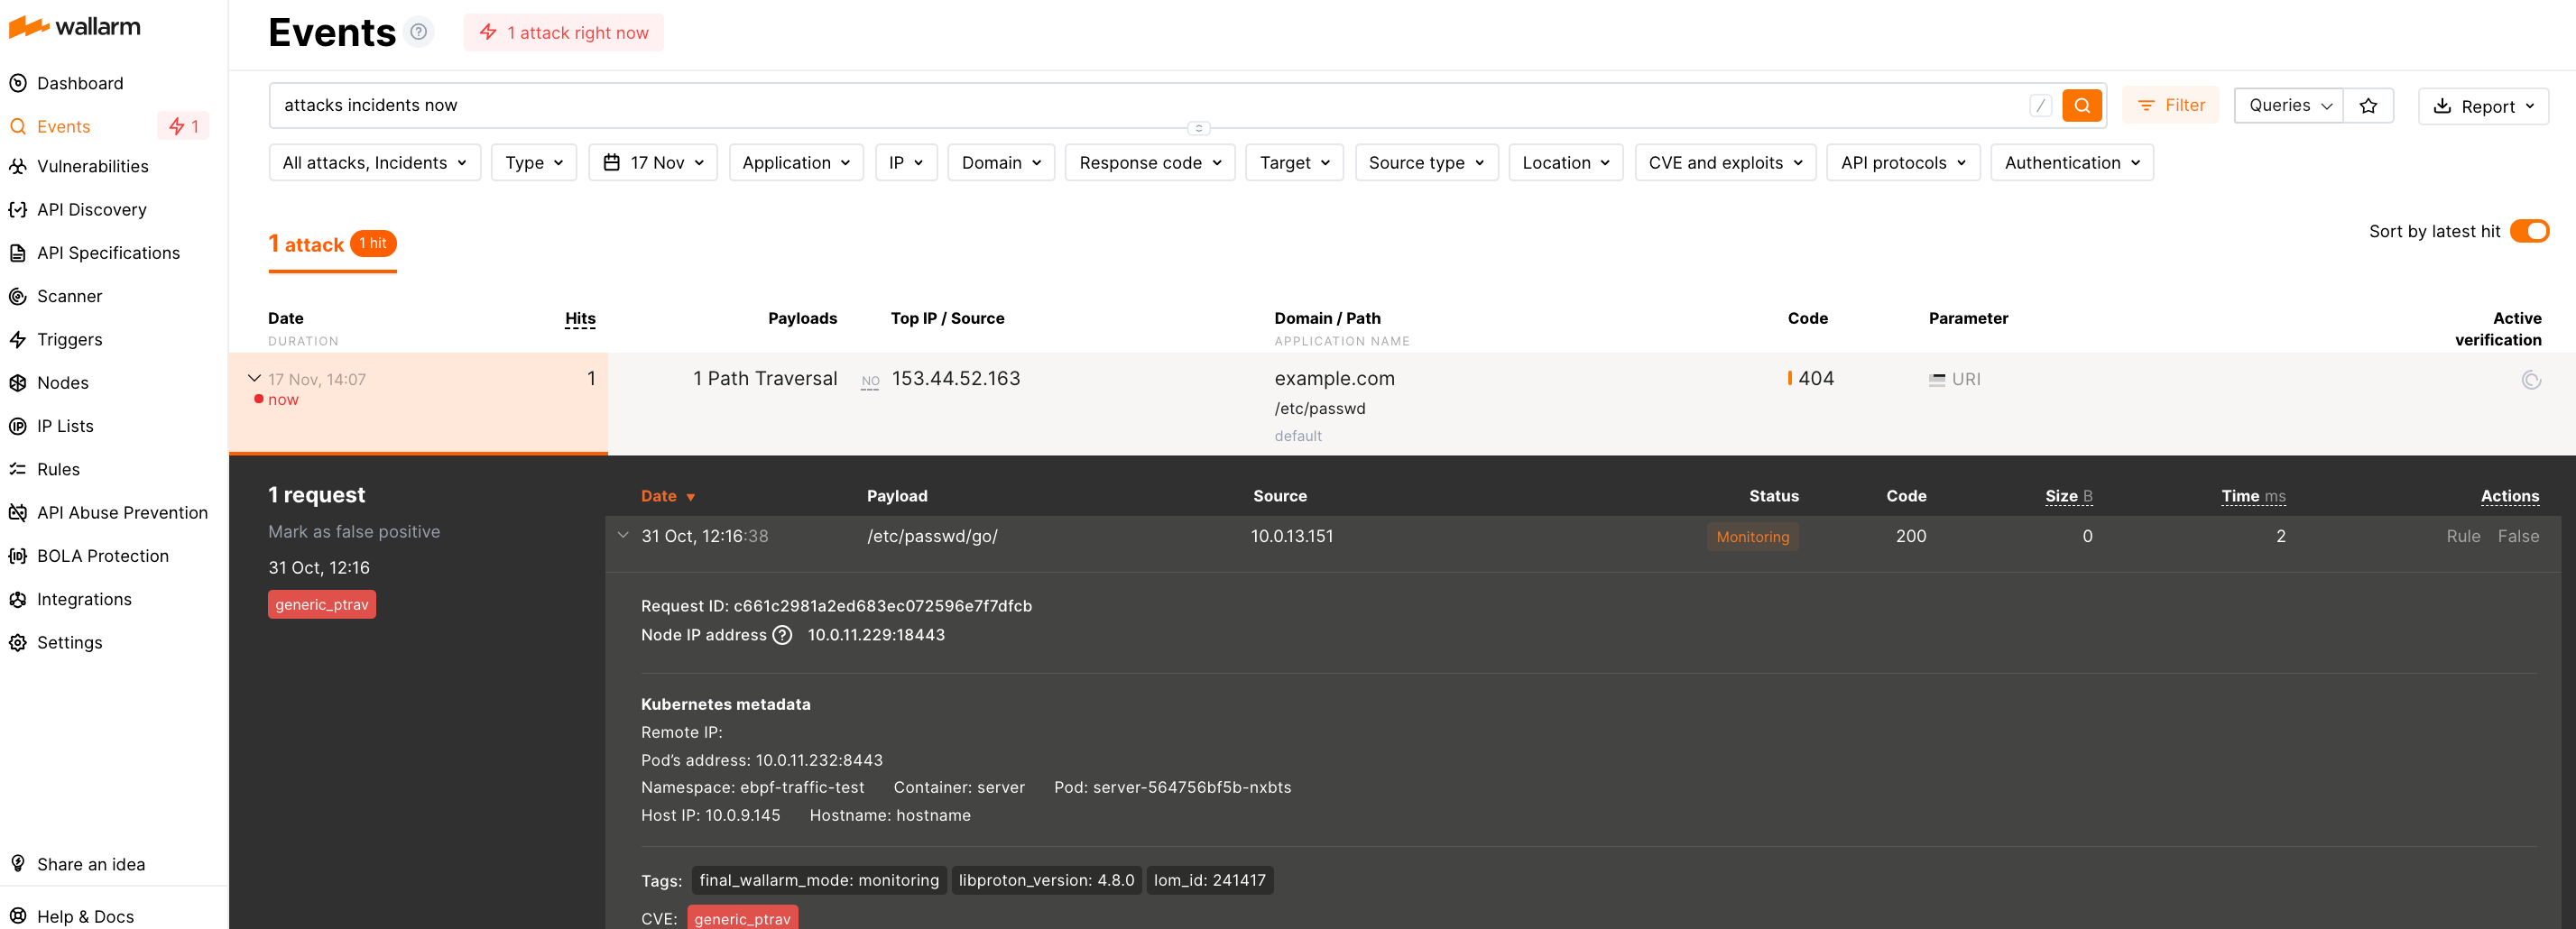
Send the test Path Traversal attack to the mirror source address by replacing <MIRROR_SOURCE_ADDRESS> with the actual IP address or DNS name of the instance:
Since the Wallarm solution for TCP traffic mirror analysis operates out-of-band, it does not block attacks but only registers them.
To check that the attack has been registered, proceed to Wallarm Console → Events:
Verifying the node operation
-
To check if there is traffic on the network interface you are trying to capture from, run the following command on your machine:
-
To verify the node is detecting traffic, you can check the logs:
- The Native Node logs are written to
/opt/wallarm/var/log/wallarm/go-node.logby default. - Standard logs of the filtering node such as whether the data is sent to the Wallarm Cloud, detected attacks, etc. are located in the directory
/opt/wallarm/var/log/wallarm.
- The Native Node logs are written to
For additional debugging, set the log.level parameter to debug.
Installer launch options
-
As soon as you have the all-in one script downloaded, you can get help on it with:
-
You can also run the installer in an interactive mode and choose the
tcp-capturemode in the 1st step: -
You can use the node in API Discovery-only mode (available since version 0.12.1). In this mode, attacks - including those detected by the Node's built-in mechanisms and those requiring additional configuration (e.g., credential stuffing, API specification violation attempts and brute force) - are detected and logged locally but not exported to Wallarm Cloud. Since there is no attack data in the Cloud, Threat Replay Testing does not work.
Meanwhile, API Discovery, API session tracking, and security vulnerability detection remain fully functional, detecting relevant security entities and uploading them to the Cloud for visualization.
This mode is for those who want to review their API inventory and identify sensitive data first, and plan controlled attack data export accordingly. However, disabling attack export is rare, as Wallarm securely processes attack data and provides sensitive attack data masking if needed.
To enable API Discovery-only mode:
-
Create or modify the
/etc/wallarm-override/env.listfile:Add the following variable:
-
Follow the node installation procedure from the 1st step.
-
Upgrade and reinstallation
-
To upgrade the node, follow the instructions.
-
If there is a problem with the upgrade or reinstallation process:
-
Remove the current installation:
-
Install the node as usual following the installation steps from above.
-
Limitations
-
Due to its out-of-band (OOB) operation, which analyzes traffic independently from actual flow, the solution has several inherent limitations:
- It does not instantly block malicious requests. Wallarm only observes attacks and provides you with the details in Wallarm Console.
- Rate limiting is not supported as it is impossible to limit load on target servers.
- Filtering by IP addresses is not supported.
-
The solution analyzes only unencrypted HTTP traffic over raw TCP, not encrypted HTTPS traffic.
-
The solution does not support parsing responses over HTTP keep-alive connections yet.

