Wallarm eBPF-Based Solution (Beta Version)
Wallarm offers a beta version of its eBPF-based security solution that leverages the power of the Linux kernel and seamlessly integrates with Kubernetes environments. This article explains how to use and deploy the solution using the Helm chart.
Limited to version 4.10
The Wallarm eBPF-based solution currently supports only the features available in Wallarm Node 4.10.
Traffic flow
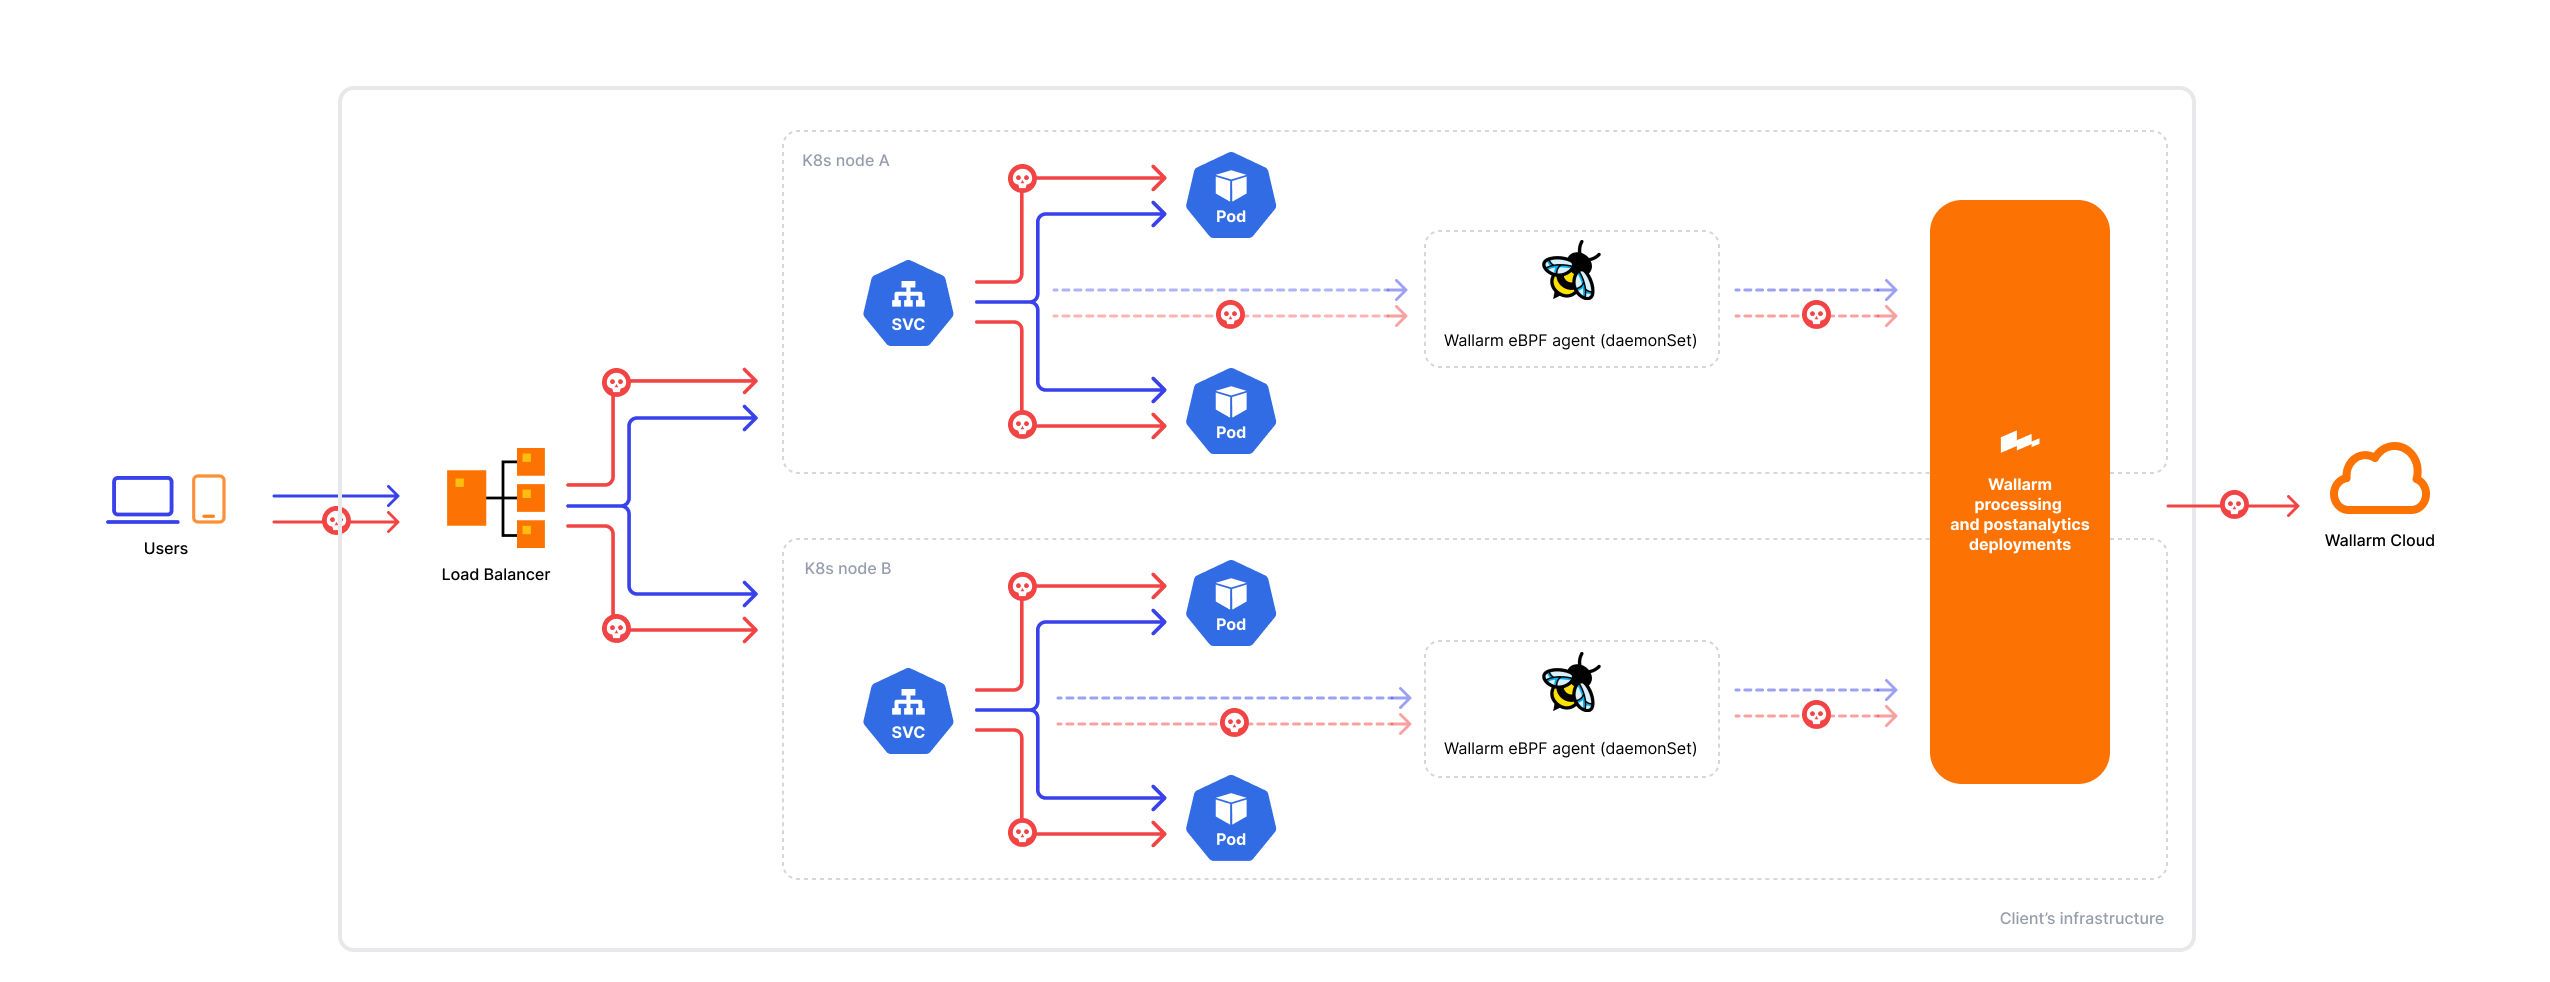
Traffic flow with Wallarm eBPF-based solution:
The eBPF solution is designed to monitor traffic using the following protocols:
-
HTTP 1.x or HTTP 2
-
Proxy v1 or Proxy v2
Traffic may utilize TLS/SSL encryption or plain text data transfer. SSL traffic analysis is limited to servers using the shared OpenSSL library (e.g., NGINX, HAProxy) and is not available for servers employing other SSL implementations like Envoy.
How it works
The Linux operating system comprises the kernel and the user space, where the kernel manages hardware resources and critical tasks, while applications operate in the user space. Within this environment, eBPF (Extended Berkeley Packet Filter) enables the execution of custom programs within the Linux kernel, including those focused on security. Read more about eBPF
As Kubernetes utilizes the capabilities of the Linux kernel for crucial tasks like process isolation, resource management, and networking, it creates a conducive environment for integrating eBPF-based security solutions. In line with this, Wallarm offers an eBPF-based security solution that seamlessly integrates with Kubernetes, leveraging the kernel's functionalities.
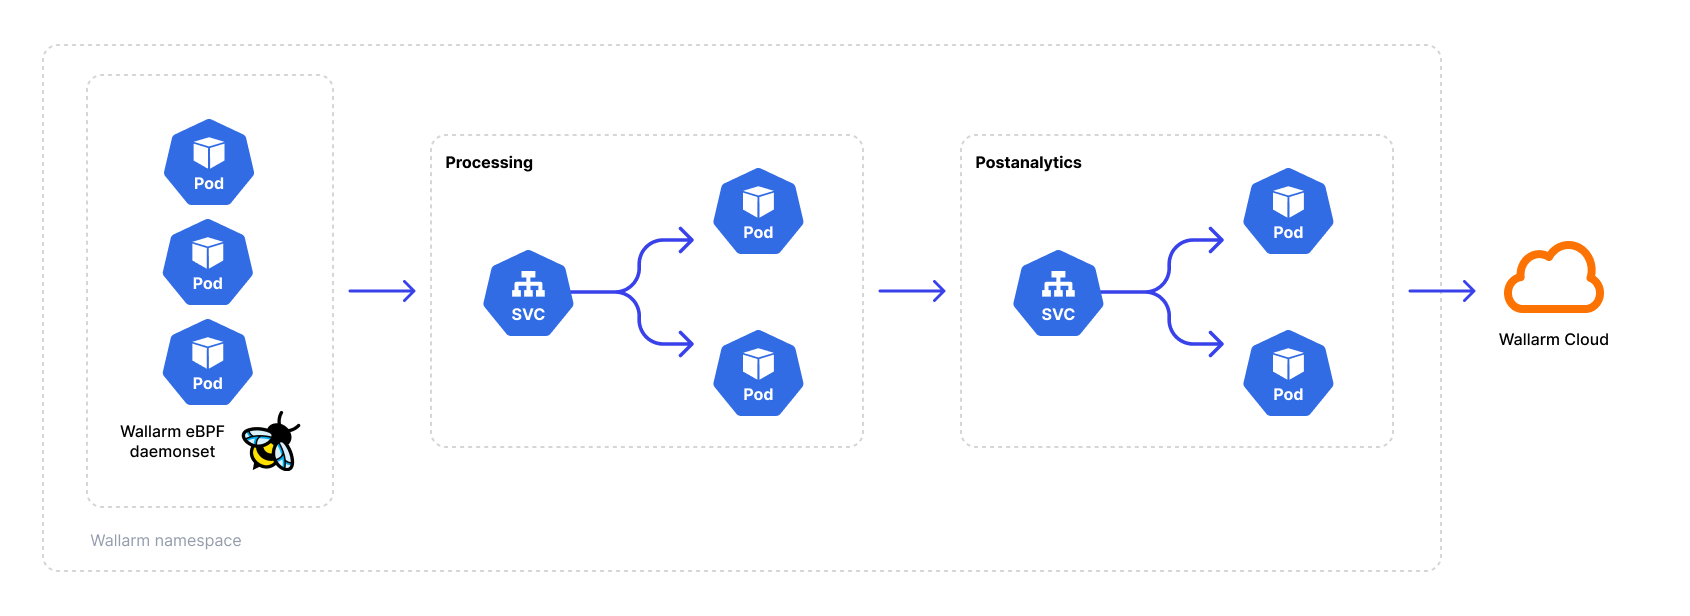
The solution consists of an agent that generates a traffic mirror and forwards it to the Wallarm node. During deployment, you can specify the mirror level at either the namespace or pod level. The Wallarm node examines the mirrored traffic for security threats, without blocking any malicious activity. Instead, it records the detected activity in the Wallarm Cloud, providing visibility into traffic security through the Wallarm Console UI.
The following diagram demonstrates the solution components:
The eBPF agent is deployed as a DaemonSet on every Kubernetes worker node. To ensure proper functionality, the agent container must run in a privileged mode with the following essential capabilities: SYS_PTRACE and SYS_ADMIN.
Furthermore, the solution processes response codes, empowering Wallarm's core API Discovery module to identify your API endpoints, construct your API inventory, and ensure it remains up-to-date.
Use cases
Among all supported Wallarm deployment options, this solution is the recommended one for out-of-band operation. By capturing a mirrored copy of traffic instead of operating in-line, the eBPF-based solution ensures uninterrupted traffic flow. This approach minimizes the impact on live traffic, and avoids introducing extra delays that could affect latency.
Technical requirements
Ensure the following technical prerequisites are met for a successful deployment of the eBPF solution:
-
Supported Kubernetes version:
- AWS - Kubernetes 1.24 and above
- Azure - Kubernetes 1.26 and above
- GCP - any Kubernetes version
- Bare-metal server - Kubernetes 1.22 and above
-
Installed cert-manager to enable the agent to mirror captured traffic to the Wallarm processing node in a secure way.
-
Helm v3 package manager.
-
Linux kernel version 5.10 or 5.15 with BTF (BPF Type Format) enabled. Supported on Ubuntu, Debian, RedHat, Google COS, or Amazon Linux 2.
-
Processor with the x86_64 architecture.
-
While the solution is in beta, not all Kubernetes resources can be mirrored effectively. Therefore, we recommend enabling traffic mirroring specifically for NGINX Ingress controllers, Kong Ingress controllers, or regular NGINX servers in Kubernetes.
-
Your user account should have Administrator access to the Wallarm Console.
If your use case differs from the listed requirements, contact our sales engineers providing detailed technical information about your environment to explore potential adjustments to meet your specific needs.
Network access
To ensure the solution functions correctly in environments with restricted outbound traffic, configure network access to allow the following external resources:
-
https://charts.wallarm.comto add the Wallarm Helm charts. -
https://hub.docker.com/r/wallarmto retrieve Wallarm Docker images from Docker Hub. -
For users working with the US Wallarm Cloud, access
https://us1.api.wallarm.com. For those using the EU Wallarm Cloud, accesshttps://api.wallarm.com. -
The IP addresses below for downloading updates to attack detection rules and API specifications, as well as retrieving precise IPs for your allowlisted, denylisted, or graylisted countries, regions, or data centers.
Deployment
To deploy the Wallarm eBPF solution:
-
Create the Wallarm node.
-
Deploy the Wallarm Helm chart.
-
Enable traffic mirroring.
-
Test the Wallarm eBPF operation.
Step 1: Create the Wallarm node
-
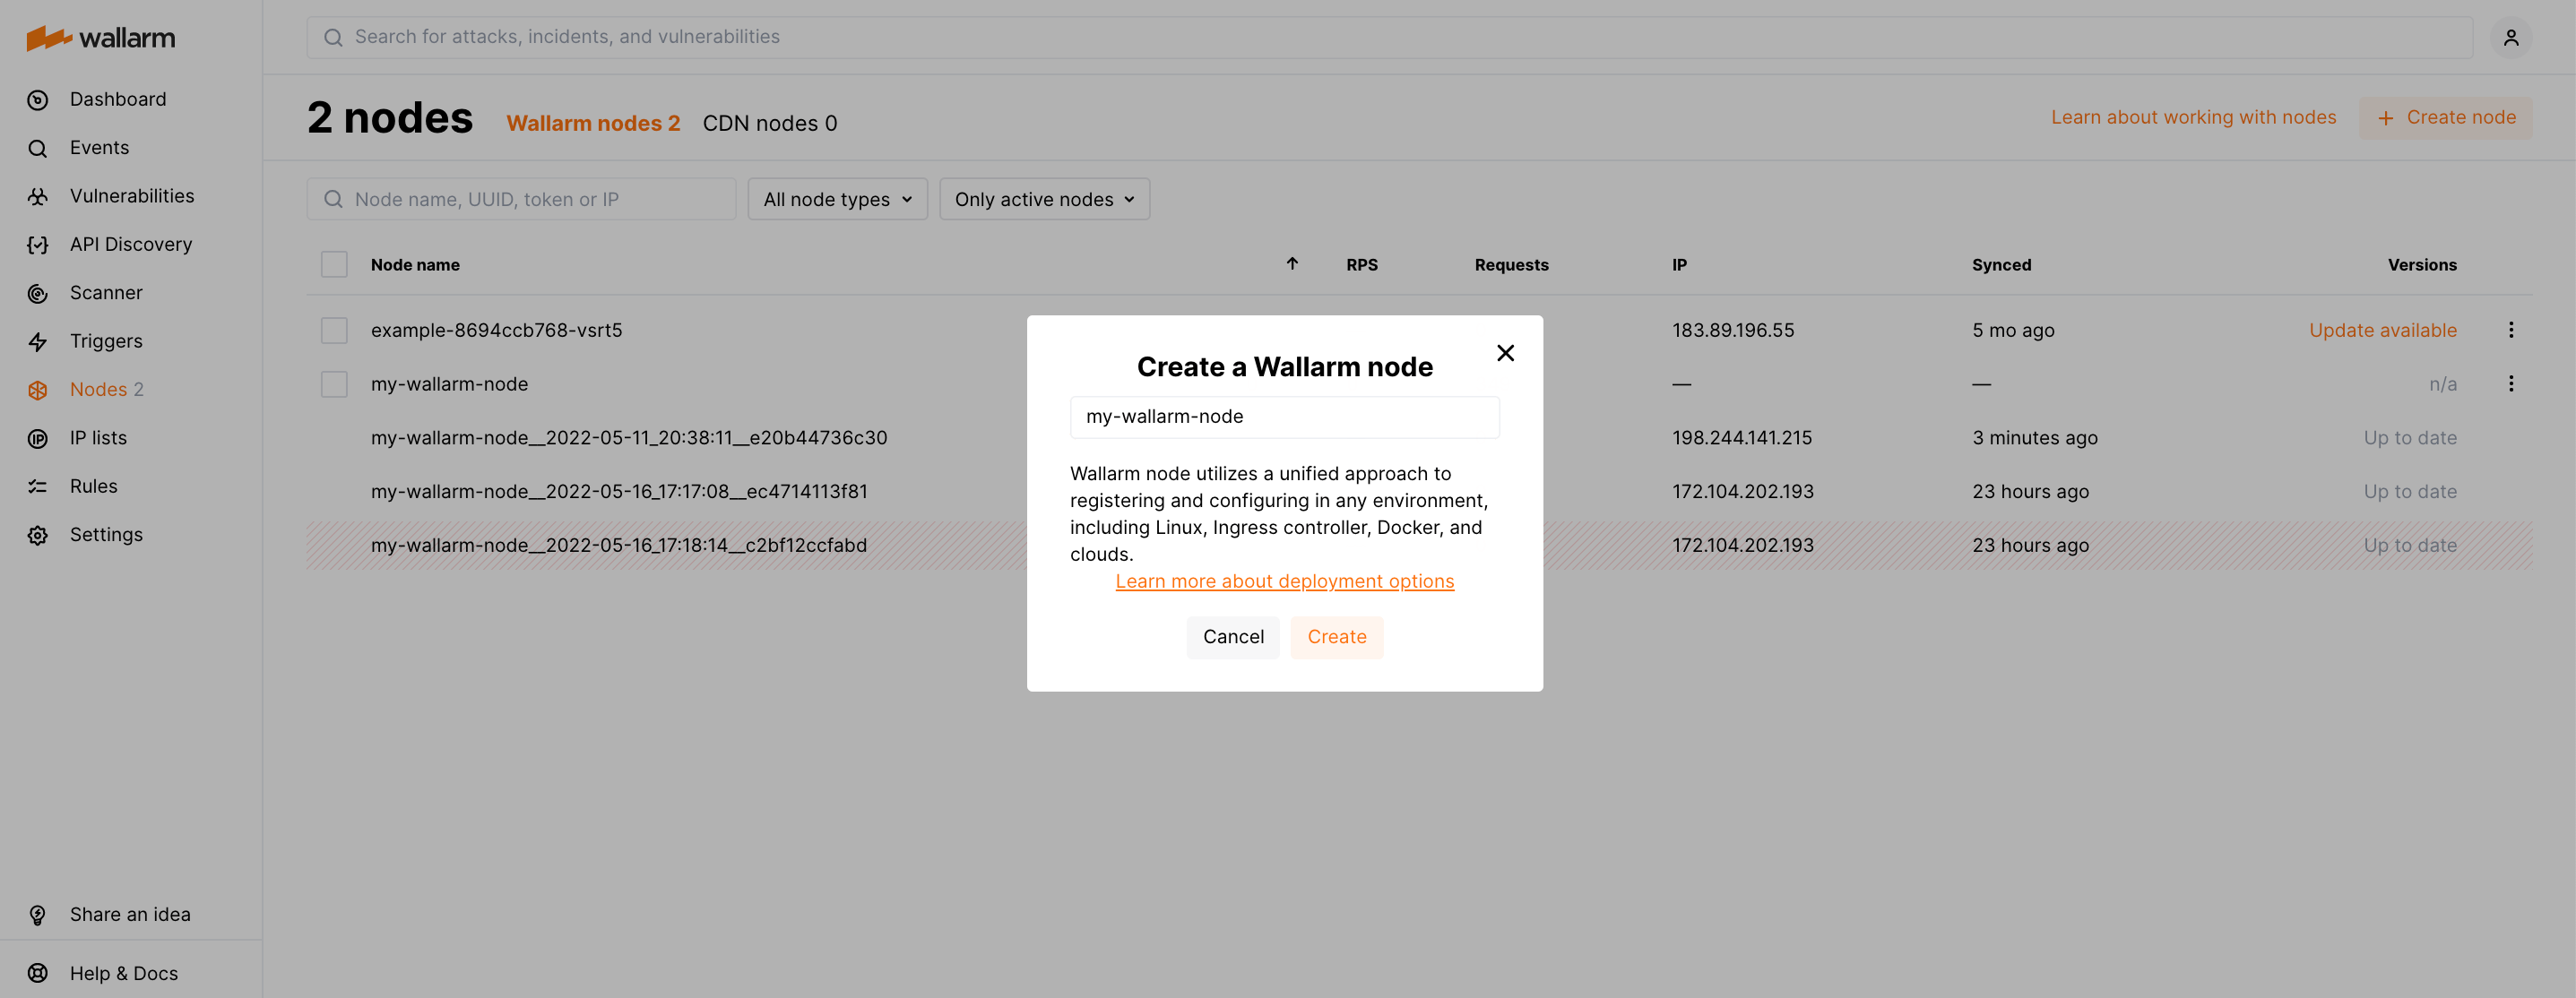
Open Wallarm Console → Nodes via the link below:
- https://us1.my.wallarm.com/nodes for the US Cloud
- https://my.wallarm.com/nodes for the EU Cloud
-
Create a filtering node with the Wallarm node type and copy the generated token.
Step 2: Deploy the Wallarm Helm chart
-
Make sure that your environment meets the requirements above and cert-manager is installed.
-
Add the Wallarm chart repository:
-
Create the
values.yamlfile with the Wallarm eBPF solution configuration.Example of the file with the minimum configuration:
<NODE_TOKEN>is the token of the Wallarm node to be run in Kubernetes.Using one token for several installations
You can use one token in several installations regardless of the selected platform. It allows logical grouping of node instances in the Wallarm Console UI. Example: you deploy several Wallarm nodes to a development environment, each node is on its own machine owned by a certain developer.
-
Deploy the Wallarm Helm chart:
helm install --version 0.10.28 <RELEASE_NAME> wallarm/wallarm-oob --wait -n wallarm-ebpf --create-namespace -f <PATH_TO_VALUES><RELEASE_NAME>is the name for the Helm release of the Wallarm eBPF chartwallarm-ebpfis the new namespace to deploy the Helm release with the Wallarm eBPF chart, it is recommended to deploy it to a separate namespace<PATH_TO_VALUES>is the path to thevalues.yamlfile
Step 3: Enable traffic mirroring
We recommend enabling traffic mirroring to utilize the Wallarm eBPF-based solution effectively for NGINX Ingress controller, Kong Ingress controller, or regular NGINX servers.
By default, the deployed solution does not analyze any traffic. To enable traffic analysis, you need to enable traffic mirroring at the desired level, which can be:
-
For a namespace
-
For a pod
-
For a node name or a container
There are two ways to enable traffic mirroring: using dynamic filters as namespace labels or pod annotations, or controlling it through the config.agent.mirror.filters block in the values.yaml file. You can also combine these approaches. More details
For a namespace using a label
To enable mirroring for a namespace, set the namespace label wallarm-mirror to enabled:
For a pod using an annotation
To enable mirroring for a pod, set the mirror.wallarm.com/enabled annotation to true:
kubectl patch deployment <DEPLOYMENT_NAME> -n <NAMESPACE> -p '{"spec": {"template":{"metadata":{"annotations":{"mirror.wallarm.com/enabled":"true"}}}} }'
For a namespace, pod, container, or node using values.yaml
For more granular control, you can use the config.agent.mirror.filters block in the values.yaml file of the Wallarm eBPF to specify the mirroring level. Read the article on how to configure filters and how they interact with Wallarm namespace labels and pod annotations.
Step 4: Test the Wallarm eBPF operation
To test that the Wallarm eBPF operates correctly:
-
Get the Wallarm pod details to check they have been successfully started:
Each pod should display the following: READY: N/N and STATUS: Running, e.g.:
-
Send the test Path Traversal attack to the application by replacing
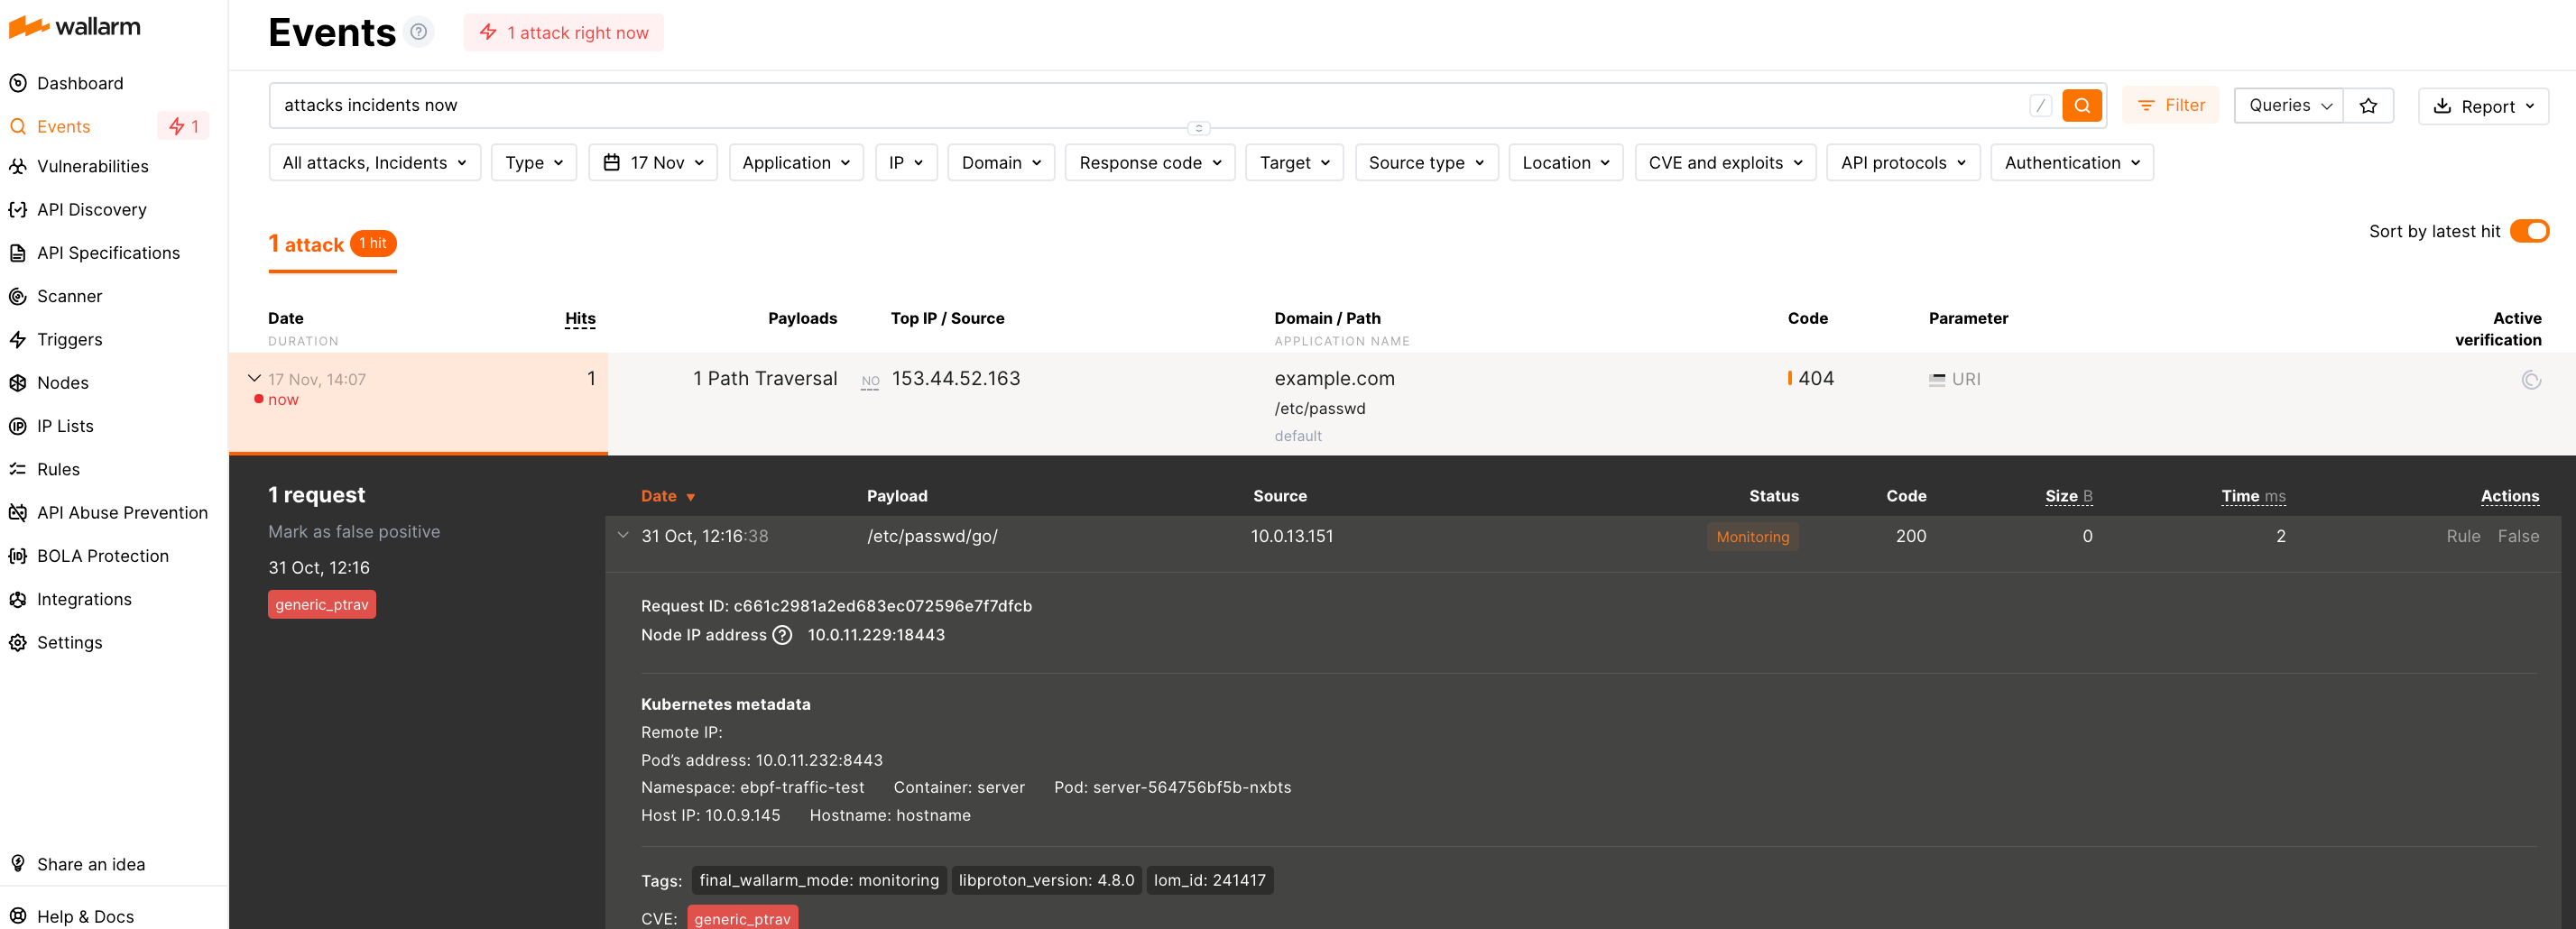
<LOAD_BALANCER_IP_OR_HOSTNAME>with the actual IP address or DNS name of the load balancer directing traffic to it:Since the Wallarm eBPF solution operates in the out-of-band approach, it does not block attacks but only registers them.
To check that the attack has been registered, proceed to Wallarm Console → Events:
Limitations
-
Due to its out-of-band (OOB) operation, which analyzes traffic independently from actual flow, the solution has several inherent limitations:
- It does not instantly block malicious requests. Wallarm only observes attacks and provides you with the details in Wallarm Console.
- Rate limiting is not supported as it is impossible to limit load on target servers.
- Filtering by IP addresses is not supported.
-
As server response bodies are not mirrored:
- Vulnerability detection based on passive detection is not supported.
- Displaying API endpoint response structure in API Discovery is not supported.
-
While the solution is in beta, not all Kubernetes resources can be mirrored effectively. Therefore, we recommend enabling traffic mirroring specifically for NGINX Ingress controllers, Kong Ingress controllers, or regular NGINX servers in Kubernetes.


