Wallarm On-Premises Solution Overview
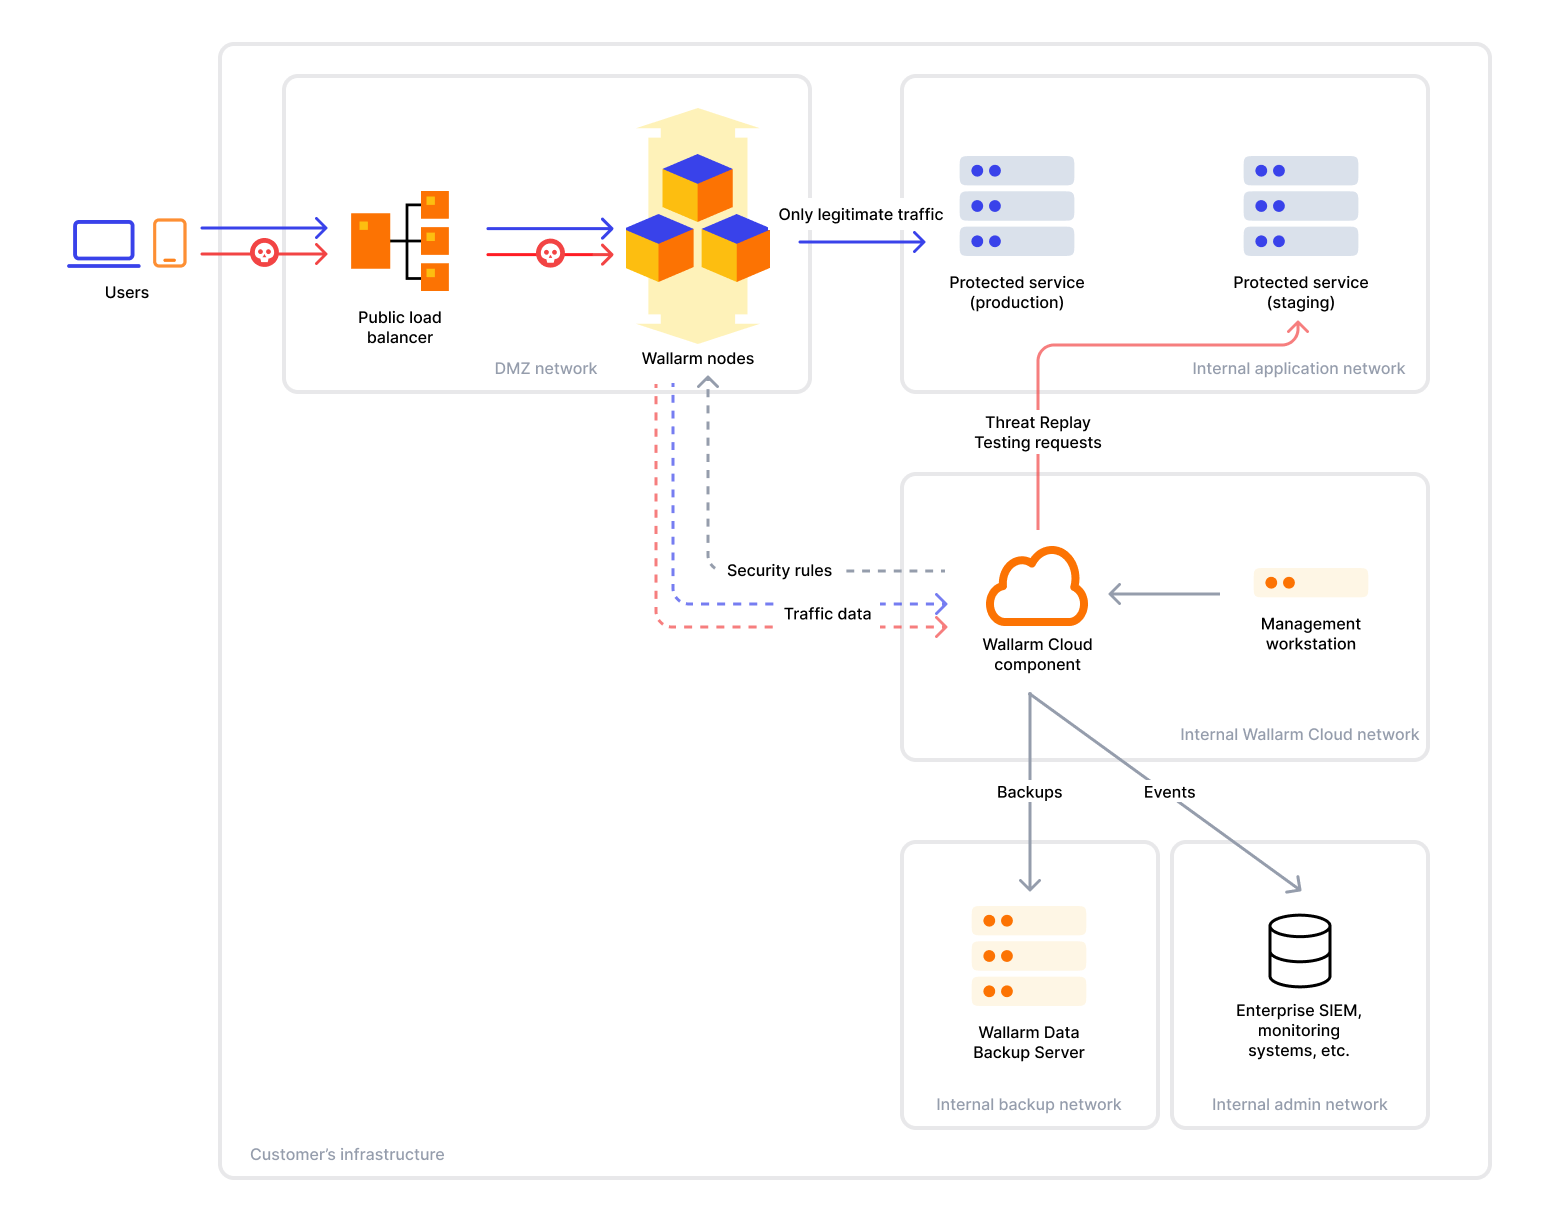
Wallarm offers an on-premises solution tailored for partners, large enterprises, and any organization that requires complete control over their security infrastructure. This deployment model enables hosting both Wallarm Filtering Nodes and the Wallarm Cloud component entirely within your environment.
This document provides an overview of the solution's architecture, core components and deployment models - to help you evaluate whether Wallarm On-Premise fits your organization.
Solution component overview
The Wallarm architecture is built around two main components:
-
Filtering Node which integrates into your traffic flow to inspect incoming requests for malicious activities.
-
Wallarm Cloud which processes data from Filtering Nodes and hosts the Wallarm Console UI - your control plane for configuration and security event investigation.
Both components are fully hosted and managed by a customer in the on-premises solution.
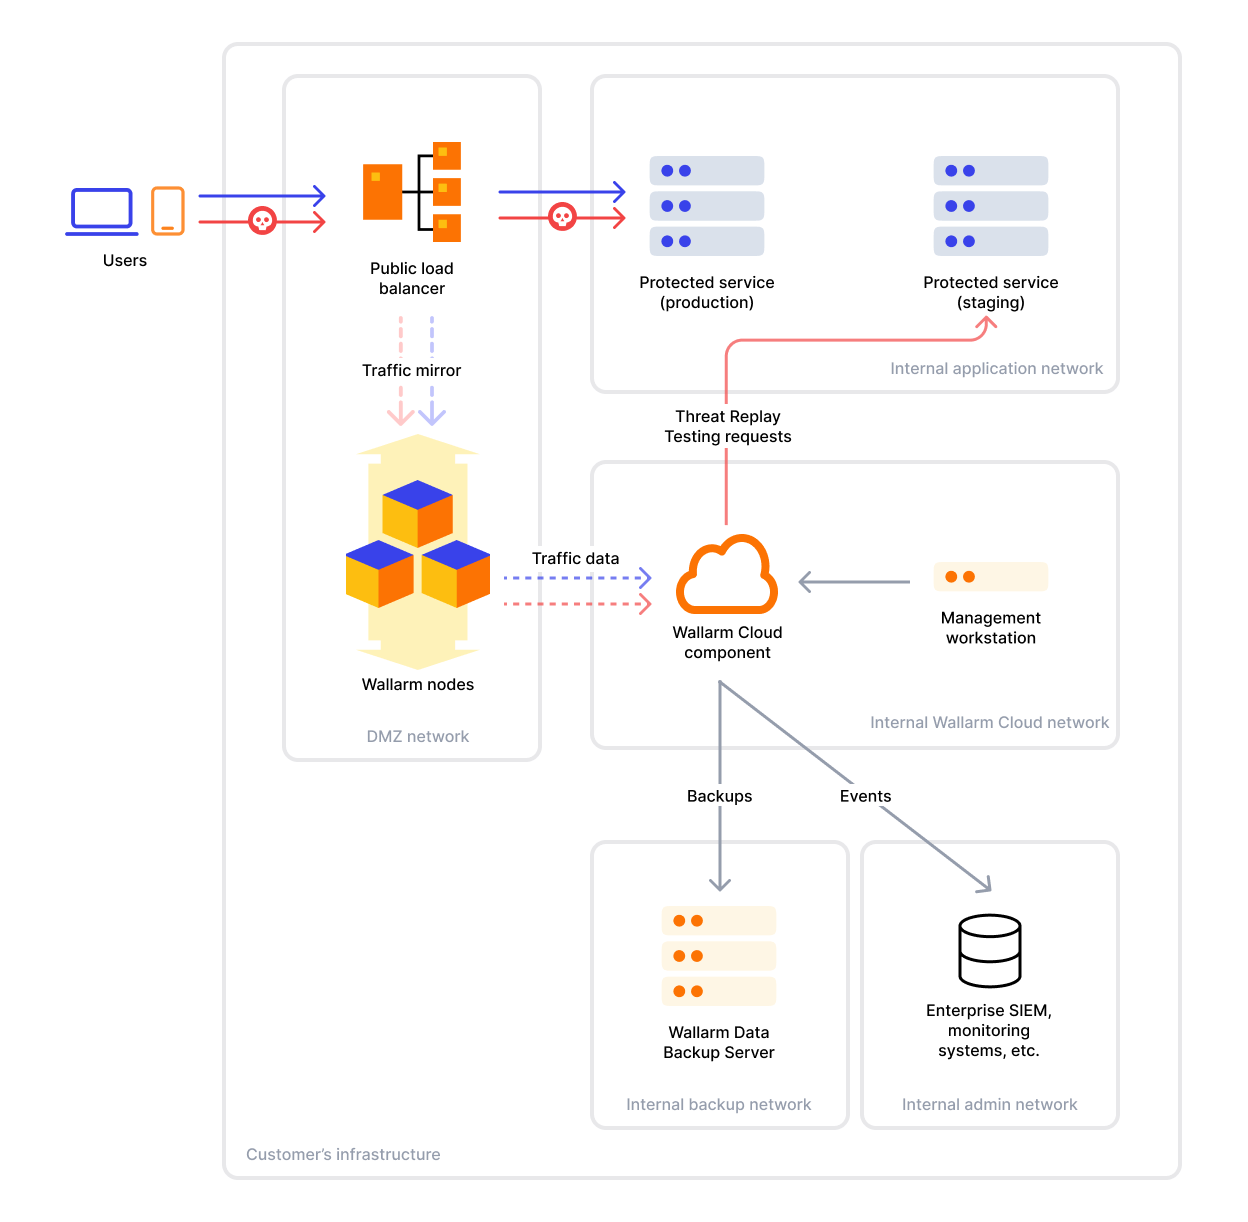
Both inline and out-of-band Node deployment approaches are supported in the on-premises solution. In both cases, the Filtering Node intercepts or mirrors traffic and sends metadata to the local Wallarm Cloud component for analysis and coordination.
Filtering Node in on-premises deployment
All standard deployment options for Filtering Nodes are supported in the on-premise setup. You can follow the regular deployment instructions.
Filtering Nodes must be deployed on separate instances from Wallarm Cloud.
Wallarm Cloud in on-premises deployment
The Wallarm Cloud component is deployed within your internal infrastructure and must reside in an isolated network segment and on separate secure servers, separated by a firewall from the Internet and other parts of the internal network.
It is designed to run on dedicated standalone virtual or physical servers, supporting both single-node and clustered architectures.
Deployment layers
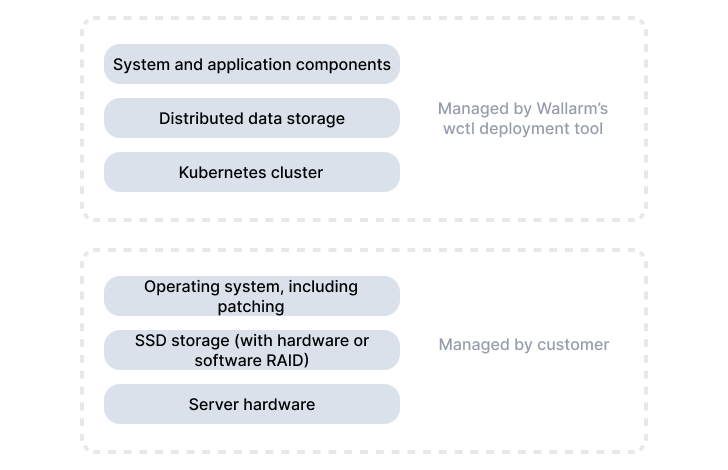
The Wallarm Cloud system is built from the following layers deployed and managed by Wallarm's software installer tool:
-
Kubernetes cluster
-
Distributed block storage for Kubernetes
-
Databases
-
MinIO
-
Configuration and deployment tools
-
~20 Wallarm internal microservices
Deployment architectures
There are the following primary architectures for how an instance of Wallarm Cloud can be deployed and managed:
-
Standalone - Single-node deployment. Suitable only for testing and evaluation, there is no redundancy or fault tolerance.
-
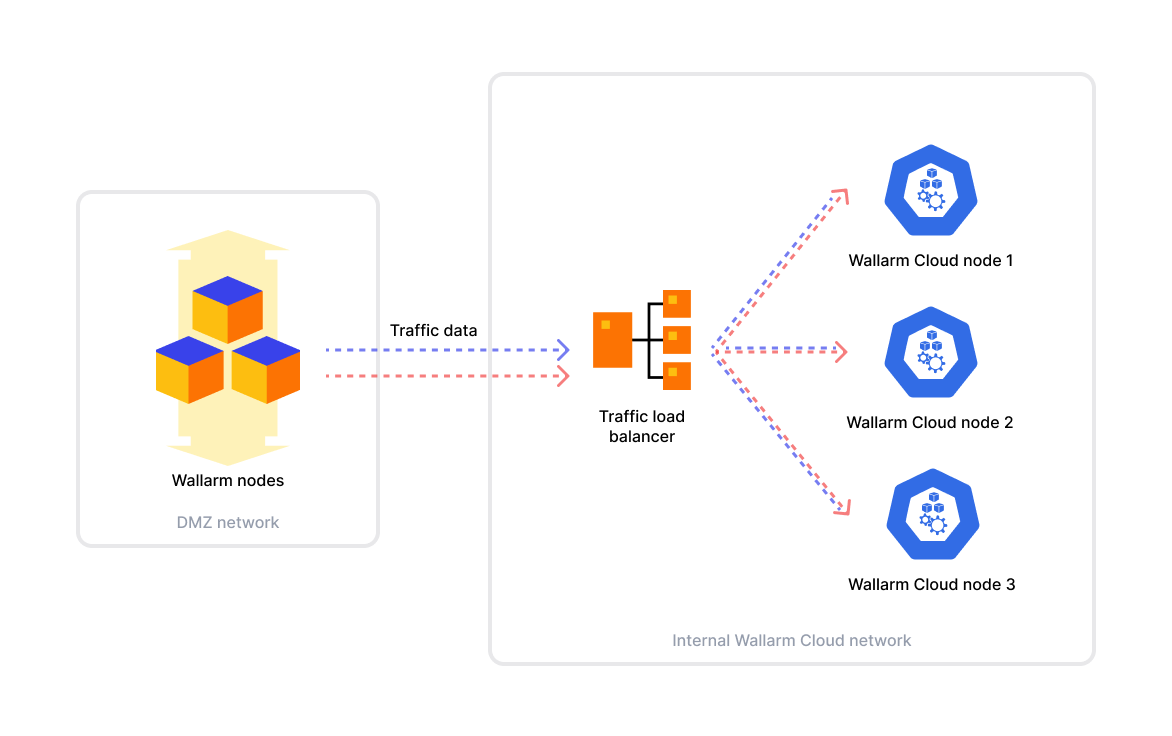
Cluster. Multi-node Kubernetes deployment designed for production use. The cluster requires at least 3 nodes and can tolerate the failure of one node - more than one down breaks quorum.
Wallarm Cloud nodes should be placed in the same network/subnet - they use the network to synchronize data and configuration across cluster nodes.
In a cluster deployment, a network load balancer is required to distribute traffic across active Wallarm Cloud nodes. There are two supported options:
-
Built-in software load balancer provided as part of the Cloud instance deployment
To use it, you need to allocate a Virtual IP (VIP) within the same private subnet. The local network should support allocating additional IP addresses (on the ARP and RARP protocol level) to existing servers.
-
Customer-managed external load balancer
The standalone balancer should support both TCP- and UDP-layer load balancing and TCP health checks (to verify the state of Wallarm Cloud nodes).
Management workstation
A separate management workstation is required to install and manage the Wallarm Cloud component.
This machine is not part of the cluster itself and is used solely for administrative tasks such as installation, configuration, updates, and disaster recovery. It must meet the requirements.
The management workstation runs Wallarm's on-premises management tool wctl and stores the necessary configuration files used during deployment and maintenance.
Layer management responsibilities
The following diagram shows which layers of the Wallarm Cloud system are managed via wctl and which require customer management:
High availability and automatic failover
When a Wallarm Cloud instance is deployed in the cluster mode, you can expect from the instance the following capabilities:
-
In case of a single Wallarm Cloud node failure, the Wallarm Cloud instance may (but not necessarily will) experience up to 5 minutes of service degradation while the system detects and recovers from the failure.
-
After a node outage, the Longhorn data storage subsystem waits for about 10 minutes before starting to rebalance the data across the surviving nodes and restore the degraded volumes.
-
After adding a new node to a degraded Wallarm Cloud cluster, the system may take 30-40 minutes to rebalance the data and workload in the cluster. During this period, the system may experience a short (1-2 minutes) period of service degradation.
Staging environment
We recommend setting up a separate staging instance of the Wallarm Cloud component to test new software releases and major configuration changes before applying them in production.
Ideally, the staging environment should mirror the production setup (network, servers, software) and be deployed in an isolated network with clear naming to avoid confusion during maintenance or testing.
Filtering Node and Wallarm Cloud dependency
The functionality of the Wallarm Filtering Node component depends on the availability and functionality of the Wallarm Cloud component as described in the Wallarm Cloud Is Down document.
While planning the deployment of the Wallarm Cloud component, it is important to consider the mentioned dependencies and design the deployment with proper levels of redundancy, high availability, monitoring, and other aspects that affect the correct functionality of the whole Wallarm API Security system.
Wallarm API
A Wallarm Cloud instance exposes a set of API endpoints that a customer can use to programmatically perform different tasks, such as managing vulnerabilities, attacks, incidents, etc.
On-premises Wallarm Cloud deployments provide a SwaggerUI interface using the following URL:
Licensing
Each on-premises Wallarm Cloud instance requires a license key provided by Wallarm. The key defines:
-
License validity period
-
Enabled product features
-
Monthly API traffic volume (RPM)
If the license expires or the monthly API traffic exceeds the allowed RPM volume:
-
Filtering Nodes continue filtering traffic using rules uploaded to the Node before license expiration
-
Filtering Nodes stop uploading API attacks and sessions to the Wallarm Cloud, so new events do not appear in the Console UI
-
The system stops analyzing API sessions and generating new API Abuse Prevention rules
The system automatically sends email notifications when the Wallarm license is about to expire or when the current RPM is approaching the licensed volume.
To access the on-premises solution, please contact Wallarm's Sales Team.
Limitations
The following functionalities are currently not supported by the on-premises Wallarm solution:
-
AASM (API Attack Surface Management) feature
While the feature is unavailable in the on-premise version, customers can still create an account in Wallarm's cloud-based service and activate the AASM product following the above instructions.
-
Integration with Telegram (if you need the integration, please contact our Sales Team)
Data retention and automatic removal
By default, Wallarm Cloud follows the publicly available data retention policy.
Because the disk storage size is typically preconfigured in advance and cannot be changed easily, Wallarm Cloud has an automated process to delete data on old user sessions, attacks, hits, and incidents from the database should the system detect a potential disk overflow.
In this case, the system administrator receives an email notification prompting them to potentially plan and execute a process to add additional disk storage capacity.


