Deploying the Native Node with AWS AMI
The Wallarm Native Node, which operates independently of NGINX, is designed for Wallarm connector self-hosted deployment and TCP traffic mirror analysis. You can run the Native Node on an AWS instance using the AWS AMI.
The AMI is based on Debian 12 and includes the all-in-one installer. This installer is the Wallarm script used to deploy and configure the Node. After launching an instance from the AMI, you will execute this script to complete the installation.
Deploying the Wallarm Node from the AMI on AWS typically takes around 10 minutes.
Security note
This solution is designed to follow AWS security best practices. We recommend avoiding the use of the AWS root account for deployment. Instead, use IAM users or roles with only the necessary permissions.
The deployment process assumes the principle of least privilege, granting only the minimal access required to provision and operate Wallarm components.
For guidance on estimating AWS infrastructure costs for this deployment, see the Cost Guidance for Deploying Wallarm in AWS page.
Use cases and deployment modes
-
When deploying a Wallarm node as part of a connector solution for MuleSoft Mule Gateway, Cloudflare, Amazon CloudFront, Broadcom Layer7 API Gateway, Fastly on AWS.
Run the image in
connector-servermode. -
When you need a security solution for TCP traffic mirror analysis and your infrastructure resides on AWS.
Run the image in
tcp-capture-v2mode.Limitations of the
tcp-capture-v2mode- The solution analyzes only unencrypted HTTP traffic over raw TCP, not encrypted HTTPS traffic.
- The solution requires bidirectional TCP streams, with all packets from both directions captured in a single coherent flow.
tcp-capture-v2does not support traffic mirrored as independent, one-way streams (e.g., by some FortiGate configurations), because such traffic cannot be reliably reconstructed and HTTP request/response pairs may not be matched.
-
When you need a gRPC-based external processing filter for APIs managed by Istio.
Run the image in
envoy-external-filtermode.
Requirements
-
An AWS account
-
Understanding of AWS EC2, Security Groups
-
Any AWS region of your choice, there are no specific restrictions on the region for the Wallarm node deployment
Wallarm supports both single availability zone (AZ) and multi availability zone deployments. In multi-AZ setups, Wallarm Nodes can be launched in separate availability zones and placed behind a Load Balancer for high availability.
-
Access to the account with the Administrator role in Wallarm Console for the US Cloud or EU Cloud
-
Executing all commands on a Wallarm EC2 instance as a superuser (e.g.
root) -
When running the node in the
connector-serverorenvoy-external-filtermode, a trusted SSL/TLS certificate for the machine's domain should be issued and uploaded to the machine along with the private key -
When running the node in the
tcp-capture-v2mode:- Traffic and response mirroring must be configured with both source and target set up, and the prepared instance chosen as a mirror target. Specific environment requirements must be met, such as allowing specific protocols for traffic mirroring configurations.
- Unencrypted HTTP traffic over raw TCP, not encrypted HTTPS traffic.
-
The
tcp-capture-v2mode supports VLAN (802.1Q) mirrored traffic without requiring VLAN tags.
Limitations
-
When using the Node in
connector-serverorenvoy-external-filtermode, a trusted SSL/TLS certificate is required for the machine's domain. Self-signed certificates are not yet supported. -
The
tcp-capture-v2mode does not support traffic mirrored as independent, one-way streams (e.g., by some FortiGate configurations), because such traffic cannot be reliably reconstructed and HTTP request/response pairs may not be matched.tcp-capture-v2requires bidirectional TCP streams, with all packets from both directions captured in a single coherent flow. -
At the moment, the
tcp-capture-v2mode does not support VXLAN or SPAN-mirrored traffic. -
Custom blocking page and blocking code configurations are not yet supported.
-
Rate limiting by the Wallarm rule is not supported.
-
Multitenancy is not supported yet.
Installation
1. Launch a Wallarm Node instance
Launch an EC2 instance using the Wallarm Native Node AMI.
Recommended configuration:
-
Latest available AMI version
-
Any preferred AWS region
-
EC2 instance type:
t3.mediumort3.large, see cost guidance for details -
Appropriate VPC and subnet based on your infrastructure
-
Security Group inbound access to the port defined in the Node configuration
-
Security Group outbound access to:
https://meganode.wallarm.comto download the Wallarm installerhttps://us1.api.wallarm.comorhttps://api.wallarm.comfor US/EU Wallarm Cloud-
IP addresses and their corresponding hostnames (if any) listed below. This is needed for downloading updates to attack detection rules and API specifications, as well as retrieving precise IPs for your allowlisted, denylisted, or graylisted countries, regions, or data centers
-
SSH key pair for accessing the instance
2. Prepare the Wallarm API token
To register the Node in the Wallarm Cloud, you need an API token:
-
Open Wallarm Console → Settings → API tokens in the US Cloud or EU Cloud.
-
Find or create API token with the
Node deployment/Deploymentusage type. -
Copy this token.
3. Store the token in AWS Secrets Manager (recommended)
For secure token handling, store the token in AWS Secrets Manager.
The secret must be in the same AWS region as your Wallarm Node EC2 instance.
-
Store the token in AWS Secrets Manager:
- Open the AWS Secrets Manager console.
- Click Store a new secret.
- Select Other type of secret.
- In Key/value pairs, switch to Plaintext and paste your Wallarm API token.
- Click Next, set the secret name to
wallarm/api-token, then complete the wizard.
If you have the AWS CLI installed and configured, run the
aws secretsmanagercommand:aws secretsmanager create-secret \ --region <AWS_REGION> \ --name wallarm/api-token \ --description "Wallarm node API token" \ --secret-string "<YOUR_WALLARM_API_TOKEN>"Replace
<AWS_REGION>with the region where your Wallarm Node EC2 instance is running (e.g.,us-east-1).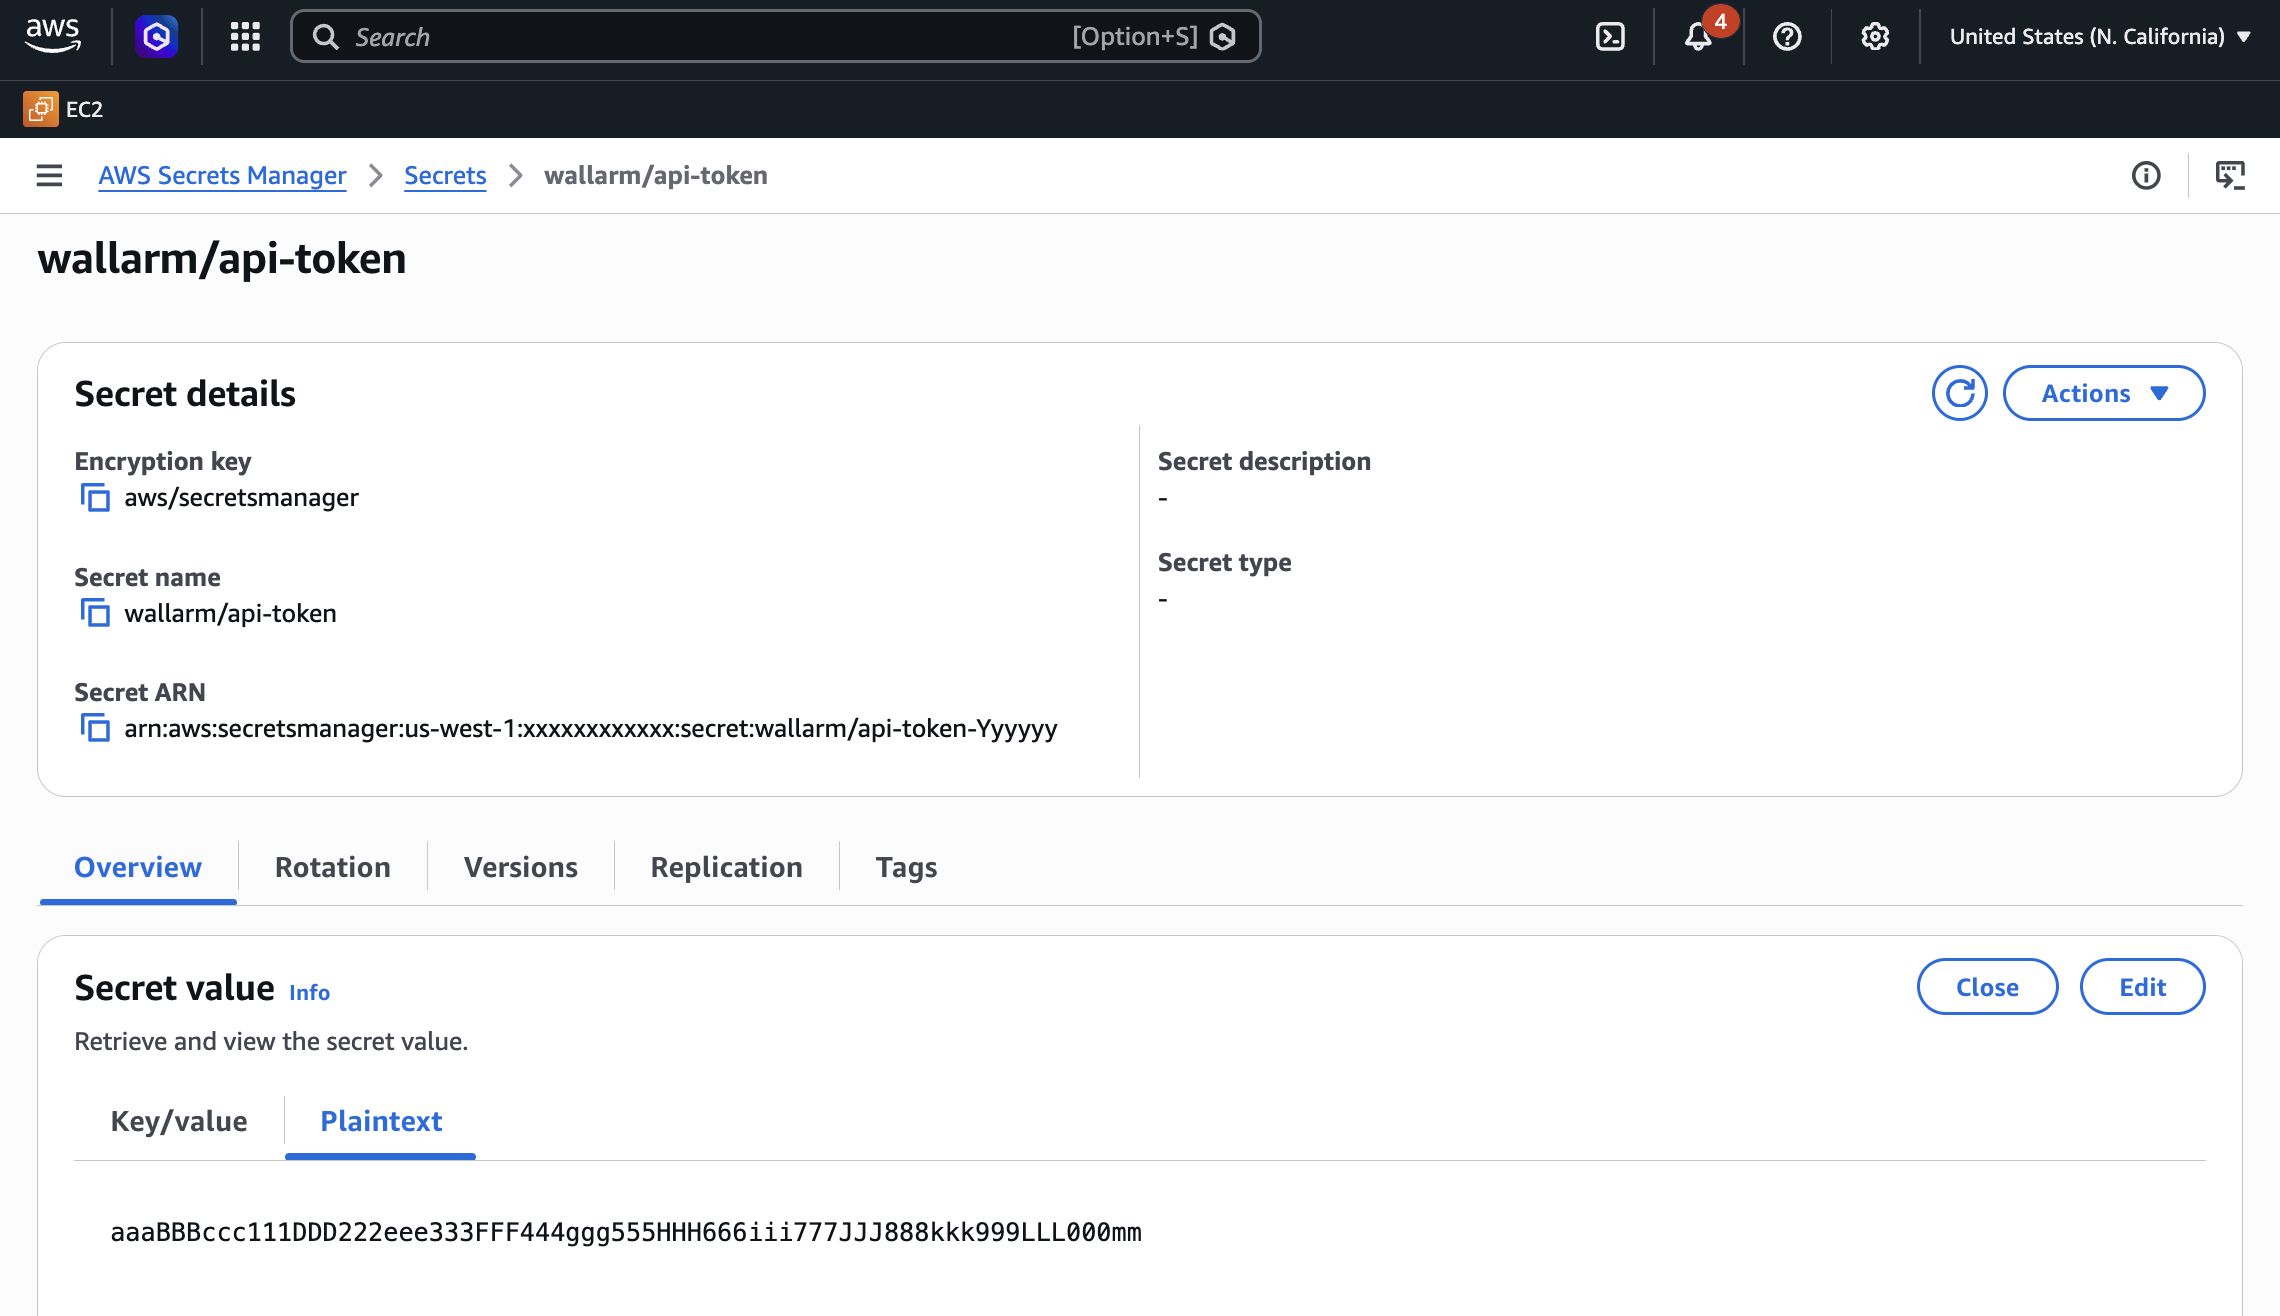
-
Grant the EC2 instance access to the secret. Create an IAM policy with least-privilege access to the secret, then attach it to the EC2 instance via an IAM role.
- Open the IAM console → Policies and click Create policy.
-
Switch to the JSON tab and paste the policy.
{
"Version": "2012-10-17",
"Statement": [
    {
    "Effect": "Allow",
    "Action": [
        "secretsmanager:GetSecretValue"
    ],
    "Resource": "arn:aws:secretsmanager:<REGION>:<ACCOUNT_ID>:secret:wallarm/api-token*"
    }
  ]
}
Replace
<REGION>and<ACCOUNT_ID>with your values.If the secret is encrypted with a customer managed KMS key (rather than the default AWS managed key), also add
kms:Decryptpermission for that key. -
Name the policy (e.g.,
WallarmSecretsReadOnly) and create it. - Open the IAM console → Roles and click Create role.
- Select AWS service → EC2 as the trusted entity, then click Next.
- Attach the
WallarmSecretsReadOnlypolicy and complete the wizard. - Open the EC2 console, select your Wallarm Node instance, then go to Actions → Security → Modify IAM role and attach the role you created.
-
Create a trust policy file that allows EC2 to assume the role:
-
Create the IAM role and attach the policy:
aws iam create-role \
  --role-name WallarmNodeRole \
  --assume-role-policy-document file://trust-policy.json

aws iam put-role-policy \
  --role-name WallarmNodeRole \
  --policy-name WallarmSecretsReadOnly \
  --policy-document '{
    "Version": "2012-10-17",
    "Statement": [
      {
        "Effect": "Allow",
        "Action": ["secretsmanager:GetSecretValue"],
        "Resource": "arn:aws:secretsmanager:<REGION>:<ACCOUNT_ID>:secret:wallarm/api-token*"
      }
    ]
  }'
Replace
<REGION>and<ACCOUNT_ID>with your values. -
Create an instance profile and attach the role to your EC2 instance:
aws iam create-instance-profile \
  --instance-profile-name WallarmNodeProfile

aws iam add-role-to-instance-profile \
  --instance-profile-name WallarmNodeProfile \
  --role-name WallarmNodeRole

aws ec2 associate-iam-instance-profile \
  --instance-id <INSTANCE_ID> \
  --iam-instance-profile Name=WallarmNodeProfile
4. Connect to the Node instance via SSH
Use the selected SSH key to connect to your running EC2 instance:
You need to use the admin username to connect to the instance.
5. Upload TLS certificates
For the connector-server and envoy-external-filter mode, issue a trusted TLS certificate and private key for the Node domain. These files must be accessible inside the instance and referenced in the further configuration.
Upload the certificate and key files to the EC2 instance using scp, rsync, or another method, e.g.:
6. Prepare the configuration file
On the EC2 instance, create a file named wallarm-node-conf.yaml with one of the following minimal configurations:
version: 4

mode: connector-server

connector:
  address: ":5050"
  tls_cert: path/to/tls-cert.crt
  tls_key: path/to/tls-key.key
In the connector.tls_cert and connector.tls_key, you specify the paths to a trusted certificate and private key issued for the machine's domain.
In the tcp_stream.from_interface.interface parameter, you specify the network interface to capture traffic from. To check network interfaces available on the host:
version: 4

mode: envoy-external-filter

envoy_external_filter:
  address: ":5080"
  tls_cert: "/path/to/cert.crt"
  tls_key: "/path/to/cert.key"
In the envoy_external_filter.tls_cert and envoy_external_filter.tls_key, you specify the paths to a trusted certificate and private key issued for the machine's domain.
7. Run the Node installation script
On the EC2 instance, execute the installer.
If you stored the token in AWS Secrets Manager (step 3), retrieve it:
WALLARM_TOKEN=$(aws secretsmanager get-secret-value \
  --secret-id wallarm/api-token \
  --query SecretString --output text)
Then run the installer using $WALLARM_TOKEN. Alternatively, you can pass the token directly as <API_TOKEN> (simpler for testing but not recommended for production):
# US Cloud
sudo env WALLARM_LABELS='group=<GROUP>' ./aio-native-0.14.0.x86_64.sh -- --batch --token $WALLARM_TOKEN --mode=connector-server --go-node-config=./wallarm-node-conf.yaml --host us1.api.wallarm.com

# EU Cloud
sudo env WALLARM_LABELS='group=<GROUP>' ./aio-native-0.14.0.x86_64.sh -- --batch --token $WALLARM_TOKEN --mode=connector-server --go-node-config=./wallarm-node-conf.yaml --host api.wallarm.com
# US Cloud
sudo env WALLARM_LABELS='group=<GROUP>' ./aio-native-0.14.0.x86_64.sh -- --batch --token $WALLARM_TOKEN --mode=tcp-capture-v2 --go-node-config=./wallarm-node-conf.yaml --host us1.api.wallarm.com

# EU Cloud
sudo env WALLARM_LABELS='group=<GROUP>' ./aio-native-0.14.0.x86_64.sh -- --batch --token $WALLARM_TOKEN --mode=tcp-capture-v2 --go-node-config=./wallarm-node-conf.yaml --host api.wallarm.com
# US Cloud
sudo env WALLARM_LABELS='group=<GROUP>' ./aio-native-0.14.0.x86_64.sh -- --batch --token $WALLARM_TOKEN --mode=envoy-external-filter --go-node-config=./wallarm-node-conf.yaml --host us1.api.wallarm.com

# EU Cloud
sudo env WALLARM_LABELS='group=<GROUP>' ./aio-native-0.14.0.x86_64.sh -- --batch --token $WALLARM_TOKEN --mode=envoy-external-filter --go-node-config=./wallarm-node-conf.yaml --host api.wallarm.com
-
The
WALLARM_LABELSvariable sets group into which the node will be added (used for logical grouping of nodes in the Wallarm Console UI). -
$WALLARM_TOKEN(or<API_TOKEN>) specifies the API token for theNode deployment/Deploymentusage type. -
--go-node-configspecifies the path to the configuration file prepared before.
The provided configuration file will be copied to the path: /opt/wallarm/etc/wallarm/go-node.yaml.
If needed, you can change the copied file after the installation is finished. To apply the changes, you will need to restart the Wallarm service with sudo systemctl restart wallarm.
8. Finish the installation
After deploying the node, the next step is to apply the Wallarm code to your API management platform or service in order to route traffic to the deployed node.
- Contact sales@wallarm.com to obtain the Wallarm code bundle for your connector.
-
Follow the platform-specific instructions to apply the bundle on your API management platform:
After deploying the node, the next step is to update Envoy settings to forward traffic to the node.
Verifying the node operation
To verify the node is detecting traffic, you can check the logs:
-
The Native Node logs are written to
/opt/wallarm/var/log/wallarm/go-node.logby default. -
Standard logs of the filtering node such as whether the data is sent to the Wallarm Cloud, detected attacks, etc. are located in the directory
/opt/wallarm/var/log/wallarm. -
For additional debugging, set the
log.levelparameter todebug.
You can also verify the Node operation by checking its Prometheus metrics exposed at http://<NODE_IP>:9000/metrics.
Installer launch options
The AMI includes an installer script with the following launch options:
-
Get help on the script with:
-
Run the installer in an interactive mode and choose the required mode in the 1st step:
-
You can use the node in API Discovery-only mode. In this mode, attacks - including those detected by the Node's built-in mechanisms and those requiring additional configuration (e.g., credential stuffing, API specification violation attempts, and malicious activity from denylisted and graylisted IPs) - are detected and blocked locally (if enabled) but not exported to Wallarm Cloud. Since there is no attack data in the Cloud, Threat Replay Testing does not work. Traffic from whitelisted IPs is allowed.
Meanwhile, API Discovery, API session tracking, and security vulnerability detection remain fully functional, detecting relevant security entities and uploading them to the Cloud for visualization.
This mode is for those who want to review their API inventory and identify sensitive data first, and plan controlled attack data export accordingly. However, disabling attack export is rare, as Wallarm securely processes attack data and provides sensitive attack data masking if needed.
To enable API Discovery-only mode:
-
Create or modify the
/etc/wallarm-override/env.listfile:Add the following variable:
-
Follow the node installation procedure.
With the API Discovery-only mode enabled, the
/opt/wallarm/var/log/wallarm/wcli-out.loglog returns the following message: -