Wallarm Connector for MuleSoft Mule Gateway
This guide describes how to secure your Mule APIs managed by Mule Gateway using the Wallarm connector.
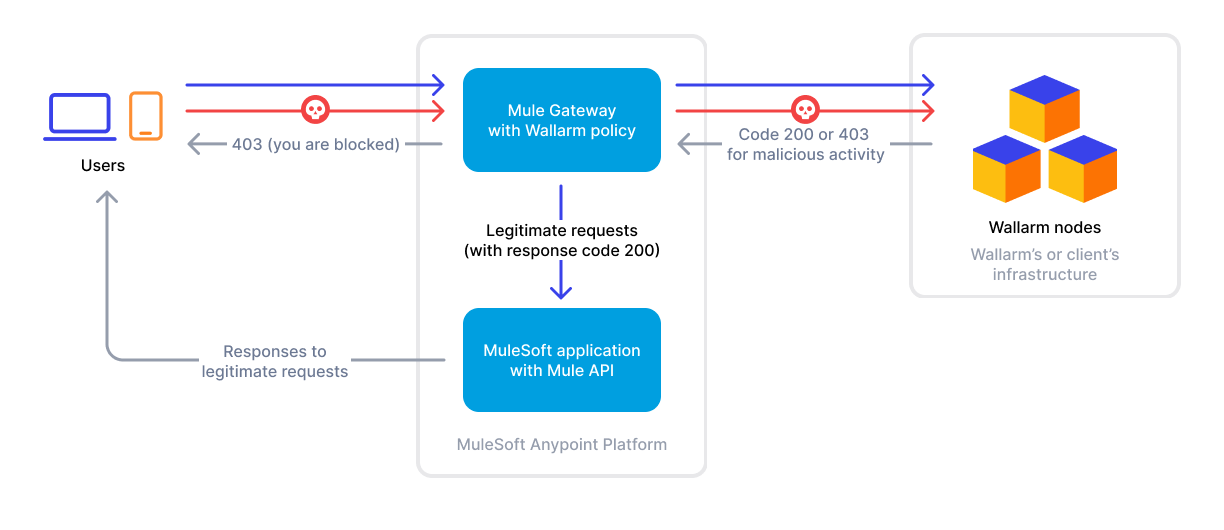
To use Wallarm as a connector for Mule Gateway, you need to deploy the Wallarm node externally and apply the Wallarm-provided policy in MuleSoft to route traffic to the Wallarm node for analysis.
The Wallarm connector for Mule Gateway supports only in-line traffic analysis:
Use cases
This solution is recommended for securing Mule APIs managed by Mule Gateway.
Limitations
-
When deploying the Wallarm service with the
LoadBalancertype using the Helm chart, a trusted SSL/TLS certificate is required for the domain. Self-signed certificates are not yet supported. -
Custom blocking page and blocking code configurations are not yet supported.
All blocked malicious traffic is returned with status code
403and the default block page. -
Rate limiting by Wallarm rules is not supported.
Rate limiting cannot be enforced on the Wallarm side for this connector. If you need rate limiting, use the features built into your API gateway or cloud platform.
-
Multitenancy is not supported on Security Edge hosting, but it is supported for a self-hosted node deployed with the connector.
Requirements
To proceed with the deployment, ensure that the following requirements are met:
-
Understanding of the MuleSoft platform.
-
An Enterprise subscription in Anypoint Platform (required for custom policy deployment and external traffic routing).
-
Your MuleSoft user is enabled to upload artifacts to your MuleSoft Anypoint Platform account.
-
Your MuleSoft Exchange credentials (username and password) are specified in the
<MAVEN_DIRECTORY>/conf/settings.xmlfile. -
Your application and API are linked and running on Mule Gateway.
-
Access to the account with the Administrator role in Wallarm Console for the US Cloud or EU Cloud.
Deployment
1. Deploy a Wallarm node
The Wallarm node is a core component of the Wallarm platform that you need to deploy. It inspects incoming traffic, detects malicious activities, and can be configured to mitigate threats.
You can deploy it either hosted by Wallarm or in your own infrastructure, depending on the level of control you require.
To deploy a Wallarm-hosted node for the connector, follow the instructions.
Choose an artifact for a self-hosted node deployment and follow the attached instructions:
- All-in-one installer for Linux infrastructures on bare metal or VMs
- Docker image for environments that use containerized deployments
- AWS AMI for AWS infrastructures
- Helm chart for infrastructures utilizing Kubernetes
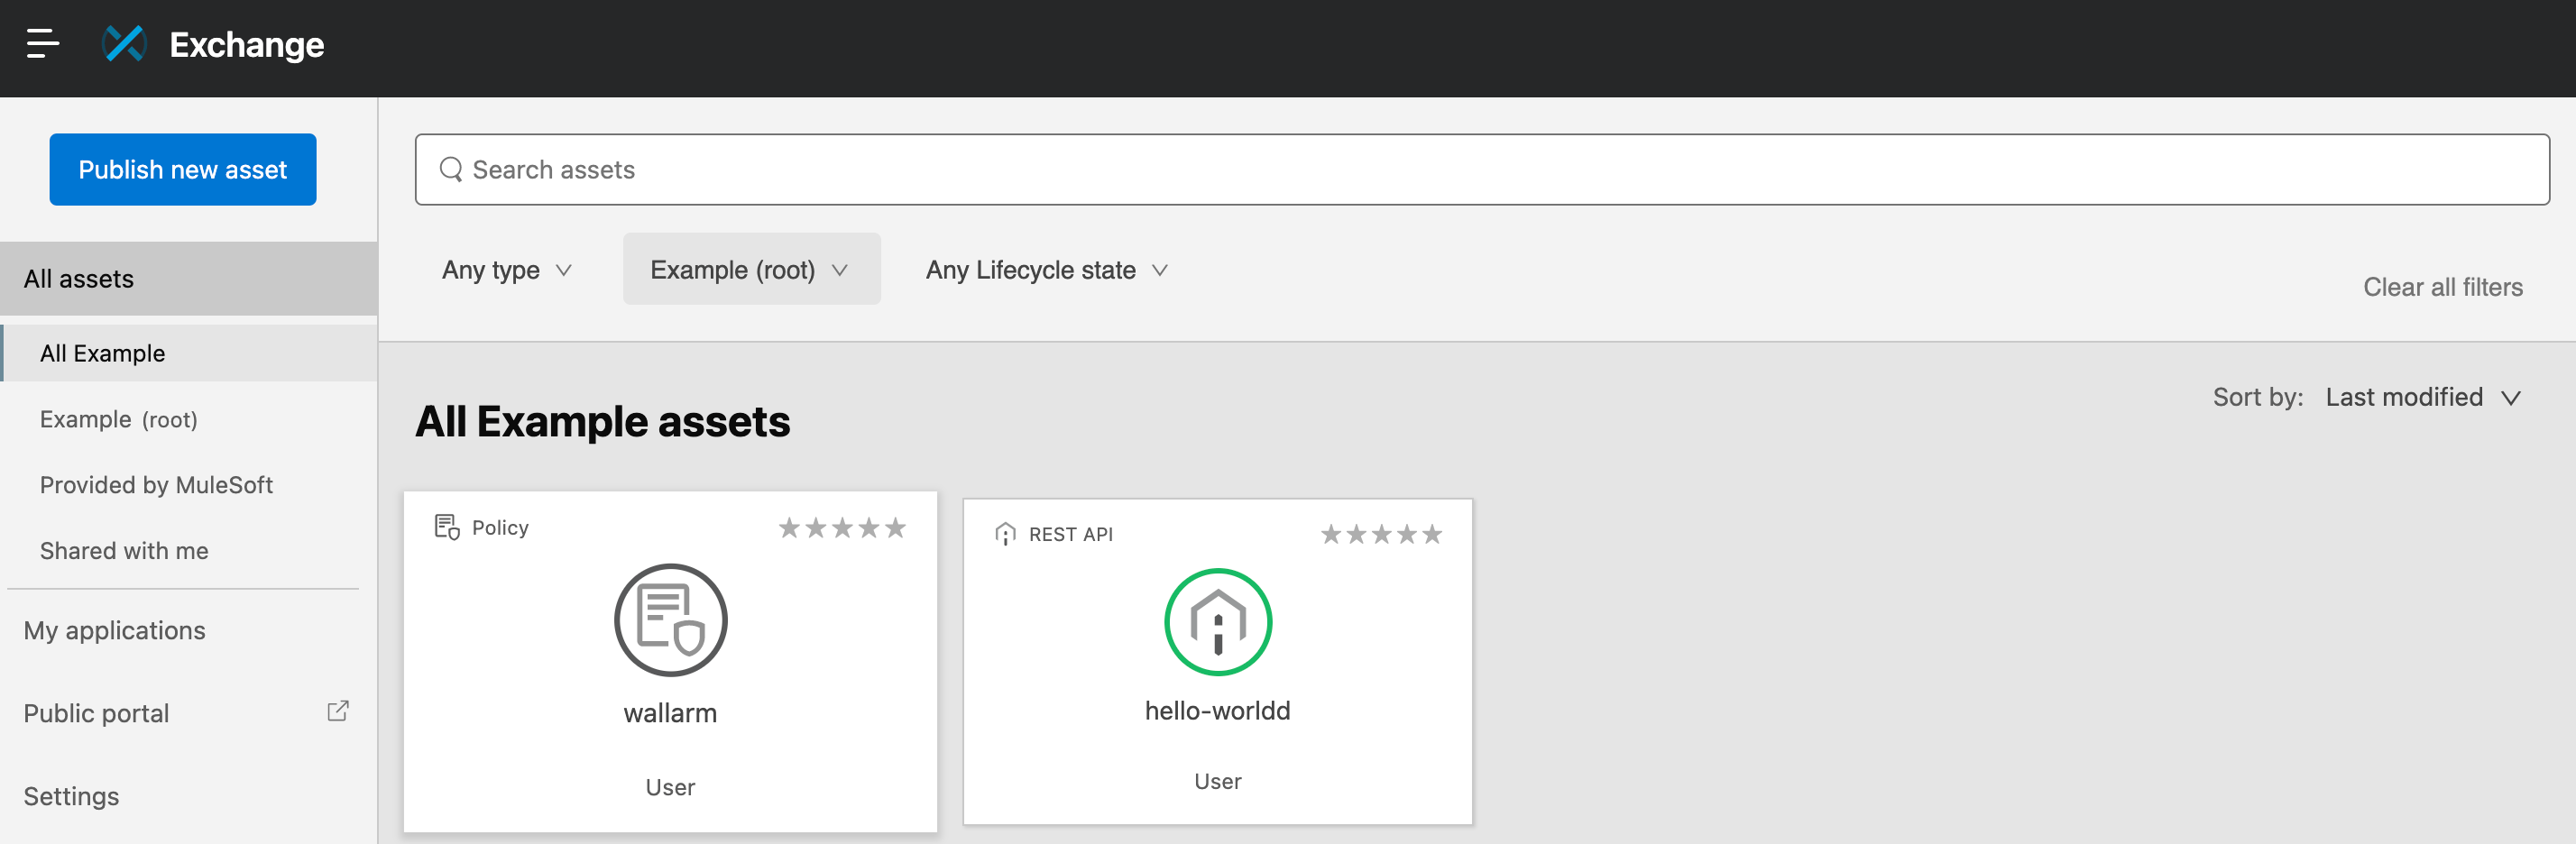
2. Obtain and upload the Wallarm policy to MuleSoft Exchange
To acquire and upload the Wallarm policy to MuleSoft Exchange, follow these steps:
-
Proceed to Wallarm Console → Security Edge → Connectors → Download code bundle and download a code bundle for your platform.
If running a self-hosted node, contact sales@wallarm.com to get the code bundle.
-
Extract the policy archive.
-
Within the
pom.xmlfile, specify the following:- Navigate to MuleSoft Anypoint Platform → Access Management → Business Groups → choose your organization → copy its ID.
- Specify the copied group ID in the
groupIdparameter of thepom.xmlfile:
- Navigate to MuleSoft Anypoint Platform → Access Management → Business Groups → choose your organization → copy its ID.
- Specify the copied group ID in the
groupIdparameter of thepom.xmlfile. - For MuleSoft instances hosted in specific regions, update the
pom.xmlfile to use the corresponding regional URLs. For example, for a European instance of MuleSoft:
<?xml version="1.0" encoding="UTF-8"?> <groupId>BUSINESS_GROUP_ID</groupId> <artifactId>wallarm</artifactId> <properties> <mule.maven.plugin.version>4.1.2</mule.maven.plugin.version> <exchange.url>https://maven.eu1.anypoint.mulesoft.com/api/v1/organizations/${project.groupId}/maven</exchange.url> </properties> <distributionManagement> <repository> <id>anypoint-exchange-v3</id> <name>Anypoint Exchange</name> <url>https://maven.eu1.anypoint.mulesoft.com/api/v3/organizations/${project.groupId}/maven </url> <layout>default</layout> </repository> </distributionManagement> <repositories> <repository> <id>anypoint-exchange-v3</id> <name>Anypoint Exchange</name> <url>https://maven.eu1.anypoint.mulesoft.com/api/v3/maven</url> <layout>default</layout> </repository> </repositories> -
Create the
confdirectory and asettings.xmlfile inside it with the following content:Replace
usernameandpasswordwith your actual credentials:<?xml version="1.0" encoding="UTF-8"?> <settings xmlns="http://maven.apache.org/SETTINGS/1.0.0" xmlns:xsi="http://www.w3.org/2001/XMLSchema-instance" xsi:schemaLocation="http://maven.apache.org/SETTINGS/1.0.0 http://maven.apache.org/xsd/settings-1.0.0.xsd"> <servers> <server> <id>anypoint-exchange-v3</id> <username>myusername</username> <password>mypassword</password> </server> <server> <id>mulesoft-releases-ee</id> <username>myusername</username> <password>mypassword</password> </server> </servers> </settings>Generate and specify your token in the
passwordparameter:<?xml version="1.0" encoding="UTF-8"?> <settings xmlns="http://maven.apache.org/SETTINGS/1.0.0" xmlns:xsi="http://www.w3.org/2001/XMLSchema-instance" xsi:schemaLocation="http://maven.apache.org/SETTINGS/1.0.0 http://maven.apache.org/xsd/settings-1.0.0.xsd"> <servers> <server> <id>anypoint-exchange-v3</id> <username>~~~Token~~~</username> <password>01234567-89ab-cdef-0123-456789abcdef</password> </server> <server> <id>mulesoft-releases-ee</id> <username>~~~Token~~~</username> <password>01234567-89ab-cdef-0123-456789abcdef</password> </server> </servers> </settings> -
Deploy the policy to MuleSoft using the following command:
Your custom policy is now available in your MuleSoft Anypoint Platform Exchange.
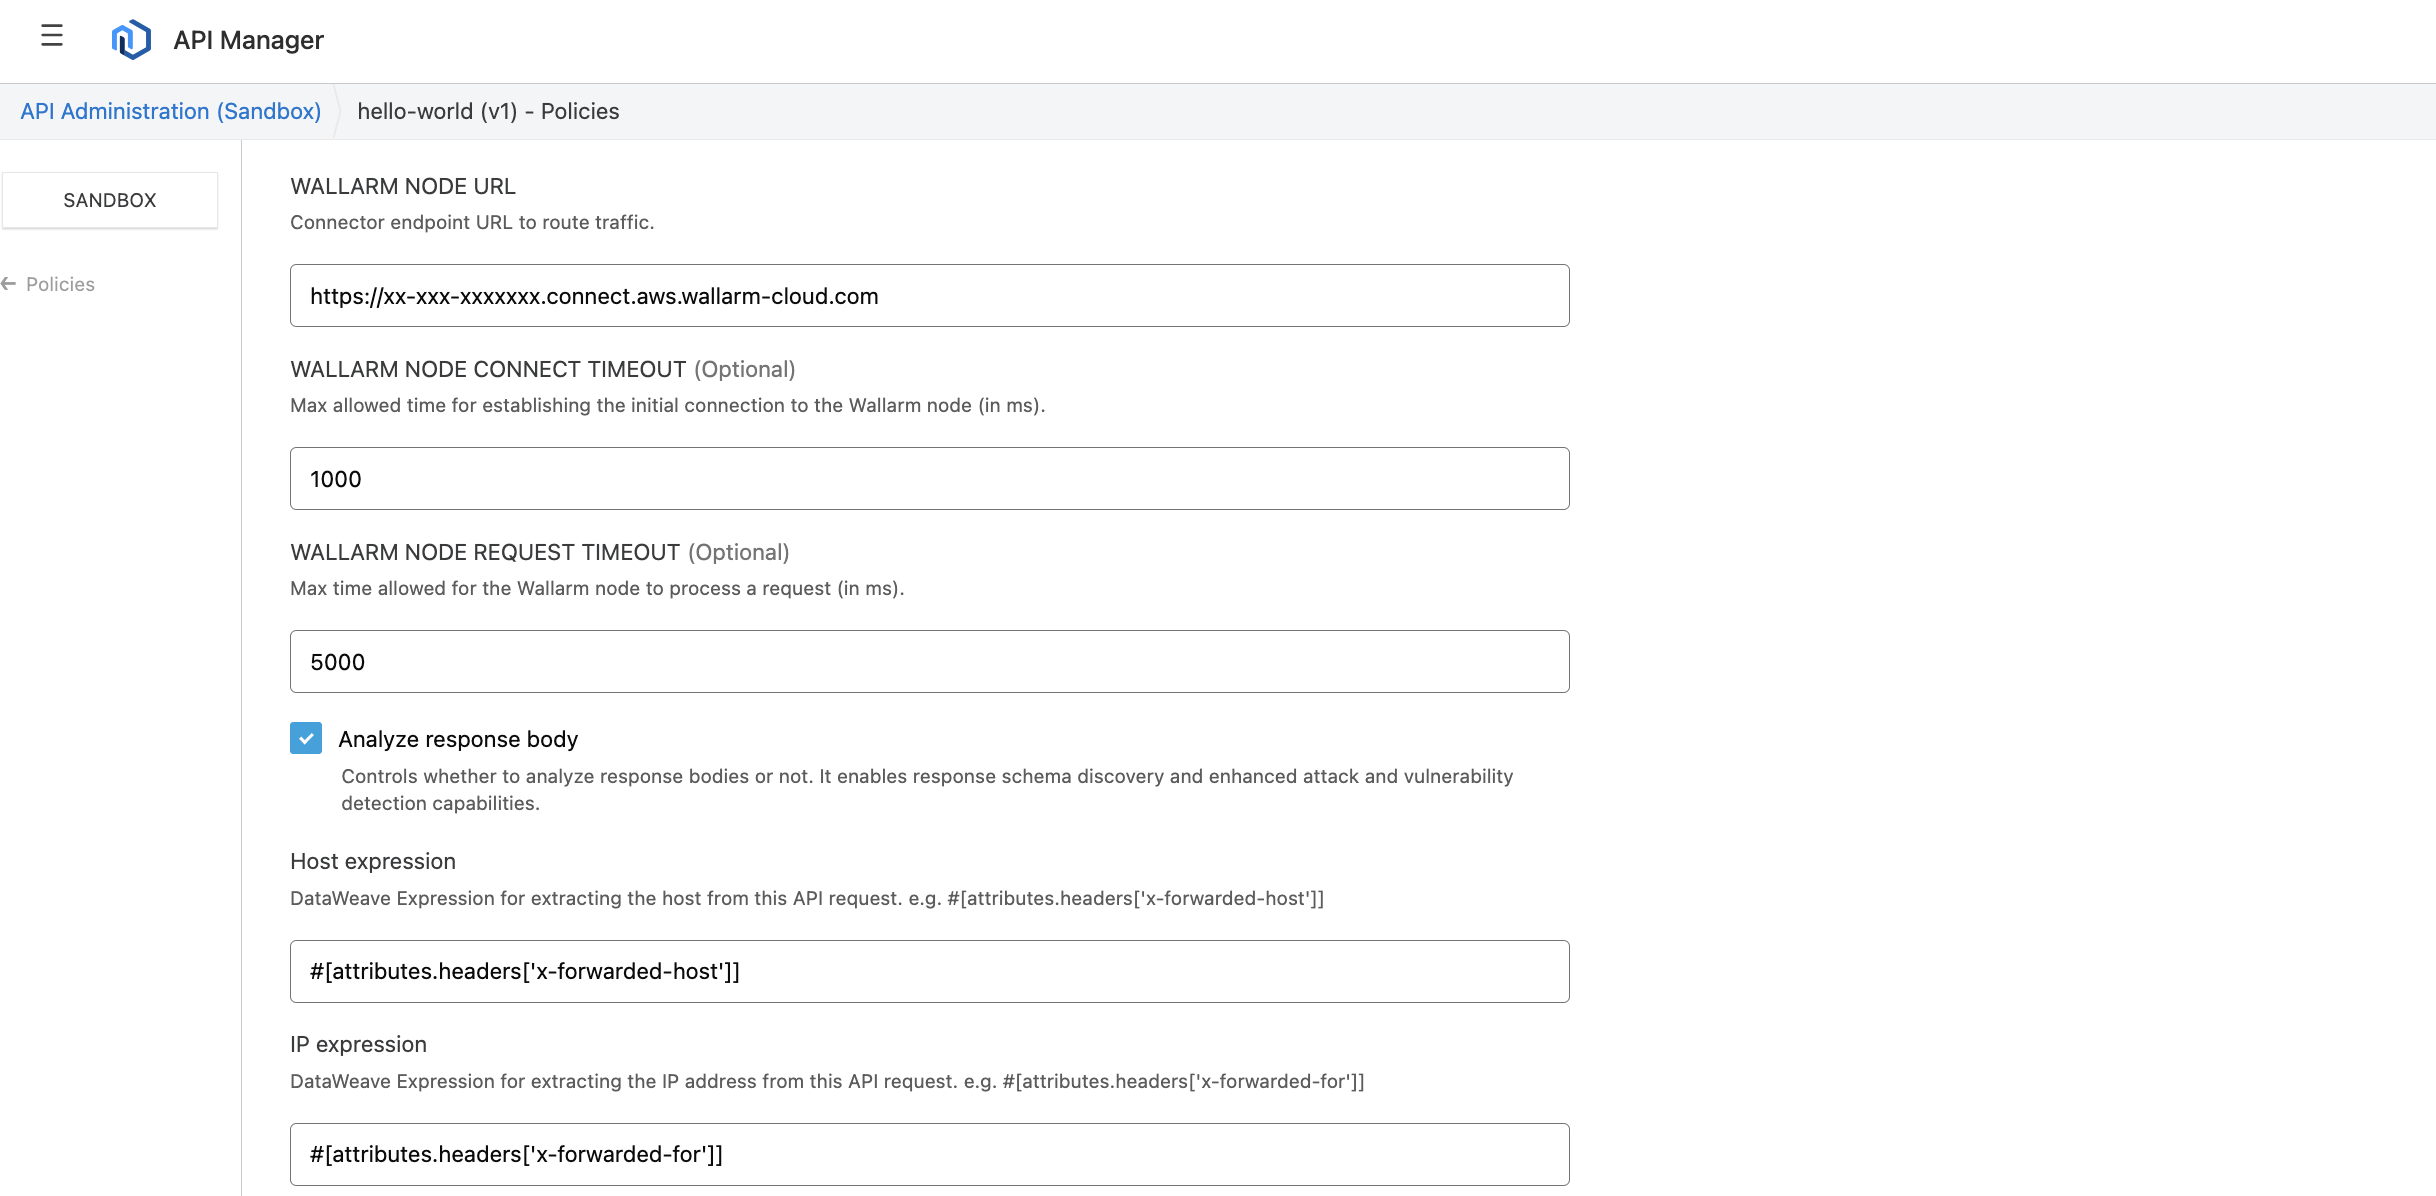
3. Attach the Wallarm policy to your API
You can attach the Wallarm policy to either an individual API or all APIs.
-
To apply the policy to an individual API, navigate to Anypoint Platform → API Manager → select the desired API → Policies → Add policy.
-
To apply the policy to all APIs, go to Anypoint Platform → API Manager → Automated Policies → Add automated policy.
-
Choose the Wallarm policy from Exchange.
-
Specify the Wallarm node URL including
http://orhttps://. -
If necessary, modify other parameters.
-
Apply the policy.
Testing
To test the functionality of the deployed policy, follow these steps:
-
Send the request with the test Path Traversal attack to your API:
-
Open Wallarm Console → Attacks section in the US Cloud or EU Cloud and make sure the attack is displayed in the list.

If the Wallarm node mode is set to blocking and the traffic flows in-line, the request will also be blocked.
Troubleshooting
If the solution does not perform as expected, refer to the logs of your API by accessing MuleSoft Anypoint Platform → Runtime Manager → your application → Logs.
You can also verify whether the policy is applied to the API by navigating to your API in the API Manager and reviewing the policies applied on the Policies tab. For automated policies, you can use the See covered APIs option to view the APIs covered and the reasons for any exclusions.
Upgrading the policy
To upgrade the deployed Wallarm policy to a newer version:
-
Download the updated Wallarm policy and upload it to MuleSoft Exchange, as described in Step 2.
-
Once the new version appears in Exchange, go to API Manager → your API → Policies → Wallarm policy → Edit configuration → Advanced options and choose the new policy version from the dropdown.
-
If the new version introduces additional parameters, provide the necessary values.
For example, if upgrading from 2.x to 3.x:
- CLIENT HOST EXPRESSION: use the default value
#[attributes.headers['x-forwarded-host']]unless specific changes are needed. - CLIENT IP EXPRESSION: use the default value
#[attributes.headers['x-forwarded-for']]unless specific changes are needed.
- CLIENT HOST EXPRESSION: use the default value
-
Save changes.
If the Wallarm policy is applied as an automated policy, direct upgrades may not be possible. In such cases, remove the current policy and reapply the new version manually.
Policy upgrades may require a Wallarm node upgrade, especially for major version updates. See the Native Node changelog for the self-hosted Node release notes and upgrade instructions or the Edge connector upgrade procedure. Regular node updates are recommended to avoid deprecation and simplify future upgrades.
Uninstalling the policy
To uninstall the Wallarm policy, use the Remove policy option in either the automated policy list or the list of policies applied to an individual API.