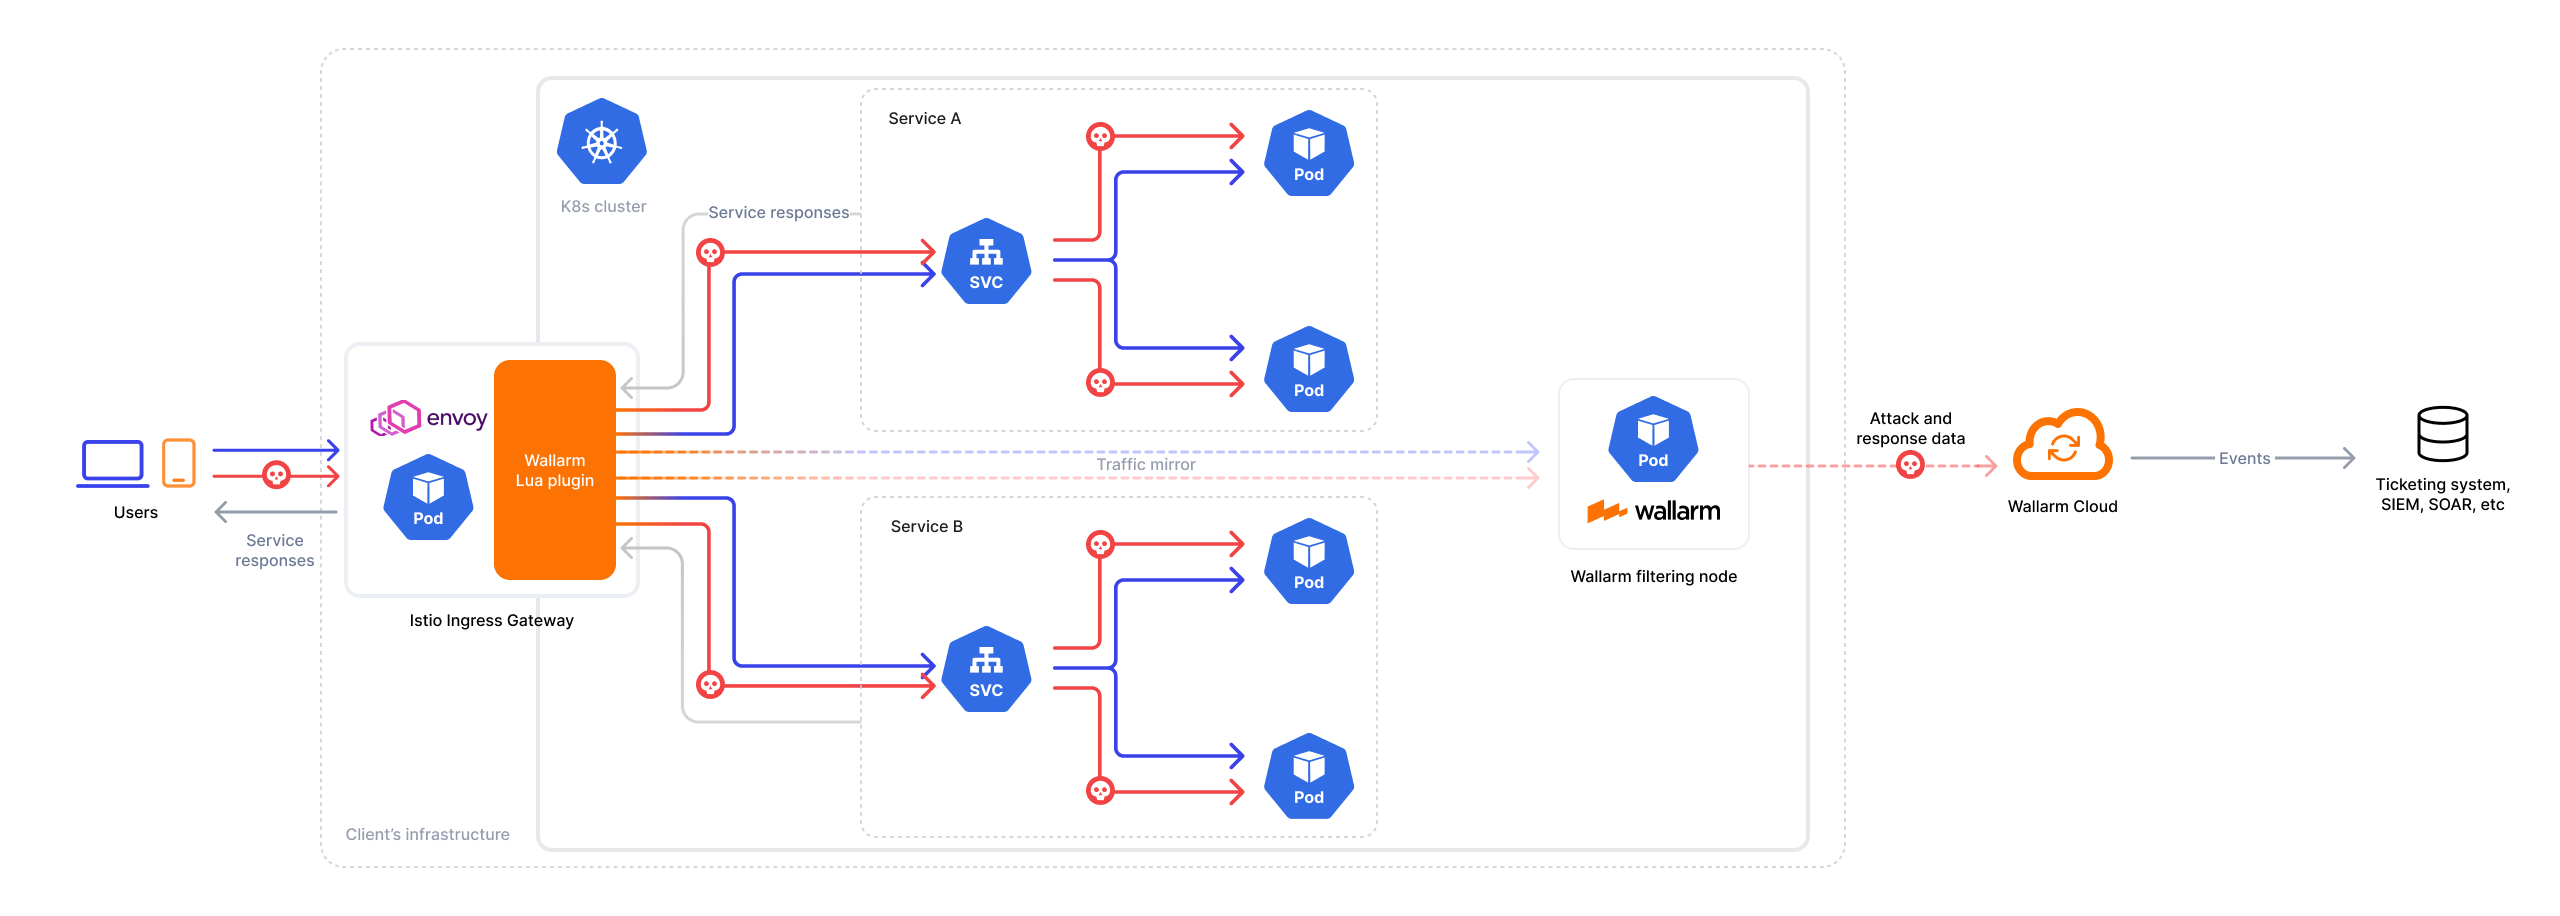
Wallarm Connector for Istio Ingress (Out‑of‑Band)
Wallarm provides a connector for securing APIs managed by Istio to analyze traffic out-of-band (OOB). By deploying Wallarm nodes alongside Istio's Envoy proxies, the connector mirrors incoming traffic, sending it asynchronously for analysis while allowing traffic to continue flowing uninterrupted.
The integration relies on a Lua plugin, deployed within the Envoy proxy, to handle traffic mirroring and communication with the Wallarm node.
Use cases
This solution is recommended when real-time traffic analysis is unnecessary, and asynchronous analysis is sufficient.
Among all supported Wallarm deployment options, this is the optimal choice for securing APIs managed by Istio running with Envoy proxy in Kubernetes.
Limitations
This setup allows fine-tuning Wallarm only via the Wallarm Console UI. Some Wallarm features that require file-based configuration are not supported in this implementation, such as:
Requirements
To proceed with the deployment, ensure that you meet the following requirements:
-
Istio with Envoy proxy managing API traffic in your Kubernetes cluster
-
Helm v3 package manager
-
Access to
https://us1.api.wallarm.com(US Wallarm Cloud) or tohttps://api.wallarm.com(EU Wallarm Cloud) -
Access to
https://charts.wallarm.comto add the Wallarm Helm chart -
Access to the Wallarm repositories on Docker Hub
https://hub.docker.com/r/wallarm -
Access to the IP addresses below for downloading updates to attack detection rules, as well as retrieving precise IPs for your allowlisted, denylisted, or graylisted countries, regions, or data centers
-
Administrator access to Wallarm Console for US Cloud or EU Cloud
Deployment
To secure APIs managed by Istio and Envoy proxy, follow these steps:
-
Deploy the Wallarm filtering node service in your Kubernetes cluster.
-
Configure the Envoy proxy in Istio to mirror traffic and send it to the Wallarm node for out-of-band analysis.
1. Deploy a Wallarm Native Node
To deploy the Wallarm node as a separate service in your Kubernetes cluster, follow the instructions.
2. Configure Envoy to mirror traffic to the Wallarm node
-
Contact support@wallarm.com to obtain the Wallarm Lua plugin code for Istio. The filenames provided by the support team are used in the following steps.
-
Apply the Envoy filter and cluster configuration to mirror traffic to the Wallarm node using Lua scripts:
-
Create ConfigMaps to mount the Wallarm connector and its Lua dependencies within the Istio Ingress controller namespace:
-
To mount the ConfigMaps, update your Istio Ingress Gateway deployment. Depending on how you manage Istio (Helm, IstioOperator, or custom deployment), apply the changes accordingly.
For example, if Istio was installed using IstioOperator, you can mount the ConfigMaps by updating the
IstioOperatorresource:apiVersion: install.istio.io/v1alpha1 kind: IstioOperator spec: components: ingressGateways: - name: istio-ingressgateway enabled: true k8s: volumes: - name: lua-mpack configMap: name: lua-msgpack-lib - name: lua-rrasync configMap: name: rr-async-packed volumeMounts: - name: lua-mpack mountPath: /usr/local/share/lua/5.1/msgpack container: istio-proxy - name: lua-rrasync mountPath: /usr/local/share/lua/5.1/rrasync container: istio-proxy
Testing
To test the functionality of the deployed connector, follow these steps:
-
Verify that the Wallarm pods are up and running:
wallarm-nodeis the namespace where the Wallarm node service is deployed.Each pod status should be STATUS: Running or READY: N/N. For example:
-
Send the request with the test Path Traversal attack to the Istio Gateway:
-
Open Wallarm Console → Attacks section in the US Cloud or EU Cloud and make sure the attack is displayed in the list.
Since the connector operates in the out-of-band mode and does not block malicious requests, the Wallarm node will not block the attack but will register it.
-
If needed, monitor the Wallarm logs in a separate console window:
Upgrading the Wallarm Lua plugin
To upgrade the deployed Wallarm Lua plugin to a newer version:
-
Contact support@wallarm.com to obtain the updated Wallarm Lua plugin code for your Istio Ingress.
-
Deploy the updated plugin as described in the Step 2.
Plugin upgrades may require a Wallarm node upgrade, especially for major version updates. See the Wallarm Native Node changelog for release updates and upgrade instructions. Regular node updates are recommended to avoid deprecation and simplify future upgrades.

