Wallarm Filter for Gloo Gateway
This guide describes how to secure your APIs managed by Gloo Gateway (Gloo Edge API) using the Wallarm Connector based on Envoy's ext_proc filter.
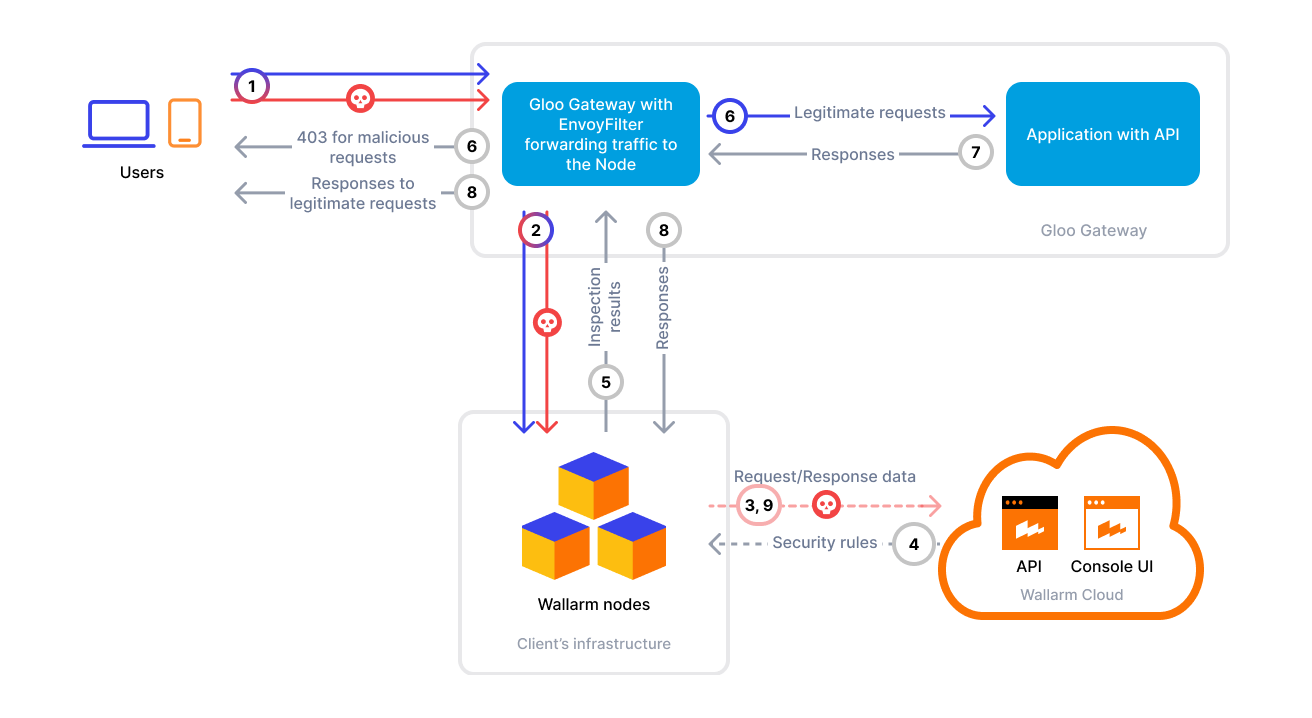
To use Wallarm with Gloo, you need to deploy a Wallarm Node within your cluster and configure Gloo's ext_proc integration to send traffic to the Node over gRPC for analysis.
The Wallarm connector for Gloo Gateway supports only synchronous (in-line) traffic analysis:
Use cases
This connector is the optimal choice when you need protection for workloads managed by Gloo Gateway and Envoy.
Limitations
-
A trusted SSL/TLS certificate is required for the Wallarm Node domain. Self-signed certificates are not supported.
-
Custom blocking page and blocking code configurations are not yet supported.
All blocked malicious traffic is returned with status code
403and the default block page. -
Rate limiting by Wallarm rules is not supported.
Rate limiting cannot be enforced on the Wallarm side for this connector. If you need rate limiting, use the features built into your API gateway or cloud platform.
Requirements
Before deploying the connector, make sure that the following requirements are met:
-
A Kubernetes cluster with the Enterprise version of Gloo Gateway installed
-
A Gloo Gateway Enterprise license key (it will be later used with the
GLOO_KEYenvironment variable) -
Kubernetes v1.30 or later
-
Envoy v1.30.0 or later
-
Helm v3.x or later
-
Applications deployed and reachable through Gloo Gateway and VirtualService
-
Wallarm Native Node v0.22.0 or later
-
Access to the Administrator account in Wallarm Console for the US Cloud or EU Cloud
-
Outbound access to:
https://charts.wallarm.comto download the Wallarm Helm charthttps://hub.docker.com/r/wallarmto download the Docker images required for the deploymenthttps://us1.api.wallarm.comorhttps://api.wallarm.comfor US/EU Wallarm Cloud-
IP addresses and their corresponding hostnames (if any) listed below. This is needed for downloading updates to attack detection rules and API specifications, as well as retrieving precise IPs for your allowlisted, denylisted, or graylisted countries, regions, or data centers
-
A trusted TLS certificate and private key for the Wallarm Node domain
Deployment
1. Deploy a Wallarm Node
The Wallarm node is a core component of the Wallarm platform that you need to deploy. It inspects incoming traffic, detects malicious activities, and can be configured to mitigate threats.
Choose an artifact for a self-hosted node deployment and follow the instructions for the envoy-external-filter mode:
-
All-in-one installer for Linux on bare metal or VMs
-
Docker image for containerized deployments
-
Helm chart for Kubernetes (recommended when using Gloo)
Important deployment notes:
-
(Recommended setup) Deploy the Node in the same Kubernetes cluster where Gloo runs (e.g. via the Helm chart:
-
If the Node is deployed outside the cluster (e.g. Docker image on a host or all-in-one installer on a VM):
- There will be no Kubernetes Service.
- You must create create a static Gloo Upstream pointing to the Node's address and port (see Gloo static upstreams).
- Ensure the Node is reachable from the cluster.
- Configure the Node to listen on the same port (e.g.
5000) inenvoy_external_filter.addressin the Node config.
2. Configure Gloo Gateway to forward traffic to the Wallarm Node
You already have Gloo Gateway installed and a Helm values file from installation. Add the following Wallarm-specific block to your existing values (under the global key). If global.extensions does not exist yet, add it; then add the extProc section:
-
Update your existing Gloo Helm values file with the
ext_procconfiguration. Add or merge the following underglobal:global: extensions: extProc: allowModeOverride: false failureModeAllow: false # If true, traffic is allowed when the Wallarm Node is unavailable filterStage: # Defines when and where the ext_proc filter is applied in the filter chain predicate: After stage: AuthZStage grpcService: extProcServerRef: name: wallarm-node # Name of the Upstream pointing to the Wallarm Node (step 4) namespace: gloo-system # Namespace where the Upstream is created processingMode: requestBodyMode: STREAMED # Use STREAMED for full request body analysis responseBodyMode: STREAMED # Use STREAMED for full response body analysis requestAttributes: [request.id, request.time, source.address] -
Upgrade the Gloo Gateway release so the new configuration is applied:
helm -n gloo-system upgrade gloo glooe/gloo-ee \
  -f <path-to-your-values-file> \
  --set license_key="<GLOO_KEY>"
whereGLOO_KEYis your Gloo Gateway Enterprise license key.Wait for Gloo to be ready
The Gloo Gateway takes some time to start. Before proceeding, wait about 90 seconds for all Gloo components to become ready.
3. Create a TLS secret for the gRPC connection
Create a Kubernetes TLS secret from your existing certificate and key (see Requirements):
4. Create an upstream for the Wallarm Node
The following example is for a Node deployed in the cluster (e.g. via the Helm chart). If the Node runs outside the cluster, use a static Upstream to the Node's address and port instead.
-
Prepare the Wallarm Upstream manifest (e.g.
upstream.yaml). Key configuration parameters are highlighted and explained in the comments:apiVersion: gloo.solo.io/v1 kind: Upstream metadata: name: wallarm-node namespace: gloo-system spec: discoveryMetadata: {} useHttp2: true # Must be true for gRPC communication kube: serviceName: wallarm-node # Wallarm Node processing service name serviceNamespace: wallarm # Namespace where the Wallarm Node is deployed servicePort: 5000 # gRPC port (5000 for Gloo integration) sslConfig: secretRef: # Reference to the TLS secret for secure gRPC name: tlskeys namespace: gloo-system -
Apply the upstream:
5. Create a VirtualService for traffic routing
-
Prepare the VirtualService manifest (e.g.
vs.yaml):apiVersion: gateway.solo.io/v1 kind: VirtualService metadata: name: workload-vsvc spec: virtualHost: domains: - "*" # Use only for a single VirtualService or as a catch-all; otherwise, specify explicit domains routes: - matchers: - prefix: / routeAction: single: upstream: name: workload-workload-80 # Auto-discovered upstream namespace: gloo-system -
Apply the VirtualService:
Gloo service discovery
Gloo automatically discovers Kubernetes services and creates upstreams. The upstream name follows the pattern:
<namespace>-<service-name>-<port>.
The Wallarm Connector is now deployed, and your Gloo-managed API traffic is being analyzed and protected in real time.
Testing
To test the functionality of the deployed filter, follow these steps:
-
Send the request with the test Path Traversal attack:
-
Open Wallarm Console → Attacks section in the US Cloud or EU Cloud and make sure the attack is displayed in the list.

If the Wallarm node mode is set to blocking and the traffic flows in-line, the request will also be blocked.