Wallarm Connector for Fastly
Fastly is a powerful edge cloud platform providing Content Delivery Network (CDN) services, real-time application delivery, caching, and Compute@Edge for running custom logic at the edge. With the Wallarm connector, you can secure APIs running on Fastly.
To use Wallarm as a Fastly connector, you need to deploy the Wallarm Node externally and run a Fastly Compute service using the Wallarm-provided binaries to route traffic to the Wallarm Node for analysis.
The Fastly connector supports both in-line and out-of-band traffic flows.
Use cases
This solution is recommended when you deliver traffic through Fastly.
Limitations
-
When deploying the Wallarm service with the
LoadBalancertype using the Helm chart, a trusted SSL/TLS certificate is required for the Node instance domain. Self-signed certificates are not yet supported. -
Rate limiting by the Wallarm rule is not supported.
-
Multitenancy is not supported on Security Edge hosting, but it is supported for self-hosted nodes deployed with the connector.
Requirements
To proceed with the deployment, ensure that the following requirements are met:
-
Understanding of Fastly technologies.
-
APIs or traffic running through Fastly.
Deployment
1. Deploy a Wallarm Node
The Wallarm Node is a core component of the Wallarm platform that you need to deploy. It inspects incoming traffic, detects malicious activities, and can be configured to mitigate threats.
You can deploy it either hosted by Wallarm or in your own infrastructure, depending on the level of control you require.
To deploy a Wallarm-hosted node for the connector, follow the instructions.
Choose an artifact for a self-hosted node deployment and follow the attached instructions:
- All-in-one installer for Linux infrastructures on bare metal or VMs
- Docker image for environments that use containerized deployments
- AWS AMI for AWS infrastructures
- Helm chart for infrastructures utilizing Kubernetes
2. Deploy Wallarm code on Fastly
To route traffic from Fastly to the Wallarm Node, you need to deploy a Fastly Compute service with the corresponding Wallarm logic:
-
Proceed to Wallarm Console → Security Edge → Connectors → Download code bundle and download the Wallarm package.
If running a self-hosted node, contact sales@wallarm.com to get the package.
-
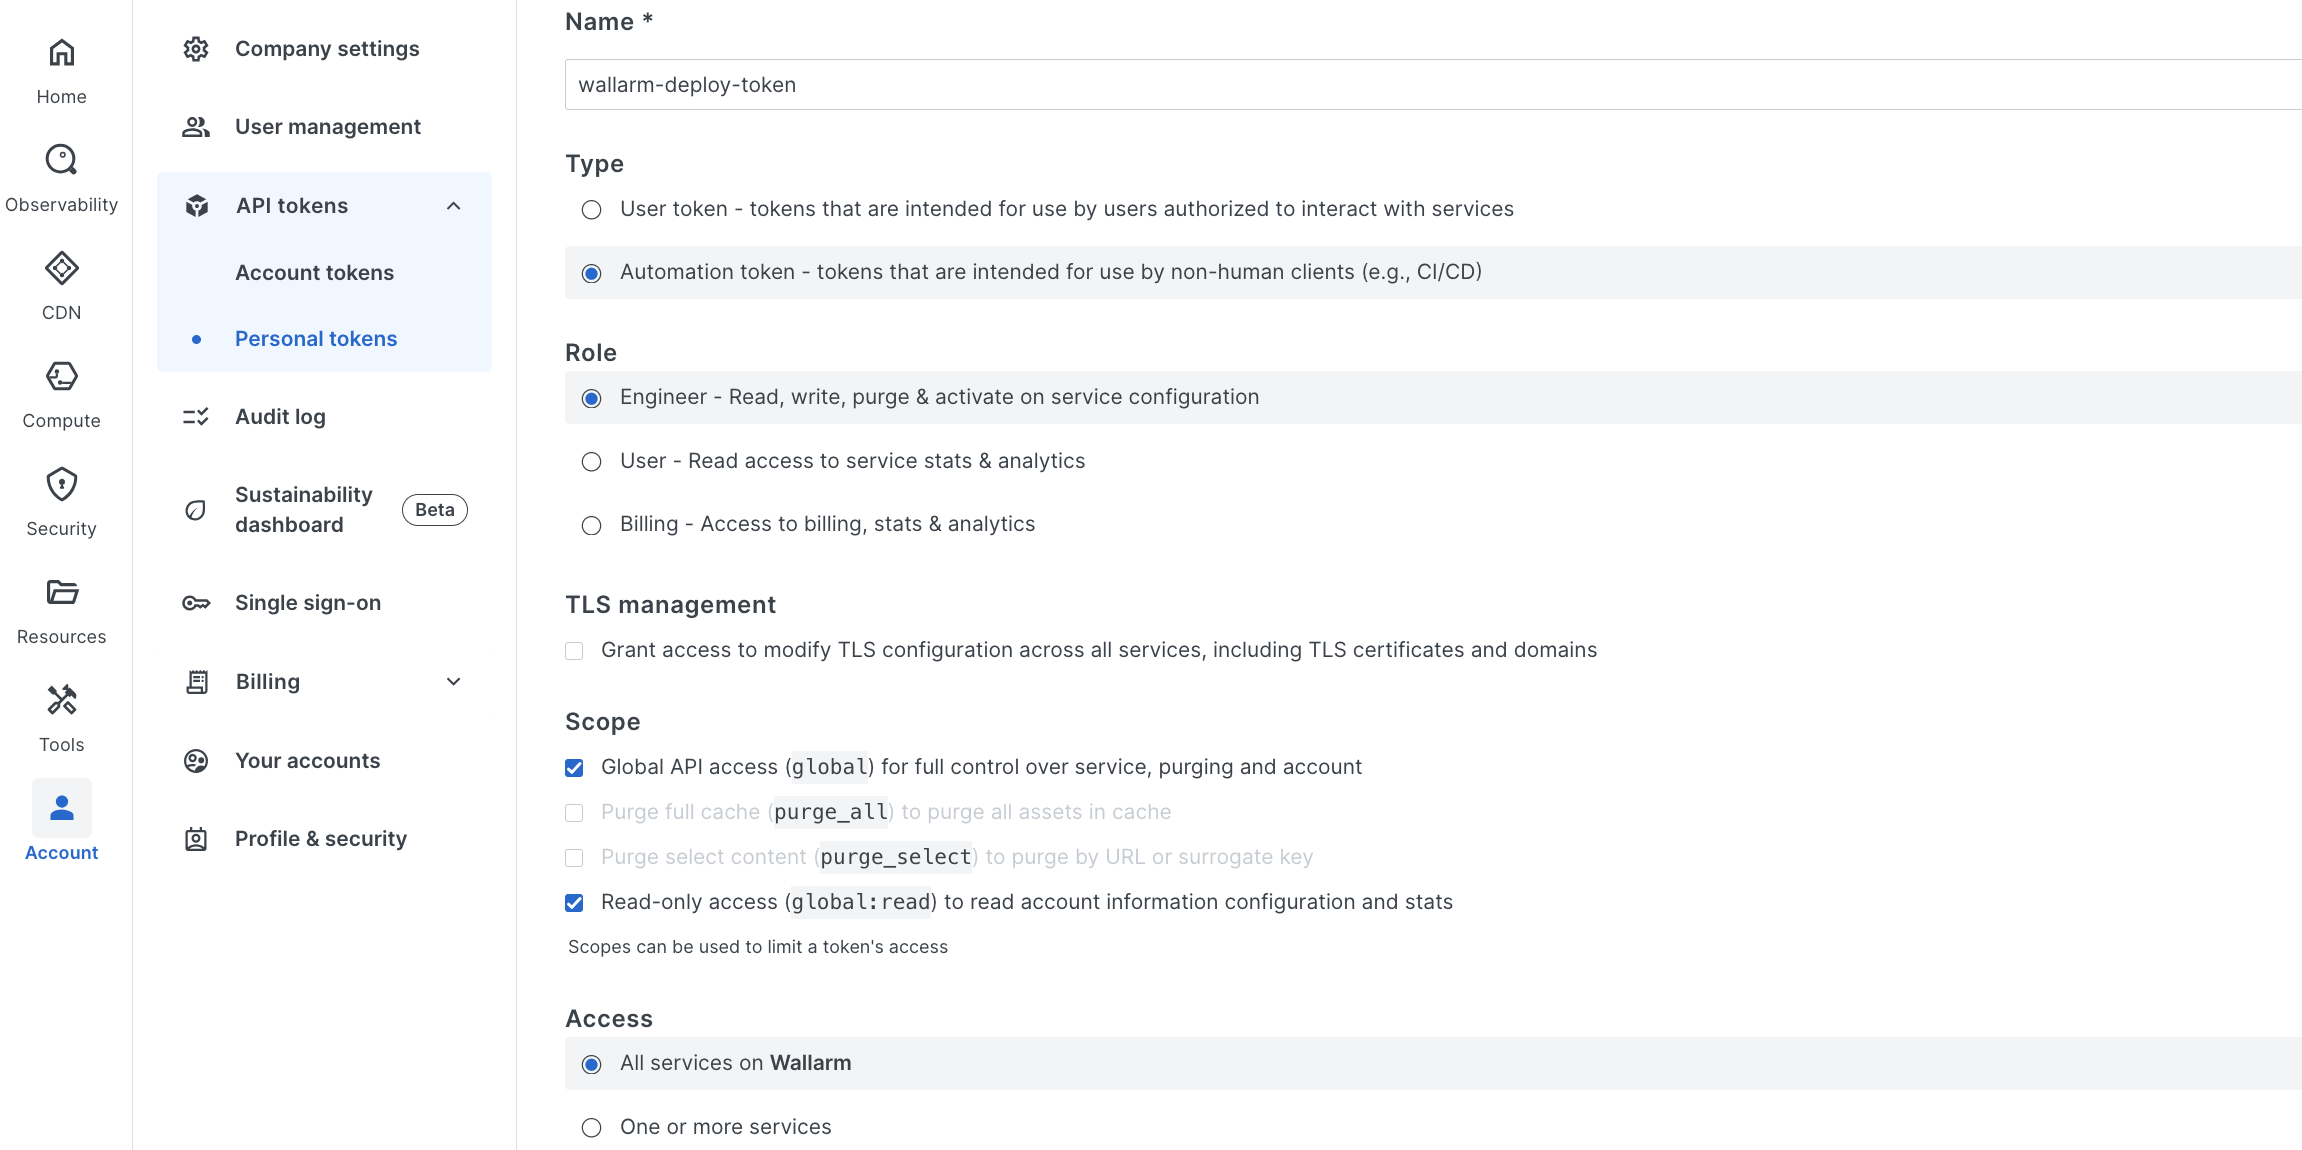
Go to Fastly UI → Account → API tokens → Personal tokens → Create token:
- Type: Automation token
- Scope: Global API access
- Leave other settings at their default unless specific changes are required
-
Go to Fastly UI → Compute → Compute services → Create service → Use a local project and create an instance for Wallarm.
Once created, copy the generated
--service-id: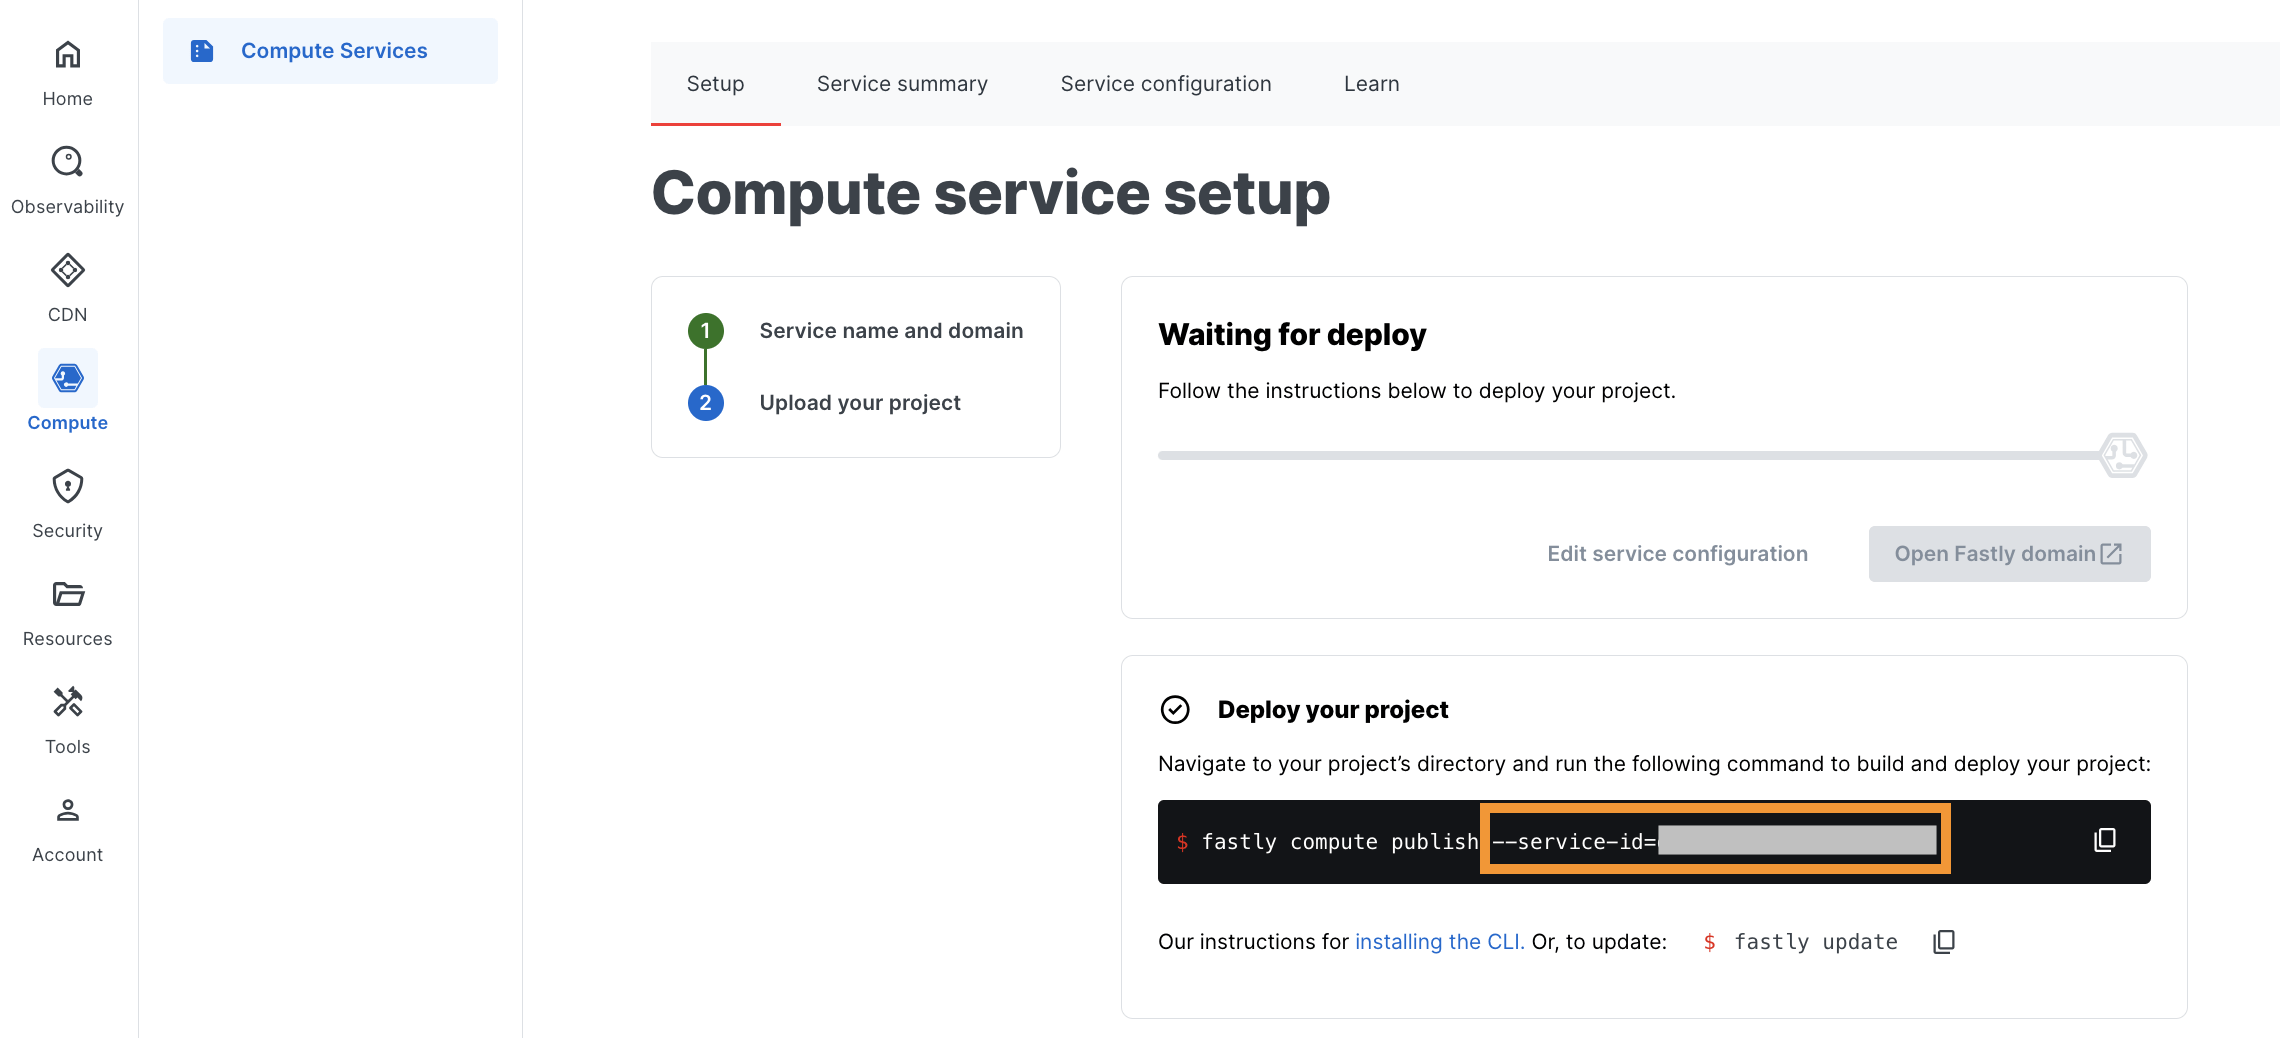
-
Go to the local directory containing the Wallarm package and deploy it:
fastly compute deploy --service-id=<SERVICE_ID> --package=wallarm-api-security.tar.gz --token=<FASTLY_TOKEN>The success message:
3. Specify Wallarm Node's and backend's hosts
For proper traffic routing for analysis and forwarding, you need to define the Wallarm Node and backend hosts in the Fastly service configuration:
-
Go to Fastly UI → Compute → Compute services → Wallarm service → Edit configuration.
-
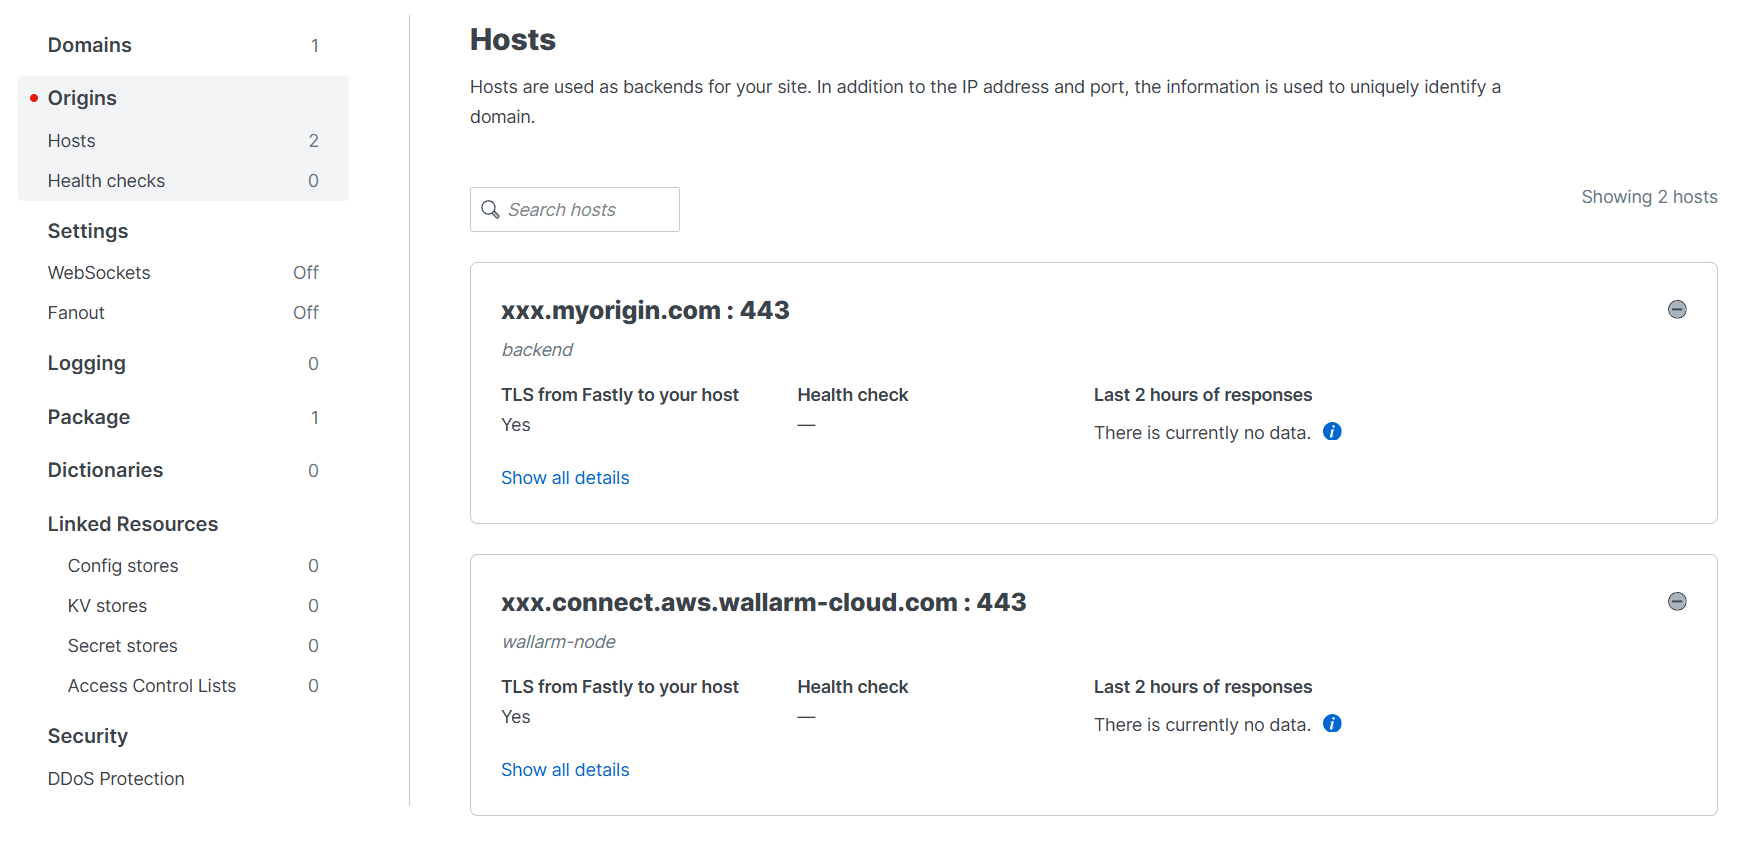
Go to Origins and Create hosts:
- Add the Wallarm node URL as the
wallarm-nodehost to route traffic to the Wallarm node for analysis. - Add your backend address as another host (e.g.,
backend) to forward traffic from the node to your origin backend.
- Add the Wallarm node URL as the
-
Activate the new service version.
4. Create the Wallarm config store
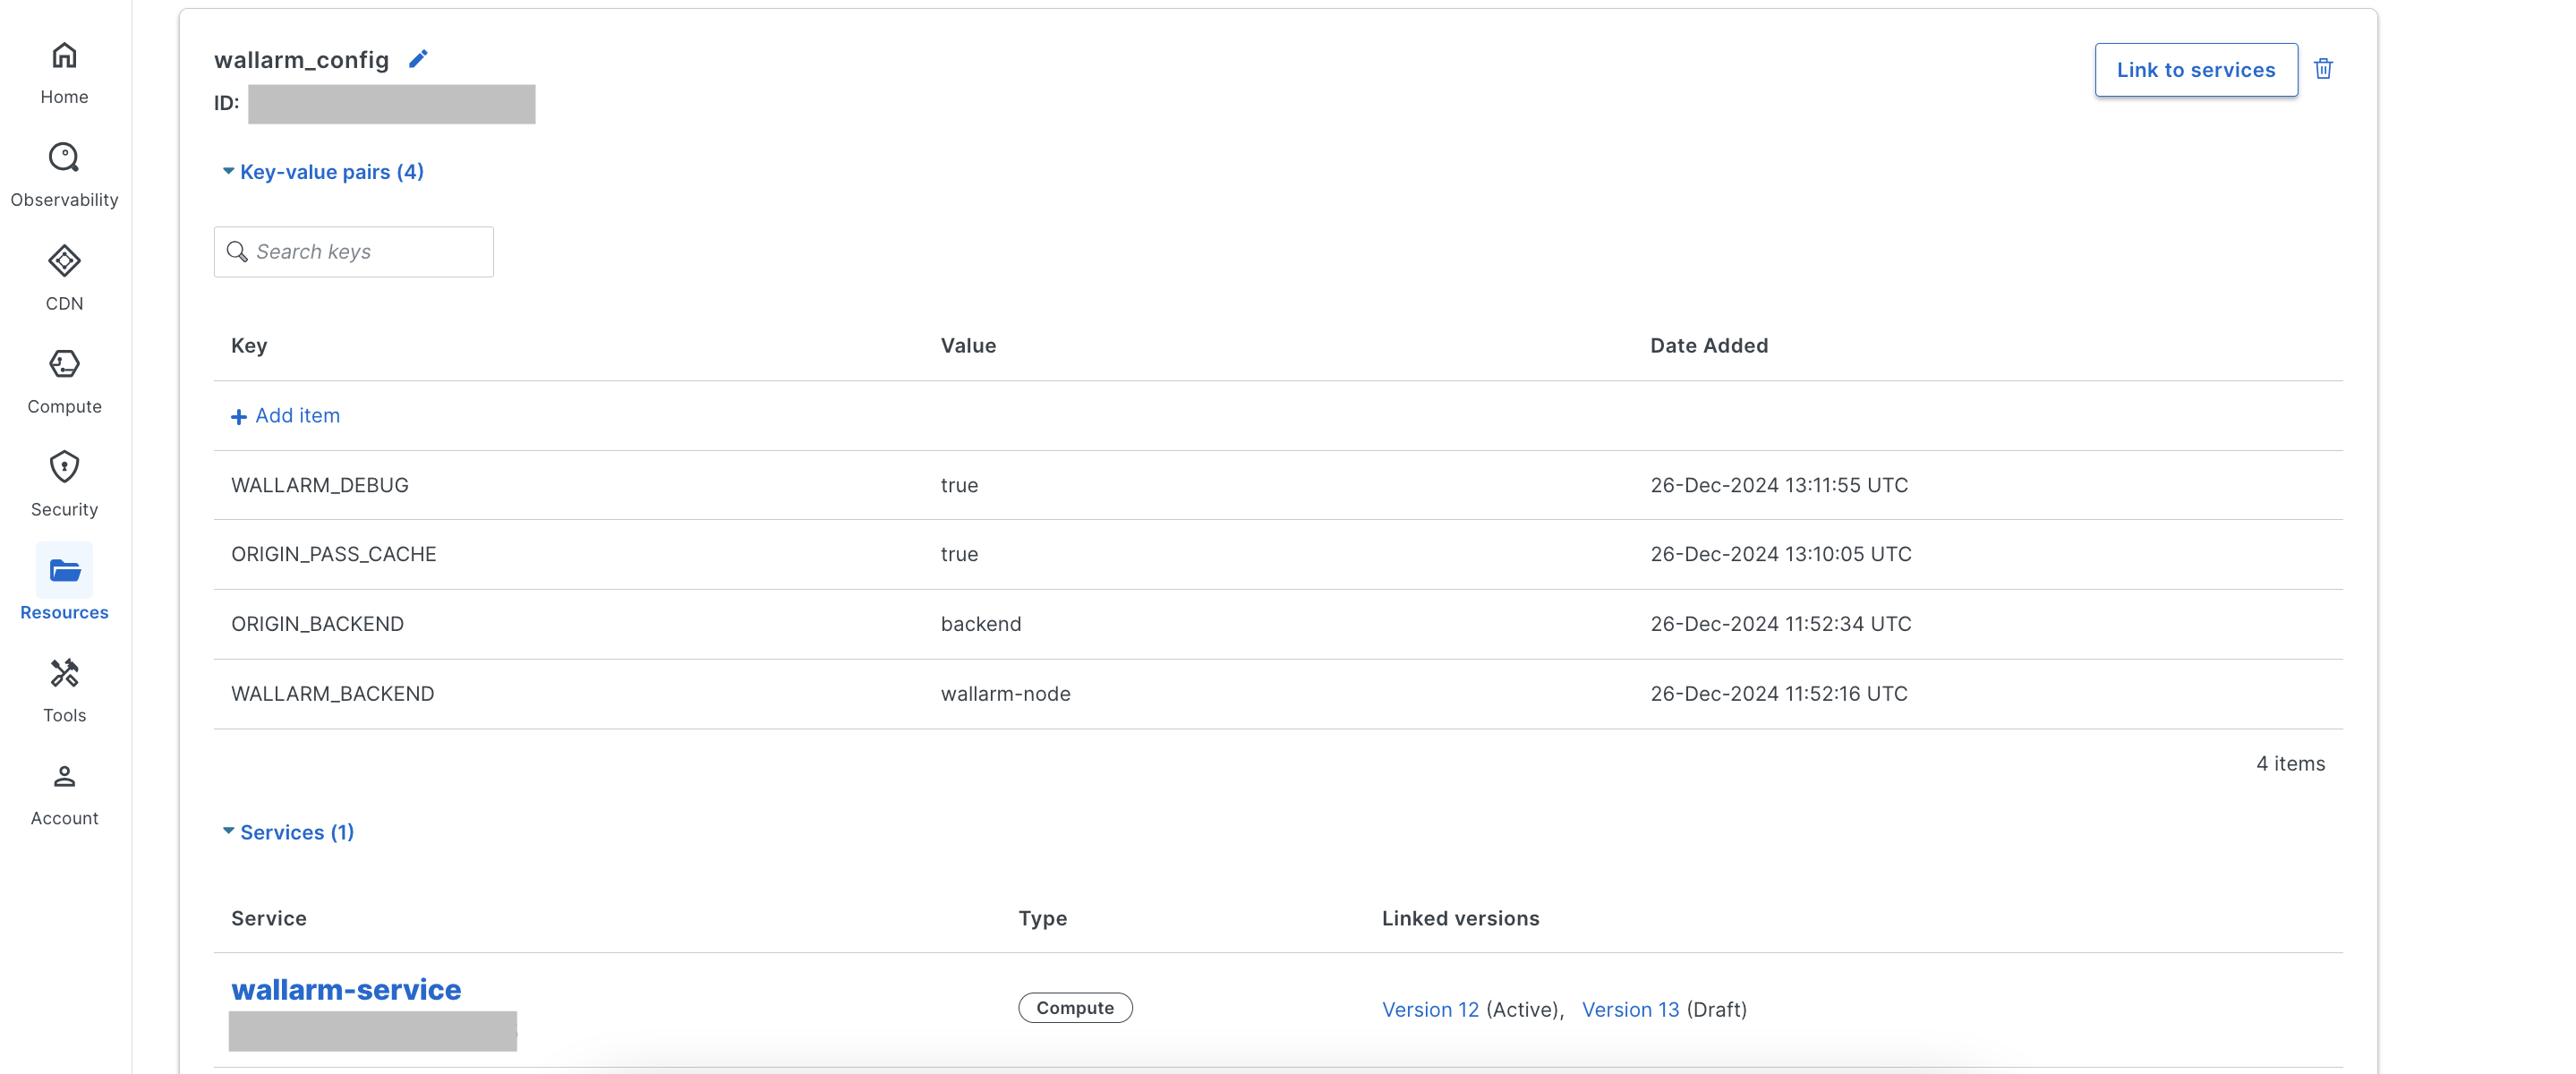
Create the wallarm_config config defining Wallarm-specific settings:
-
Go to Fastly UI → Resources → Config stores → Create a config store and create the
wallarm_configstore with the following key-value items:Parameter Description Required? WALLARM_BACKENDHost name for the Wallarm Node instance specified in Compute service settings. Yes ORIGIN_BACKENDHost name for the backend specified in Compute service settings. Yes WALLARM_MODE_ASYNCEnables traffic copy analysis without affecting the original flow ( true) or inline analysis (false, default).No -
Link the config store to the Wallarm Compute service.
Config stores for multiple services
If you run multiple Compute services for Wallarm, you can do one of the following:
- Create multiple config stores with different configurations and link each of them to the corresponding service.
- Share the same config store (for example,
wallarm_config) across multiple services. Note that while all services must use the same origin backend name, the actual backend value can be customized in each service's settings.
5. (Optional) Set up a custom blocking page
When the Wallarm Node operates in inline mode and blocks attacks, it responds to malicious requests with HTTP 403 status codes. To customize the response, you can configure a custom HTML blocking page using a KV store in Fastly:
-
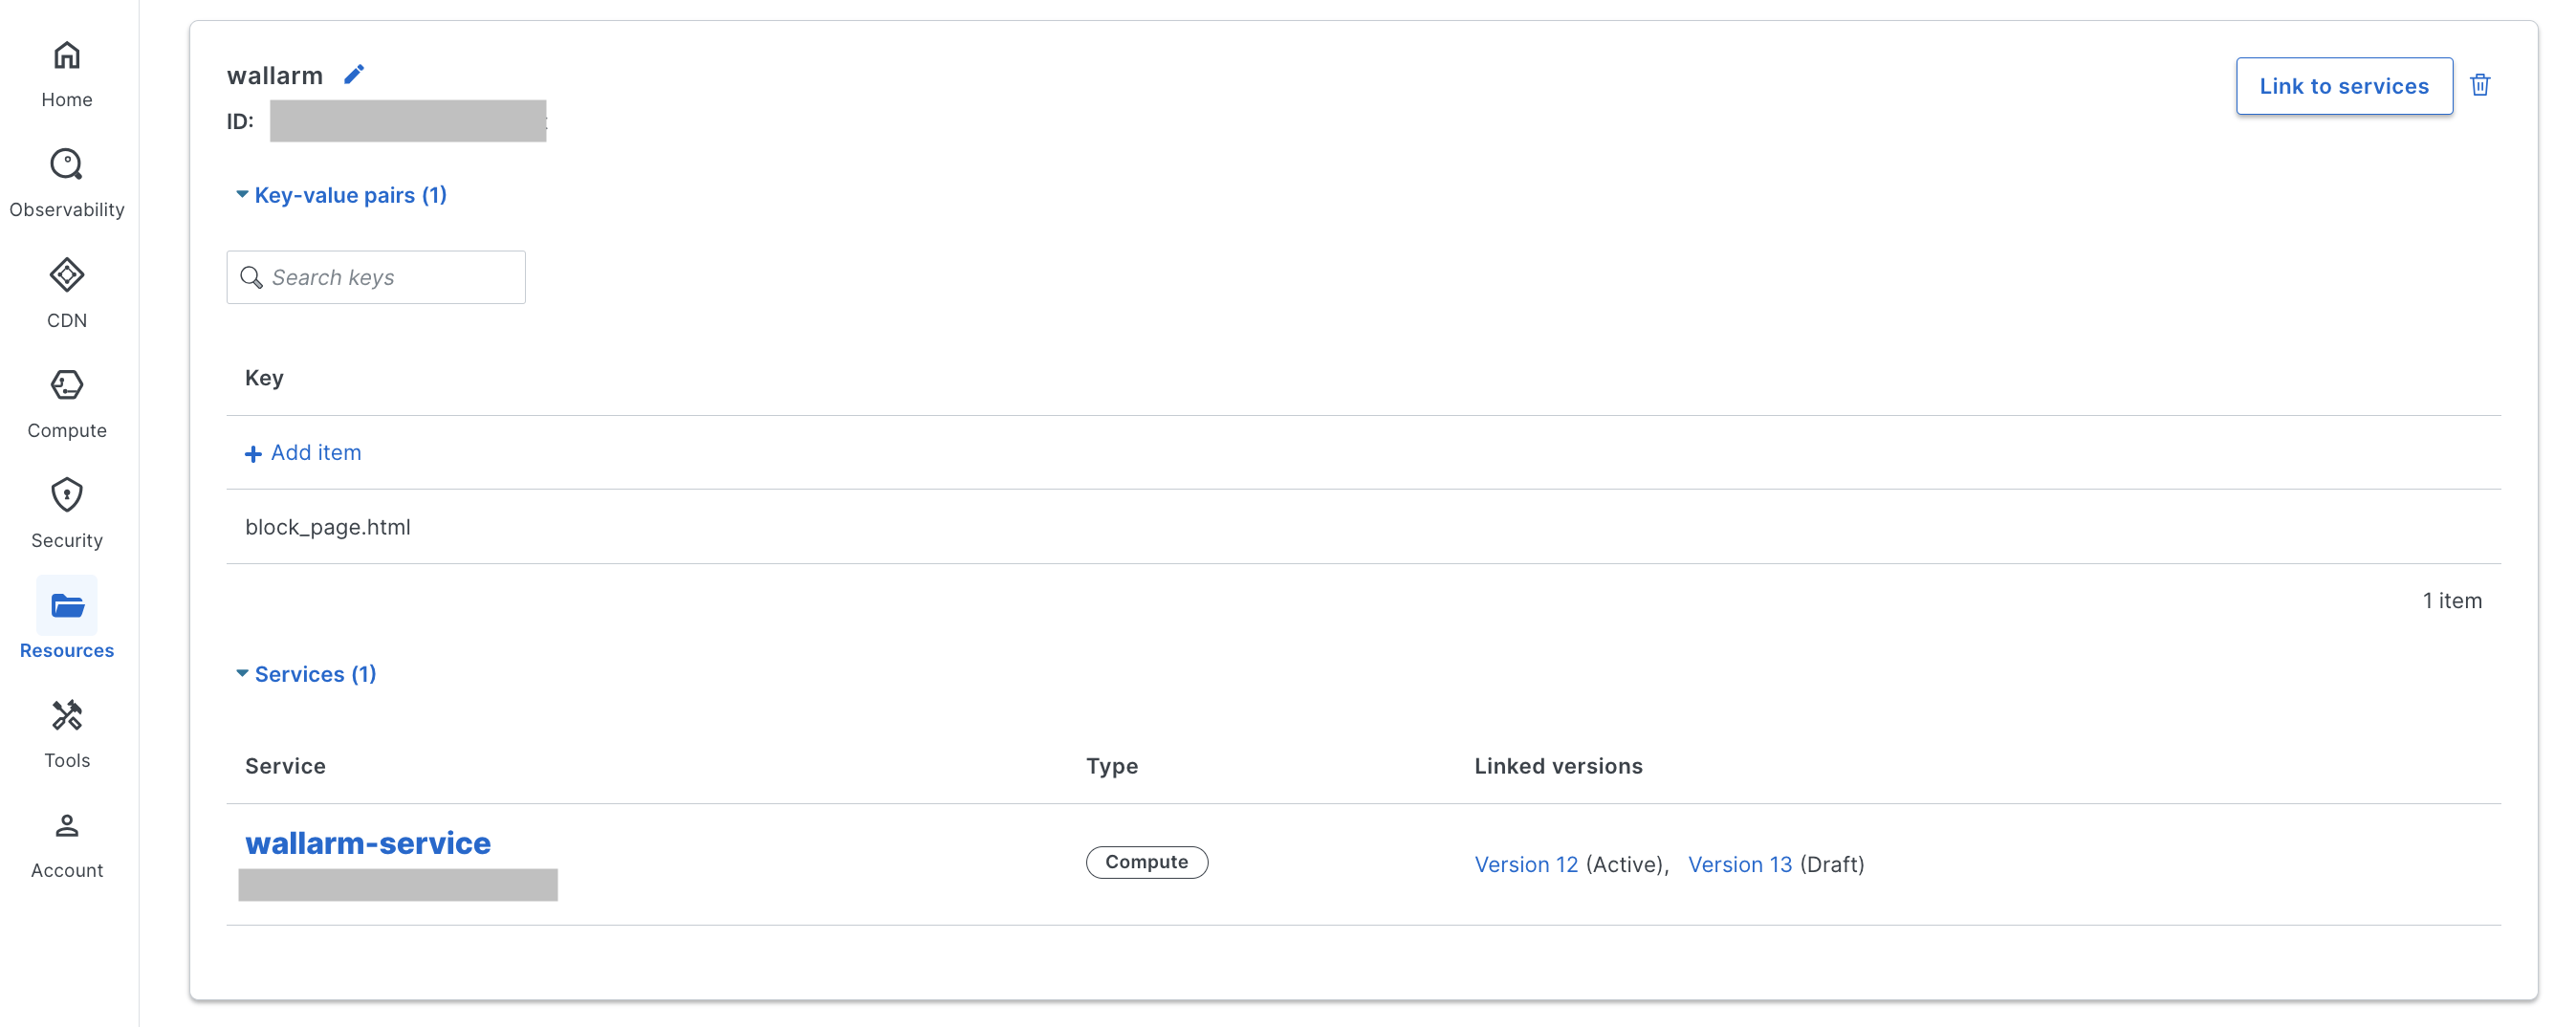
Go to Fastly UI → Resources → KV stores → Create a KV store and create a store named
wallarm. -
Add a key named
block_page.htmland upload your custom HTML blocking page. This page will be returned to blocked requests. -
Link the KV store to the Wallarm Compute service.
Show Wallarm template for a custom blocking page
As a starting point, you can use the following Wallarm-provided template for a custom blocking page. Adjust it as needed to include the information you want to display to users and to match your desired design:
<!DOCTYPE html>
<html lang="en">

<head>
    <meta charset="UTF-8">
    <meta name="viewport" content="width=device-width, initial-scale=1.0">
    <meta http-equiv="X-UA-Compatible" content="ie=edge">
    <title>You are blocked</title>
    <link href="https://fonts.googleapis.com/css?family=Poppins:700|Roboto|Roboto+Mono&display=swap" rel="stylesheet">
    <style>
        html {
            font-family: 'Roboto', sans-serif;
        }

        body {
            margin: 0;
            height: 100vh;
        }

        .content {
            display: flex;
            flex-direction: column;
            justify-content: space-between;
            align-items: center;
            min-height: 100%;
        }

        .logo {
            margin-top: 32px;
        }

        .message {
            display: flex;
            margin-bottom: 100px;
        }

        .alert {
            padding-top: 20px;
            width: 246px;
            text-align: center;
        }

        .alert-title {
            font-family: 'Poppins', sans-serif;
            font-weight: bold;
            font-size: 24px;
            line-height: 32px;
        }

        .alert-desc {
            font-size: 14px;
            line-height: 20px;
        }

        .info {
            margin-left: 76px;
            border-left: 1px solid rgba(149, 157, 172, 0.24);
            padding: 20px 0 20px 80px;
            width: 340px;
        }

        .info-title {
            font-weight: bold;
            font-size: 20px;
            line-height: 28px;
        }

        .info-text {
            margin-top: 8px;
            font-size: 14px;
            line-height: 20px;
        }

        .info-divider {
            margin-top: 16px;
        }

        .info-data {
            margin-top: 12px;
            border: 1px solid rgba(149, 157, 172, 0.24);
            border-radius: 4px;
            padding: 9px 12px;
            font-size: 14px;
            line-height: 20px;
            font-family: 'Roboto Mono', monospace;
        }

        .info-copy {
            margin-top: 12px;

            padding: 6px 12px;
            border: none;
            outline: none;
            background: rgba(149, 157, 172, 0.08);
            cursor: pointer;
            transition: 0.24s cubic-bezier(0.24, 0.1, 0.24, 1);
            border-radius: 4px;

            font-size: 14px;
            line-height: 20px;
        }

        .info-copy:hover {
            background-color: rgba(149, 157, 172, 0.24);
        }

        .info-copy:active {
            background-color: rgba(149, 157, 172, 0.08);
        }

        .info-mailto,
        .info-mailto:visited {
            color: #fc7303;
        }
    </style>
    <script>
        // Place your support email here
        const SUPPORT_EMAIL = "";
    </script>
</head>

<body>
    <div class="content">
        <div id="logo" class="logo">
            <!--
                Place you logo here.
                You can use an external image:
                <img src="https://example.com/logo.png" width="160" alt="Company Name" />
                Or put your logo source code (like svg) right here:
                <svg width="160" height="80"> ... </svg>
            -->
        </div>

        <div class="message">
            <div class="alert">
                <svg width="207" height="207" viewBox="0 0 207 207" fill="none" xmlns="http://www.w3.org/2000/svg">
                    <path
                        d="M88.7512 33.2924L15.6975 155.25C14.1913 157.858 13.3943 160.816 13.3859 163.828C13.3775 166.84 14.1579 169.801 15.6494 172.418C17.141 175.035 19.2918 177.216 21.8877 178.743C24.4837 180.271 27.4344 181.092 30.4462 181.125H176.554C179.566 181.092 182.516 180.271 185.112 178.743C187.708 177.216 189.859 175.035 191.351 172.418C192.842 169.801 193.623 166.84 193.614 163.828C193.606 160.816 192.809 157.858 191.303 155.25L118.249 33.2924C116.711 30.7576 114.546 28.6618 111.963 27.2074C109.379 25.7529 106.465 24.9888 103.5 24.9888C100.535 24.9888 97.6206 25.7529 95.0372 27.2074C92.4538 28.6618 90.2888 30.7576 88.7512 33.2924V33.2924Z"
                        stroke="#F24444" stroke-width="16" stroke-linecap="round" stroke-linejoin="round" />
                    <path d="M103.5 77.625V120.75" stroke="#F24444" stroke-width="16" stroke-linecap="round"
                        stroke-linejoin="round" />
                    <path d="M103.5 146.625V146.668" stroke="#F24444" stroke-width="16" stroke-linecap="round"
                        stroke-linejoin="round" />
                </svg>
                <div class="alert-title">Malicious activity blocked</div>
                <div class="alert-desc">Your request is blocked since it was identified as a malicious one.</div>
            </div>
            <div class="info">
                <div class="info-title">Why it happened</div>
                <div class="info-text">
                    You might have used symbols similar to a malicious code sequence, or uploaded a specific file.
                </div>

                <div class="info-divider"></div>

                <div class="info-title">What to do</div>
                <div class="info-text">
                    If your request is considered to be legitimate, please <a id="mailto" href="" class="info-mailto">contact us</a> and provide your last action description and the following data:
                </div>

                <div id="data" class="info-data">
                    IP ${remote_addr}<br />
                    Blocked on ${time_iso8601}<br />
                    UUID ${request_id}
                </div>

                <button id="copy-btn" class="info-copy">
                    Copy details
                </button>
            </div>
        </div>
        <div></div>
    </div>
    <script>
        // Warning: ES5 code only

        function writeText(str) {
            const range = document.createRange();

            function listener(e) {
                e.clipboardData.setData('text/plain', str);
                e.preventDefault();
            }

            range.selectNodeContents(document.body);
            document.getSelection().addRange(range);
            document.addEventListener('copy', listener);
            document.execCommand('copy');
            document.removeEventListener('copy', listener);
            document.getSelection().removeAllRanges();
        }

        function copy() {
            const text = document.querySelector('#data').innerText;

            if (navigator.clipboard && navigator.clipboard.writeText) {
                return navigator.clipboard.writeText(text);
            }

            return writeText(text);
        }

        document.querySelector('#copy-btn').addEventListener('click', copy);

        const mailto = document.getElementById('mailto');
        if (SUPPORT_EMAIL) mailto.href = `mailto:${wallarm_dollar}{SUPPORT_EMAIL}`;
        else mailto.replaceWith(mailto.textContent);
    </script>
</body>
Testing
To test the functionality of the deployed solution, follow these steps:
-
Send the request with the test Path Traversal attack to the Wallarm Compute service domain:
-
Open Wallarm Console → Attacks section in the US Cloud or EU Cloud and make sure the attack is displayed in the list.

If the Wallarm Node mode is set to blocking and the traffic flows in-line, the request will also be blocked.
Configuration options
In the Wallarm config store, you can specify the following key-value items:
| Parameter | Description | Required? |
|---|---|---|
WALLARM_BACKEND |
Host name for the Wallarm Node instance specified in Compute service settings. | Yes |
ORIGIN_BACKEND |
Host name for the backend specified in Compute service settings. | Yes |
WALLARM_MODE_ASYNC |
Enables traffic copy analysis without affecting the original flow (true) or inline analysis (false, default). |
No |
WALLARM_DEBUG |
Writes debug information to tailing logs (true) or disables it (false, default). |
No |
WALLARM_RESPONSE_BODY_SIZE_LIMIT |
Limit for a response body size the Node can parse and analyze (in bytes). Non-numerical values like none (default) mean no limit. |
No |
ORIGIN_PASS_CACHE |
Forces pass-through behavior for requests sent to the origin backend, bypassing Fastly's caching layer (true). By default, the Fastly's caching layer is used (false). |
No |
ORIGIN_PRESERVE_HOST |
Retains the original Host header from the client request instead of replacing it with the origin backend's hostname via the X-Forwarded-Host header. Useful for backends relying on the original Host for routing or logging. Default: false. |
No |
LOGGING_ENDPOINT |
Sets a logging endpoint for the connector. Default: tailing logs (stderr). | No |
Upgrading the Wallarm Compute service on Fastly
To upgrade the deployed Fastly Compute service to a newer version:
-
Proceed to Wallarm Console → Security Edge → Connectors → Download code bundle and download the updated code bundle.
If running a self-hosted node, contact sales@wallarm.com to get the updated code bundle.
-
Go to the directory containing the updated
wallarm-api-security.tar.gzWallarm package archive and run:fastly compute deploy --service-id=<SERVICE_ID> --package=wallarm-api-security.tar.gz --token=<FASTLY_TOKEN><SERVICE_ID>with the ID of your deployed Wallarm service.<FASTLY_TOKEN>with the Fastly API token used for deployment.
-
Activate the new service version in the Fastly UI.
Compute service upgrades may require a Wallarm Node upgrade, especially for major version updates. See the Native Node changelog for the self-hosted Node release notes and upgrade instructions or the Edge connector upgrade procedure. Regular node updates are recommended to avoid deprecation and simplify future upgrades.