# Wallarm Connector for Azure API Management
This guide describes how to secure your APIs managed by [Azure API Management (APIM)](https://azure.microsoft.com/en-us/products/api-management) using the Wallarm connector.
## Overview
To use Wallarm as a connector for Azure APIM, you need to **deploy the Wallarm Node externally** and **apply Wallarm policy fragments in Azure** to route traffic to the Node for analysis.
The Wallarm connector for Azure APIM supports the **synchronous** and **asynchronous** traffic analysis:
**Synchronous traffic analysis:**
In [synchronous (inline)](https://docs.wallarm.com/installation/inline/overview.md) mode, the policy intercepts requests and sends them to the Wallarm Node for inspection. Based on the Node's [filtration mode](https://docs.wallarm.com/admin-en/configure-wallarm-mode.md), malicious requests may be blocked with `403`, providing real-time threat mitigation.
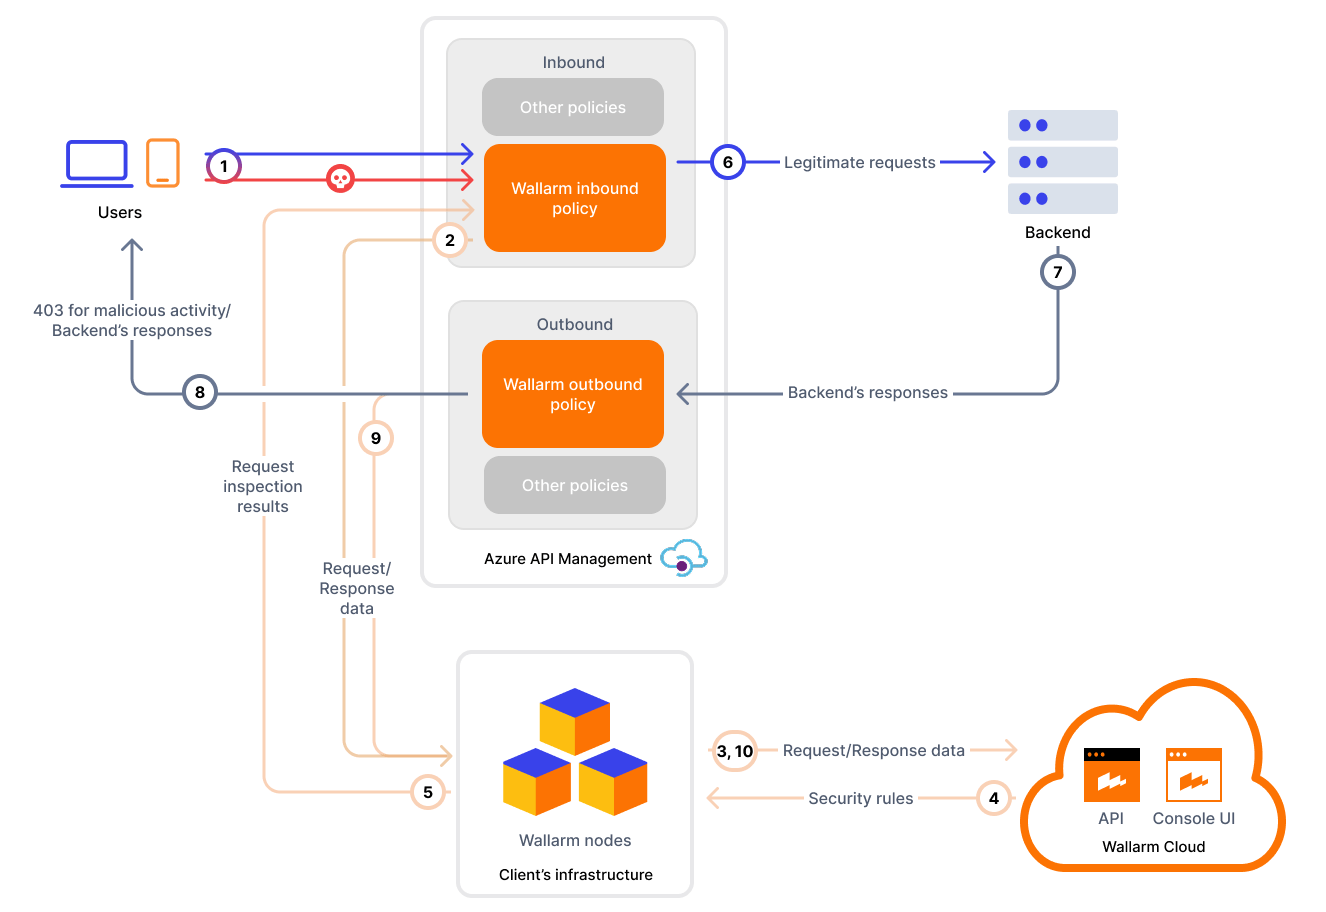
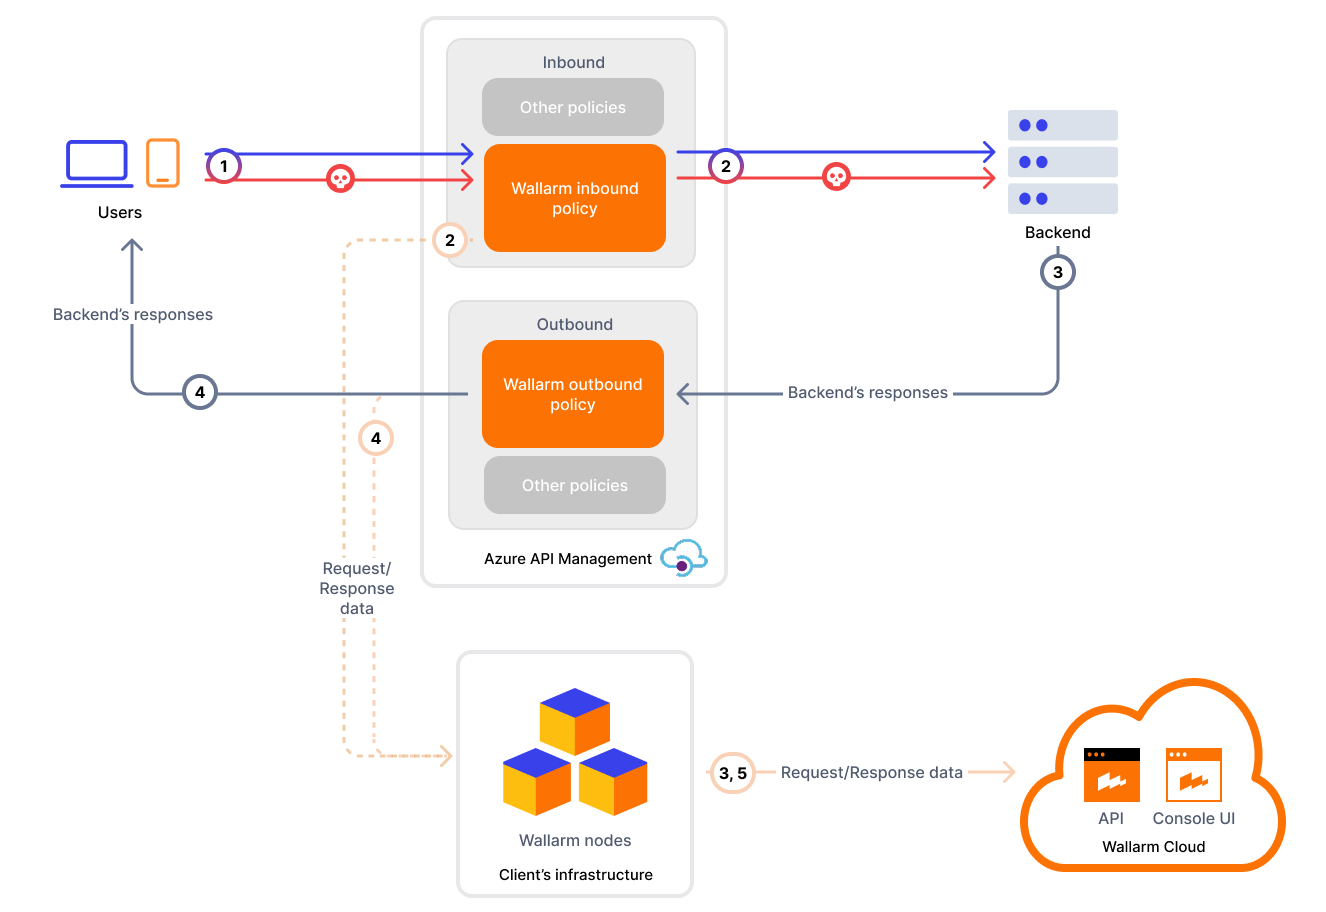
**Asynchronous traffic analysis:**
In [asynchronous (out-of-band)](https://docs.wallarm.com/installation/oob/overview.md) mode, traffic is mirrored to the Node without affecting the original flow. Malicious requests are logged in Wallarm Console but not blocked.
## Use cases
This solution is recommended for securing APIs managed by the Azure APIM service.
## Limitations
* [Custom blocking code](https://docs.wallarm.com/admin-en/configuration-guides/configure-block-page-and-code.md) configuration is not supported.
All [blocked](https://docs.wallarm.com/admin-en/configure-wallarm-mode.md) malicious traffic is returned with status code `403` by default. You can customize the block page content, but not the response code itself.
* [Rate limiting](https://docs.wallarm.com/user-guides/rules/rate-limiting.md) by Wallarm rules is not supported.
Rate limiting cannot be enforced on the Wallarm side for this connector. If rate limiting is required, use [Azure APIM's built-in policies](https://learn.microsoft.com/en-us/azure/api-management/rate-limit-policy).
* [Multitenancy](https://docs.wallarm.com/installation/multi-tenant/overview.md) is not supported on Security Edge hosting, but it is supported for self-hosted nodes deployed with the connector.
* Attacks in query parameters and URI are registered **3 times**.
This is because the Azure Application Gateway adds the `X-ORIGINAL-URL` and `X-WAWS-UNENCODED-URL` headers, which fully reflect the original URI including the attack pattern. As a result, a single malicious parameter or URI path generates three detections:
* In the query parameter or URI path itself
* In the `X-ORIGINAL-URL` header
* In the `X-WAWS-UNENCODED-URL` header
## Requirements
Before deployment, ensure the following prerequisites are met:
* Familiarity with Azure API Management.
* APIs are published via Azure API Management.
* A user account with one of the following [roles in Azure APIM](https://learn.microsoft.com/en-us/azure/api-management/api-management-role-based-access-control):
* **API Management Workspace Contributor** - for managing policy fragments within a workspace.
* **API Management Service Contributor** - for global configuration across the entire APIM instance.
* Access to the **Administrator** account in Wallarm Console for the [US Cloud](https://us1.my.wallarm.com/) or [EU Cloud](https://my.wallarm.com/), or [ME Cloud](https://me1.my.wallarm.com/).
* Native Node [version 0.18.0 or higher](https://docs.wallarm.com/updating-migrating/native-node/node-artifact-versions.md).
* A valid **trusted** SSL/TLS certificate for the Wallarm Node domain (self-signed certificates are not supported).
## Deployment
### 1. Deploy a Wallarm Node
The Wallarm Node is a core component of the Wallarm platform that you need to deploy. It inspects incoming traffic, detects malicious activities, and can be configured to mitigate threats.
You can deploy it either hosted by Wallarm or in your own infrastructure, depending on the level of control you require.
**Edge node:**
To deploy a Wallarm-hosted node for the connector, follow the [instructions](https://docs.wallarm.com/installation/security-edge/se-connector.md).
**Self-hosted node:**
Choose an artifact for a self-hosted node deployment and follow the attached instructions:
* [All-in-one installer](https://docs.wallarm.com/installation/native-node/all-in-one.md) for Linux infrastructures on bare metal or VMs
* [Docker image](https://docs.wallarm.com/installation/native-node/docker-image.md) for environments that use containerized deployments
* [Helm chart](https://docs.wallarm.com/installation/native-node/helm-chart.md) for infrastructures utilizing Kubernetes
!!! info "Required Node version"
Please note that the Azure APIM connector is supported only by the Native Node [version 0.18.0+](https://docs.wallarm.com/updating-migrating/native-node/node-artifact-versions.md).
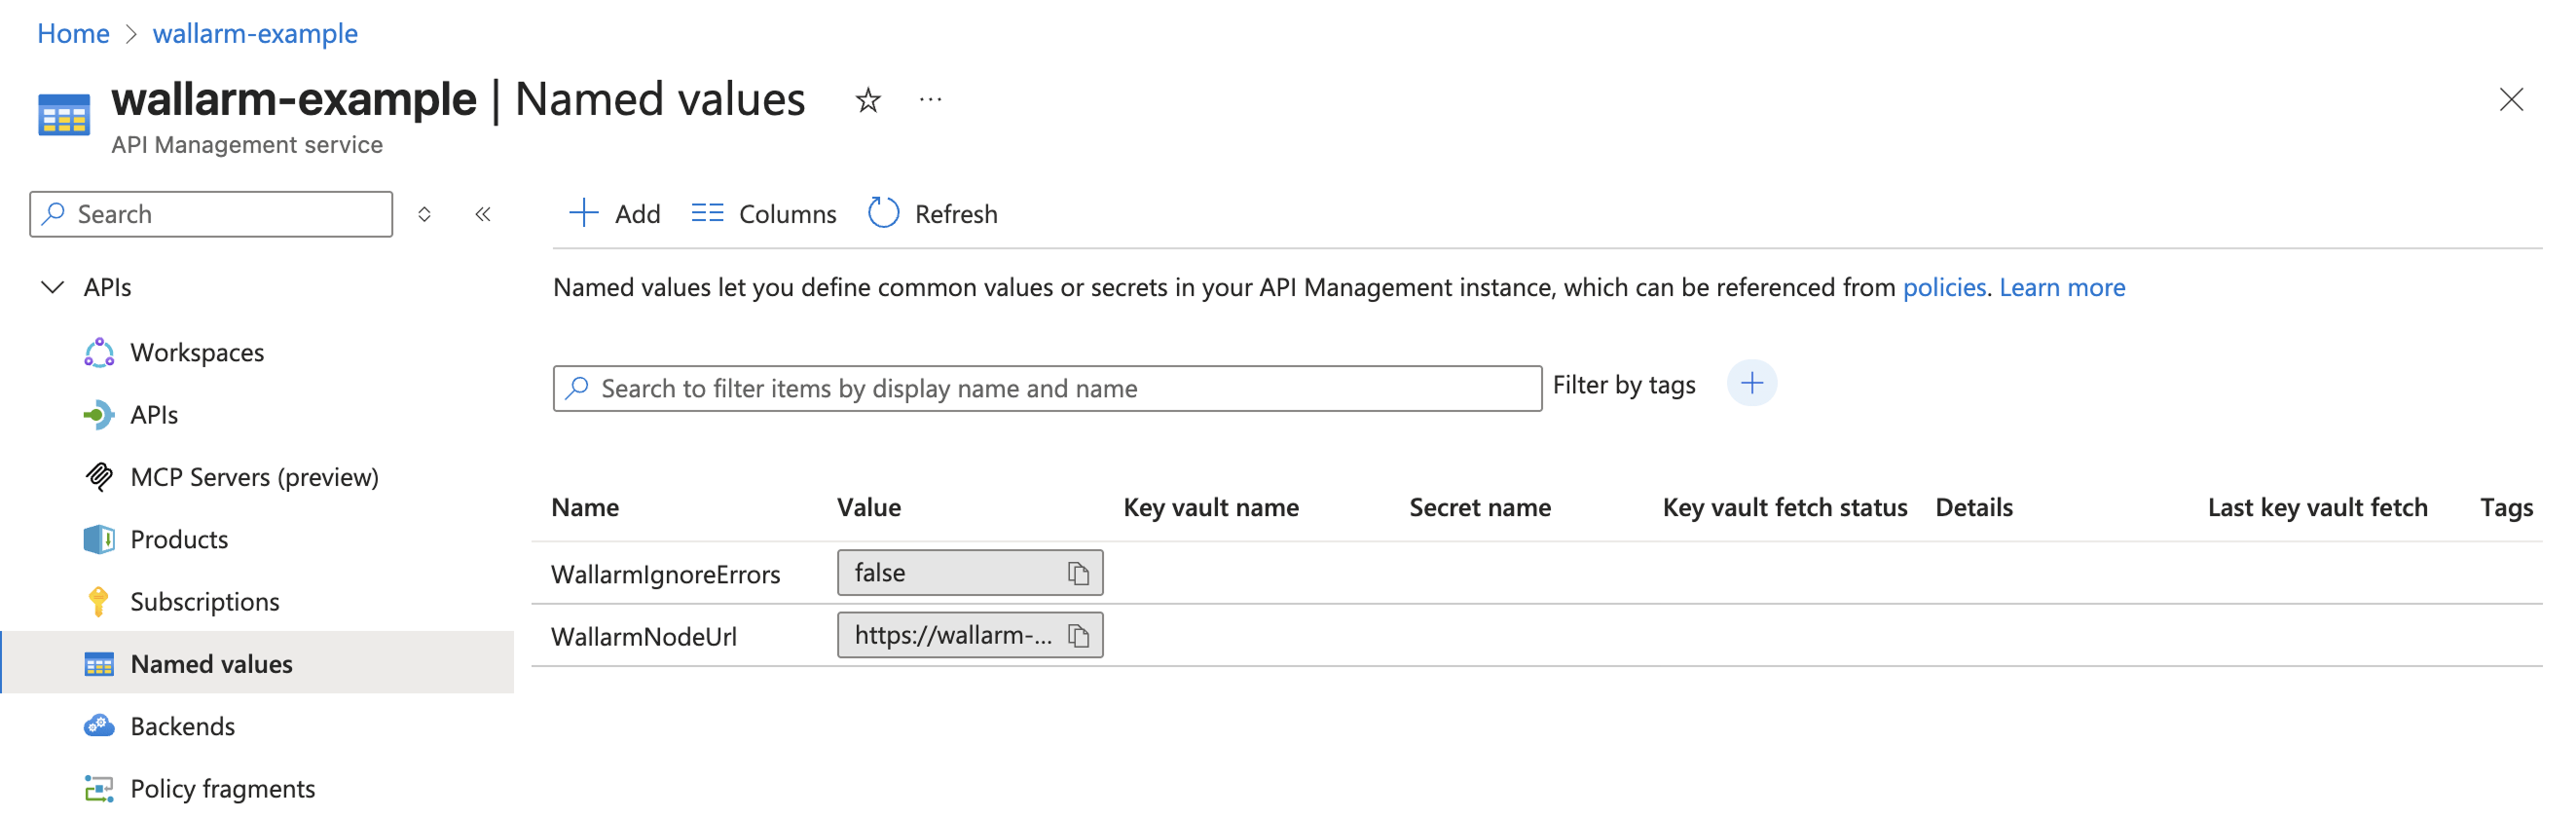
### 2. Create named values in Azure
Define the following [named values in Azure API Management](https://learn.microsoft.com/en-us/azure/api-management/api-management-howto-properties?tabs=azure-portal) to reference them from policies:
| Named value | Description | Type | Required? |
| ----------- | ----------- | ---- | --------- |
| `WallarmNodeUrl` | Full domain name of your [Wallarm Node](#1-deploy-a-wallarm-node) including protocol (e.g., `https://wallarm-node-instance.com`). | Plain | Yes |
| `WallarmIgnoreErrors` | Defines error-handling behavior in synchronous traffic analysis when the Node is unavailable (e.g., timeouts):- `true` (default) - requests are forwarded to APIs when the Node is not available
- `false` - block requests with status code `403` when the Node is not available
If not specified, the connector defaults to `true`, meaning requests are always forwarded to APIs when the Node is unavailable. | Plain | No |
The example below shows how the named values look in the Azure Portal:
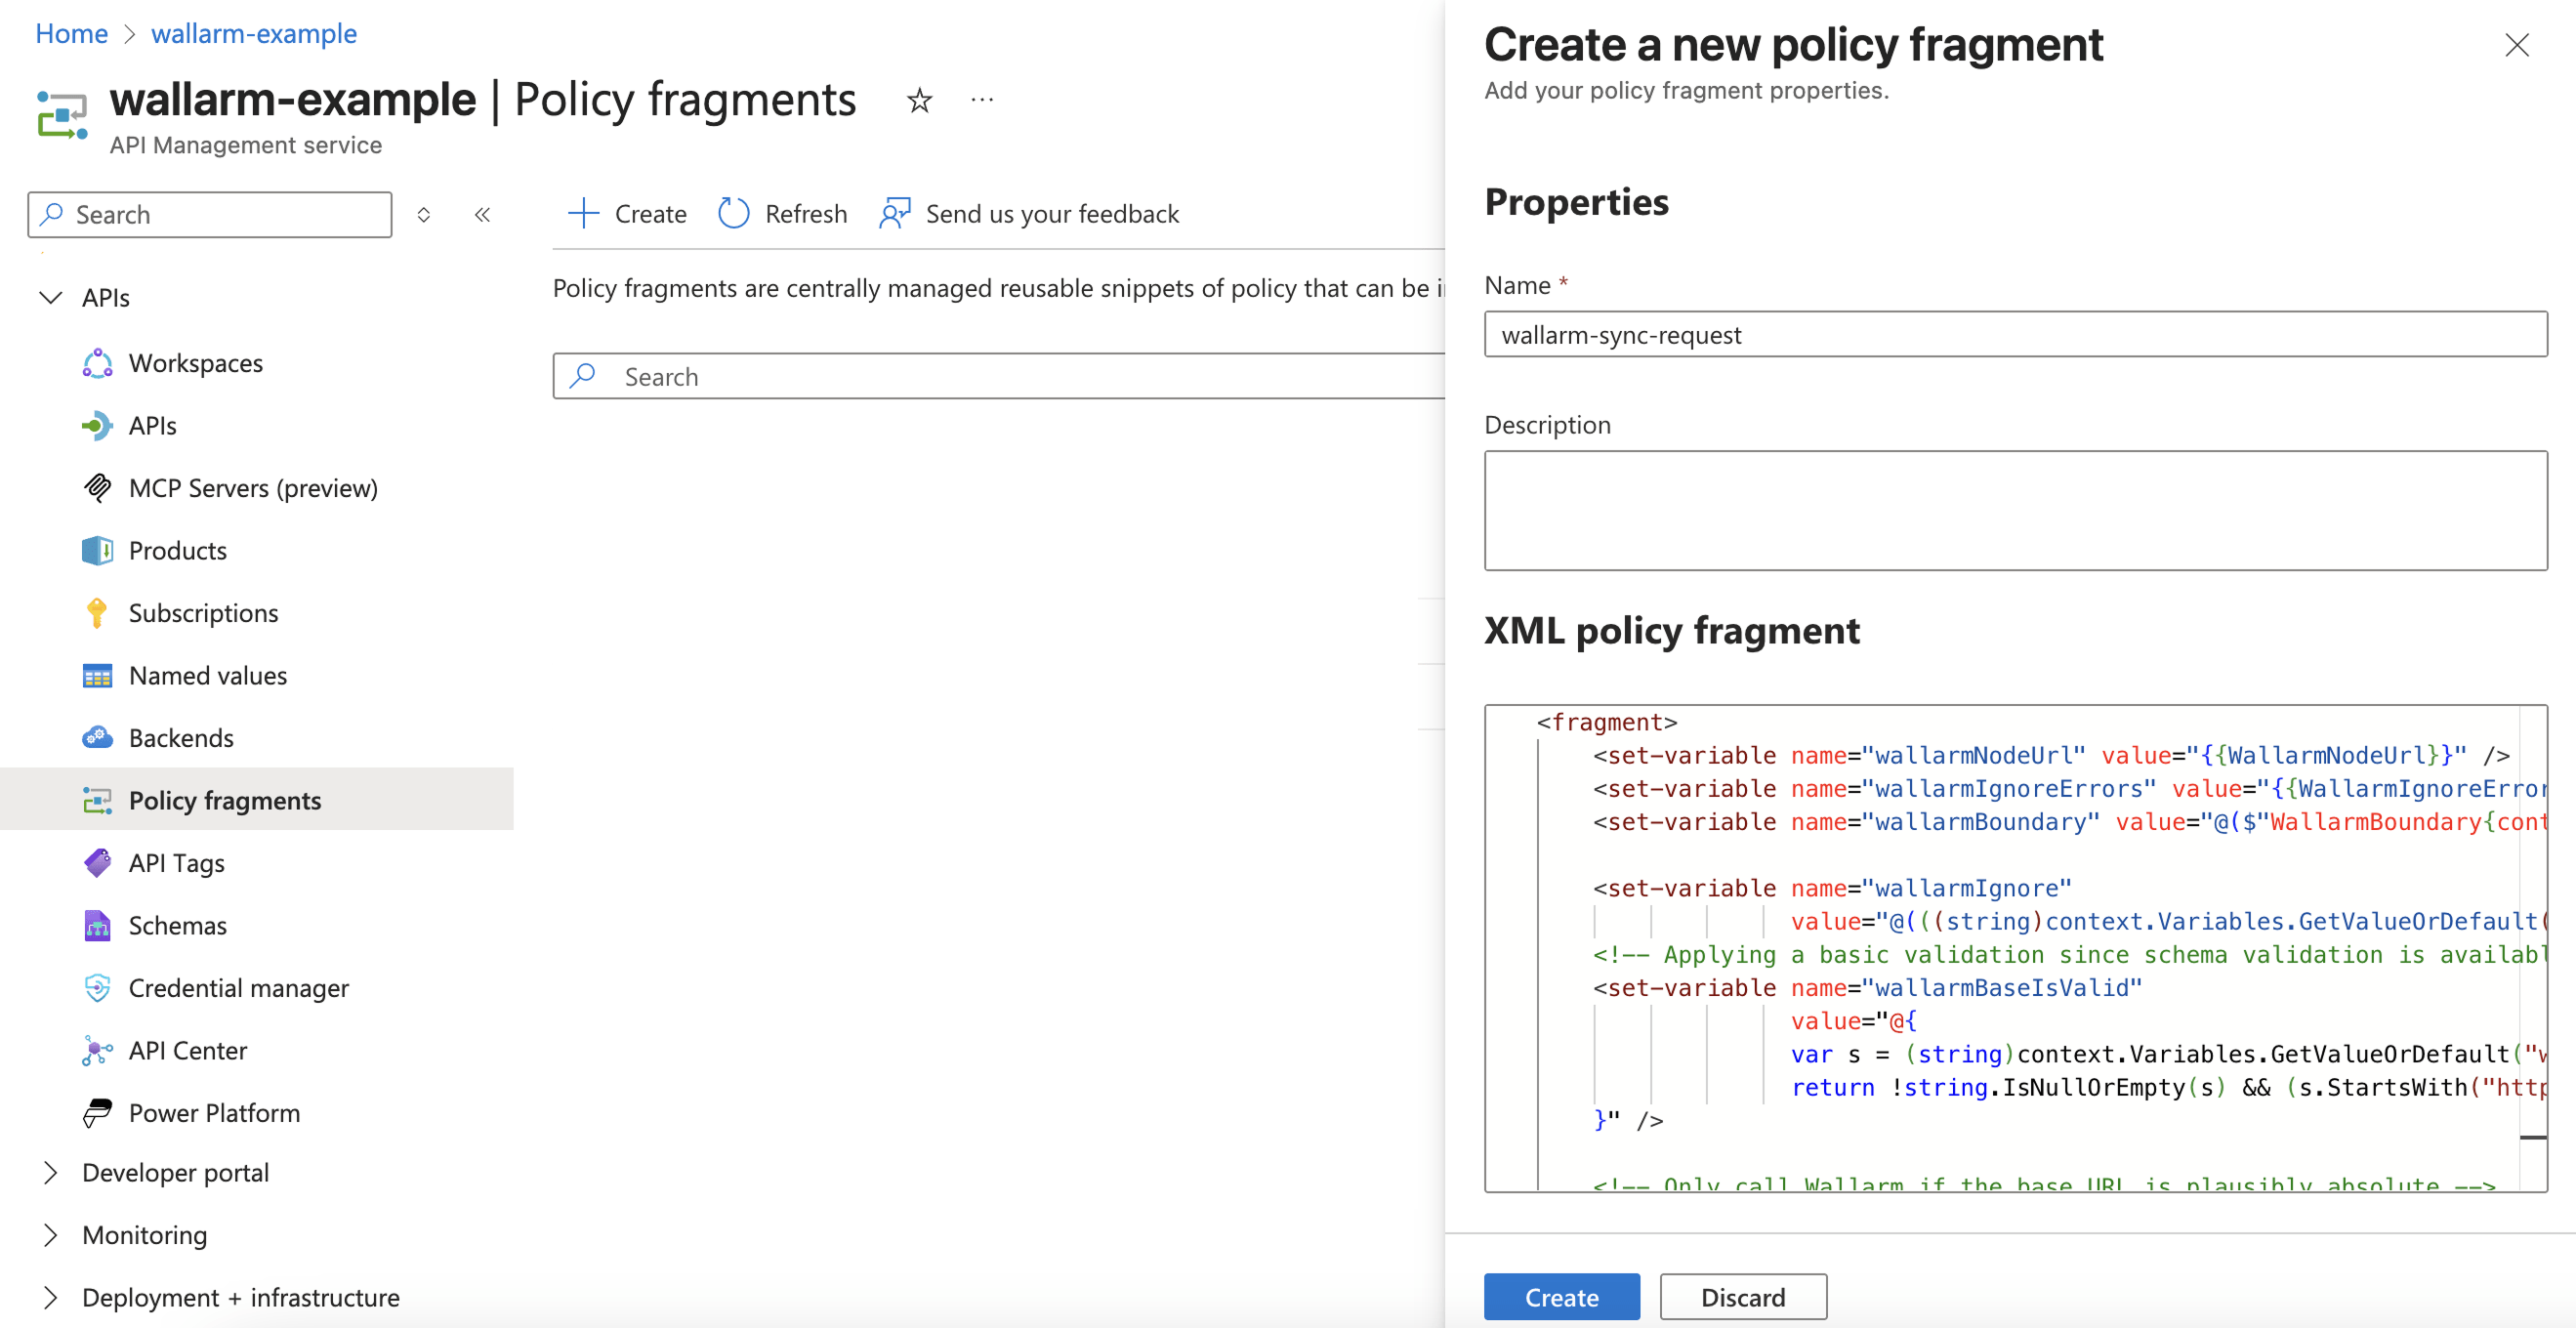
### 3. Obtain and deploy Wallarm policy fragments
The Azure API Management connector package includes 4 XML files:
* Synchronous mode:
* `wallarm-sync-request.xml`
* `wallarm-sync-response.xml`
* Asynchronous mode:
* `wallarm-async-request.xml`
* `wallarm-async-response.xml`
Each mode requires 2 fragments: one for requests (inbound) and one for responses (outbound).
The steps below use the Azure Portal UI, but you can also deploy policy fragments with Terraform or ARM templates.
1. Contact sales@wallarm.com to get the policy fragments.
1. Extract the policy archive.
1. Navigate to Azure Portal → **API Management** service → **APIs** → **Policy fragments** → **Create**.
1. Create a request policy fragment using `wallarm-sync-request.xml` for synchronous mode or `wallarm-async-request.xml` for asynchronous mode.
You can name the fragment consistently with the file: `wallarm-sync-request` or `wallarm-async-request`.
Example of a request policy fragment in Azure Portal:
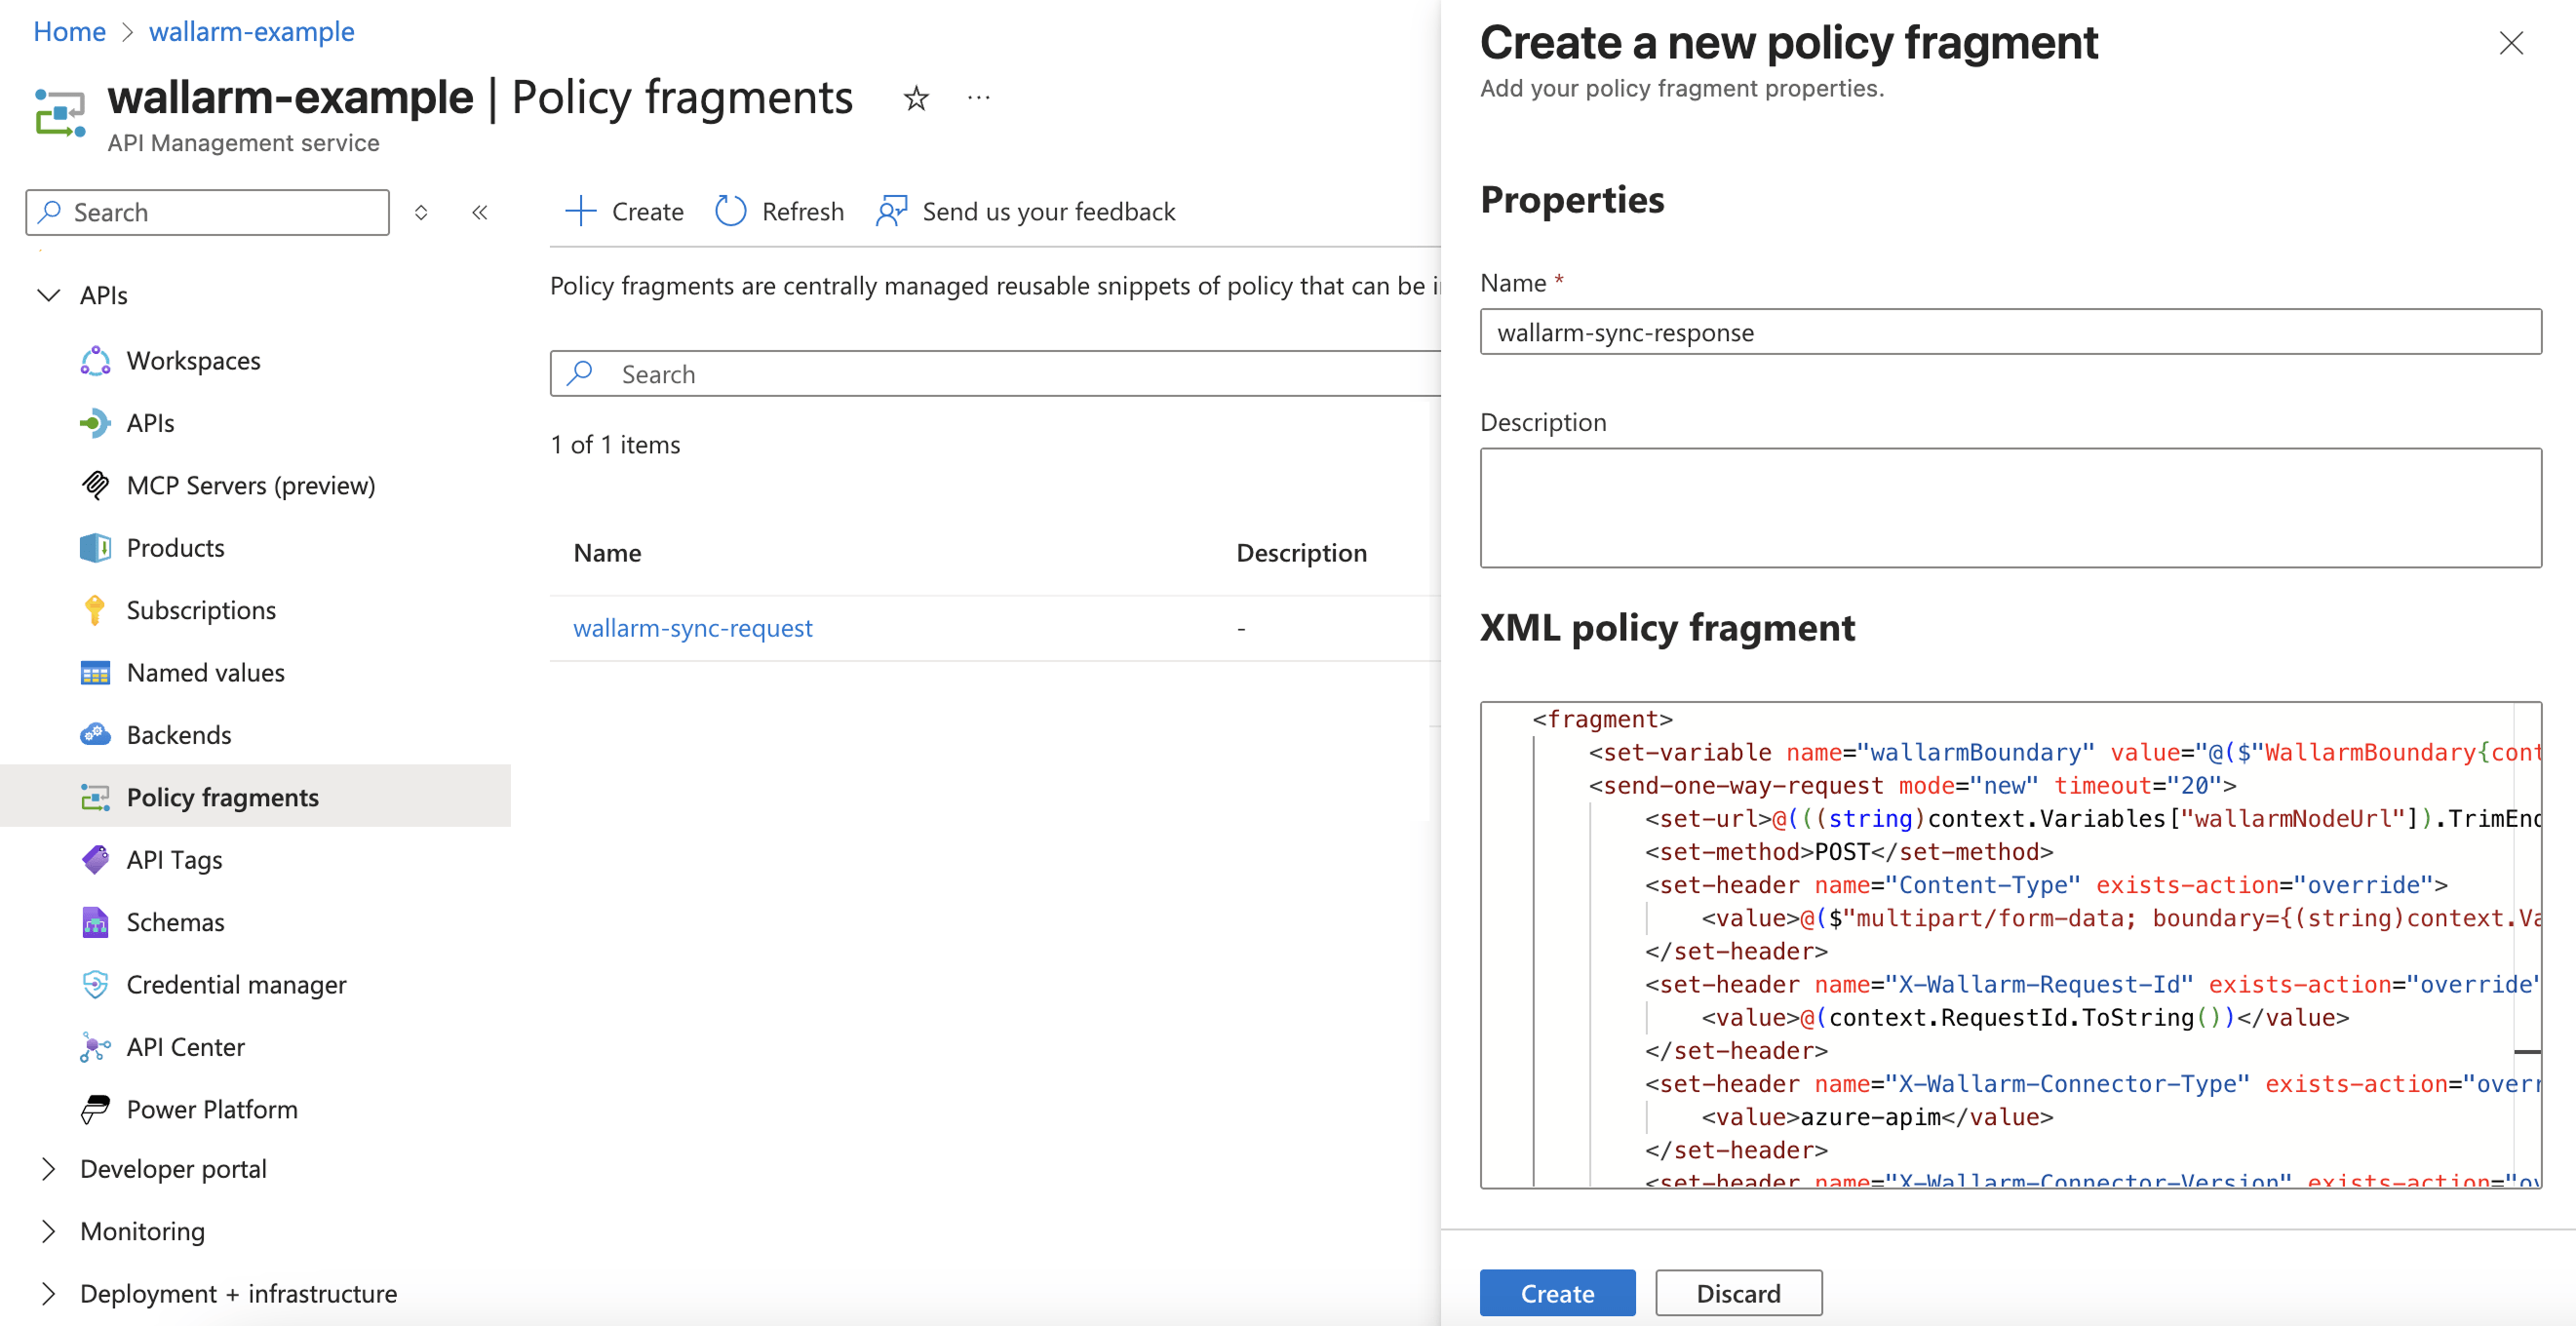
1. Create a response policy fragment using `wallarm-sync-response.xml` for synchronous mode or `wallarm-async-response.xml` for asynchronous mode.
You can name the fragment consistently with the file: `wallarm-sync-response` or `wallarm-async-response`.
Example of a response response fragment in Azure Portal:
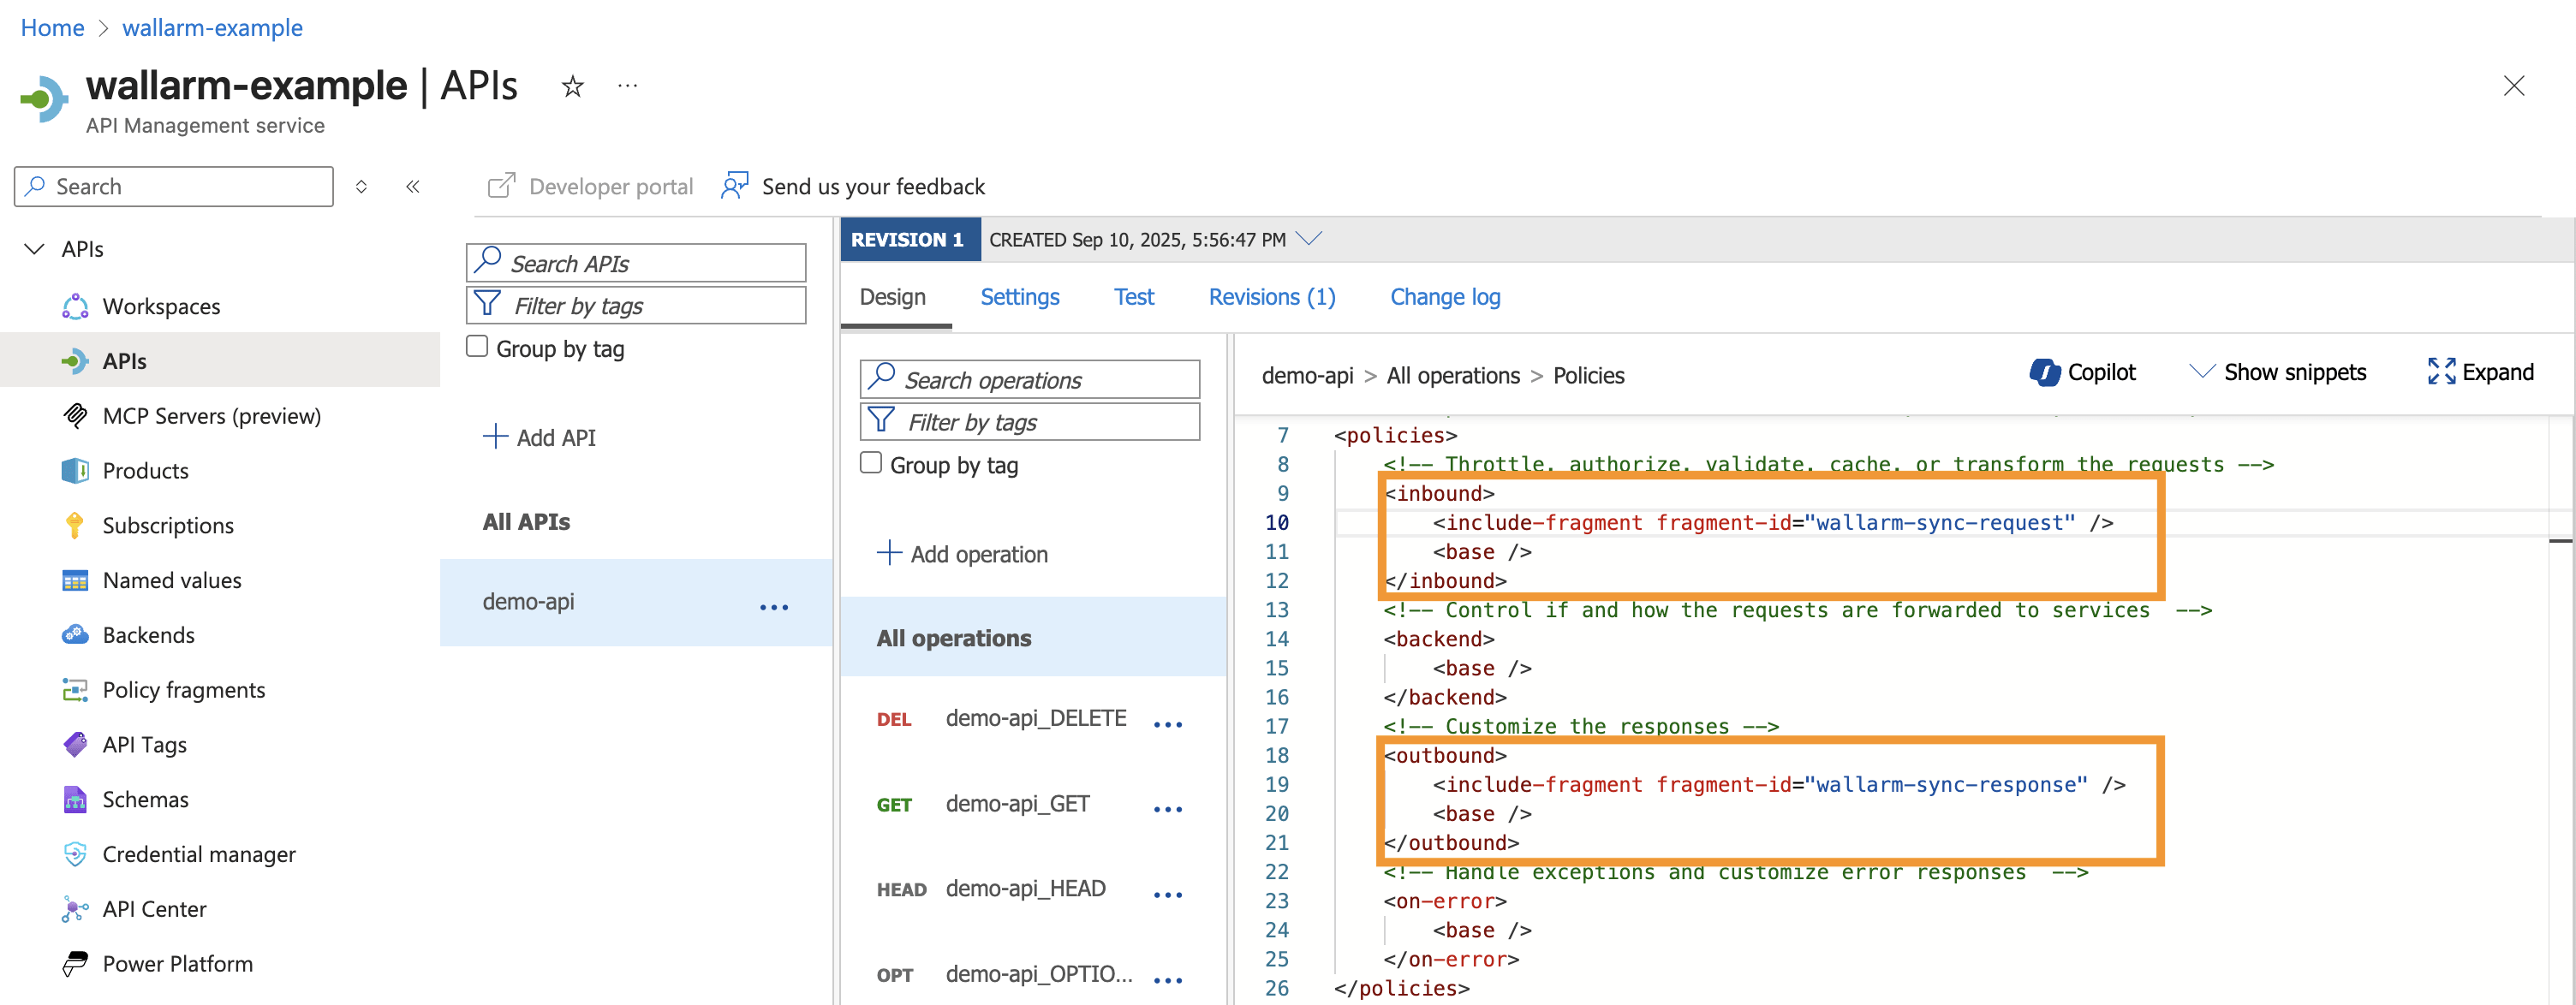
### 4. Apply Wallarm policy fragments to APIs
You can attach Wallarm fragments **globally** to all APIs or **individually** to specific APIs or operations.
Insert fragments inside your existing policy to preserve the current flow.
#### Globally (all APIs)
1. Navigate to Azure Portal → **APIs** → **All APIs**.
1. Under **Inbound processing** and **Outbound processing**, add the fragments, for example:
**Synchronous traffic analysis:**
```xml hl_lines="2-4 8-10"
```
**Asynchronous traffic analysis:**
```xml hl_lines="2-4 8-10"
```
#### Per API or operation
To apply the created fragments to individual APIs or operations:
1. Navigate to Azure Portal → **APIs** → select API → **All operations** or specific operation.
1. Under **Inbound processing** and **Outbound processing**, add the fragments **before ``** so inspection happens prior to routing, for example:
**Synchronous traffic analysis:**
```xml hl_lines="2-6 10-13"
```
**Asynchronous traffic analysis:**
```xml hl_lines="2-6 10-13"
```
Example of per-API application in Azure Portal:
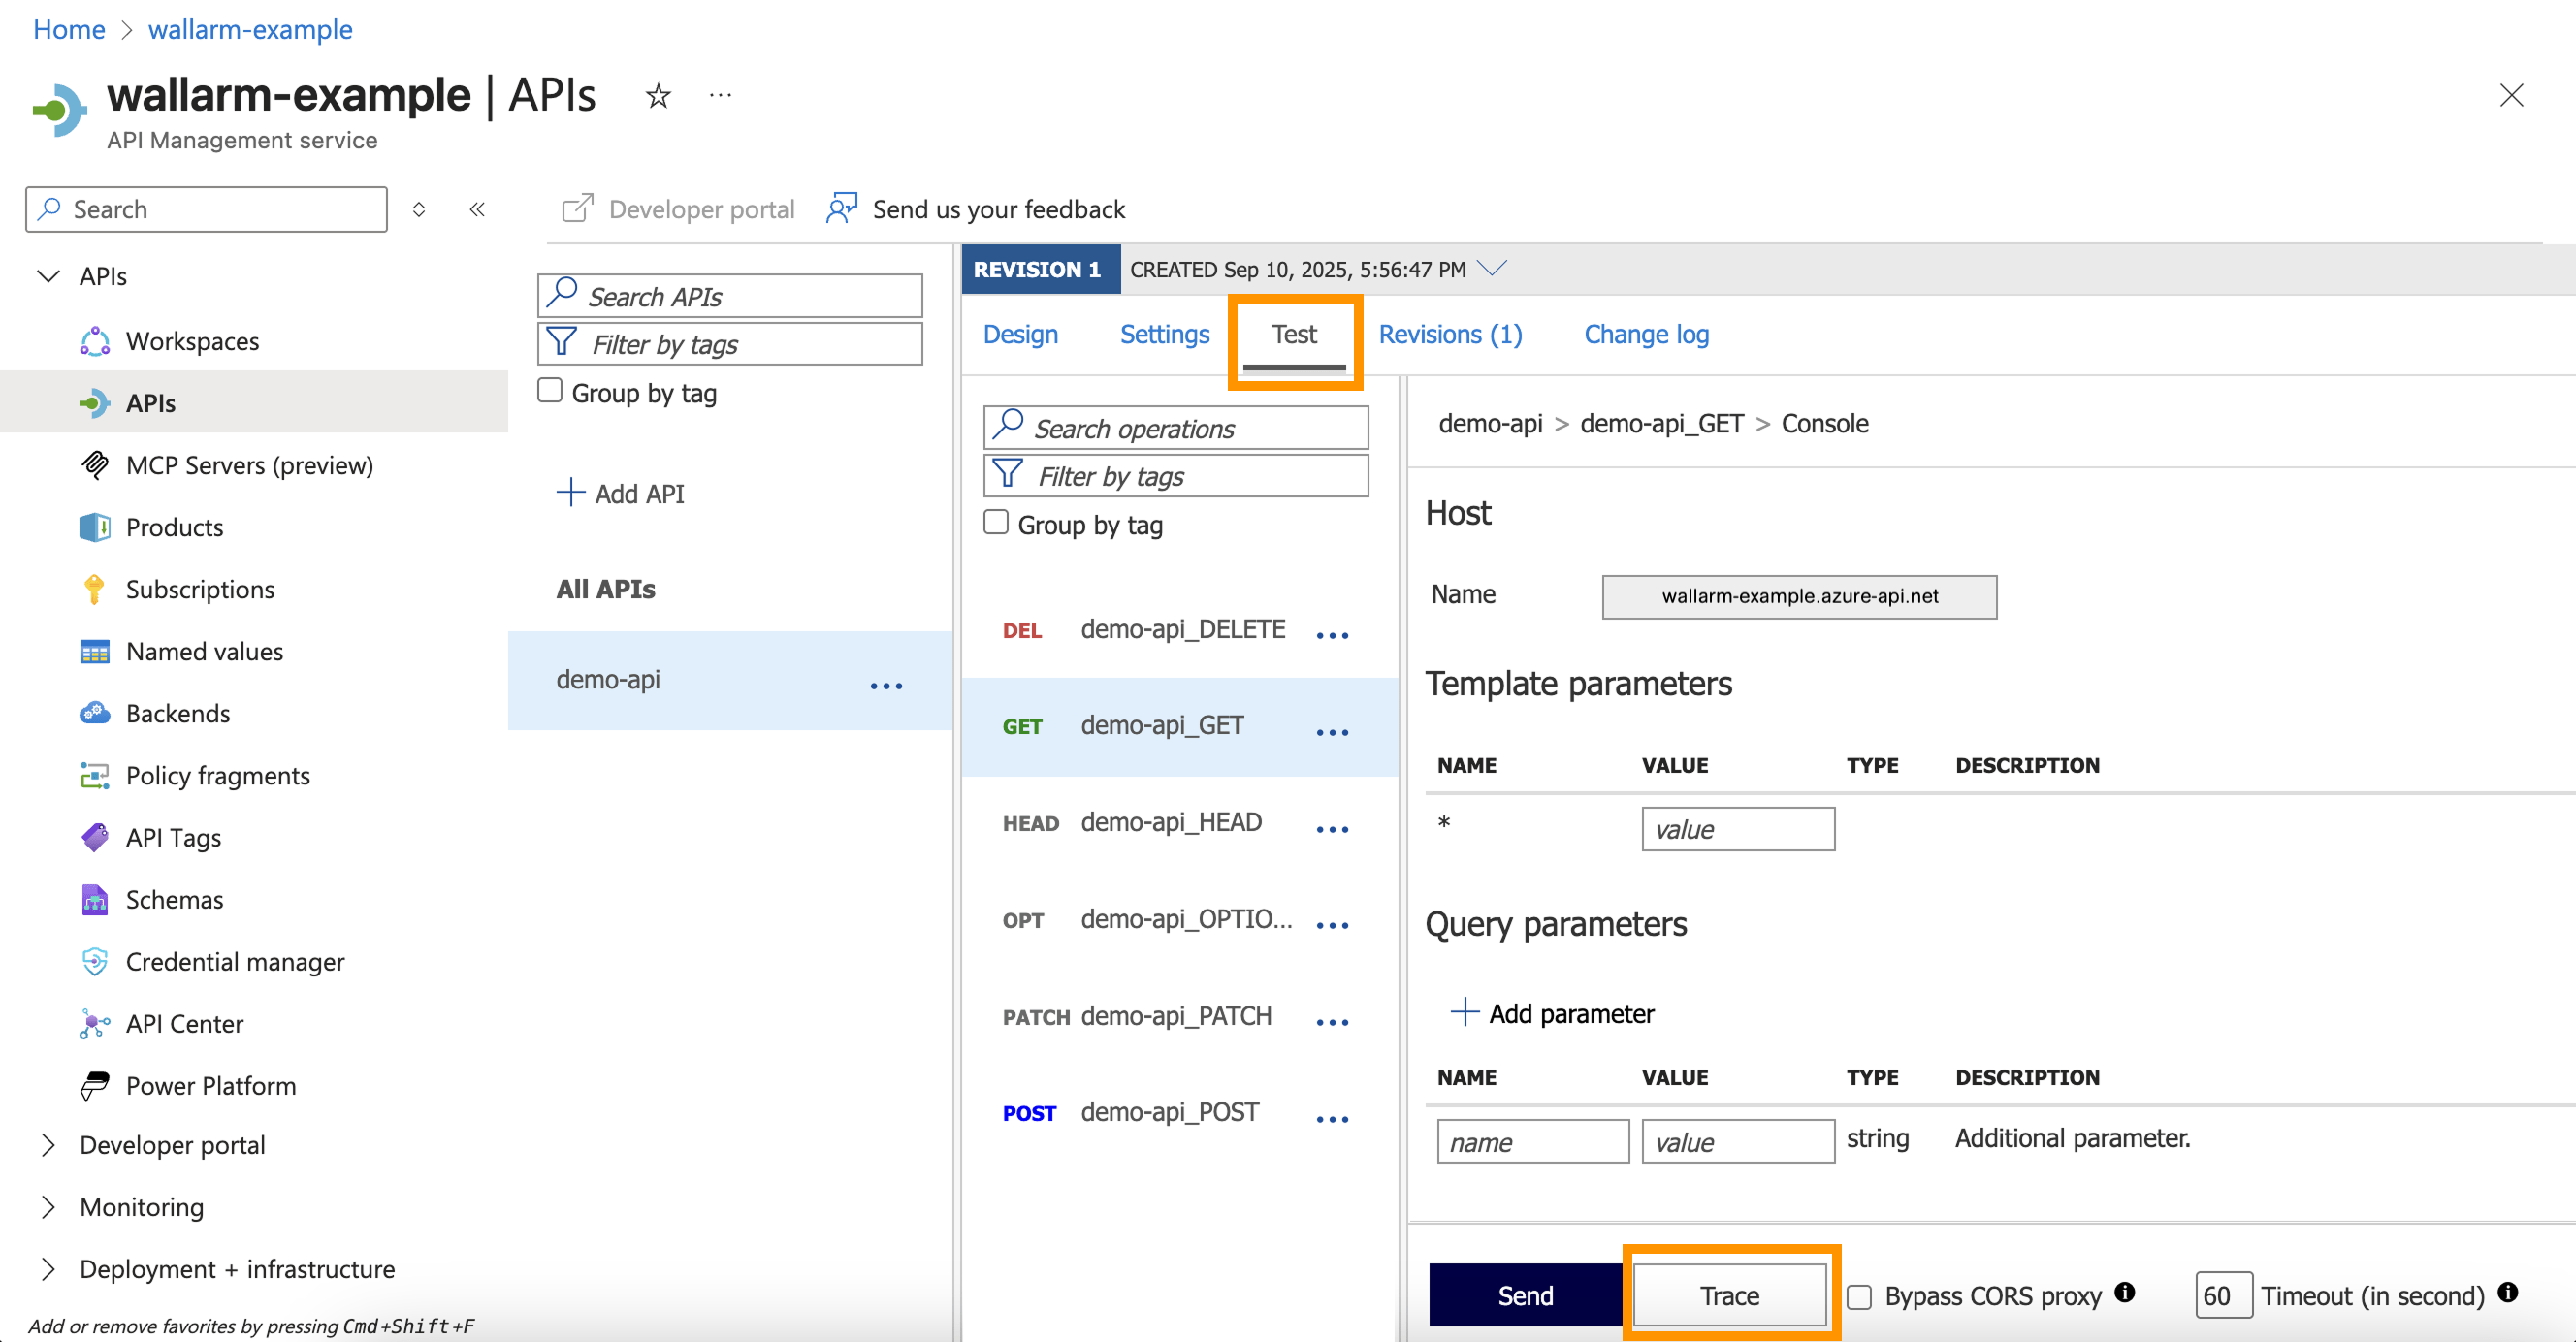
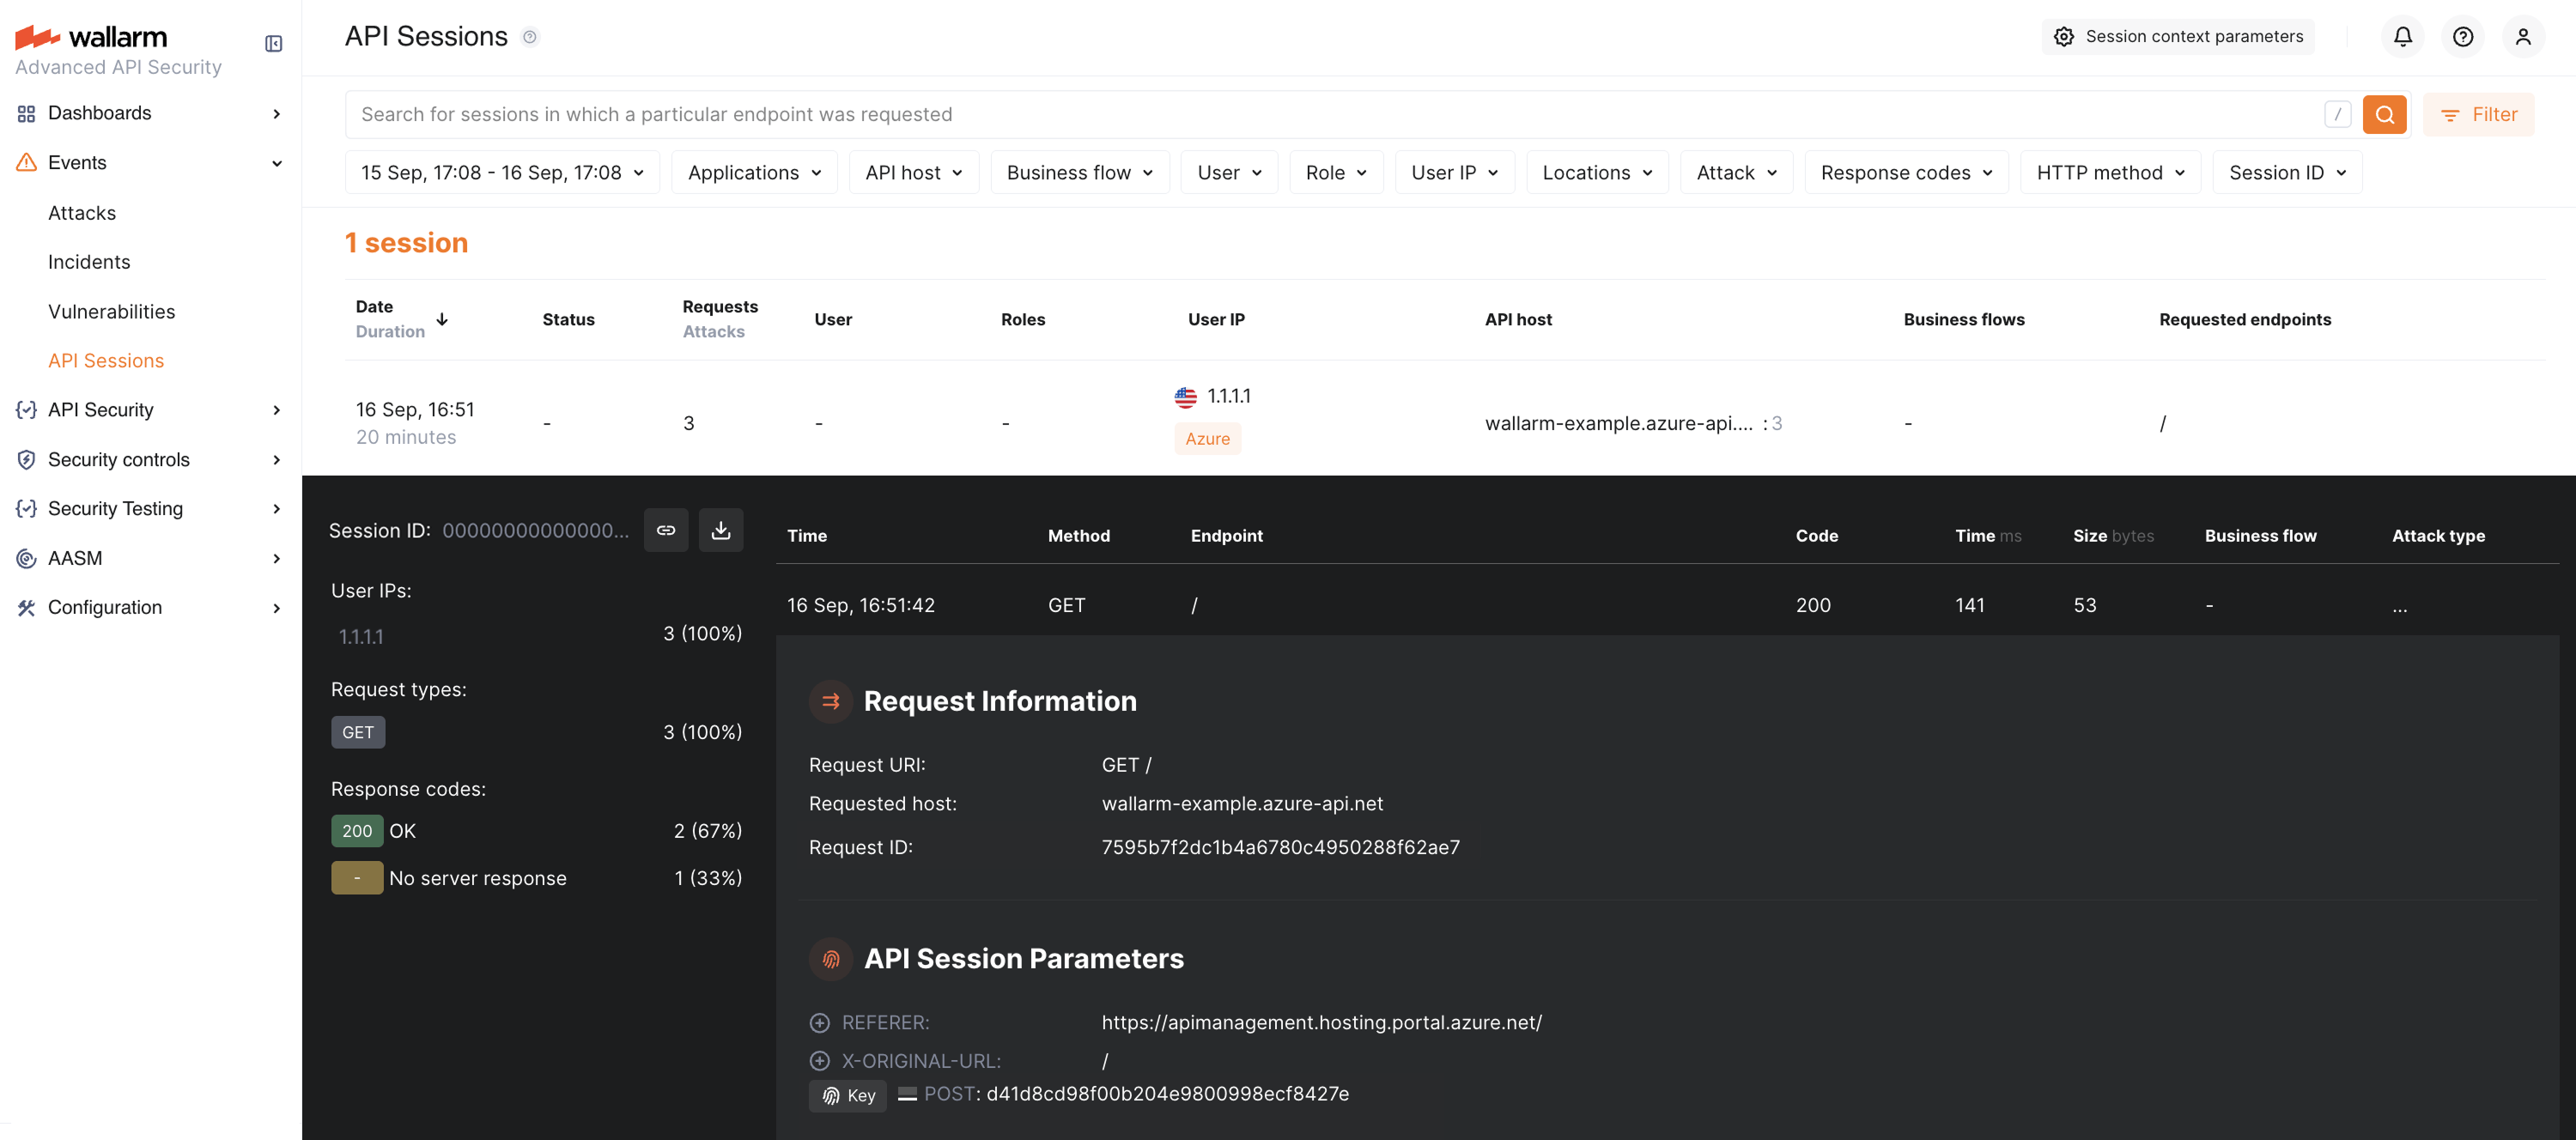
## Testing
Test the deployed policy fragments with both legitimate and malicious traffic.
### Legitimate traffic
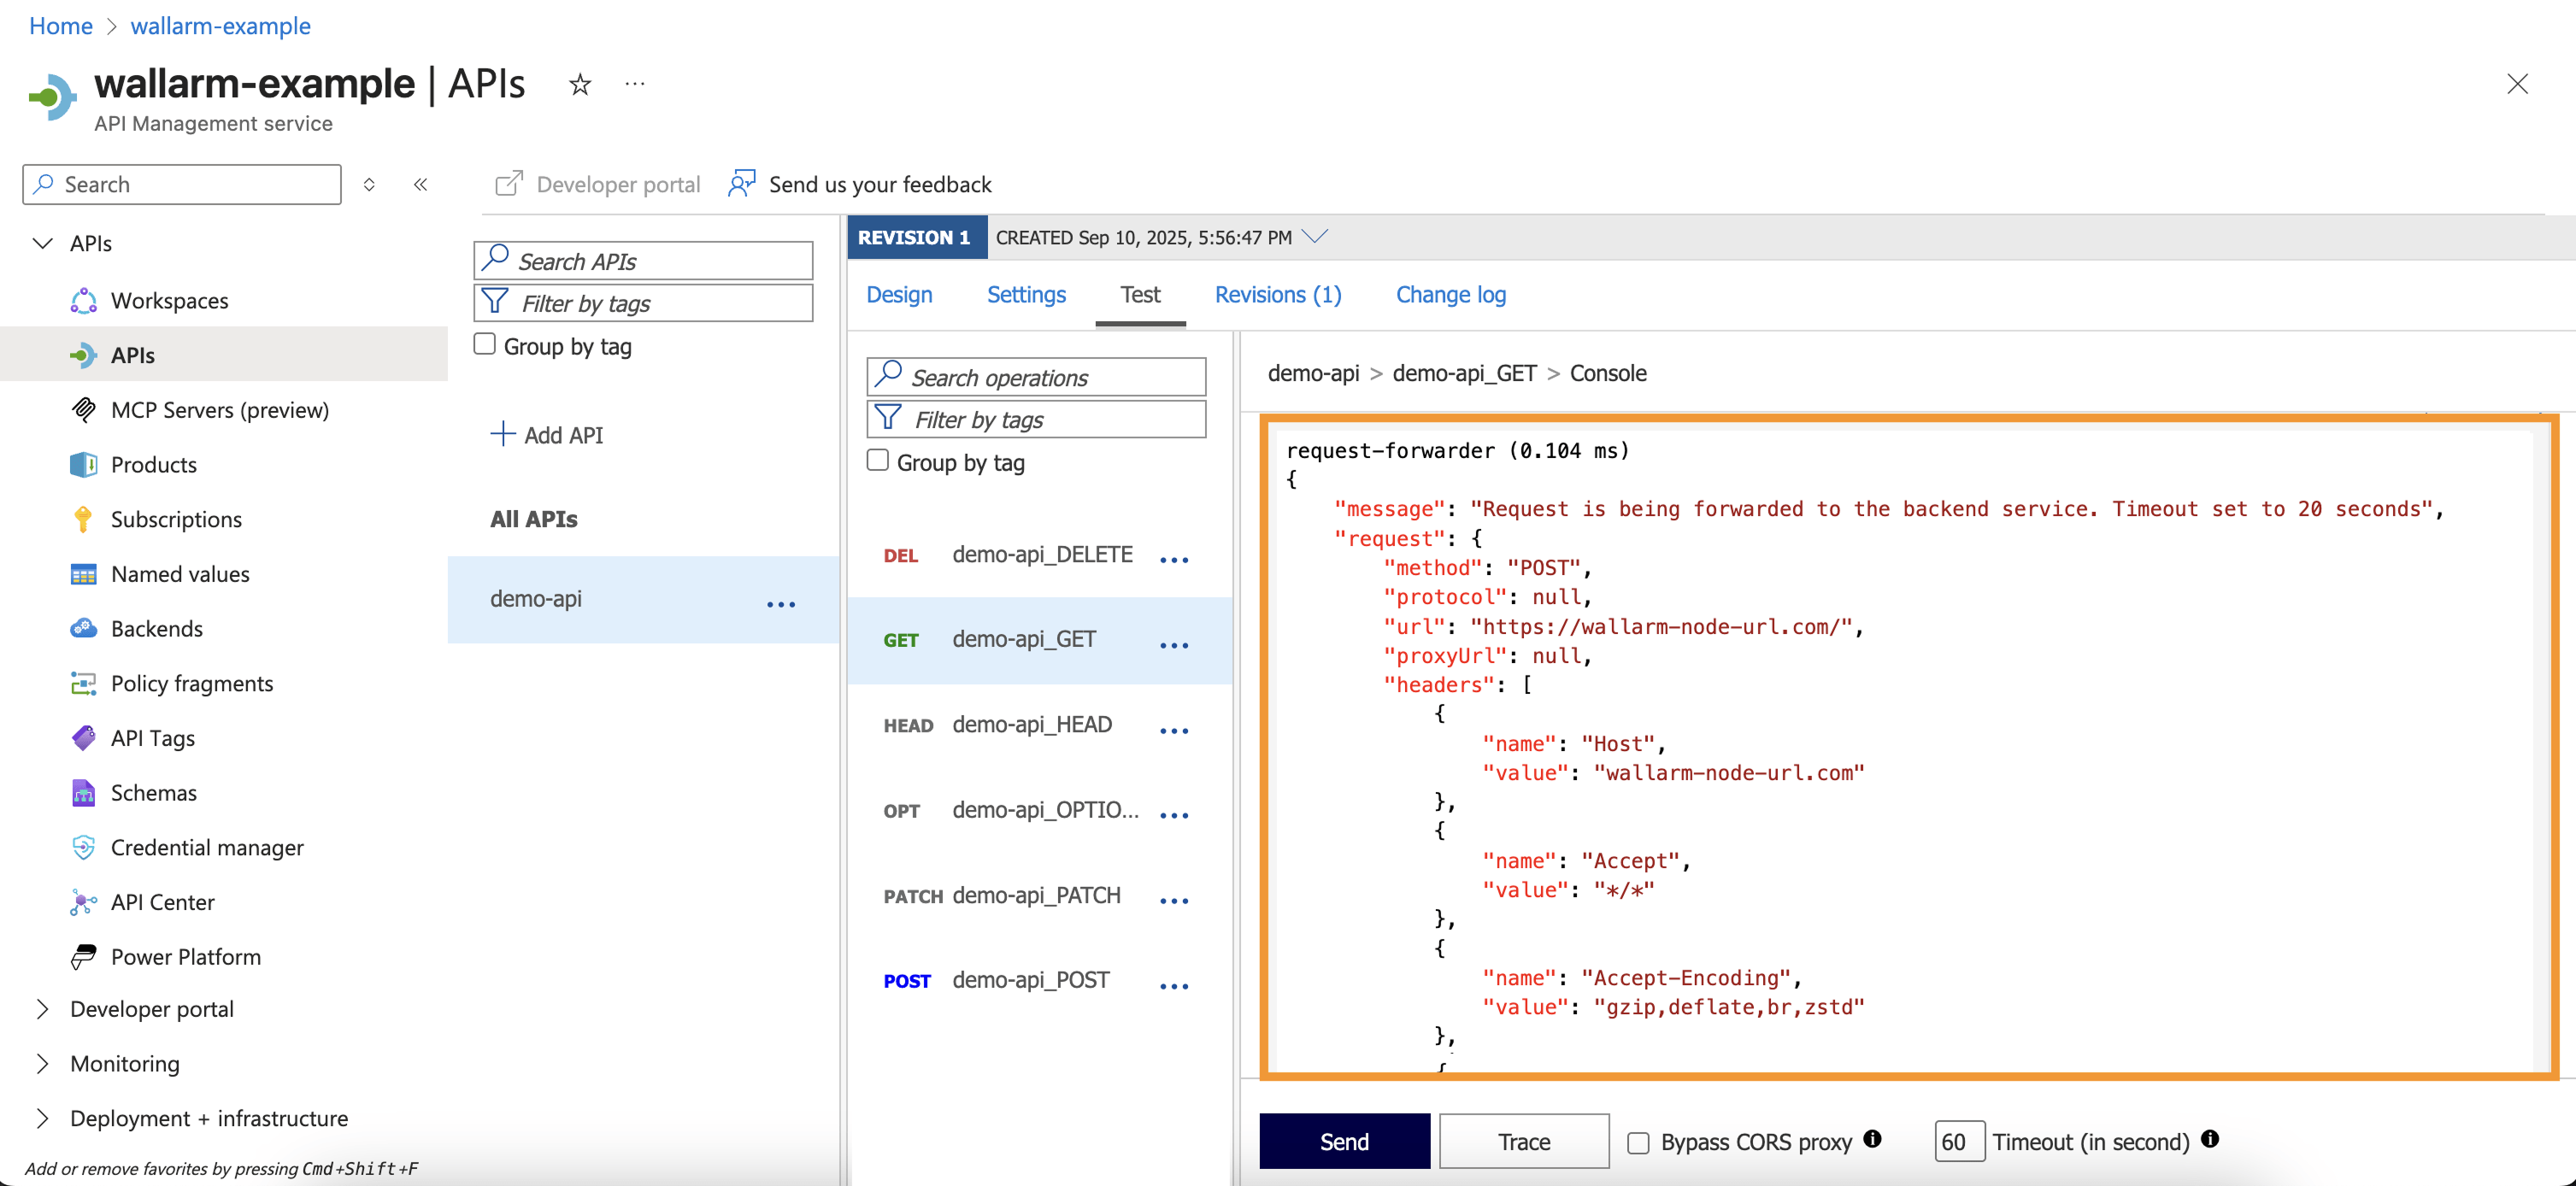
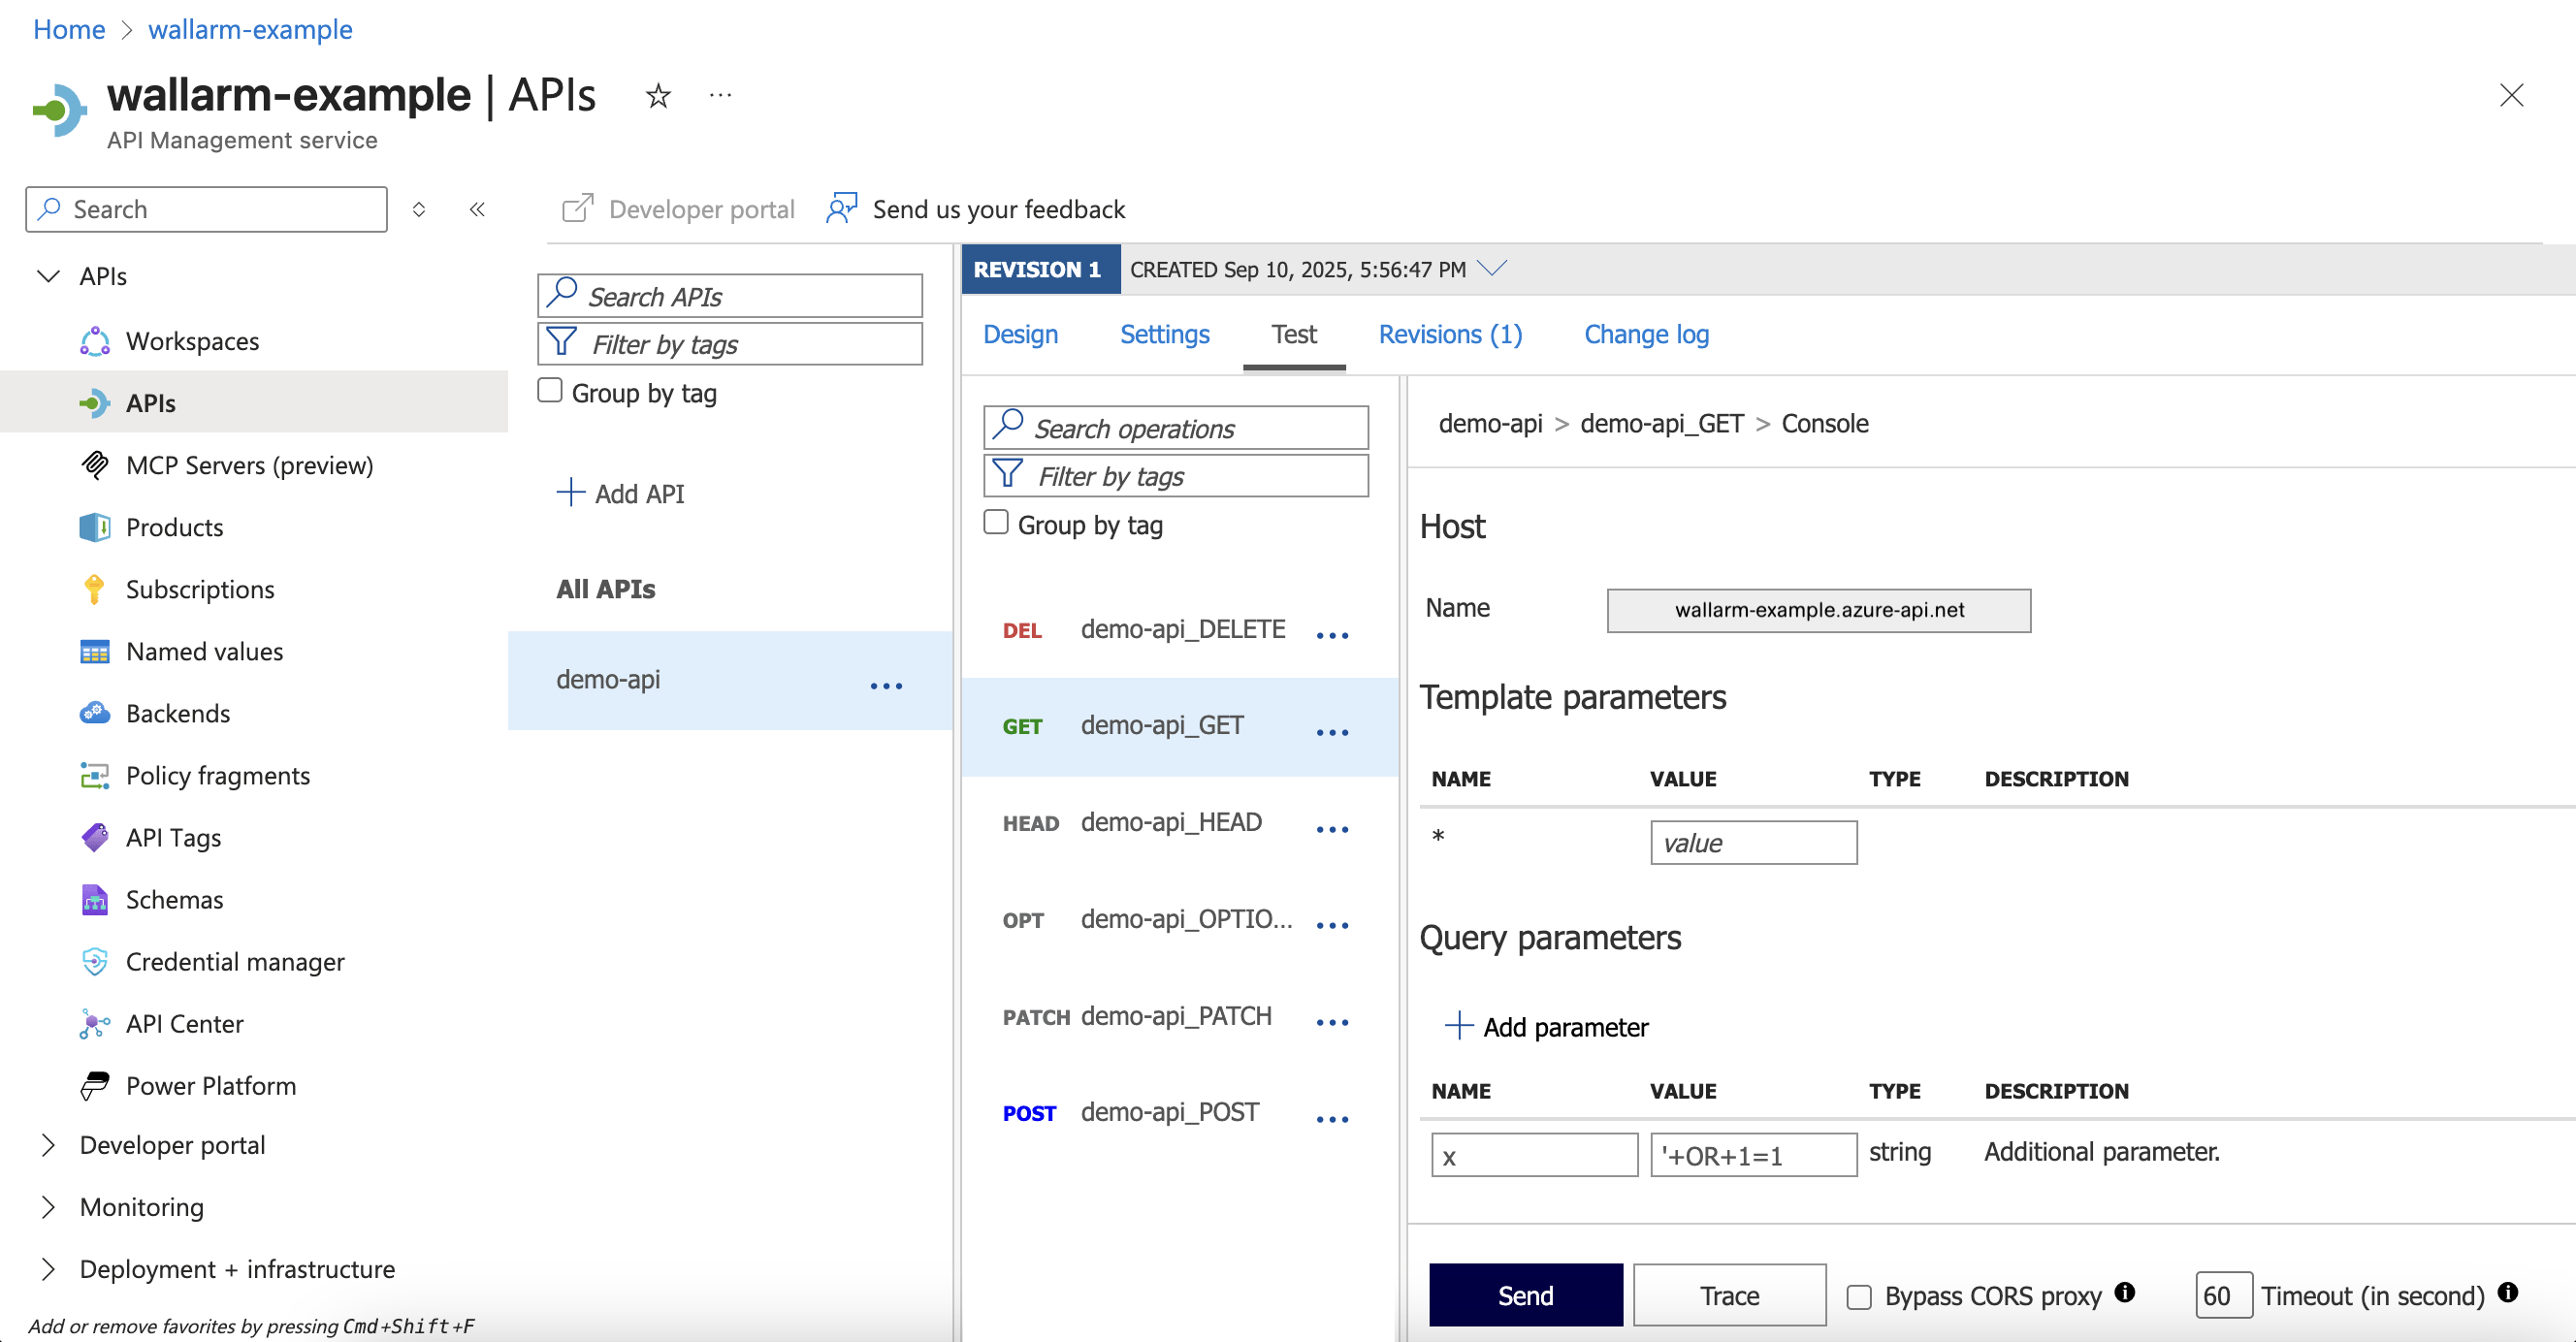
1. In Azure Portal, go to your API → **Test** → select an operation → enter valid parameters → **Trace**:
1. Review the HTTP response trace - you should see the inbound policy `request-forwarder`:
1. In Wallarm Console → [**API Sessions**](https://docs.wallarm.com/api-sessions/overview.md), verify that the legitimate request is displayed:
### Malicious traffic
1. Send a request with a test [SQLi](https://docs.wallarm.com/attacks-vulns-list.md#sql-injection) attack by adding the query parameter `x='+OR+1=1`:
* Synchronous mode with [blocking enabled](https://docs.wallarm.com/admin-en/configure-wallarm-mode.md): the request is blocked with `403`.
* Synchronous mode (monitoring): request reaches the API and is logged in Wallarm Console.
* Asynchronous mode: request reaches the API and is logged in Wallarm Console.
1. In Wallarm Console → **API Sessions**, verify that the malicious request is logged:
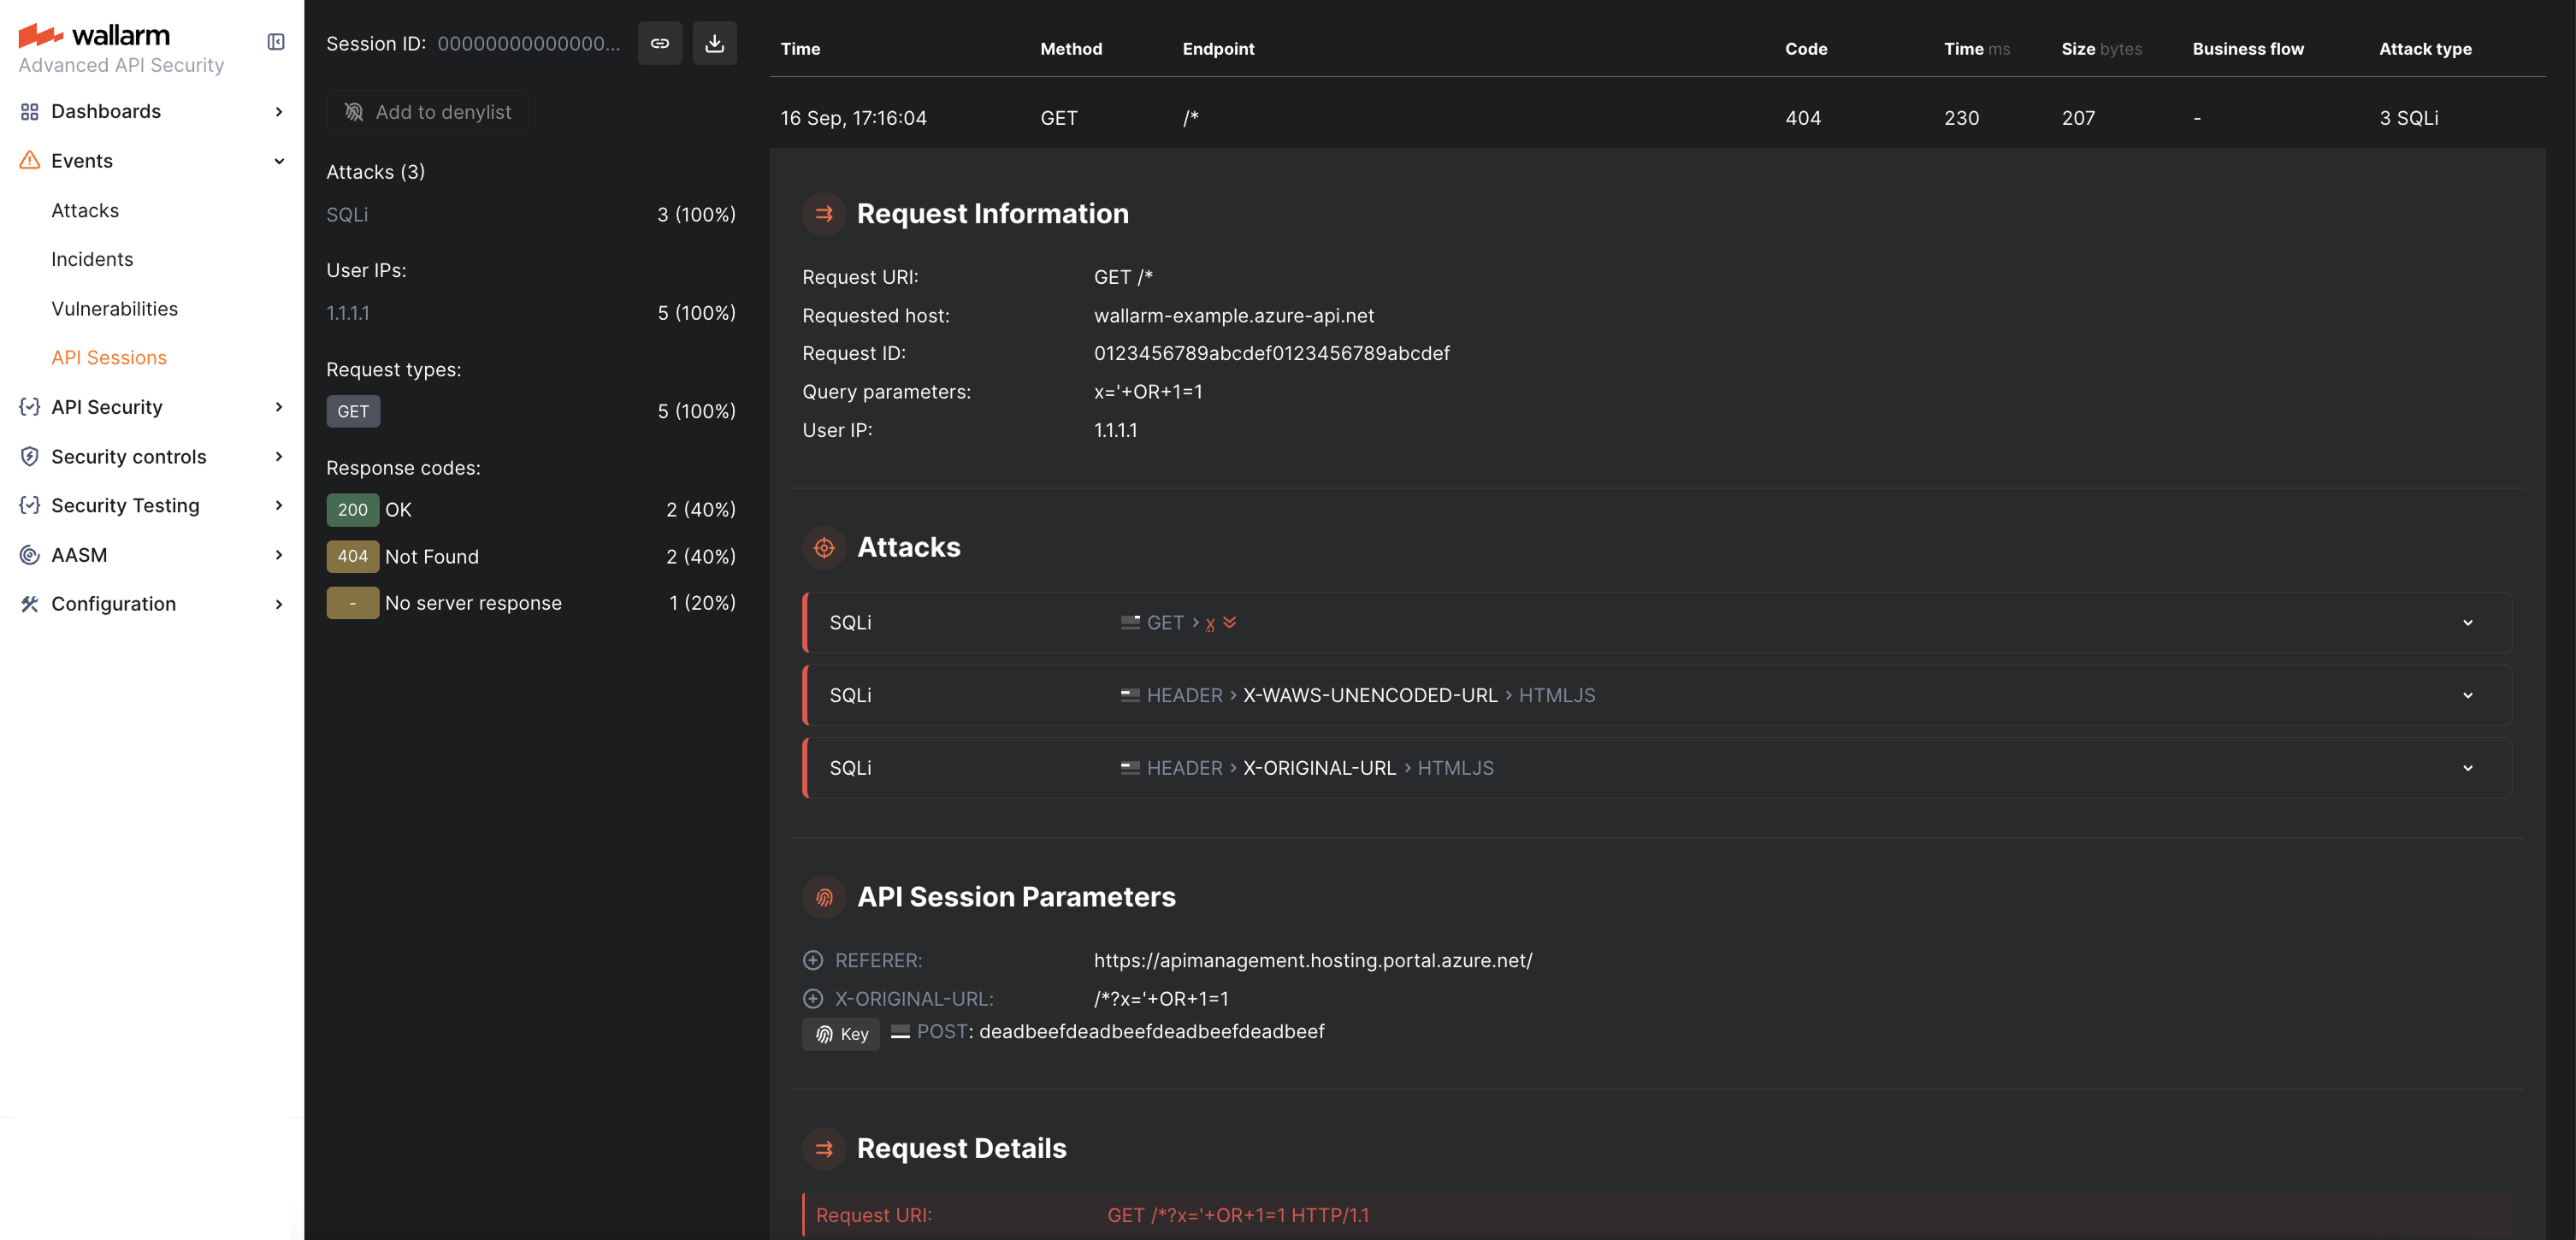
1. In Wallarm Console → **Attacks**, confirm that the attack is listed:
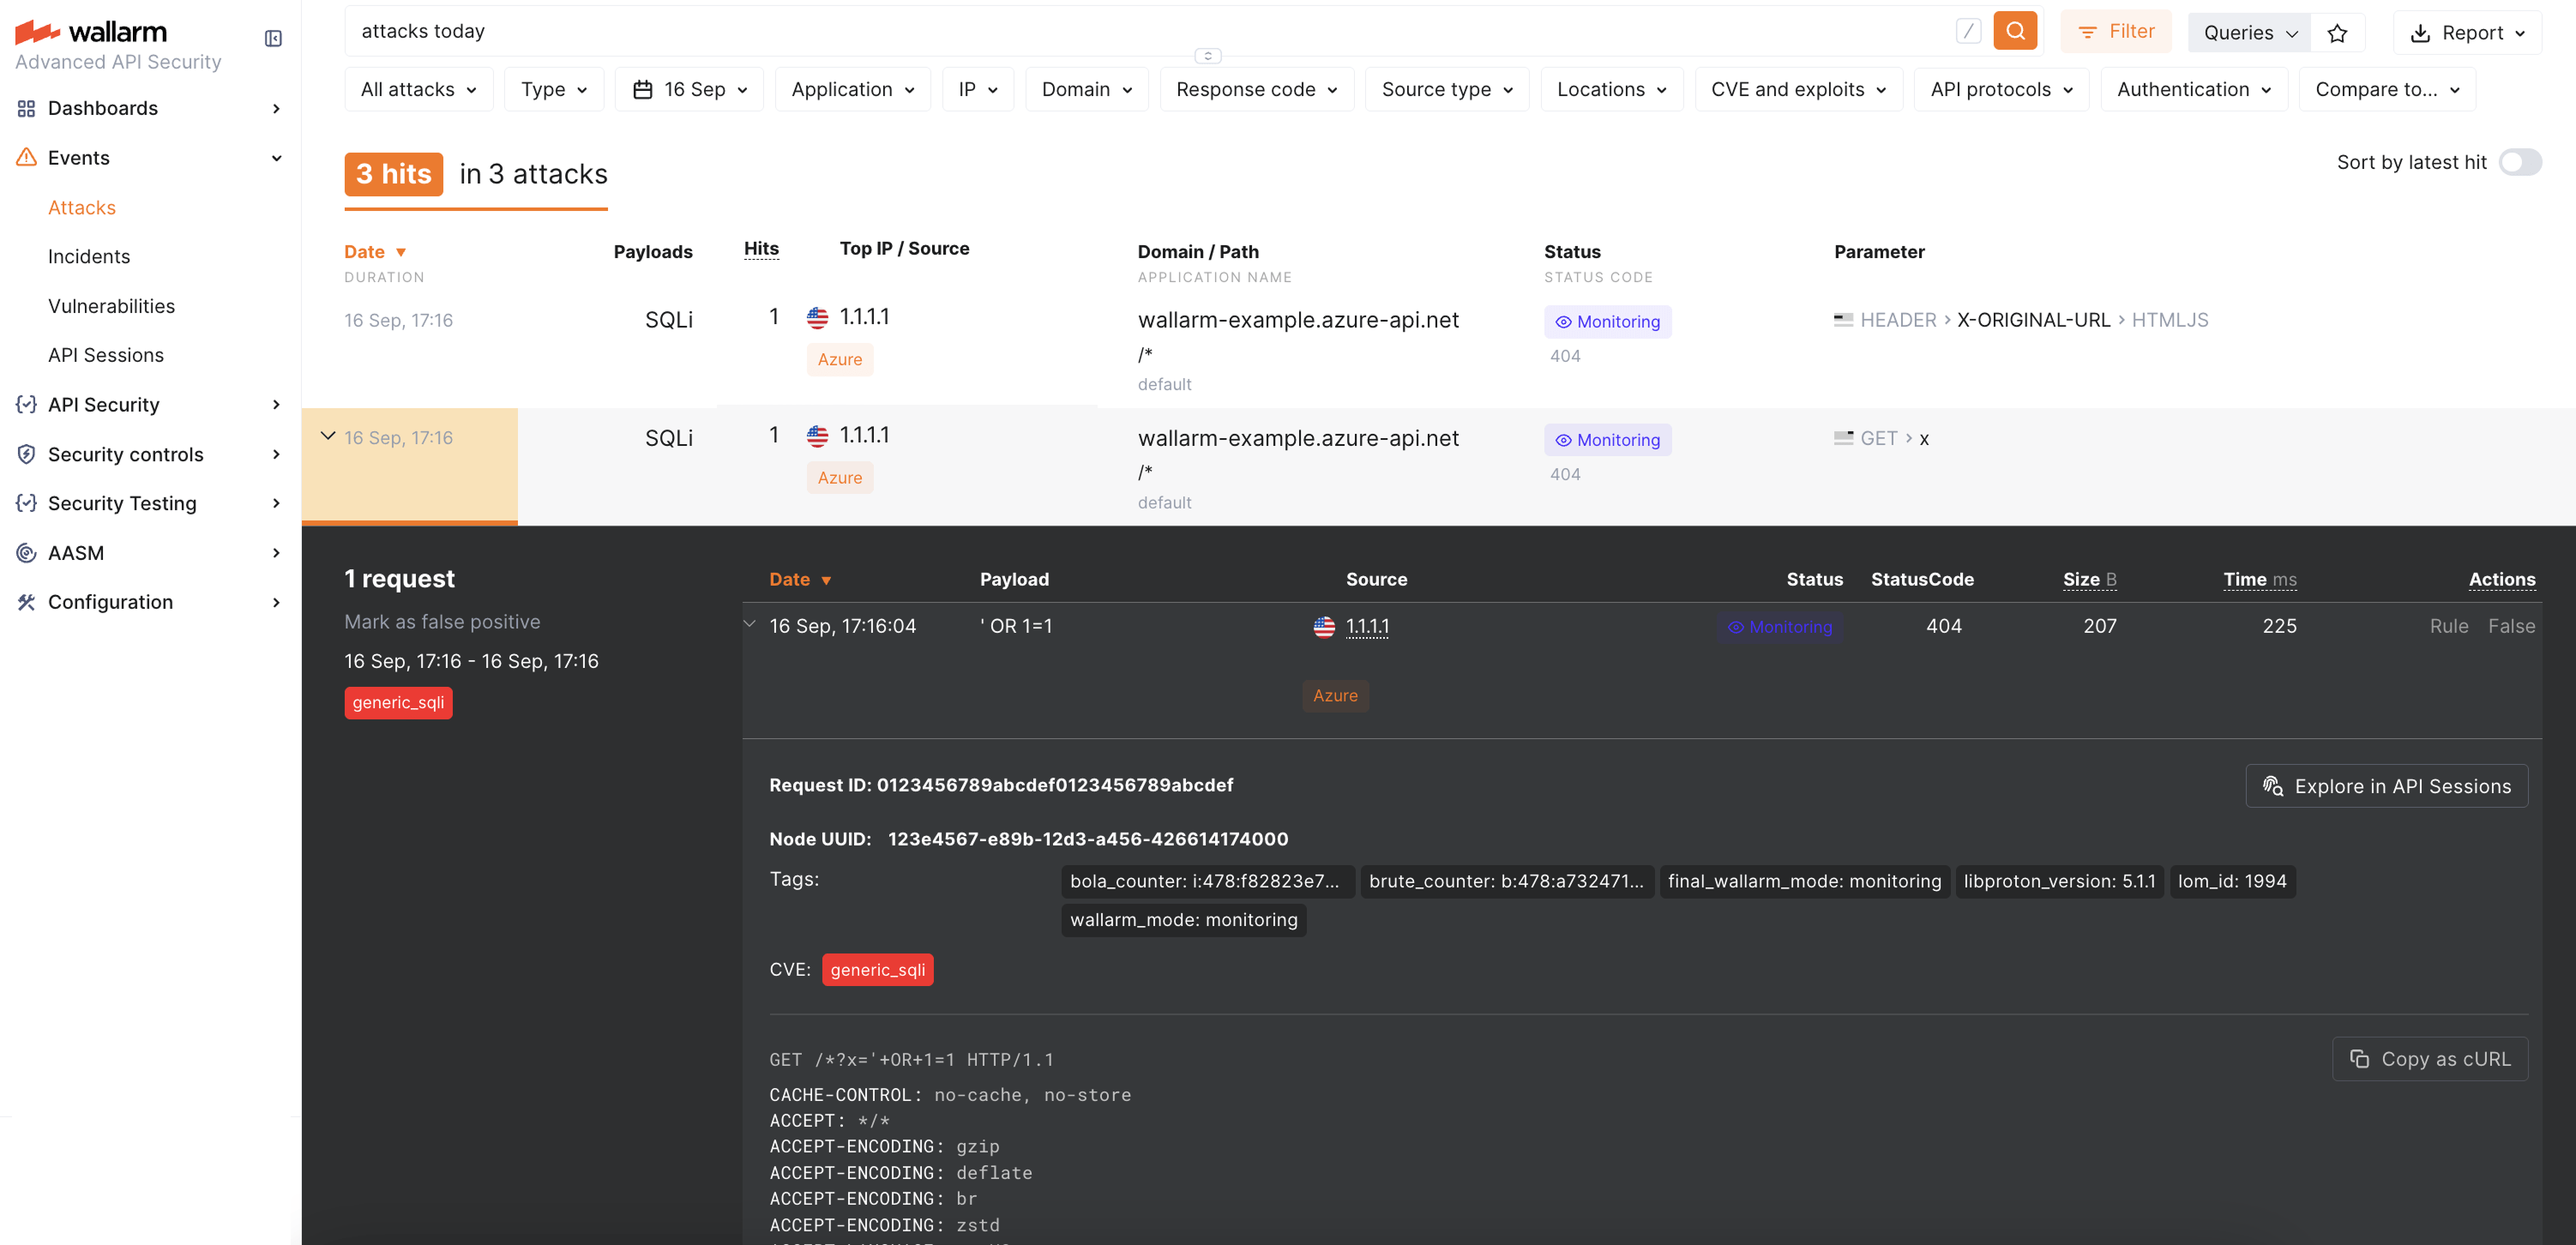
The attack will appear 3 times due to [APIM headers](#limitations).
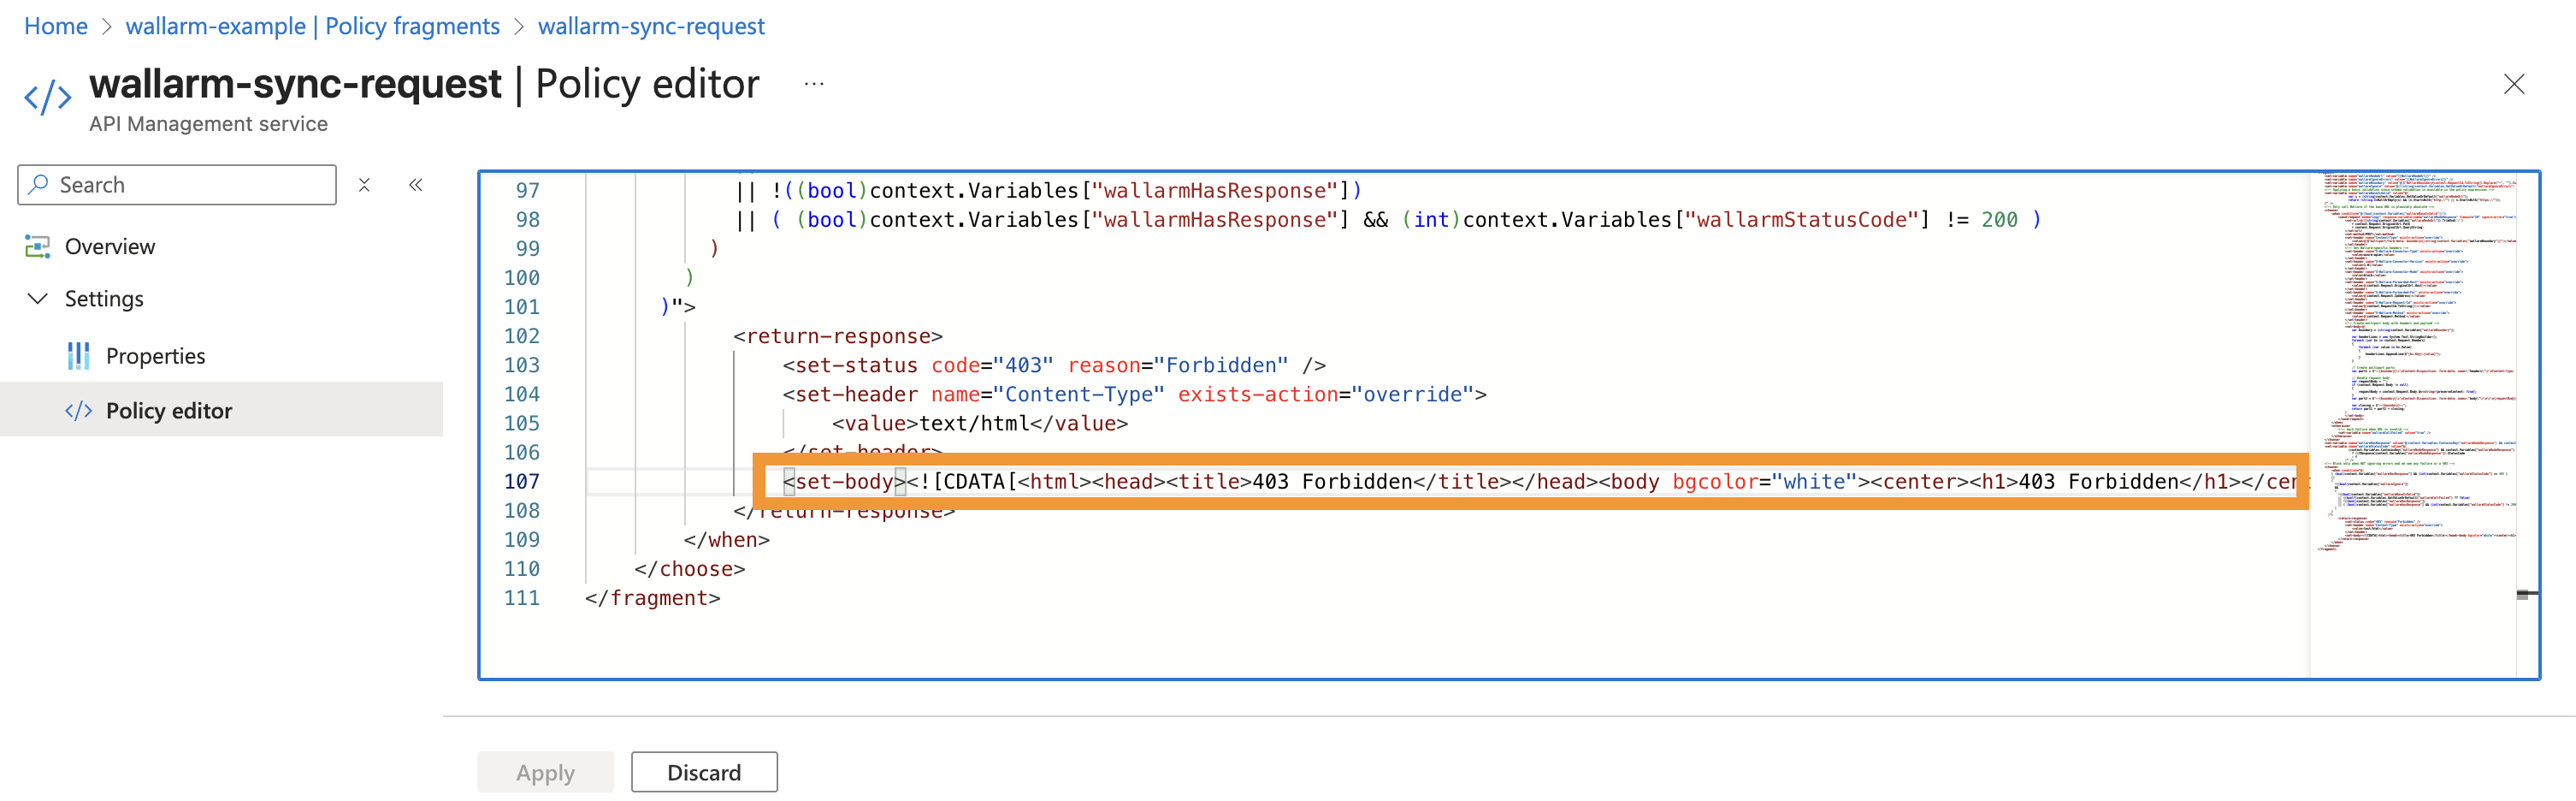
## Block page customization
If the Node is deployed in synchronous mode with [blocking enabled](https://docs.wallarm.com/admin-en/configure-wallarm-mode.md), you can customize the block page returned for blocked malicious requests:
1. Navigate to Azure Portal → **API Management** → **APIs** → **Policy fragments**.
1. Open the `wallarm-sync-request` fragment and edit the `` section:
## Upgrading the policies
To upgrade the deployed Wallarm policies to a [newer version](https://docs.wallarm.com/installation/connectors/code-bundle-inventory.md#azure-api-management):
1. Download the updated Wallarm policy package and create **new fragments** using the updated XML files, as described in [Step 3](#3-obtain-and-deploy-wallarm-policy-fragments).
1. Update your API policies to reference the new fragment names, as described in [Step 4](#4-apply-wallarm-policy-fragments-to-apis).
1. [Test](#testing) both legitimate and malicious traffic to confirm correct behavior.
Policy upgrades may require a Wallarm Node upgrade, especially for major version updates. See the [Native Node changelog](https://docs.wallarm.com/updating-migrating/native-node/node-artifact-versions.md) for the self-hosted Node release notes. Regular node updates are recommended to avoid deprecation and simplify future upgrades.
## Uninstalling the policies
To remove the Wallarm connector from Azure API Management:
1. Navigate to Azure Portal → **API Management** service → **APIs** → your API.
1. Remove the inbound and outbound `` lines referencing Wallarm fragments.
1. Remove the Wallarm policy fragments from **Policy fragments**.
1. Remove the `WallarmNodeUrl` and `WallarmIgnoreErrors` **named values** if they are no longer needed.