Deploying Wallarm as Proxy for Amazon API Gateway
This example demonstrates how to protect Amazon API Gateway with Wallarm deployed as an inline proxy to AWS Virtual Private Cloud (VPC) using the Terraform module.
Wallarm proxy solution provides an additional functional network layer serving as an advanced HTTP traffic router with the WAAP and API security functions. It can route requests to almost any service type including Amazon API Gateway without limiting its capabilities.
Security note
This solution is designed to follow AWS security best practices. We recommend avoiding the use of the AWS root account for deployment. Instead, use IAM users or roles with only the necessary permissions.
The deployment process assumes the principle of least privilege, granting only the minimal access required to provision and operate Wallarm components.
Use cases
Among all supported Wallarm deployment options, Terraform module is recommended for Wallarm deployment on AWS VPC in these use cases:
-
Your existing infrastructure resides on AWS.
-
You leverage the Infrastructure as Code (IaC) practice. Wallarm's Terraform module allows for the automated management and provisioning of the Wallarm node on AWS, enhancing efficiency and consistency.
Requirements
-
Terraform 1.0.5 or higher installed locally
-
Access to the account with the Administrator role in Wallarm Console in the US or EU Cloud
-
Access to
https://us1.api.wallarm.comif working with US Wallarm Cloud or tohttps://api.wallarm.comif working with EU Wallarm Cloud. Please ensure the access is not blocked by a firewall -
Any AWS region of your choice, there are no specific restrictions on the region for the Wallarm node deployment
-
Understanding of Terraform, AWS EC2, Security Groups and other AWS services
-
AWS root account should never be used for deploying resources
Please use a dedicated IAM user or role with minimal necessary permissions to perform the deployment described in this guide.
-
Avoid the use of broad permissions (e.g.,
AdministratorAccess) and assign only the specific actions needed for this module to operateThe IAM roles and permissions used in this deployment are designed following the principle of least privilege. Only the permissions required to create and manage the necessary AWS resources (e.g., EC2, networking, logging) should be granted.
Solution architecture
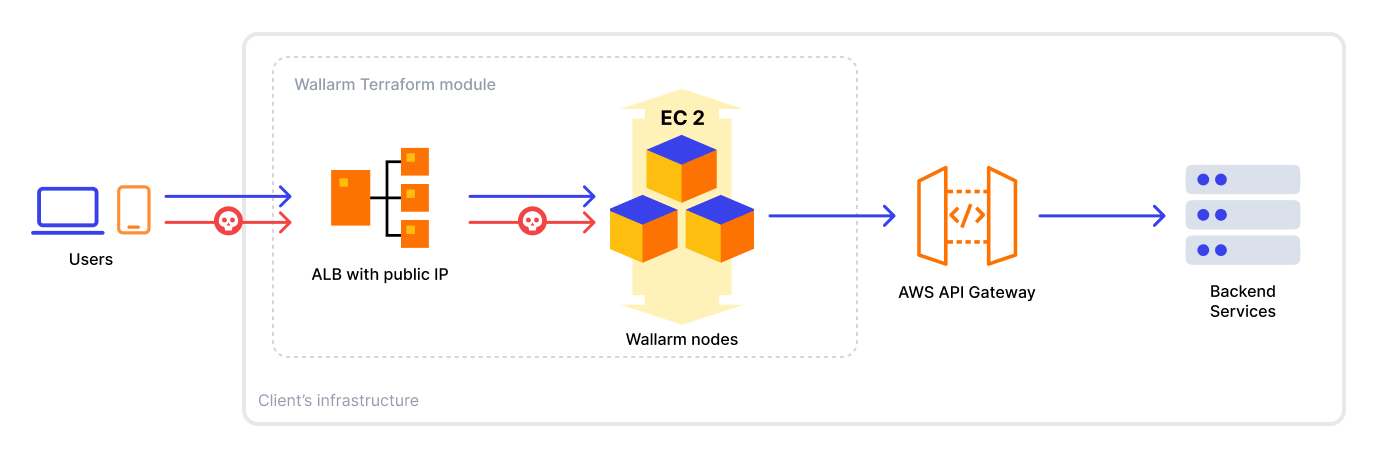
The example Wallarm proxy solution has the following components:
-
Internet-facing Application Load Balancer routing traffic to Wallarm node instances.
-
Wallarm node instances analyzing traffic and proxying any requests to API Gateway.
The example runs Wallarm nodes in the monitoring mode that drives the described behavior. Wallarm nodes can also operate in other modes including those aimed at blocking malicious requests and forwarding only legitimate ones further. To learn more about Wallarm node modes, use our documentation.
-
API Gateway the Wallarm nodes proxy requests to. The API Gateway has the following settings:
- The
/demo/demopath assigned. - A single mock configured.
- During this Terraform module deployment, you can choose either the "regional" or "private" endpoint type for the API Gateway. More details on these types and migration between them are provided below.
Please note that the provided example deploys a regular Amazon API Gateway, so its operation will not be affected by Wallarm nodes.
- The
All listed components including the API Gateway will be deployed by the provided wallarm example module.
Code components
This example has the following code components:
-
main.tf: the main configuration of thewallarmmodule to be deployed as a proxy solution. The configuration produces an AWS ALB and Wallarm instances. -
apigw.tf: the configuration producing the Amazon API Gateway accessible under the/demo/demopath with a single mock integration configured. During the module deployment, you can also choose either the "regional" or "private" endpoint type (see details below). -
endpoint.tf: the AWS VPC Endpoint configuration for the "private" type of the API Gateway endpoint.
Difference between the "regional" and "private" API Gateway endpoints
The apigw_private variable sets the API Gateway endpoint type:
- With the "regional" option, Wallarm node instances will submit requests to the publicly available API Gateway
execute-apiservice. - With the "private" option - to AWS VPC Endpoints attached to the
execute-apiservice. For production deployment, the "private" option is the recommended one.
More options to restrict access to the API Gateway
Amazon also enables you to restrict access to your API Gateway regardless of the "private" or "regional" endpoint type as follows:
-
Using resource policies with any of two endpoint types specified.
-
Managing access by source IPs, if the endpoint type is "private".
-
Managing access by VPC and/or Endpoint, if the endpoint type is "private" that already assumes the API Gateway to be unavailable from public networks by design.
Migration between API Gateway endpoint types
You can change the API Gateway endpoint type without recreation of the component but please consider the following:
-
Once the type is changed from "regional" to "private", public endpoints will become private and thus unavailable from public resources. It is applicable to both the
execute-apiendpoints and domain names. -
Once the type is changed from "private" to "regional", AWS VPC Endpoints targeted to your API Gateway will be immediately detached and API Gateway will become unavailable.
-
Since NGINX of the community version cannot automatically detect DNS name changes, the changed endpoint type should be followed by the manual NGINX restart on the Wallarm node instances.
You can reboot, re-create instances or run
nginx -s reloadin each instance.
If changing the endpoint type from "regional" to "private":
-
Create AWS VPC Endpoint and attach it to
execute-api. You will find the example in theendpoint.tfconfiguration file. -
Switch the API Gateway endpoint type and specify the AWS VPC Endpoint in the API Gateway configuration. Once completed, the traffic flow will be stopped.
-
Run
nginx -s reloadin each Wallarm node instance or just re-create each Wallarm node. Once it is completed, the traffic flow will be restored.
It is NOT recommended to change the endpoint type from "private" to "regional" but if you ever do:
-
Remove endpoint required for running in the "private" mode and only then switch the API Gateway endpoint to "regional".
-
Run
nginx -s reloadin each Wallarm node instance or just re-create each Wallarm node. Once it is completed, the traffic flow will be restored.
For production, it is recommended to change your API Gateway to "private", otherwise traffic from Wallarm nodes to API Gateway will be passed via the public network and can produce additional charges.
Running the example Wallarm AWS proxy solution for API Gateway
-
Open Wallarm Console → Nodes and create the node of the Wallarm node type.
-
Copy the generated node token.
-
Clone the repository containing the example code to your machine:
-
Set variable values in the
defaultoptions in theexamples/apigateway/variables.tffile of the cloned repository and save changes. -
Deploy the stack by executing the following commands from the
examples/apigatewaydirectory:
To remove the deployed environment, use the following command: