ترقية صورة Docker التي تعتمد على NGINX أو Envoy والتي وصلت إلى نهاية العمر الافتراضي
هذه التعليمات تصف الخطوات لترقية الصورة العاملة التي تعتمد على Docker NGINX أو Envoy والتي وصلت إلى نهاية العمر الافتراضي (الإصدار 3.6 والأقل) إلى الإصدار 4.10.
Wallarm nodes 3.6 and lower are not supported
You are recommended to upgrade the Wallarm nodes 3.6 and lower since these versions are not supported, they are end-of-life.
Node configuration and traffic filtration have been significantly simplified in the Wallarm node of the latest versions. Before upgrading the modules, please carefully review the list of changes and general recommendations. Please note that some settings of the latest node are incompatible with the nodes 3.6 and lower.
المتطلبات
-
Docker installed on your host system
-
Access to
https://hub.docker.com/r/wallarm/nodeto download the Docker image. Please ensure the access is not blocked by a firewall -
Access to the account with the Administrator role in Wallarm Console in the US Cloud or EU Cloud
-
Access to
https://us1.api.wallarm.comif working with US Wallarm Cloud or tohttps://api.wallarm.comif working with EU Wallarm Cloud. Please ensure the access is not blocked by a firewall -
Access to the IP addresses below for downloading updates to attack detection rules, as well as retrieving precise IPs for your allowlisted, denylisted, or graylisted countries, regions, or data centers
الخطوة 1: أبلغ الدعم الفني لـWallarm بأنك تقوم بترقية وحدات العقدة الفلترة (فقط إذا كنت تقوم بترقية العقدة 2.18 أو أقل)
إذا كنت تقوم بترقية العقدة 2.18 أو أقل، يرجى إبلاغ الدعم الفني لـWallarm بأنك تقوم بترقية وحدات العقدة الفلترة إلى 4.10 وطلب تمكين منطق القائمة الجديدة لحساب Wallarm الخاص بك. عند تمكين منطق القائمة الجديد، يرجى التأكد من أن القسم القائمات الفرعية من Wallarm Console متاح.
الخطوة 2: تعطيل وحدة التحقق من التهديدات النشطة (فقط إذا كنت تقوم بترقية العقدة 2.16 أو أقل)
إذا كنت تقوم بترقية Wallarm node 2.16 أو أقل، يرجى تعطيل وحدة التحقق من التهديدات النشطة في Wallarm Console → الثغرات الأمنية→ اضبط.
يمكن أن يسبب تشغيل الوحدة الإيجابيات الكاذبة أثناء عملية الترقية. تعطيل الوحدة يقلل من هذا المخاطر.
الخطوة 3: تحديث منفذ API
Starting with version 4.0, the filtering node uploads data to the Cloud using the us1.api.wallarm.com:443 (US Cloud) and api.wallarm.com:443 (EU Cloud) API endpoints instead of us1.api.wallarm.com:444 and api.wallarm.com:444.
If you upgrade the node from the version 3.x or lower and your server with the deployed node has a limited access to the external resources and the access is granted to each resource separately, then after upgrade the synchronization between the filtering node and the Cloud will stop.
To restore the synchronization, in your configuration, change port 444 to 443 for API endpoint for each resource.
الخطوة 4: تنزيل صورة العقدة الفلترة المحدثة
الخطوة 5: الانتقال إلى الاتصال القائم على الرمز المميز مع Wallarm Cloud
مع إصدار الإصدار 4.x، تم تحديث النهج لتوصيل الحاوية بـWallarm Cloud كما يلي:
-
تم إهمال النهج القائم على "البريد الإلكتروني وكلمة المرور". في هذا النهج، تم تسجيل العقدة في Wallarm Cloud تلقائيًا بمجرد بدء تشغيل الحاوية مع إدخال البيانات المعتمدة في المتغيرات
DEPLOY_USERوDEPLOY_PASSWORD. -
تم تضمين النهج القائم على الرمز المميز. لتوصيل الحاوية بالCloud، تشغيل الحاوية مع متغير
WALLARM_API_TOKENالذي يحتوي على الرمز المميز للعقدة Wallarm المنسوخ من واجهة المستخدم Wallarm Console.
يوصى باستخدام النهج الجديد لتشغيل الصورة 4.10. سيتم حذف النهج القائم على "البريد الإلكتروني وكلمة المرور" في الإصدارات المستقبلية، يرجى الترحيل قبل ذلك.
لإنشاء عقدة Wallarm جديدة والحصول على الرمز المميز الخاص بها:
-
افتح Wallarm Console → العقد في السحابة الأمريكية أو السحابة الأوروبية وقم بإنشاء العقدة من نوع Wallarm node.
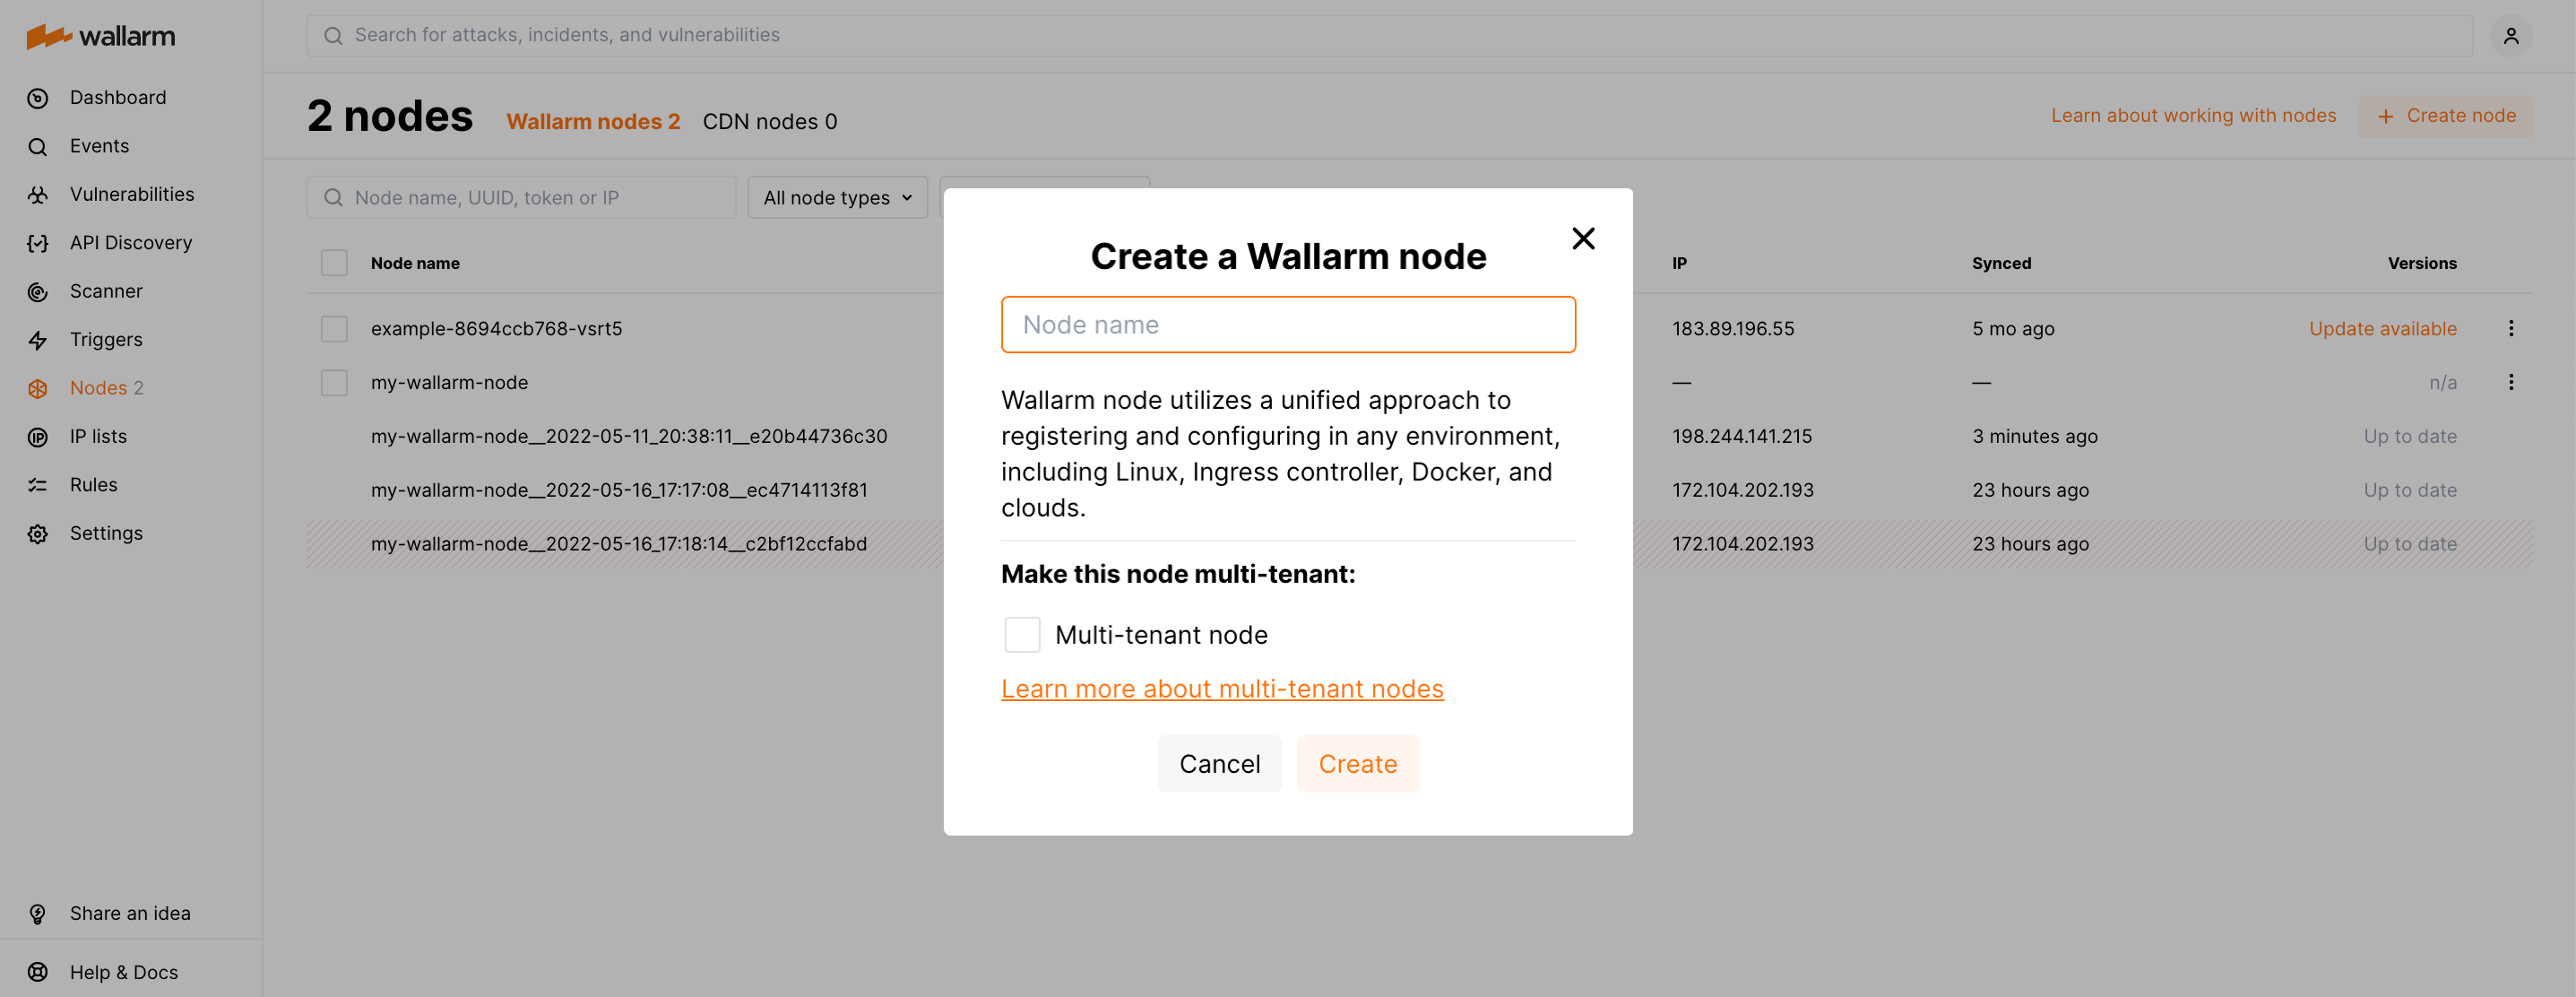
-
انسخ الرمز المميز المولد.
الخطوة 6: نقل القوائم البيضاء والقوائم السوداء من الإصدار السابق للعقدة Wallarm إلى الإصدار 4.10 (فقط في حالة ترقية العقدة 2.18 أو أقل)
إذا كنت ترقي العقدة 2.18 أو أقل، نقل تكوين القائمة البيضاء والقائمة السوداء من الإصدار السابق للعقدة Wallarm إلى الإصدار 4.10.
الخطوة 7: الانتقال من خيارات التكوين المستهجنة
توجد الخيارات التكوينية المستهجنة التالية:
-
تم إهمال متغير البيئة
WALLARM_ACL_ENABLE. إذا تم نقل القوائم الفرعية إلى الإصدار الجديد من العقدة، قم بإزالة هذا المتغير من أمرdocker run. -
تمت إعادة تسمية التعليمات التوجيهية لـNGINX التالية:
wallarm_instance→wallarm_applicationwallarm_local_trainingset_path→wallarm_custom_ruleset_pathwallarm_global_trainingset_path→wallarm_protondb_pathwallarm_ts_request_memory_limit→wallarm_general_ruleset_memory_limit
لم نغير سوى أسماء التعليمات التوجيهية، ويظل منطقها كما هو. ستتم إزالة التعليمات التوجيهية ذات الأسماء القديمة قريبًا، لذا نوصيك بإعادة تسميتها قبل ذلك.
يرجى التحقق مما إذا كانت التعليمات التوجيهية ذات الأسماء القديمة محددة بشكل صريح في ملفات التكوين المثبتة. إذا كان الأمر كذلك، قم بإعادة تسميتها.
-
تمت إعادة تسمية متغير التسجيل
wallarm_request_timeإلىwallarm_request_cpu_time.لم نغير سوى اسم المتغير، ويظل منطقه كما هو. الاسم القديم مدعوم مؤقتًا أيضًا، ولكن ما زال من المستحسن إعادة تسمية المتغير.
-
تمت إعادة تسمية العوامل التالية لـEnvoy:
lom→custom_rulesetinstance→application- القسم
tsets→rulesets، وبالتالي الإدخالاتtsNفي هذا القسم →rsN ` ts→rulesetts_request_memory_limit→general_ruleset_memory_limit
لم نغير سوى أسماء العوامل، ويظل منطقها كما هو. ستتم إزالة العوامل ذات الأسماء القديمة قريبًا، لذا نوصيك بإعادة تسميتها قبل ذلك.
يرجى التحقق مما إذا كانت العوامل ذات الأسماء القديمة محددة بشكل صريح في ملفات التكوين المثبتة. إذا كان الأمر كذلك، قم بإعادة تسميتها.
الخطوة 8: تحديث صفحة حجب Wallarm (في حالة ترقية صورة تعتمد على NGINX)
في الإصدار الجديد من العقدة، تم تغيير صفحة الحجب النموذجية لـWallarm. الشعار والبريد الإلكتروني للدعم على الصفحة فارغان الآن بشكل افتراضي.
إذا تم تكوين الحاوية Docker لإرجاع الصفحة &/usr/share/nginx/html/wallarm_blocked.html للطلبات المحجوبة، قم بتغيير هذا التكوين على النحو التالي:
-
نسخ وتخصيص الإصدار الجديد من الصفحة النموذجية.
-
تثبيت الصفحة المخصصة وملف تكوين NGINX لحاوية Docker جديدة في الخطوة التالية.
الخطوة 9: مراجعة التحديثات المعمارية الأخيرة (للصورة التي تعتمد على Docker و NGINX)
قد أدخل التعديل الأخير تحديثات معمارية قد تكون لها تأثير على المستخدمين، خاصة أولئك الذين يتعلقون بملفات التكوين المخصصة أثناء بدء تشغيل الحاوية بسبب التغييرات في مسارات بعض الملفات. يرجى التعرف على هذه التغييرات لضمان التكوين السليم واستخدام الصورة الجديدة.
الخطوة 10: نقل تكوين اكتشاف الهجمات overlimit_res من التعليمات التوجيهية إلى القاعدة
Starting from the version 3.6, you can fine-tune the overlimit_res attack detection using the rule in Wallarm Console.
Earlier, the wallarm_process_time_limit and wallarm_process_time_limit_block NGINX directives have been used.
The listed directives and parameters are considered to be deprecated with the new rule release and will be deleted in future releases.
If the overlimit_res attack detection settings are customized via the listed parameters, it is recommended to transfer them to the rule as follows:
-
Open Wallarm Console → Rules and proceed to the Limit request processing time rule setup.
-
Configure the rule as done in the mounted configuration files:
-
The time limit for the node to process a single request (milliseconds): the value of
wallarm_process_time_limitorprocess_time_limit.Risk of running out of system memory
The high time limit and/or continuation of request processing after the limit is exceeded can trigger memory exhaustion or out-of-time request processing.
-
The node will either block or pass the
overlimit_resattack depending on the node filtration mode:- In the monitoring mode, the node forwards the original request to the application address. The application has the risk to be exploited by the attacks included in both processed and unprocessed request parts.
- In the safe blocking mode, the node blocks the request if it is originated from the graylisted IP address. Otherwise, the node forwards the original request to the application address. The application has the risk to be exploited by the attacks included in both processed and unprocessed request parts.
- In the block mode, the node blocks the request.
-
-
Delete the
wallarm_process_time_limit,wallarm_process_time_limit_blockNGINX directives from the mounted configuration file.If the
overlimit_resattack detection is fine-tuned using both the parameters and the rule, the node will process requests as the rule sets.
الخطوة 11: إيقاف تشغيل الحاوية العاملة
الخطوة 12: تشغيل الحاوية باستخدام الصورة المحدثة
شغل الحاوية باستخدام صورة محدثة وقم بإجراء التعديلات اللازمة على مسارات الملفات المثبتة إذا كان مطلوبًا بالنظر لـالتغييرات الأخيرة في الصورة.
هناك خياران لتشغيل الحاوية باستخدام الصورة المحدثة:
-
مع متغيرات البيئة تحدد التكوين الأساسي للعقدة الفلترة
-
في الملف التكوين المثبت يحدد التكوين المتقدم للعقدة الفلترة
الخطوة 13: ضبط إعدادات وضع الترشيح للعقدة Wallarm للتغييرات التي تم إصدارها في الإصدارات الأخيرة (فقط في حالة ترقية العقدة 2.18 أو أقل)
-
تأكد من أن السلوك المتوقع للإعدادات المدرجة أدناه يتوافق مع المنطق المتغير لأوضاع الترشيح
offوmonitoring:- متغير البيئة
WALLARM_MODEأو التوجيهwallarm_modeللحاوية ذات التركيب Docker القائم على NGINX - متغير البيئة
WALLARM_MODEأو التوجيهmodeللحاوية التي تعتمد على Envoy - قاعدة الترشيح العامة المكونة في Wallarm Console
- قواعد الترشيح الموجهة نحو النهاية المكونة في Wallarm Console
- متغير البيئة
-
إذا لم يتوافق السلوك المتوقع مع منطق وضع الترشيح المتغير، يرجى ضبط إعدادات وضع الترشيح للتغييرات التي تم إصدارها باستخدام التعليمات.
الخطوة 14: اختبار عملية العقدة الفلترة
-
Send the request with the test Path Traversal attack to the application address:
If traffic is configured to be proxied to
example.com, include the-H "Host: example.com"header in the request. -
Make sure the node of the new type processes the request in the same way as the regular node did, e.g.:
- Blocks the request if the appropriate filtration mode is configured.
- Returns the custom blocking page if it is configured.
-
Open Wallarm Console → Attacks in the EU Cloud or US Cloud and make sure that:
- The attack is displayed in the list.
- Hit details display the Wallarm node UUID.

الخطوة 15: حذف العقدة الفلترة للإصدار السابق
إذا كانت صورة الإصدار 4.10 العاملة تعمل بشكل صحيح، يمكنك حذف العقدة الفلترة للإصدار السابق في قسم Wallarm Console → العقد.
الخطوة 16: إعادة تمكين وحدة التحقق من التهديدات النشطة (فقط إذا كنت تقوم بترقية العقدة 2.16 أو أقل)
تعرف على التوصية حول إعداد وحدة التحقق من التهديدات النشطة وأعد تمكينها إذا كان مطلوبًا.
بعد فترة، تأكد من أن تشغيل الوحدة لا يسبب إيجابيات كاذبة. إذا اكتشفت إيجابيات كاذبة، يرجى الاتصال بـالدعم الفني لـWallarm.