التنصيب باستخدام المثبِّت الشامل
هذا المثبِّت الشامل مُصمَّم لتبسيط وتوحيد عملية تثبيت عقدة Wallarm كوحدة ديناميكية ل NGINX في بيئات متعددة. هذا المثبِّت يتعرف تلقائيًا على نسخة نظام التشغيل وNGINX الخاص بك، ويثبت جميع التبعيات اللازمة.
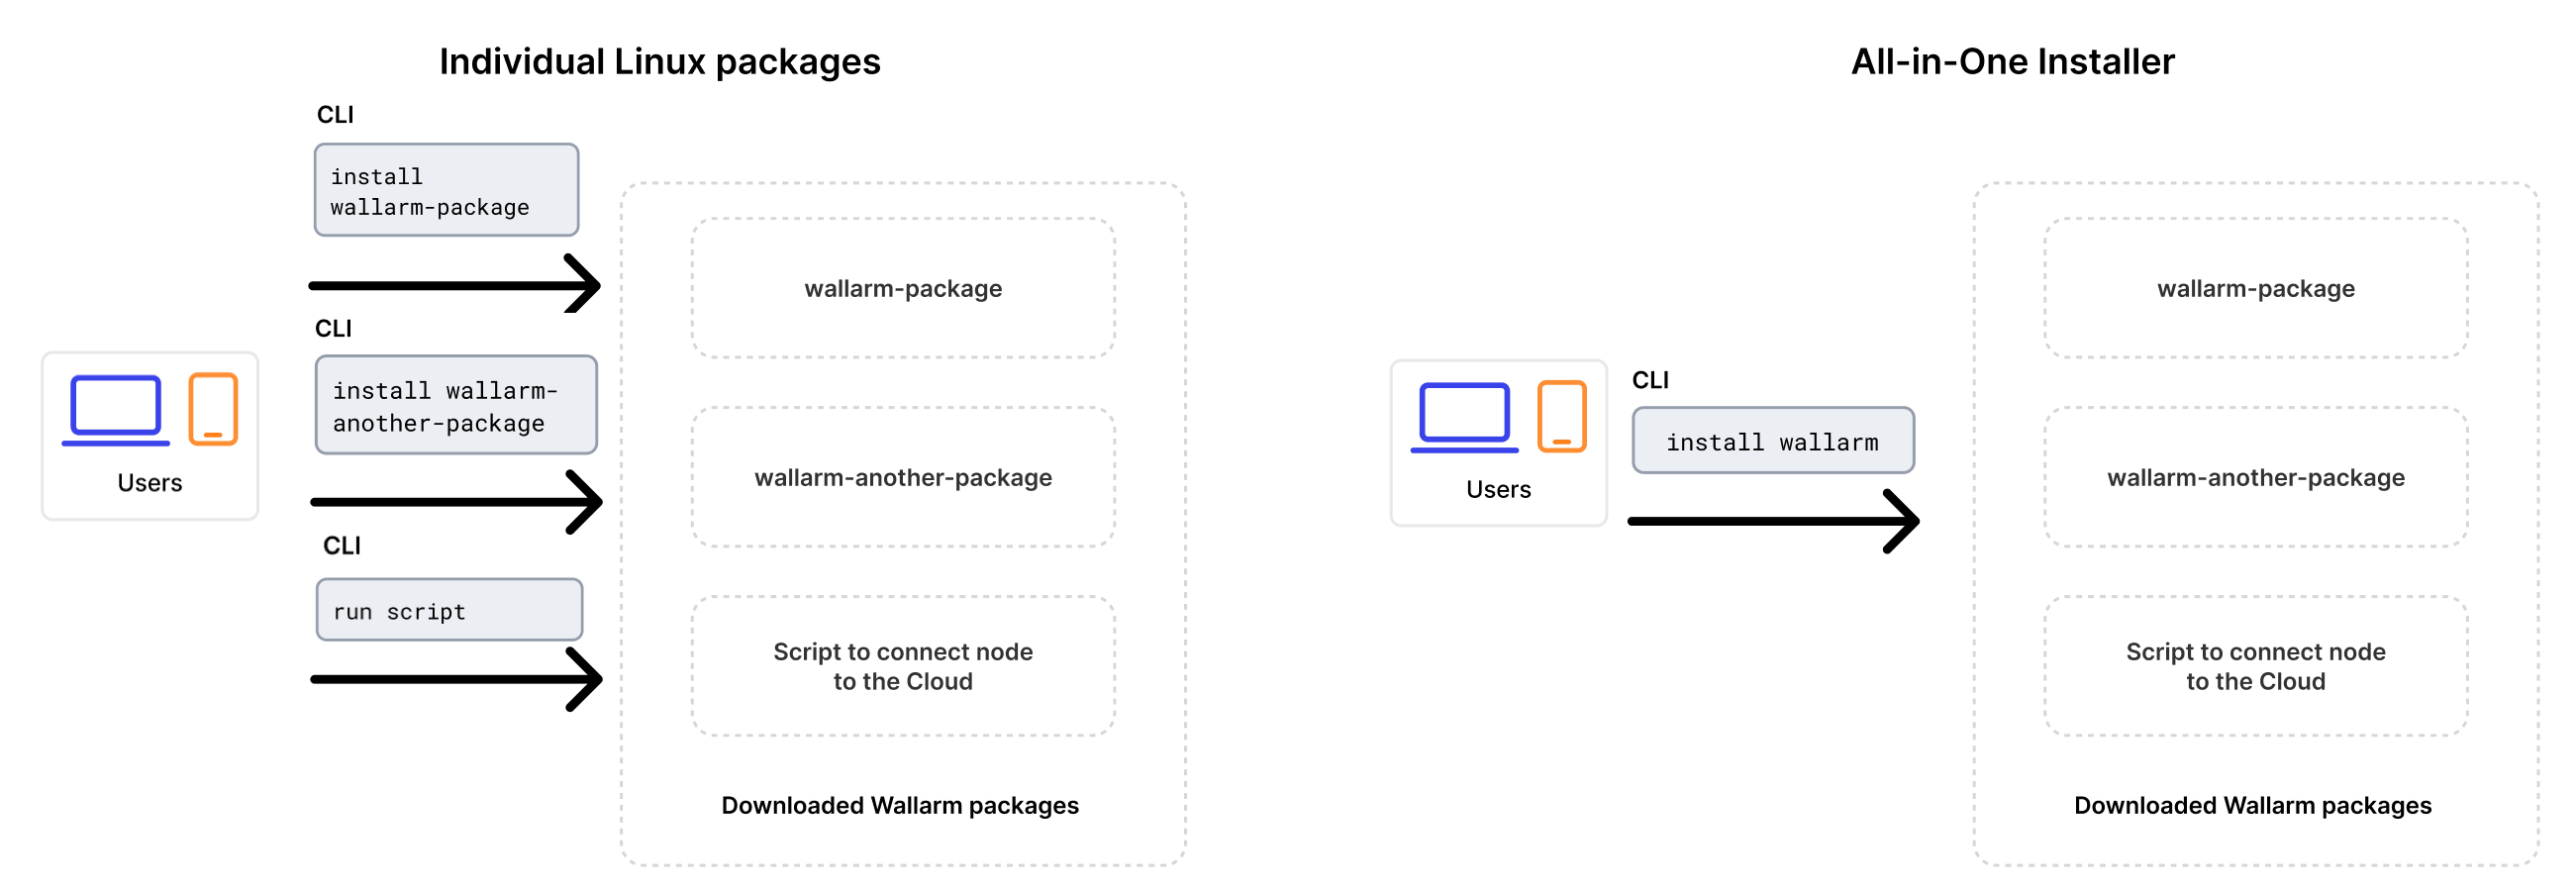
في مقارنة بالحزم الفردية من Linux التي تقدمها Wallarm for NGINX, NGINX Plus, و NGINX المقدم من التوزيع, المثبِّت الشامل يبسط العملية من خلال تنفيذ الأعمال التالية تلقائيًا:
-
التحقق من نسخة نظام التشغيل و NGINX الخاص بك.
-
إضافة المستودعات Wallarm للنسخة المكتشفة لنظام التشغيل و NGINX.
-
تثبيت حزم Wallarm من هذه المستودعات.
-
ربط الوحدة المثبتة Wallarm ب NGINX الخاص بك.
-
ربط العقدة الفرعية بـ Wallarm Cloud باستخدام الرمز المقدم.
حالات الاستخدام
Among all supported Wallarm deployment options, this solution is the recommended one for the following use cases:
-
Your infrastructure is based on bare metal or virtual machines without using container-based methods. Typically, these setups are managed with Infrastructure as Code (IaC) tools like Ansible or SaltStack.
-
Your services are built around NGINX. Wallarm can extend its functionalities using the all-in-one installer.
المتطلبات
-
Access to the account with the Administrator role in Wallarm Console for the US Cloud or EU Cloud.
-
Supported OS:
- Debian 10, 11 and 12.x
- Ubuntu LTS 18.04, 20.04, 22.04
- CentOS 7, 8 Stream, 9 Stream
- Alma/Rocky Linux 9
- RHEL 8.x
- Oracle Linux 8.x
- Oracle Linux 9.x
- Redox
- SuSe Linux
- Others (the list is constantly widening, contact Wallarm support team to check if your OS is in the list)
-
Access to
https://meganode.wallarm.comto download all-in-one Wallarm installer. Ensure the access is not blocked by a firewall. -
Access to
https://us1.api.wallarm.comfor working with US Wallarm Cloud or tohttps://api.wallarm.comfor working with EU Wallarm Cloud. If access can be configured only via the proxy server, then use the instructions. -
Access to the IP addresses and their corresponding hostnames (if any) listed below. This is needed for downloading updates to attack detection rules, as well as retrieving precise IPs for your allowlisted, denylisted, or graylisted countries, regions, or data centers
-
Executing all commands as a superuser (e.g.
root).
الخطوة الأولى: تثبيت NGINX والتبعيات
Install the latest NGINX version of:
-
NGINX
stable(the latest supported version is v1.28.1) - see how to install it in the NGINX documentation. -
NGINX Mainline (the latest supported version is v1.27.5) - see how to install it in the NGINX documentation.
-
NGINX Plus (the latest supported version is NGINX Plus R33) - see how to install it in the NGINX documentation.
-
Distribution-Provided NGINX - to install, use the following commands:
الخطوة الثانية: تجهيز رمز Wallarm
To install node, you will need a Wallarm token of the appropriate type. To prepare a token:
الخطوة الثالثة: تنزيل مثبت Wallarm الشامل
Wallarm suggests all-in-one installations for the following processors:
-
x86_64
-
ARM64
To download all-in-one Wallarm installation script, execute the command:
الخطوة الرابعة: تشغيل مثبت Wallarm الشامل
-
Run downloaded script:
If using the x86_64 version:
If using the ARM64 version:
The
WALLARM_LABELSvariable sets group into which the node will be added (used for logical grouping of nodes in the Wallarm Console UI). -
Enter Wallarm token.
الأوامر في الخطوات الأخرى هي نفسها لتثبيتات x86_64 و ARM64.
الخطوة الخامسة: تمكين العقدة لتحليل الحركة
By default, the deployed Wallarm Node does not analyze incoming traffic.
To enable traffic analysis, perform the following configuration:
If you deploy the Wallarm Node for in-line traffic analysis and proxying of legitimate traffic, update the NGINX configuration file, typically located at /etc/nginx/sites-available/default.
The following minimal configuration adjustments are necessary:
-
Set the Wallarm Node to
wallarm_mode monitoring;. This mode is recommended for initial deployments and testing.Wallarm also supports more modes like blocking and safe blocking, which you can read more.
-
Determine where the node should forward legitimate traffic by adding the
proxy_passdirective in the required locations. This could be to the IP of an application server, a load balancer, or a DNS name. - If present, remove the
try_filesdirective from the modified locations to ensure traffic is directed to Wallarm without local file interference.
If you deploy the Wallarm Node for out-of-band traffic analysis, update the NGINX configuration file, typically located at /etc/nginx/sites-available/default.
The following minimal configuration adjustments are necessary:
-
For the Wallarm node to accept mirrored traffic, set the following configuration in the
serverNGINX block:server { listen 80; ... wallarm_force server_addr $http_x_server_addr; wallarm_force server_port $http_x_server_port; # Change 222.222.222.22 to the address of the mirroring server #set_real_ip_from 222.222.222.22; #real_ip_header X-Forwarded-For; #real_ip_recursive on; wallarm_force response_status 0; wallarm_force response_time 0; wallarm_force response_size 0; }- The
set_real_ip_fromandreal_ip_headerdirectives are required to have Wallarm Console display the IP addresses of the attackers. - The
wallarm_force_response_*directives are required to disable analysis of all requests except for copies received from the mirrored traffic.
- The
-
For the Wallarm node to analyze the mirrored traffic, set the
wallarm_modedirective tomonitoring:Since malicious requests cannot be blocked, the only mode Wallarm accepts is monitoring. For in-line deployment, there are also safe blocking and blocking modes but even if you set the
wallarm_modedirective to a value different from monitoring, the node continues to monitor traffic and only record malicious traffic (aside from the mode set to off). -
If present, remove the
try_filesdirective from the NGINX locations to ensure traffic is directed to Wallarm without local file interference:
Depending on your specific traffic routing rules and requirements, further customize both NGINX and Wallarm configurations as needed.
الخطوة السادسة: إعادة تشغيل NGINX
Restart NGINX using the following command:
الخطوة السابعة: تكوين إرسال الحركة إلى العقدة
Depending on the deployment approach being used, perform the following settings:
Update targets of your load balancer to send traffic to the Wallarm instance. For details, please refer to the documentation on your load balancer.
Configure your web or proxy server (e.g. NGINX, Envoy) to mirror incoming traffic to the Wallarm node. For configuration details, we recommend to refer to your web or proxy server documentation.
Inside the link, you will find the example configuration for the most popular of web and proxy servers (NGINX, Traefik, Envoy).
الخطوة الثامنة: اختبار تشغيل العقدة
-
Send the request with test Path Traversal attack to a protected resource address:
If traffic is configured to be proxied to
example.com, include the-H "Host: example.com"header in the request. -
Open Wallarm Console → Attacks section in the US Cloud or EU Cloud and make sure the attack is displayed in the list.

-
Optionally, test other aspects of the node functioning.
الخطوة التاسعة: ضبط الحل المستخدم حسب الحاجة
وحدة Wallarm الدينامكية مع الإعدادات الافتراضية مثبتة. قد تتطلب العقدة الفرعية بعض التهيئة الإضافية بعد التنصيب.
تحدد إعدادات Wallarm باستخدام توجيهات NGINX أو واجهة المستخدم الرسومية لـ Wallarm Console. يجب تعيين التوجيهات في الملفات التالية على الجهاز الذي به العقدة:
-
/etc/nginx/nginx.confمع إعدادات NGINX -
/etc/nginx/wallarm-status.confمع إعدادات رصد العقدة. الوصف التفصيلي متاح في الرابط -
/opt/wallarm/etc/collectd/wallarm-collectd.conf.d/wallarm-tarantool.confمع إعدادات الـ 'collectd' الذي يجمع الإحصائيات من Tarantool
أدناه توجد بعض الإعدادات النمطية التي يمكنك تطبيقها إذا كانت مطلوبة:
-
تحديد الوقت الأقصى لمعالجة الطلب الواحد في التوجيه
wallarm_process_time_limit -
تحديد الوقت الأقصى لانتظار الرد من الخادم في توجيه NGINX
proxy_read_timeout -
تحديد الحجم الأقصى للطلب في توجيه NGINX
client_max_body_size
خيارات التشغيل
As soon as you have the all-in one script downloaded, you can get help on it with:
Which returns:
...
Usage: setup.sh [options]... [arguments]... [filtering/postanalytics]

OPTION                      DESCRIPTION
-b, --batch                 Batch mode, non-interactive installation.
    --install-only          Initiates the first stage of the all-in-one installer in batch mode. Copies essential configurations, including files and binaries, and sets up NGINX for node installation, bypassing Cloud registration and activation. Requires --batch.
    --skip-ngx-config       Avoids automatic NGINX configuration changes that occur during the --install-only stage in batch mode, suitable for users who prefer manual adjustments later. When used with --install-only, it ensures only essential configurations are copied without altering NGINX settings. Requires --batch.
    --register-only         Initiates the second stage of the all-in-one installer in batch mode, completing the setup by registering the node in the Cloud and starting its service. Requires --batch.
-t, --token TOKEN           Node token, required in a batch mode.
-c, --cloud CLOUD           Wallarm Cloud, one of US/EU, default is EU, only used in a batch mode.
-H, --host HOST             Wallarm API address, for example, api.wallarm.com or us1.api.wallarm.com, only used in a batch mode.
-P, --port PORT             Wallarm API pot, for example, 443.
    --no-ssl                Disable SSL for Wallarm API access.
    --no-verify             Disable SSL certificates verification.
-f, --force                 If there is a node with the same name, create a new instance.
-h, --help
    --version
Batch mode
The --batch option triggers batch (non-interactive) mode, where the script requires configuration options via the --token and --cloud flags, along with the WALLARM_LABELS environment variable if needed. In this mode, the script does not prompt the user for data input step by step as in the default mode; instead, it requires explicit commands for interaction.
Below are examples of commands to run the script in batch mode for node installation, assuming the script has already been downloaded:
Separate execution of node installation stages
When preparing your own machine image using the all-in-one installer for cloud infrastructure, the standard installation process outlined in this article may not suffice. Instead, you will need to execute specific stages of the all-in-one installer separately to accommodate the requirements of creating and deploying a machine image:
-
Build machine image: At this stage, it is necessary to download binaries, libraries, and configuration files of the filtering node and create a machine image based on them. Utilizing the
--install-onlyflag, the script copies the required files and modifies NGINX configurations for node operation. If you wish to make manual adjustments, you can opt to bypass the NGINX file modification by using the--skip-ngx-configflag. -
Initialize a cloud instance with cloud-init: During instance initialization, the bootstrap phase (cloud registration and service start) can be executed using cloud-init scripts. This stage can be run independently from the build phase by applying the
--register-onlyflag to the/opt/wallarm/setup.shscript copied during the build stage.
This functionality is supported starting from version 4.10.0 of the all-in-one installer in batch mode. The commands below enable the sequential execution of the outlined steps:
If using the x86_64 version:
curl -O https://meganode.wallarm.com/6.11/wallarm-6.11.1.x86_64-glibc.sh
sudo sh wallarm-6.11.1.x86_64-glibc.sh -- --batch --install-only
sudo env WALLARM_LABELS='group=<GROUP>' /opt/wallarm/setup.sh --batch --register-only -t <TOKEN> -c US
If using the ARM64 version:
Finally, to complete the installation, you need to enable Wallarm to analyze traffic and restart NGINX.
Separate installation of filtering and postanalytics nodes
The filtering/postanalytics switch provides the option to install the postanalytics module separately. Without this switch, both filtering and postanalytics components are installed together by default.
API Discovery-only mode
You can use the node in API Discovery-only mode (available since version 5.3.7). In this mode, attacks - including those detected by the Node's built-in mechanisms and those requiring additional configuration (e.g., credential stuffing, API specification violation attempts, and malicious activity from denylisted and graylisted IPs) - are detected and blocked locally (if enabled) but not exported to Wallarm Cloud. Since there is no attack data in the Cloud, Threat Replay Testing does not work. Traffic from whitelisted IPs is allowed.
Meanwhile, API Discovery, [API session tracking][api-sessions-docs], and security vulnerability detection remain fully functional, detecting relevant security entities and uploading them to the Cloud for visualization.
This mode is for those who want to review their API inventory and identify sensitive data first, and plan controlled attack data export accordingly. However, disabling attack export is rare, as Wallarm securely processes attack data and provides sensitive attack data masking if needed.
To enable API Discovery-only mode:
-
Create or modify the
/etc/wallarm-override/env.listfile:Add the following variable:
-
Follow the node installation procedure.
With the API Discovery-only mode enabled, the /opt/wallarm/var/log/wallarm/wcli-out.log log returns the following message:
{"level":"info","component":"reqexp","time":"2025-01-31T11:59:38Z","message":"requests export skipped (disabled)"}
إعادة البدء في التثبيت
إذا كنت بحاجة إلى حذف تثبيت العقدة والبدء من جديد، اتبع الخطوات أدناه.
تأثير إعادة البدء في التثبيت
ينطوي إعادة البدء في التثبيت على إيقاف وحذف الخدمات Wallarm المشتغلة حاليًا، وبالتالي توقف الترشيح الحركة حتى إعادة التثبيت. كن حذرًا في بيئات الإنتاج أو الحركة الحرجة، حيث يترك الحركة غير مُرَشَّحَة ومعرضة للخطر.
لترقية العقدة الموجودة (مثل من 4.8 إلى 4.10)، راجع تعليمات الترقية.
-
إنهاء عمليات Wallarm وإزالة ملفات التكوين:
-
استمر في عملية إعادة التثبيت عن طريق اتباع تعليمات الإعداد من الخطوة الثانية.