نشر صورة Docker للعقدة Wallarm على GCP
توفر هذه الدليل السريع الخطوات المطلوبة لنشر صورة Docker للعقدة Wallarm المبنية على NGINX على Google Cloud Platform باستخدام مكون Google Compute Engine (GCE).
حدود التعليمات
هذه التعليمات لا تغطي التكوين في توازن الحمولة والتوسع الذاتي للعقدة. إذا كنت تقوم بإعداد هذه المكونات بنفسك، نوصي بقراءة الجزء المناسب من توثيق GCP.
حالات الاستخدام
Among all supported Wallarm deployment options, Wallarm deployment on Google Compute Engine (GCE) using the Docker image is recommended in these use cases:
-
If your applications leverage a microservices architecture, and are already containerized and operational on GCE.
-
If you require fine-grained control over each container, the Docker image excels. It affords a greater level of resource isolation than typically possible with traditional VM-based deployments.
المتطلبات
-
حساب GCP نشط
-
تم تمكين واجهة برمجة تطبيقات Compute Engine
-
تم تثبيت Google Cloud SDK (gcloud CLI) وتكوينه
-
الوصول إلى الحساب ذو الدور Administrator والمصادقة الثنائية العوامل معطلة في Wallarm Console لـ US Cloud أو EU Cloud
خيارات تكوين حاوية Docker للعقدة Wallarm
The filtering node configuration parameters should be passed to the deployed Docker container in one of the following ways:
-
In the environment variables. This option allows for the configuration of only basic filtering node parameters. Most directives cannot be configured through environment variables.
-
In the mounted configuration file. This option allows full filtering node configuration via any directives. With this configuration method, environment variables with the filtering node and Wallarm Cloud connection settings are also passed to the container.
نشر حاوية Docker للعقدة Wallarm المكونة من خلال المتغيرات البيئية
لنشر عقدة الفلترة المضمنة في حاوية Wallarm المكونة فقط من خلال المتغيرات البيئية، يمكنك استخدام واجهه GCP Console أو gcloud CLI. في هذه التعليمات، يتم استخدام gcloud CLI.
-
Get Wallarm token of the appropriate type:
-
قم بتعيين متغير البيئة المحلي مع رمز عقدة Wallarm الذي سيتم استخدامه لربط النسخة بـ Wallarm Cloud:
-
قم بإنشاء العينة مع حاوية Docker الجاري تشغيلها باستخدام الأمر
gcloud compute instances create-with-container:gcloud compute instances create-with-container <INSTANCE_NAME> \ --zone <DEPLOYMENT_ZONE> \ --tags http-server \ --container-env WALLARM_API_TOKEN=${WALLARM_API_TOKEN} \ --container-env NGINX_BACKEND=<HOST_TO_PROTECT_WITH_WALLARM> \ --container-env WALLARM_API_HOST=us1.api.wallarm.com \ --container-image registry-1.docker.io/wallarm/node:4.10.4-1<INSTANCE_NAME>: اسم العينة، على سبيل المثال:wallarm-node.--zone: المنطقة التي ستستضيف العينة.--tags: علامات العينة. تستخدم العلامات لتكوين توفر العينة للموارد الأخرى. في الحالة الحالية، يتم تعيين العلامةhttp-serverالتي تفتح منفذ 80 للعينة.--container-image: الرابط إلى صورة Docker للعقدة الفاصلة.-
--container-env: المتغيرات البيئية مع تكوين العقدة الفاصلة (المتغيرات المتاحة مدرجة في الجدول أدناه). يرجى ملاحظة أنه لا يُنصح بتمرير قيمةWALLARM_API_TOKENصراحة.Environment variable Description Required WALLARM_API_TOKENWallarm node or API token. Yes WALLARM_LABELSAvailable starting from node 4.6. Works only if
WALLARM_API_TOKENis set to API token with theDeployrole. Sets thegrouplabel for node instance grouping, for example:WALLARM_LABELS="group=<GROUP>"...will place node instance into the
<GROUP>instance group (existing, or, if does not exist, it will be created).Yes (for API tokens) NGINX_BACKENDDomain or IP address of the resource to protect with the Wallarm solution. Yes WALLARM_API_HOSTWallarm API server: us1.api.wallarm.comfor the US Cloudapi.wallarm.comfor the EU Cloud
api.wallarm.com.No WALLARM_MODENode mode: blockto block malicious requestssafe_blockingto block only those malicious requests originated from graylisted IP addressesmonitoringto analyze but not block requestsoffto disable traffic analyzing and processing
monitoring.
Detailed description of filtration modes →No WALLARM_APPLICATIONUnique identifier of the protected application to be used in the Wallarm Cloud. The value can be a positive integer except for 0.
Default value (if the variable is not passed to the container) is-1which indicates the default application displayed in Wallarm Console → Settings → Application.
More details on setting up applications →No SLAB_ALLOC_ARENA(TARANTOOL_MEMORY_GB[NGINX Node 5.x and earlier][what-is-new-wstore])Amount of memory allocated to wstore. The value can be a float (a dot .is a decimal separator). By default: 1.0 (1 gygabyte).
Note that when passing this variable in Dockerruncommand with the-e, the variable is not recorded in any configuration file within the container, but it is still used whenwstorestarts.No NGINX_PORTSets a port that NGINX will use inside the Docker container.
Starting from the Docker image4.0.2-1, thewallarm-statusservice automatically runs on the same port as NGINX.
Default value (if the variable is not passed to the container) is80.
Syntax isNGINX_PORT='443'.No WALLARM_STATUS_ALLOWCustom CIDRs that are allowed to access the /wallarm-statusendpoint from outside the Docker container. Example value:10.0.0.0/8. If you need to pass several values, use a comma,as a separator. To access the service externally, use the Docker container's IP, specifying the/wallarm-statusendpoint path.No DISABLE_IPV6The variable with any value except for an empty one deletes the listen [::]:80 default_server ipv6only=on;line from the NGINX configuration file which will stop NGINX from IPv6 connection processing.
If the variable is not specified explicitly or has an empty value"", NGINX processes both IPv6 and IPv4 connections.No WALLARM_APIFW_ENABLEThis setting toggles API Specification Enforcement on or off, available from release 4.10 onwards. Please note that activating this feature does not substitute for the required subscription and configuration through the Wallarm Console UI.
Its default value istrue, enabling the functionality.No WALLARM_APID_ONLY(5.3.7 and higher)In this mode, attacks detected in your traffic are blocked locally by the node (if enabled) but not exported to Wallarm Cloud. Meanwhile, API Discovery and some other features remain fully functional, detecting your API inventory and uploading it to the Cloud for visualization. This mode is for those who want to review their API inventory and identify sensitive data first, and plan controlled attack data export accordingly. However, disabling attack export is rare, as Wallarm securely processes attack data and provides sensitive attack data masking if needed. More details
By default:false.No APIFW_METRICS_ENABLED(6.4.1 and higher)Enables Prometheus metrics for the API Specification Enforcement module.
By default:false(disabled).No APIFW_METRICS_HOST(6.4.1 and higher)Defines the host and port on which the API Specification Enforcement exposes metrics.
By default::9010.No APIFW_METRICS_ENDPOINT_NAME(6.4.1 and higher)Defines the HTTP path of the API Specification Enforcement metrics endpoint
By default:metrics.No WALLARM_WSTORE__METRICS__LISTEN_ADDRESSDefines the host and port on which [Postanalytics and general system metrics][wstore-metrics] are exposed.
By default:http://localhost:9001/metrics.No WALLARM_WSTORE__SERVICE__PROTOCOL(6.6.0 and higher)Specifies the protocol family that wstore uses for incoming connections. Possible values: "tcp"- dual-stack mode (listens on both IPv4 and IPv6)"tcp4"- IPv4 only"tcp6"- IPv6 only
"tcp4".No WALLARM_WCLI__METRICS__LISTEN_ADDRESSDefines the host and port on which the [wcli Controller metrics][wcli-metrics] are exposed.
By default:http://localhost:9003/metrics.No WALLARM_WCLI__METRICS__ENDPOINTDefines the HTTP path for the [wcli Controller metrics][wcli-metrics] endpoint.
By default:metrics.No -
يتم وصف جميع معلمات الأمر
gcloud compute instances create-with-containerفي توثيق GCP.
-
قم بفتح GCP Console → Compute Engine → VM instances وتأكد من أن العينة معروضة في القائمة.
نشر حاوية Docker للعقدة Wallarm المكونة من خلال الملف المثبت
لنشر عقدة الفلترة المضمنة في حاوية Wallarm المكونة من خلال المتغيرات البيئية والملف المثبت، يجب أن تقوم بإنشاء العينة، تحديد ملف تكوين العقدة الفاصلة في نظام الملفات هذه العينة وتشغيل حاوية Docker في هذه العينة. يمكنك تنفيذ هذه الخطوات عبر واجهه GCP Console أو gcloud CLI. في هذه التعليمات، يتم استخدام gcloud CLI.
-
Get Wallarm token of the appropriate type:
-
قم بإنشاء العينة على أساس أي صورة تشغيل لنظام التشغيل من سجل Compute Engine باستخدام الأمر
gcloud compute instances create:gcloud compute instances create <INSTANCE_NAME> \ --image <PUBLIC_IMAGE_NAME> \ --zone <DEPLOYMENT_ZONE> \ --tags http-server<INSTANCE_NAME>: اسم العينة.--image: اسم صورة نظام التشغيل من سجل Compute Engine. العينة المُنشأة ستكون مبنية على هذه الصورة وستتم استخدامها لتشغيل حاوية Docker في وقت لاحق. إذا تم حذف هذه الباراميتر، ستكون العينة مبنية على صورة Debian 10.--zone: المنطقة التي ستستضيف العينة.--tags: علامات العينة. تستخدم العلامات لتكوين توفر العينة للموارد الأخرى. في الحالة الحالية، يتم تعيين العلامةhttp-serverالتي تفتح منفذ 80 للعينة.- يتم وصف جميع معلمات الأمر
gcloud compute instances createفي توثيق GCP.
-
قم بفتح GCP Console → Compute Engine → VM instances وتأكد من أن العينة معروضة في القائمة وأنها في حالة RUNNING.
-
قم بالاتصال بالعينة عبر SSH وفقًا لـ تعليمات GCP.
-
قم بتثبيت حزم Docker في العينة وفقًا للـ تعليمات لنظام التشغيل المناسب.
-
قم بتعيين متغير البيئة المحلي مع رمز عقدة Wallarm الذي سيتم استخدامه لربط العينة بـ Wallarm Cloud:
-
في العينة، قم بإنشاء الدليل مع الملف
defaultالذي يحتوي على تكوين العقدة الفاصلة (على سبيل المثال، يمكن أن يُسمى الدليلconfigs). مثال على الملف مع الإعدادات القليلة:server { listen 80 default_server; listen [::]:80 default_server ipv6only=on; #listen 443 ssl; server_name localhost; #ssl_certificate cert.pem; #ssl_certificate_key cert.key; root /usr/share/nginx/html; index index.html index.htm; wallarm_mode monitoring; # wallarm_application 1; location / { proxy_pass http://example.com; include proxy_params; } }مجموعة من التوجيهات الفاصلة للعقدة التي يمكن تحديدها في ملف التكوين →
-
قم بتشغيل حاوية Docker للعقدة Wallarm باستخدام الأمر
docker runمع المتغيرات البيئية المُمررة والملف التكوين المثبت:<INSTANCE_PATH_TO_CONFIG>: المسار إلى الملف التكوين الذي تم إنشاؤه في الخطوة السابقة. على سبيل المثال،configs.-
<DIRECTORY_FOR_MOUNTING>: الدليل للحاوية لتثبيت الملف التكوين. يمكن تثبيت الملفات التكوين على الدلائل التالية المستخدمة بواسطه NGINX:/etc/nginx/conf.d— الإعدادات الشائعة/etc/nginx/sites-enabled— إعدادات الاستضافة الافتراضية/var/www/html— الملفات الثابتة
يجب وصف توجيهات العقدة الفاصلة في الملف
/etc/nginx/sites-enabled/default. -
-p: منفذ يستمع إليه العقدة الفاصلة. القيمة يجب أن تكون نفس منفذ العينة.. -
-e: এর মাধ্যমে ফিল্টারিং নোড কনফিগারেশনের পরিবেশ চলকগুলি (নিম্ন তালিকাভুক্ত চলকগুলি উপলব্ধ). অনুগ্রহ করে মনে রাখবেন যেWALLARM_API_TOKENএর মান সরাসরি পাস করার জন্য প্রস্তাব দেওয়া হয়নি।Environment variable Description Required WALLARM_API_TOKENWallarm node or API token. Yes WALLARM_API_HOSTWallarm API server: us1.api.wallarm.comfor the US Cloudapi.wallarm.comfor the EU Cloud
api.wallarm.com.No WALLARM_LABELSAvailable starting from node 4.6. Works only if
WALLARM_API_TOKENis set to API token with theDeployrole. Sets thegrouplabel for node instance grouping, for example:WALLARM_LABELS="group=<GROUP>"...will place node instance into the
<GROUP>instance group (existing, or, if does not exist, it will be created).Yes (for API tokens) SLAB_ALLOC_ARENA(TARANTOOL_MEMORY_GB[NGINX Node 5.x and earlier][what-is-new-wstore])Amount of memory allocated to wstore. The value can be a float (a dot .is a decimal separator). By default: 1.0 (1 gygabyte).No WALLARM_APID_ONLY(5.3.7 and higher)In this mode, attacks detected in your traffic are blocked locally by the node (if enabled) but not exported to Wallarm Cloud. Meanwhile, API Discovery and some other features remain fully functional, detecting your API inventory and uploading it to the Cloud for visualization. This mode is for those who want to review their API inventory and identify sensitive data first, and plan controlled attack data export accordingly. However, disabling attack export is rare, as Wallarm securely processes attack data and provides sensitive attack data masking if needed. More details
By default:false.No APIFW_METRICS_ENABLED(6.4.1 and higher)Enables Prometheus metrics for the API Specification Enforcement module.
By default:false(disabled).No APIFW_METRICS_HOST(6.4.1 and higher)Defines the host and port on which the API Specification Enforcement exposes metrics.
By default::9010.No APIFW_METRICS_ENDPOINT_NAME(6.4.1 and higher)Defines the HTTP path of the API Specification Enforcement metrics endpoint
By default:metrics.No WALLARM_WSTORE__METRICS__LISTEN_ADDRESSDefines the host and port on which [Postanalytics and general system metrics][wstore-metrics-mount] are exposed.
By default:http://localhost:9001/metrics.No WALLARM_WSTORE__SERVICE__PROTOCOL(6.6.0 and higher)Specifies the protocol family that wstore uses for incoming connections. Possible values: "tcp"- dual-stack mode (listens on both IPv4 and IPv6)"tcp4"- IPv4 only"tcp6"- IPv6 only
"tcp4".No WALLARM_WCLI__METRICS__LISTEN_ADDRESSDefines the host and port on which the [wcli Controller metrics][wcli-metrics] are exposed.
By default:http://localhost:9003/metrics.No WALLARM_WCLI__METRICS__ENDPOINTDefines the HTTP path for the [wcli Controller metrics][wcli-metrics] endpoint.
By default:metrics.No
اختبار تشغيل العقدة الفاصلة
-
قم بفتح GCP Console → Compute Engine → VM instances وانسخ عنوان IP للعينة من عمود External IP.
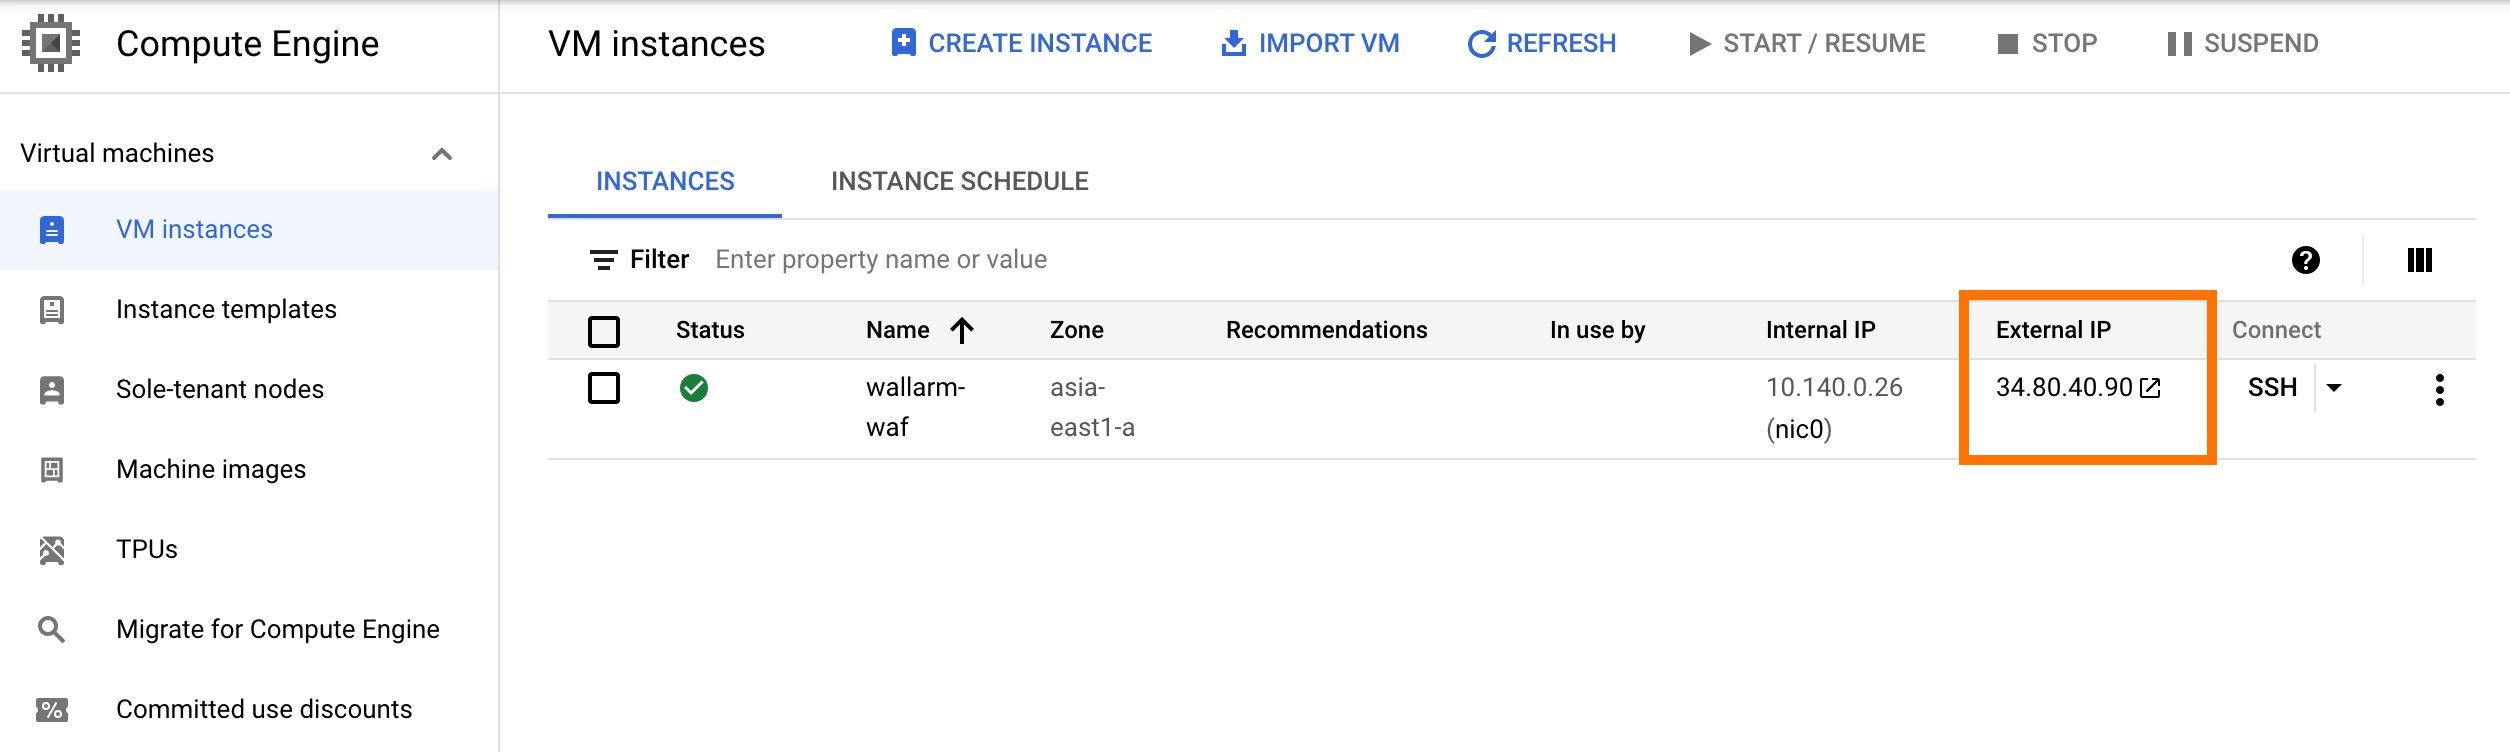
إذا كان عنوان IP فارغًا، تأكد من أن العينة في حالة RUNNING.
-
أرسل الطلب مع هجوم اختبار Path Traversal إلى العنوان المنسوخ:
-
قم بفتح Wallarm Console → Attacks في US Cloud أو EU Cloud وتأكد من أن الهجوم معروض في القائمة.

تتم عرض التفاصيل حول الأخطاء التي حدثت أثناء نشر الحاوية في القائمة View logs للعينة. إذا كانت العينة غير متاحة، يرجى التأكد من أن التكوين الفاصلة للعقدة المطلوبة مع القيم الصحيحة تُمرَر إلى الحاوية.