API Sessions Setup  
API Sessions include the built-in rules for the session identification and requires only enabled Wallarm node to start working. Optionally, you can fine-tune API Sessions under your needs as described in this article.
Requirements
-
API Sessions require NGINX Wallarm node 5.1.0 or Native Wallarm Node 0.8.0.
-
Response parsing - NGINX Wallarm node 5.3.0 or native node 0.12.0.
Session grouping
Wallarm groups requests of your applications' traffic into user sessions based on the equal values of the selected headers/parameters of the requests and/or responses. In configuration, these are parameters marked to be grouping keys. See how grouping keys work in the example.
By default, sessions are identified with the built-in set of such parameters (not displayed in Wallarm Console). Its logic is to try most common identification parameters, such as PHPSESSID or SESSION-ID headers, and if they do not work - form session based on the combination of request source IP and user-agent (or at least IP if user-agent is not presented).
You can add several grouping keys, they are tried in specified order - next is tried only if previous did not work. Drag to change the order. You own keys are always tried before the built-in ones.
Consider the following:
-
Multi-part sessions: For effective analysis, long sessions are separated in one-day parts. Also, no parts older than 7 days are stored and displayed.
-
Impact to bot detection by
API Abuse prevention: Wallarm's API Abuse Prevention uses sessions for the malicious bot detection. Adding your own session identification parameters based on your applications' logic makes both session detection and API Abuse Prevention's bot detection more precise. See details. -
Impact from
Mask sensitive datarule: For the parameter to work as a grouping key, it should not be affected by the the Mask sensitive data rule
Adding grouping keys
You can add your own identification parameters based on your applications' logic:
-
From Recommendations (requires API Discovery)
-
Manually
Adding keys from recommendations
Requires API Discovery
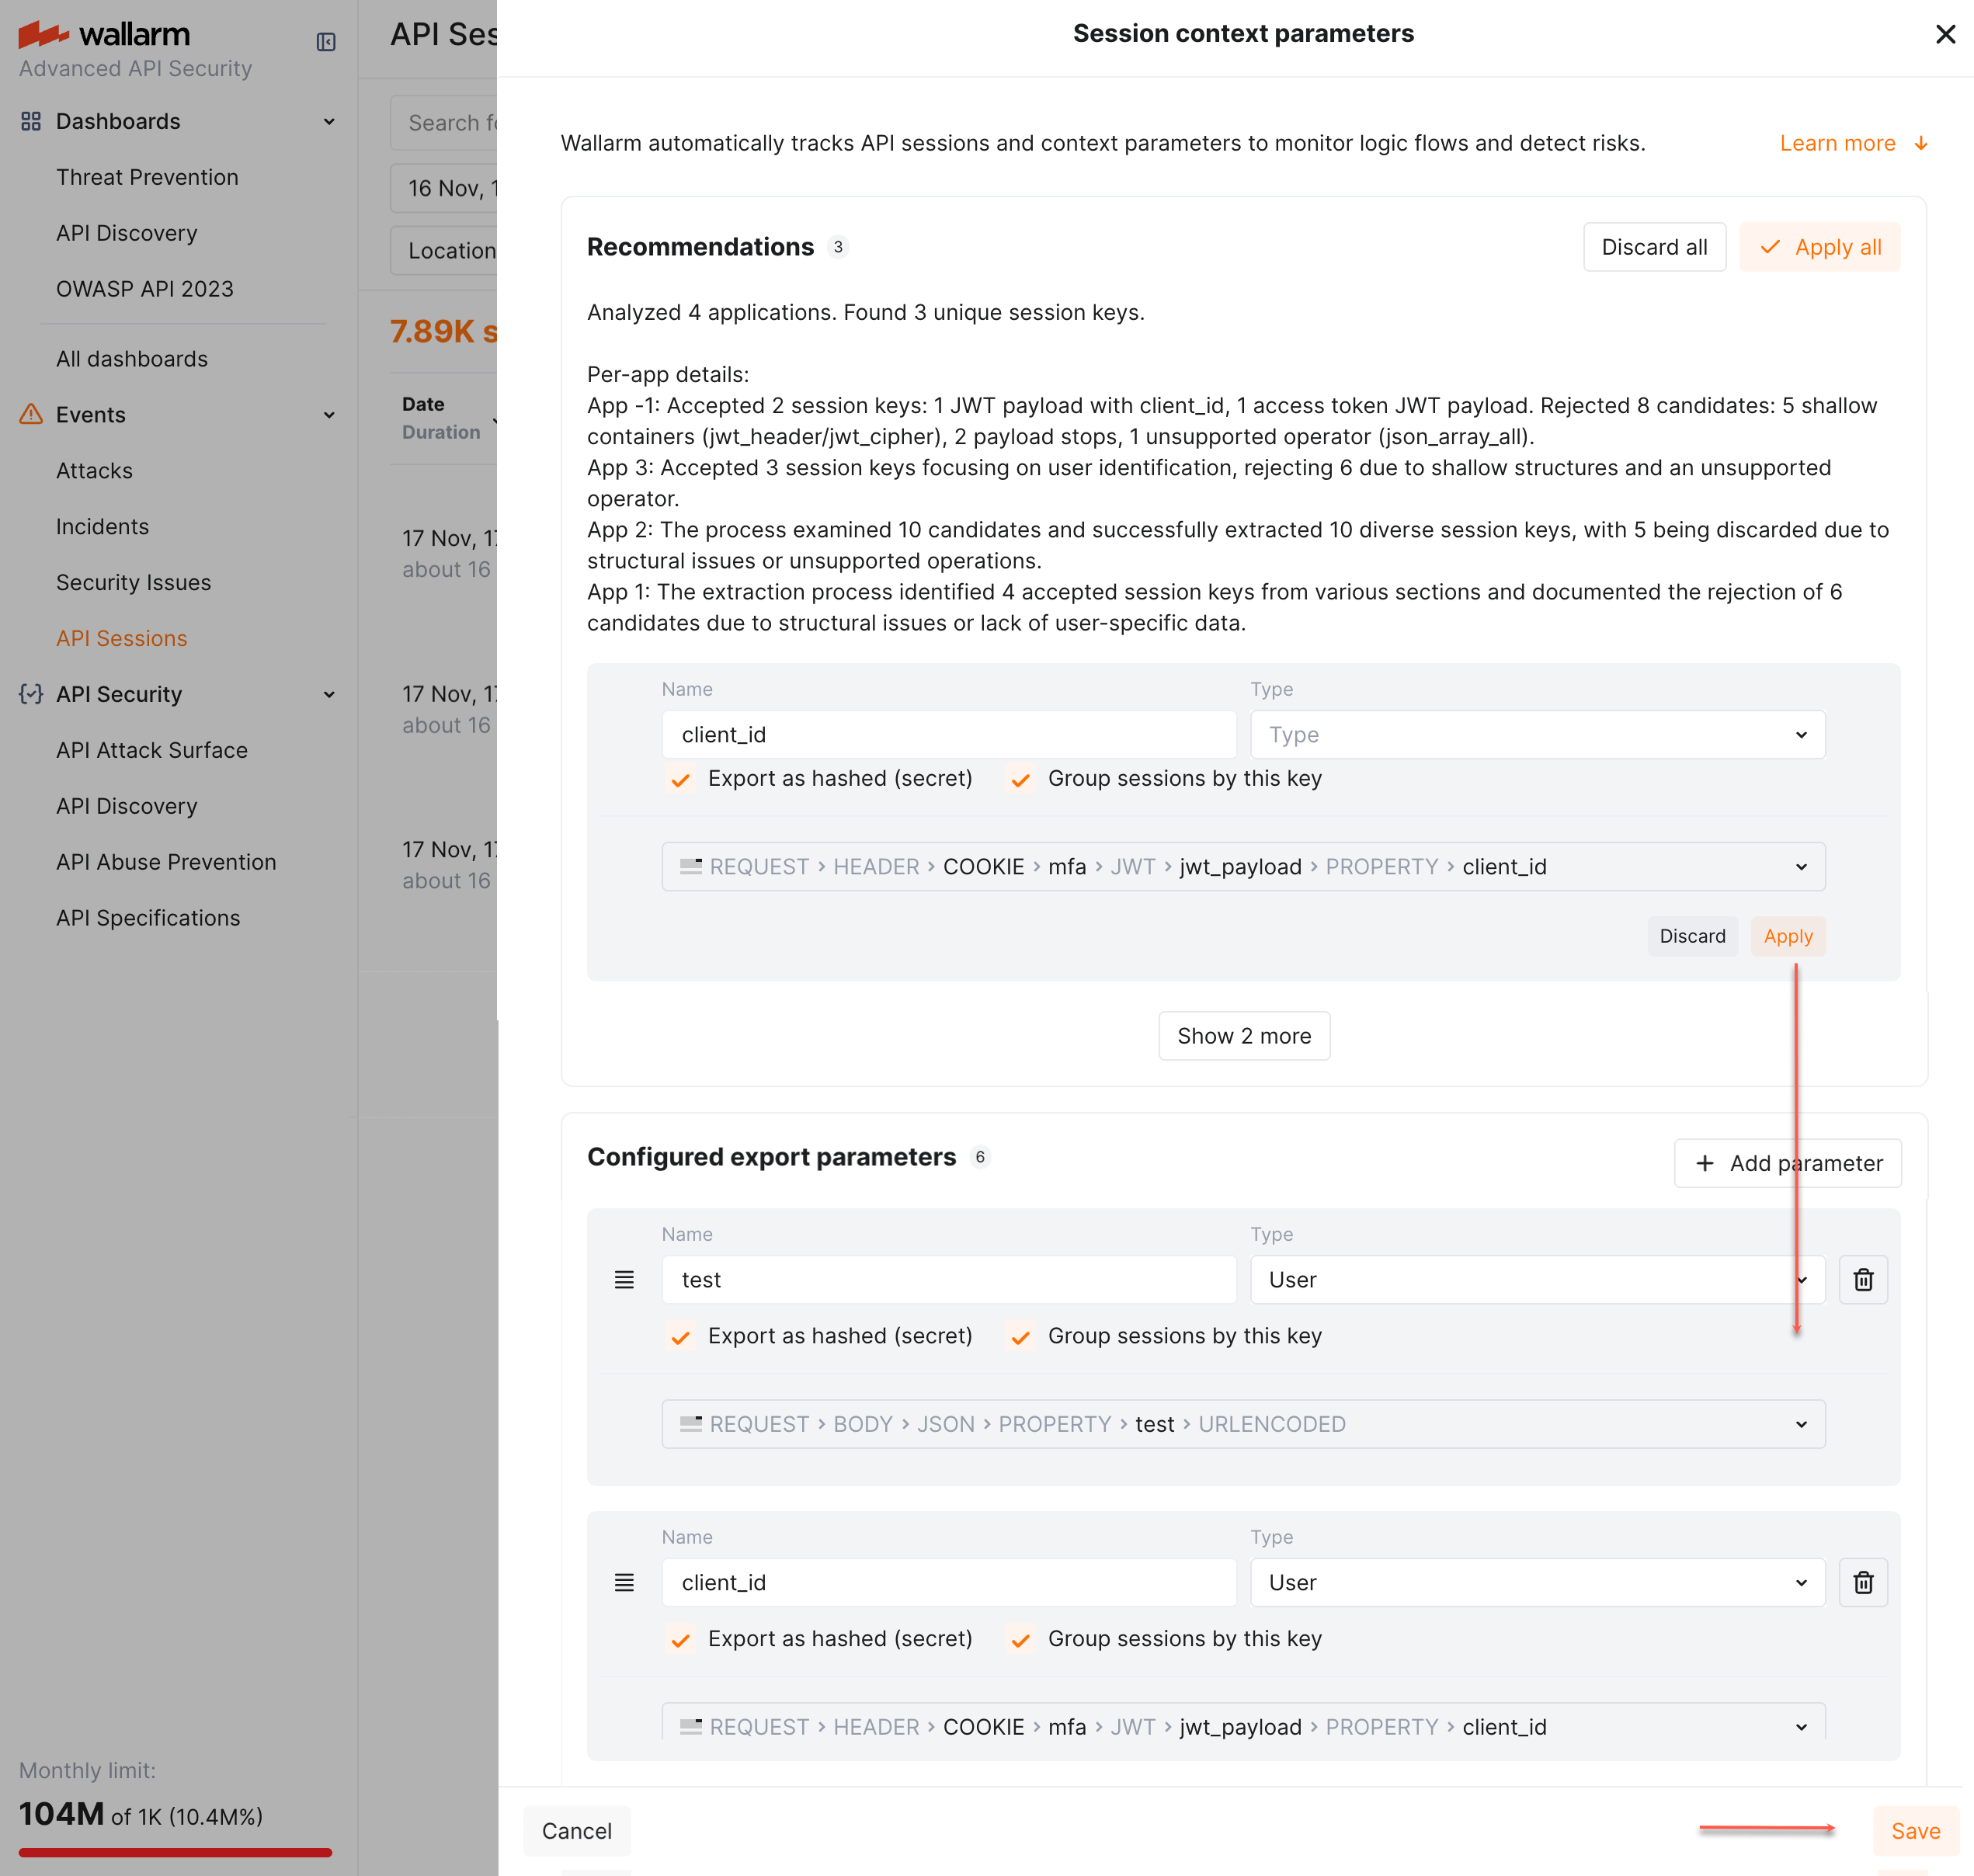
Based on your traffic, Wallarm suggests parameters you might want to use as session grouping keys:
-
The suggestions are LLM-based and rely on API Discovery data.
-
The suggestions are accompanied by explanatory text, from which you can understand why these particular parameters were suggested for identifying sessions of your different applications.
-
The appearance of new data in API Discovery may result in the new suggestions, so it is recommended to re-check the Suggestions section periodically.
-
When accepted, suggestions are added without logic in their order - you should define that order yourself.
To add grouping keys from recommendations:
-
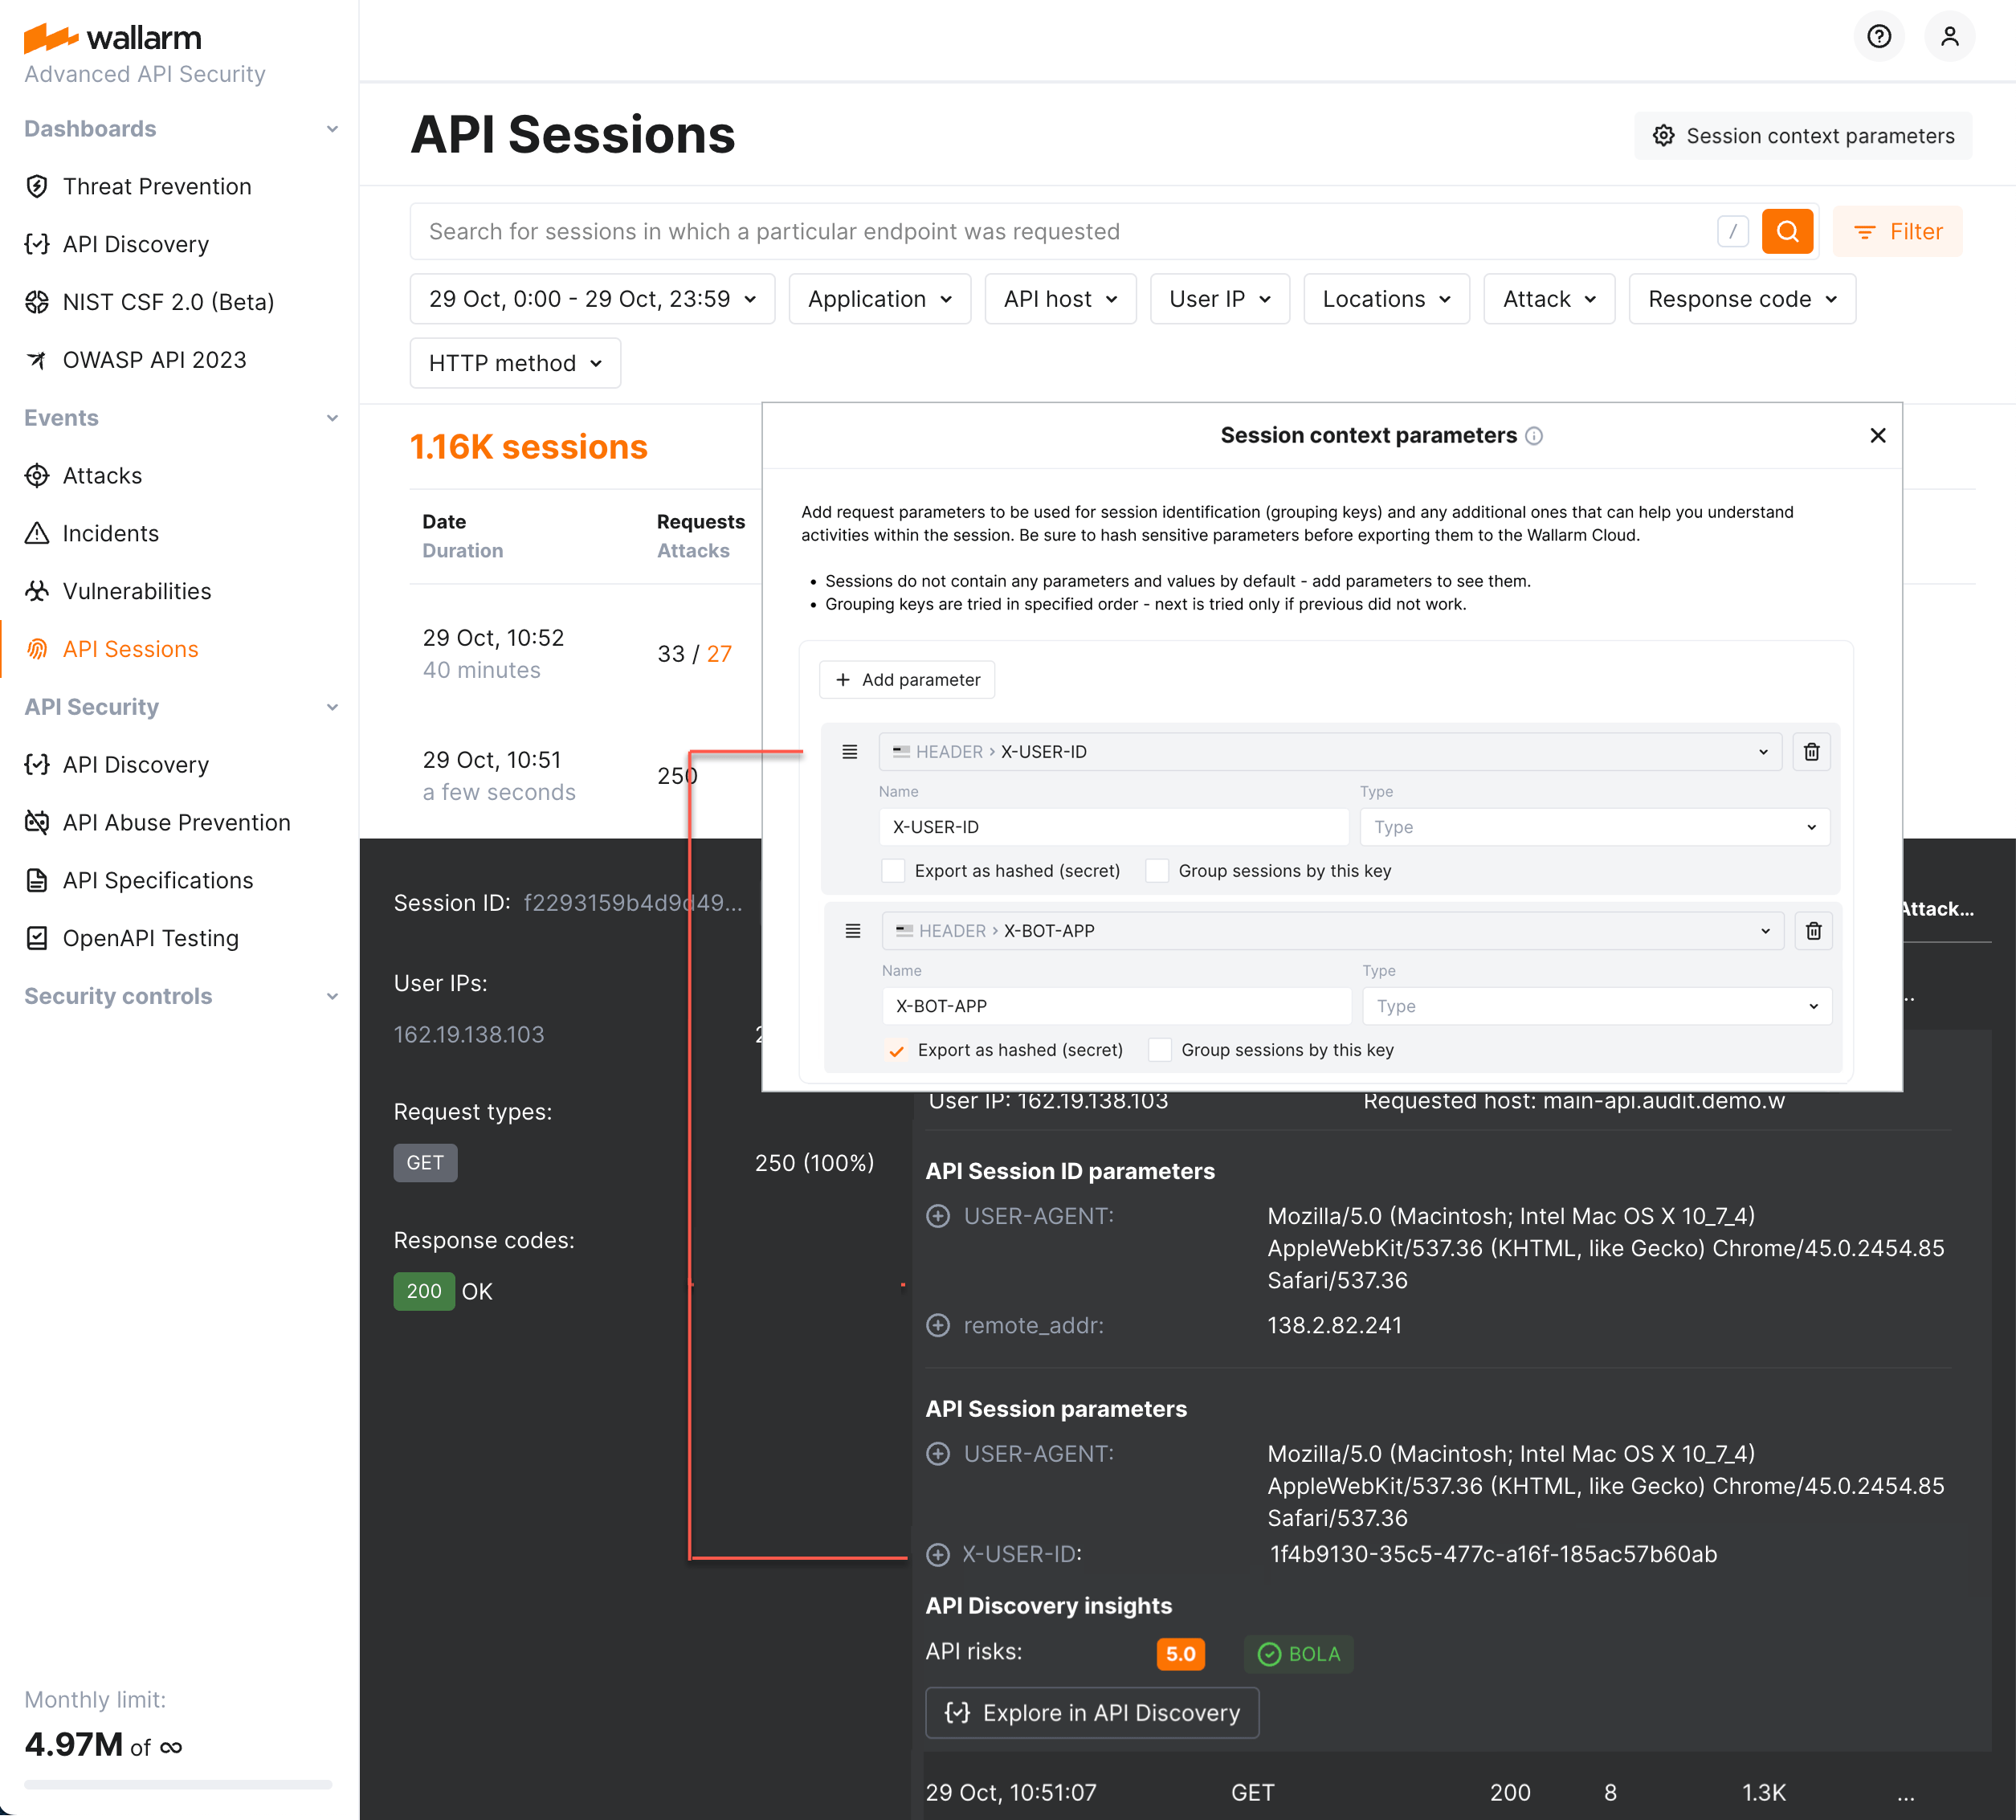
Go to Wallarm Console → API Sessions → Session context parameters.
-
Check the Recommendations section.
-
Apply all or selected parameters. The parameters are added to the Configured export parameters parameters. Note that Group sessions by this key should remain selected for all of them.
-
Drag and drop to define order (priority) - see example.
-
Save changes.
Adding from API Discovery
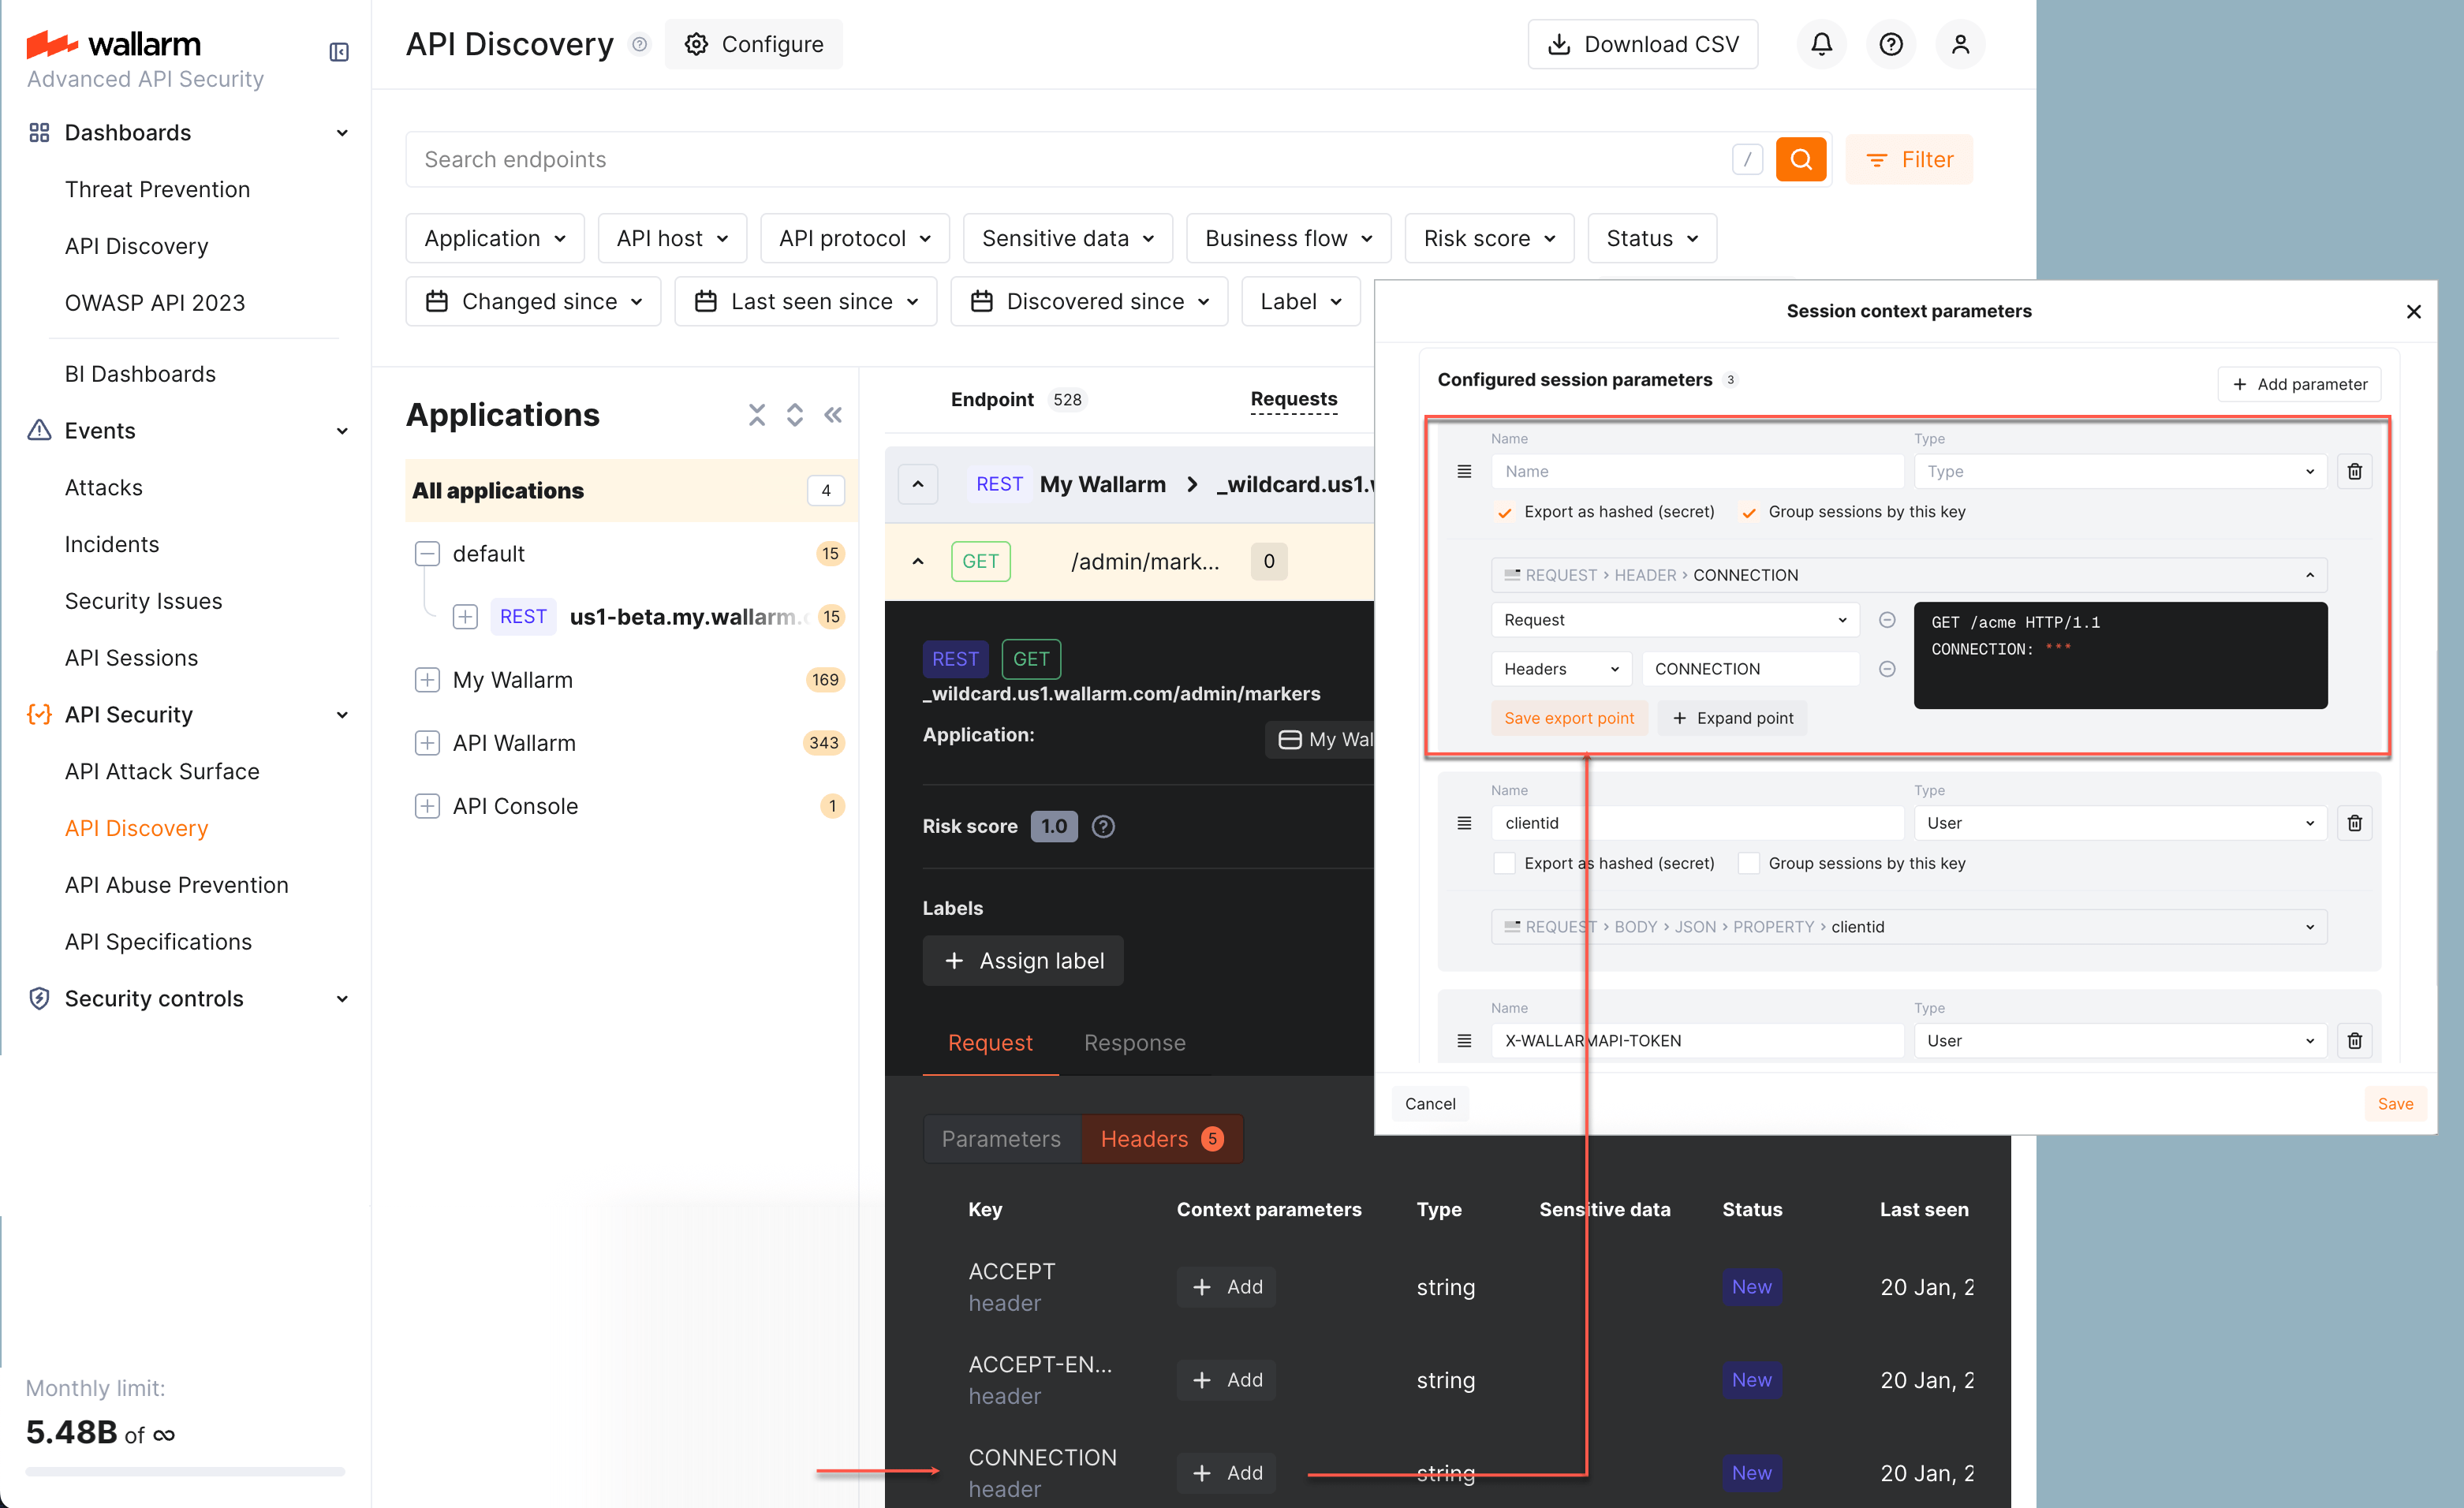
Wallarm's API Discovery automatically finds your endpoints and their parameters - you can instruct Wallarm to use any of these parameters as session grouping keys right from API Discovery:
-
In API Discovery, go to your endpoint.
-
Scroll to its request/response parameters.
-
For the desired parameter, in the Context parameters column, click Add.
The API Discovery configuration dialog is displayed with your parameter added as a grouping key.
-
If necessary, adjust grouping key order (changes priority).
-
Save changes.
Wallarm goes back to API Discovery while API Sessions now have added grouping key.
Adding keys manually
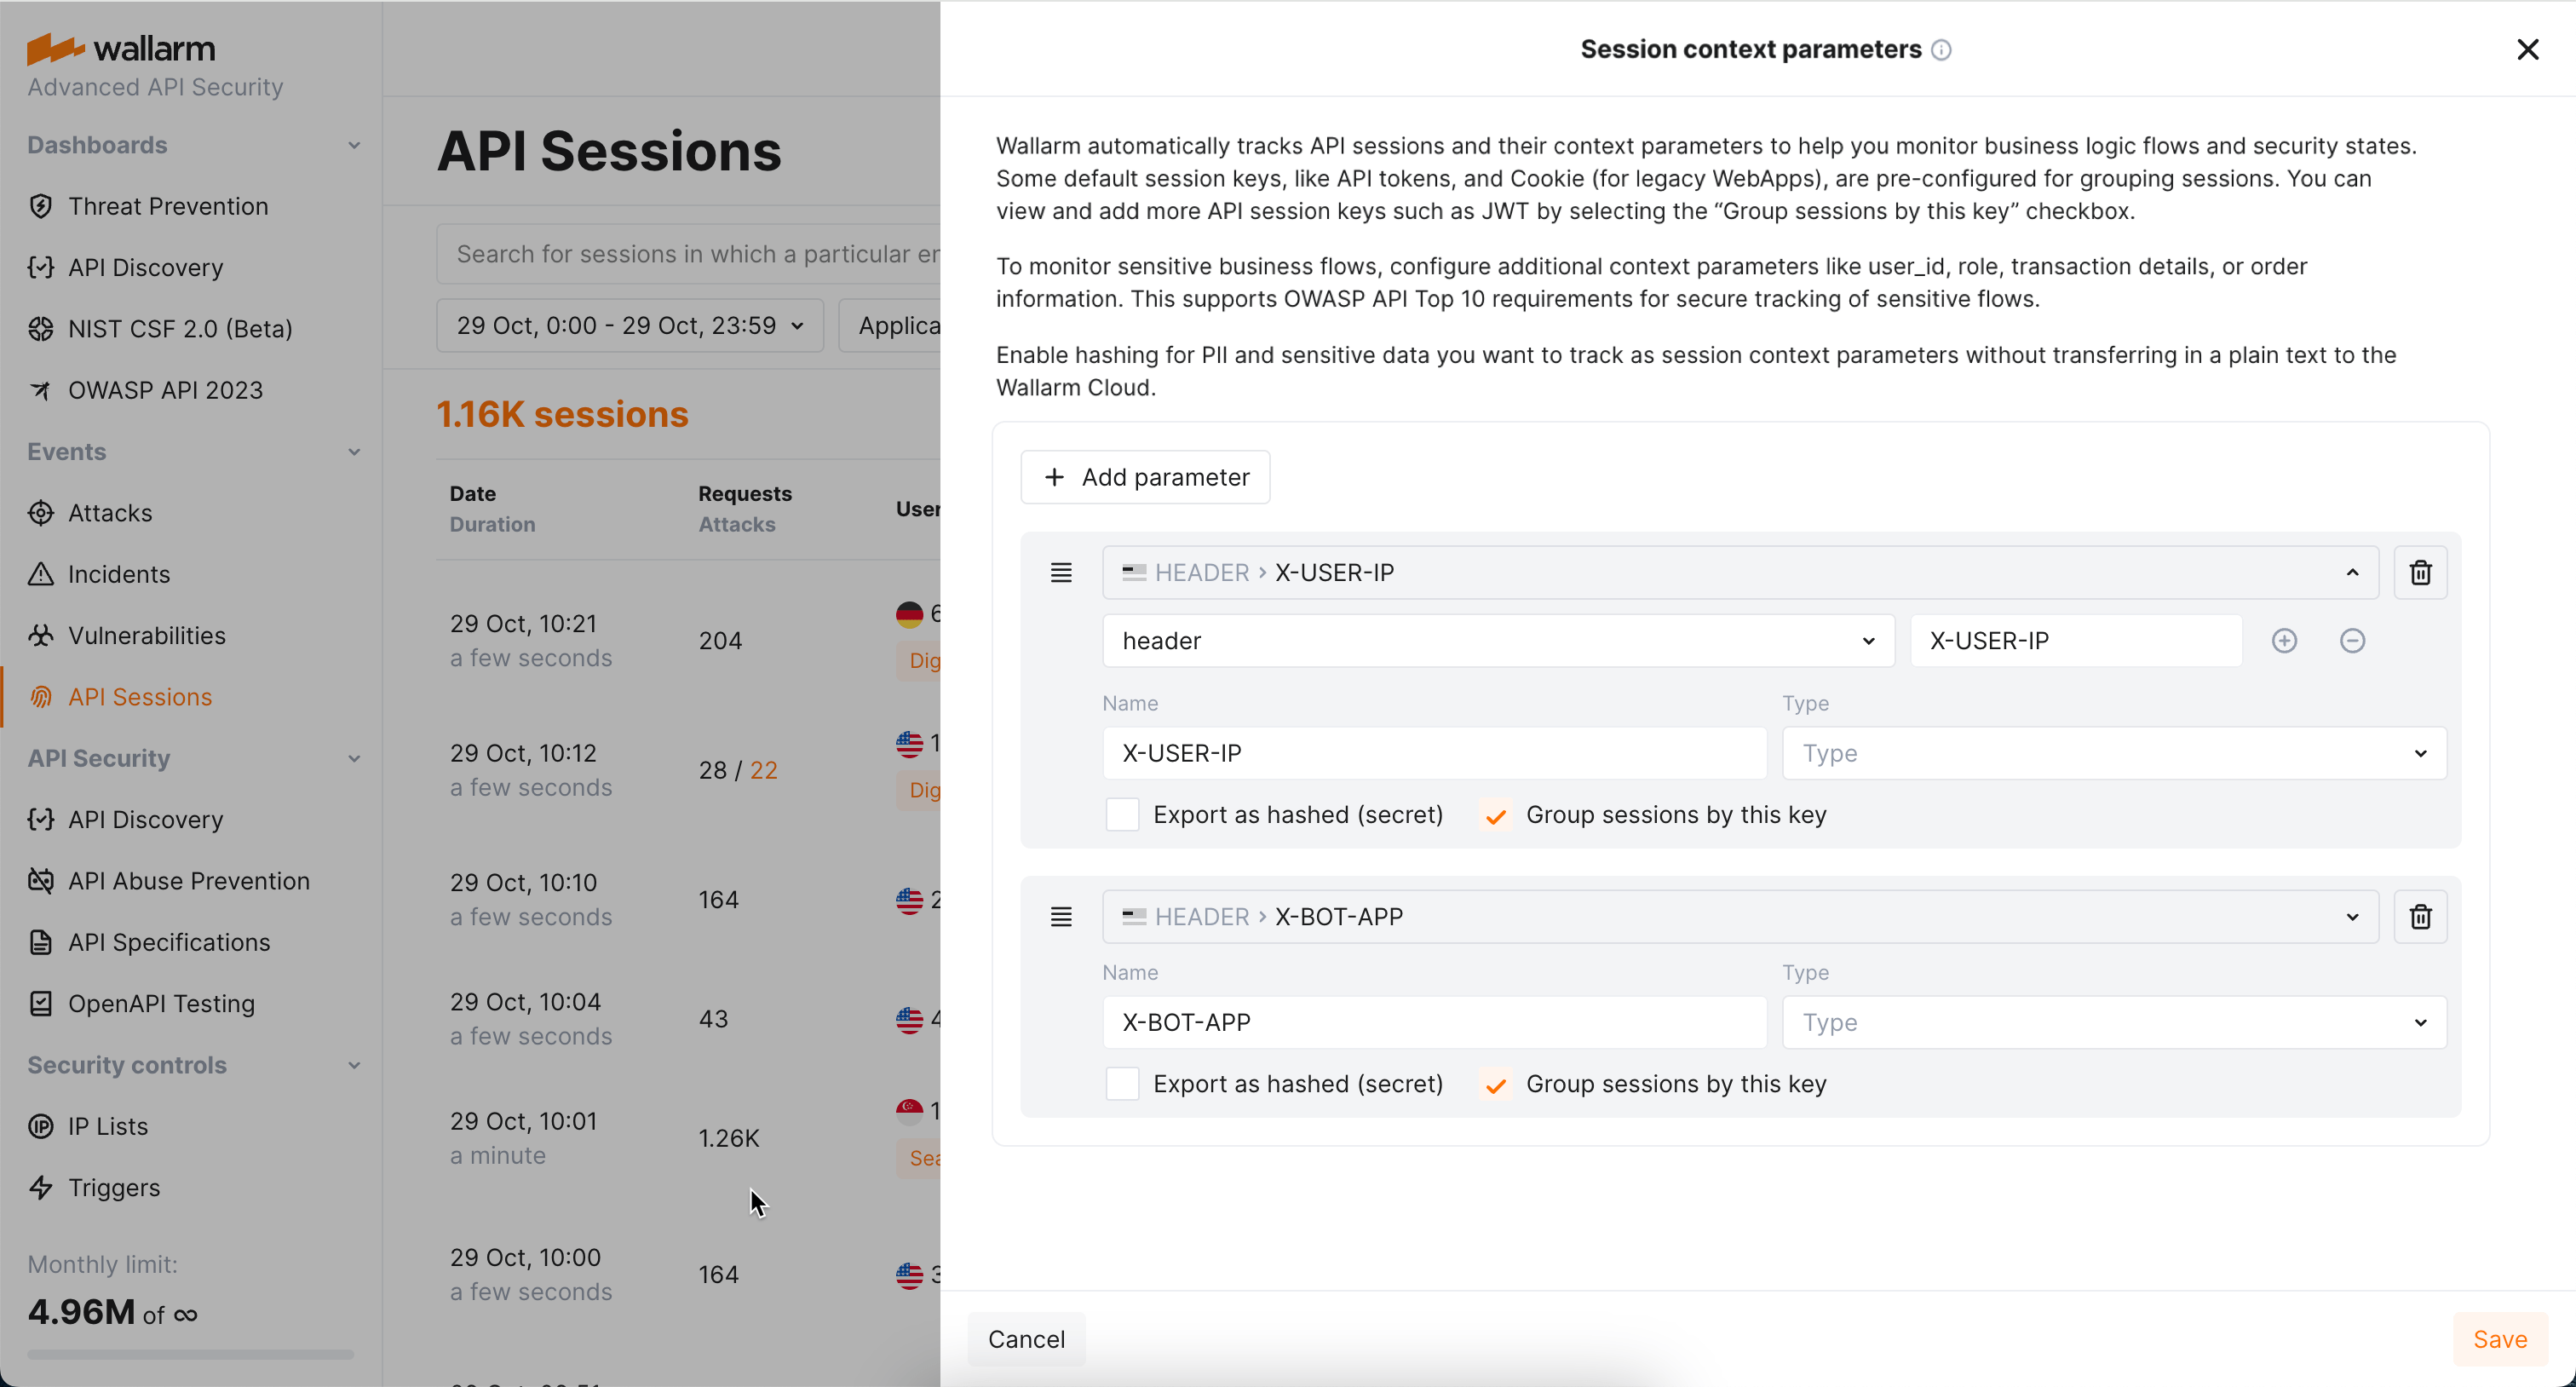
To add session grouping keys manually, go to Wallarm Console → API Sessions → Session context parameters, add your request or response parameter and select Group sessions by this key for it.
See also: simplified selection.
Example of how grouping keys work
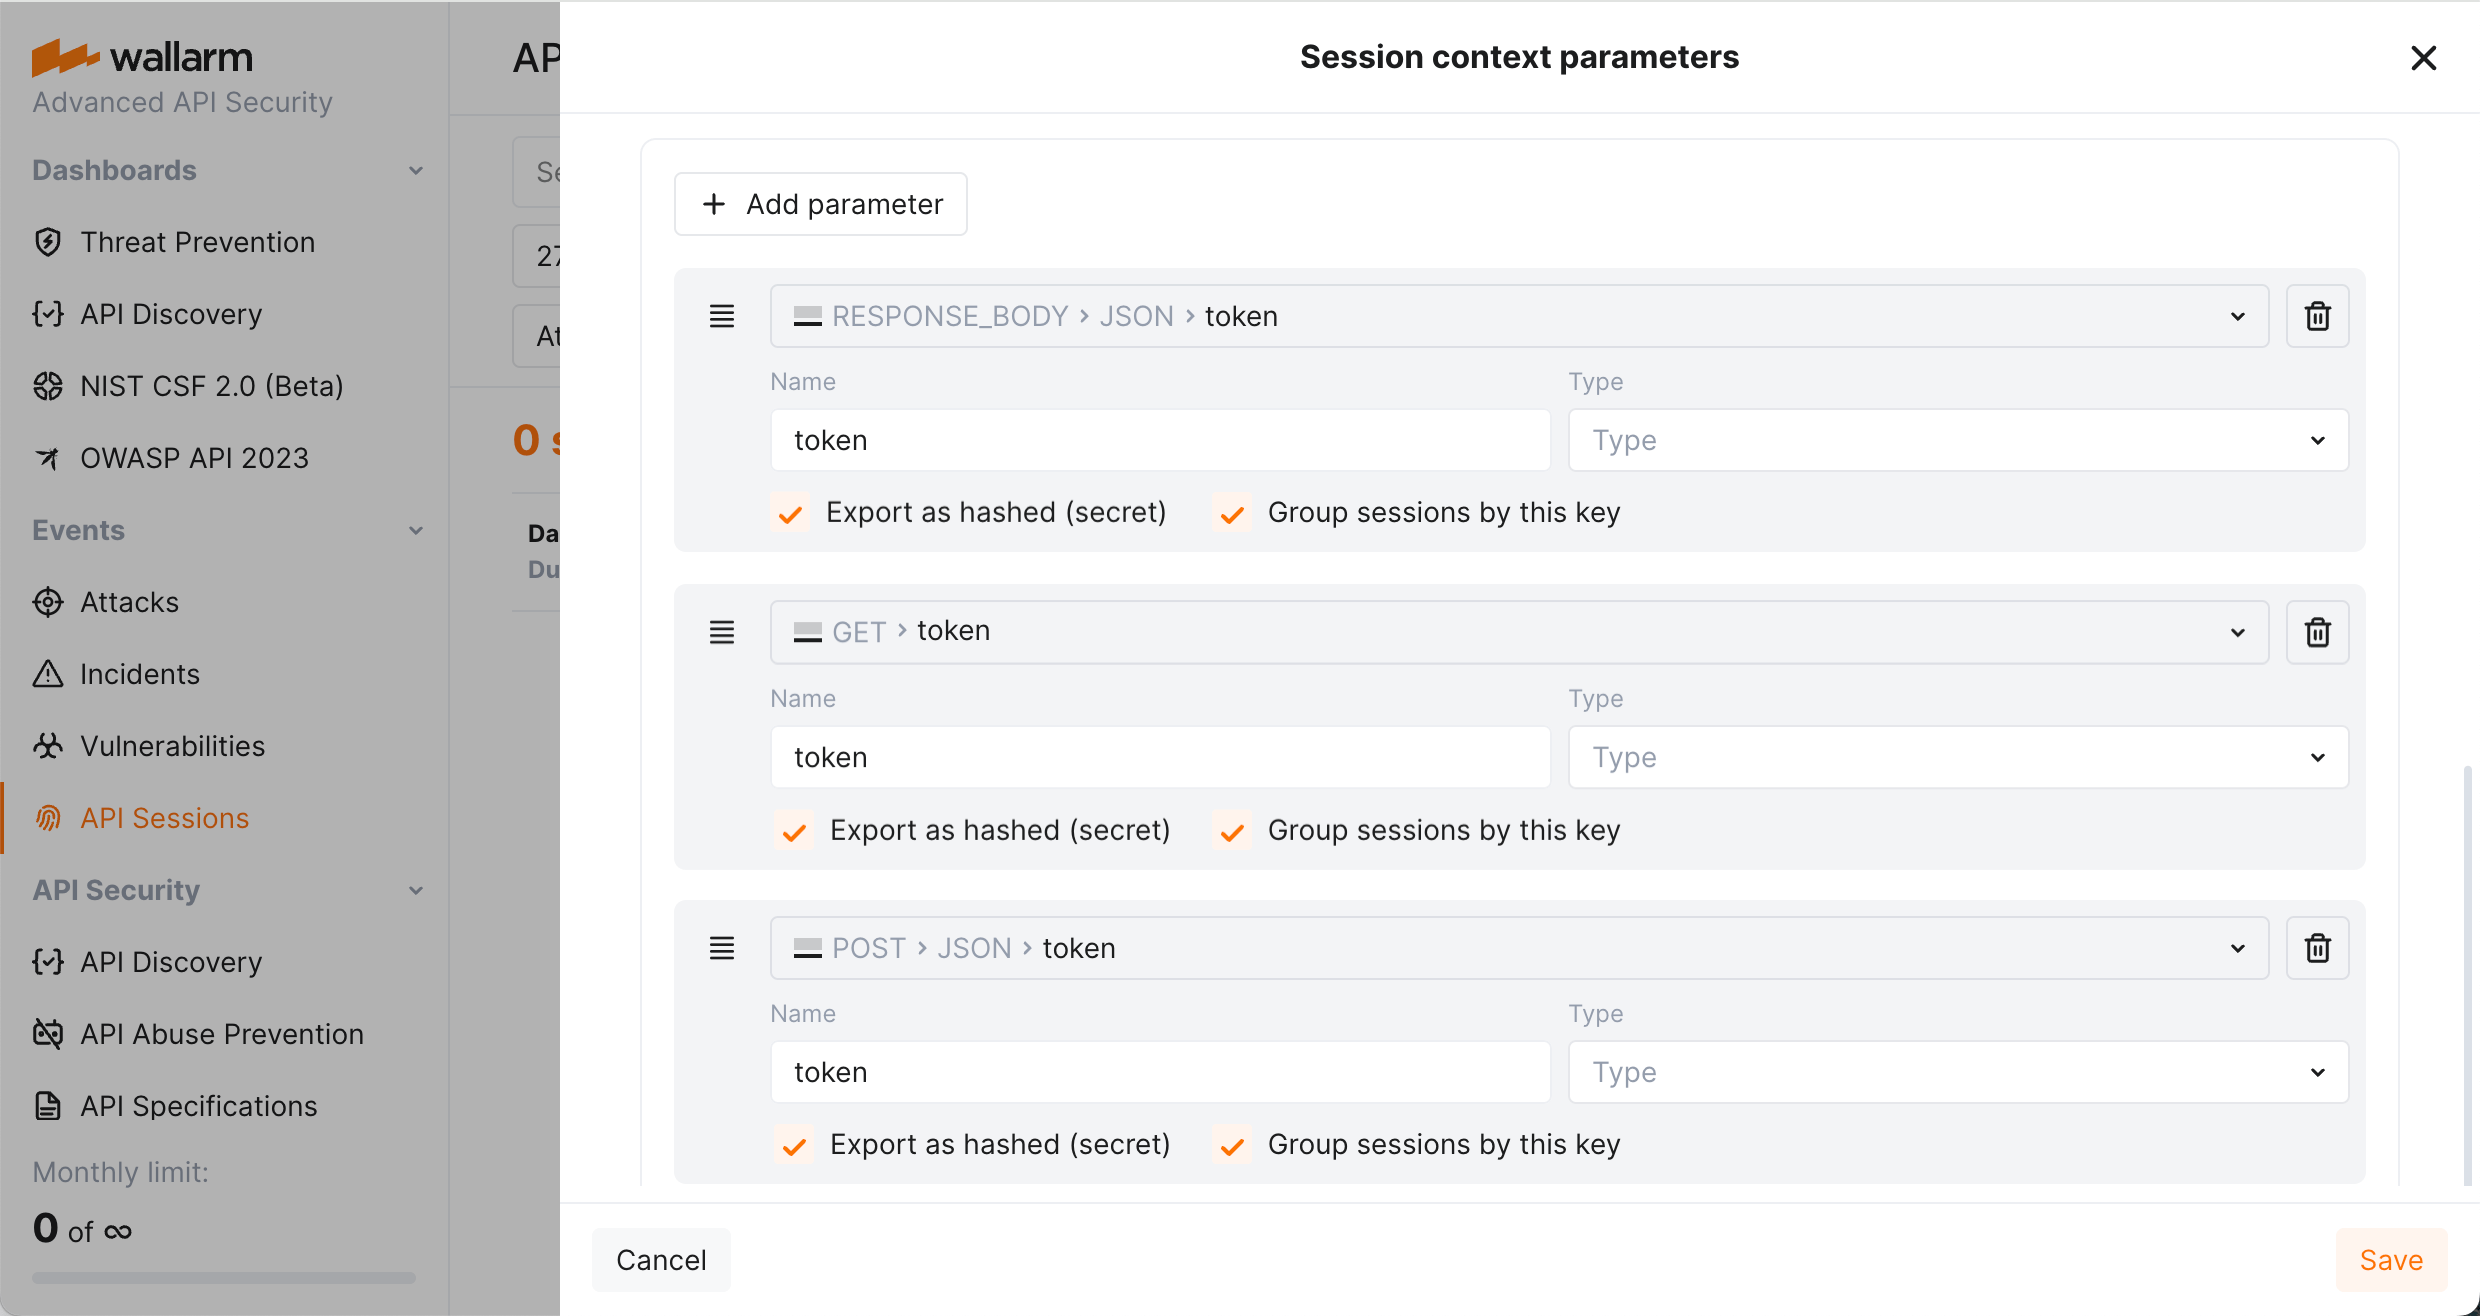
Let us say you have a route login which returns a specific <TOKEN> in RESPONSE → BODY JSON → PROPERTY → token parameter of the response. In the further requests, this <TOKEN> is used somewhere in REQUEST → QUERY → token or REQUEST → BODY → JSON → PROPERTY → token.
You can configure 3 parameters to be used as grouping keys (for response body, get and post requests). They will be tried in the following order (next is tried only if previous did not work):
-
RESPONSE → BODY → JSON → PROPERTY → token -
REQUEST → QUERY → token -
REQUEST → BODY → JSON → PROPERTY → token -
(built-in set, will be used if none of previous work)
Requests:
-
curl
example.com -d '{in: 'bbb'}'with response'{token: aaa}'→ session "A" (grouping key #1 worked) -
curl
example.com -d '{in: 'ccc'}' '{token: 'aaa'}'with response without token → session "A" (grouping key #3 worked)
The same parameter value aaa groups these requests into one session.
Session context
Context in API sessions is information that enriches session information to provide deeper insights into activities within session. Configuring context allows you to specify which aspects or additional data should be tracked and associated with each session.
Set session context by adding extra request and response parameters, associating sessions with sensitive business flows and highlighting parameters that can be used for user and user role identification.
Allowed number of session context parameters
You can add up to 20 session context parameters to use them for session context and grouping.
Extra parameters
In API Sessions, within session, the request details by default include:
-
Parameter of request or response that worked for session grouping - yours or the one from the built-in set (highlighted in the API session ID parameters group).
-
Parameters (if any) added by mitigation controls.
-
For malicious requests - full request content.
You can add any additional (context) parameters both for requests and for their related responses, that you need to understand the session content: what and in what order the actor did and what the response was. To do so, add these parameters in Wallarm Console → API Sessions → Session context parameters. Once added, Wallarm will export them to the Wallarm Cloud and display in Wallarm Console, in details of your session requests (in the API session parameters group).
Here are some examples:
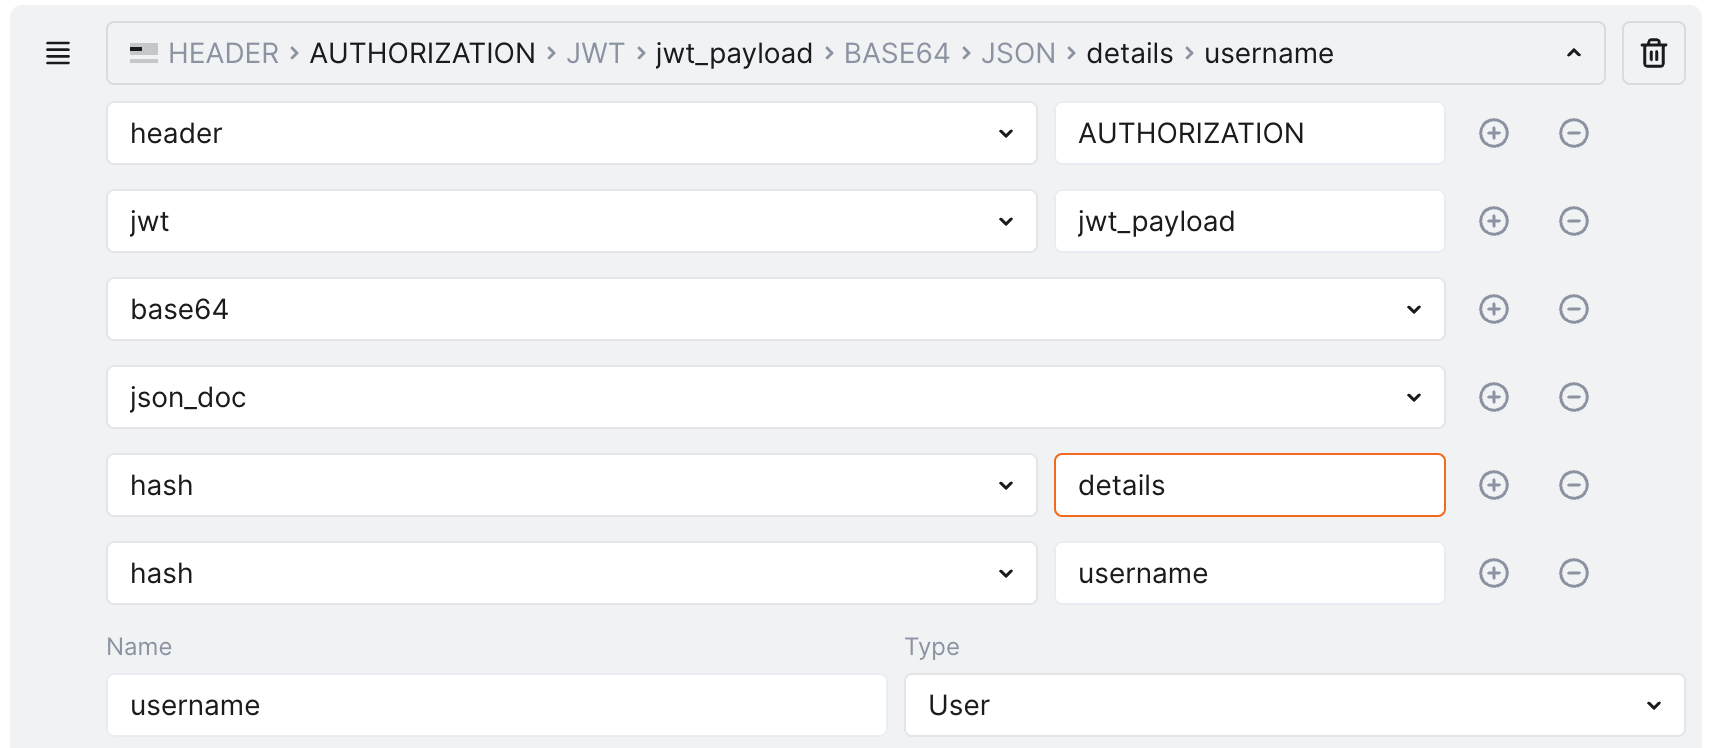
Getting the username out of the jwt_payload of the request:
{
  "token_type": "access",
  "exp": 1741774186,
  "iat": 1741773706,
  "jti": "jti_value",
  "user_id": 932,
  "details": {
    "username": "john-doe@company-001.com",
    "rnd": "some_data",
    "contact": {
      "contactId": 438,
      "contactUUID": "contact_UUID_value",
      "firstName": "John",
      "lastName": "Doe",
      "portalSecurityLevel": 3,
      "companyId": 255,
      "companyName": "Company 001",
      "companyUUID": "company_UUID_value"
    }
  }
}
... looks like:
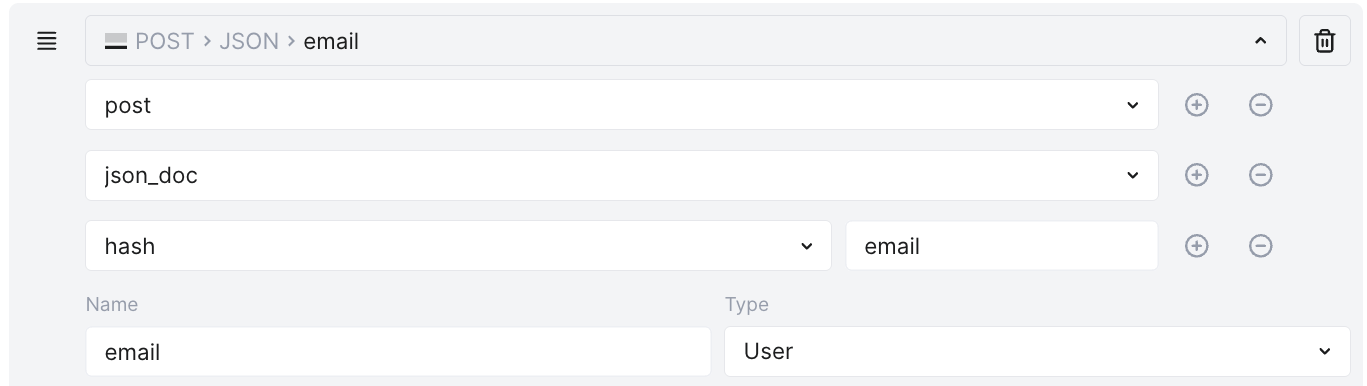
Getting the email parameter from the request body:
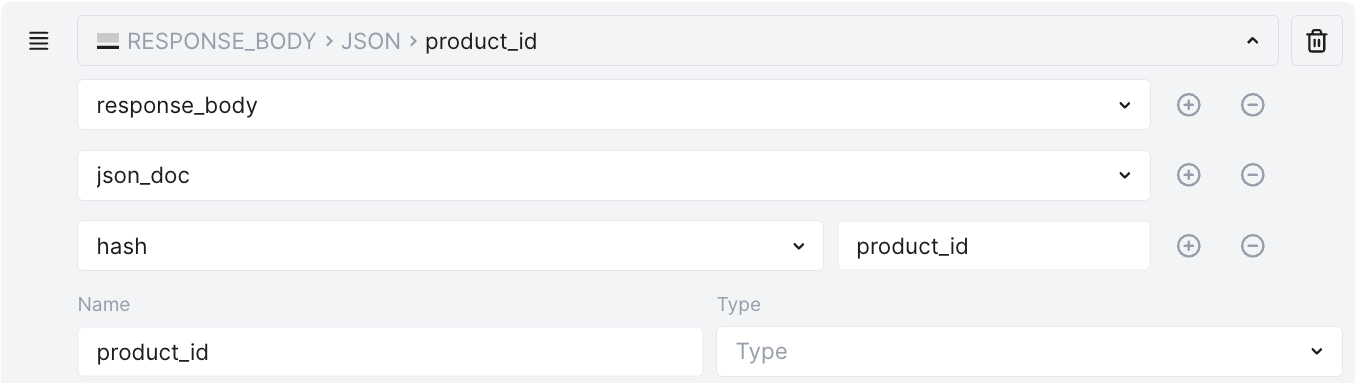
Getting the product_id parameter form the response body:
Getting JWT token from the request header:

Simplified selection
In API Sessions, selecting parameters is simplified compared to how they are selected in Rules:
-
You always start with selecting
RequestorResponse -
Instead of the
posttag to mark body, you directly selectBody -
Instead of
hushtag for values (as opposite to arrays), you selectProperty -
API Sessions provide "live" request preview to the right structure you specified
For example, what in Rules would be:

...in API Sessions will be:
Simplest selection
While adding context parameters manually is truly simple, there is even more efficient and simple way to add context parameters - adding them from API Discovery:
-
Act the same way as for adding grouping key.
-
Remove Group session by this key option. Now it is not a grouping key - just another parameter to be displayed within API Sessions - context parameter.
-
Remove Export as hashed option to see values.
-
Save changes.
In this scenario, you do not to think or care about specifying path to your parameter - Wallarm will do that path for you automatically. This is also a good way to learn how to form these paths - try adding some parameters and check automatically created paths.
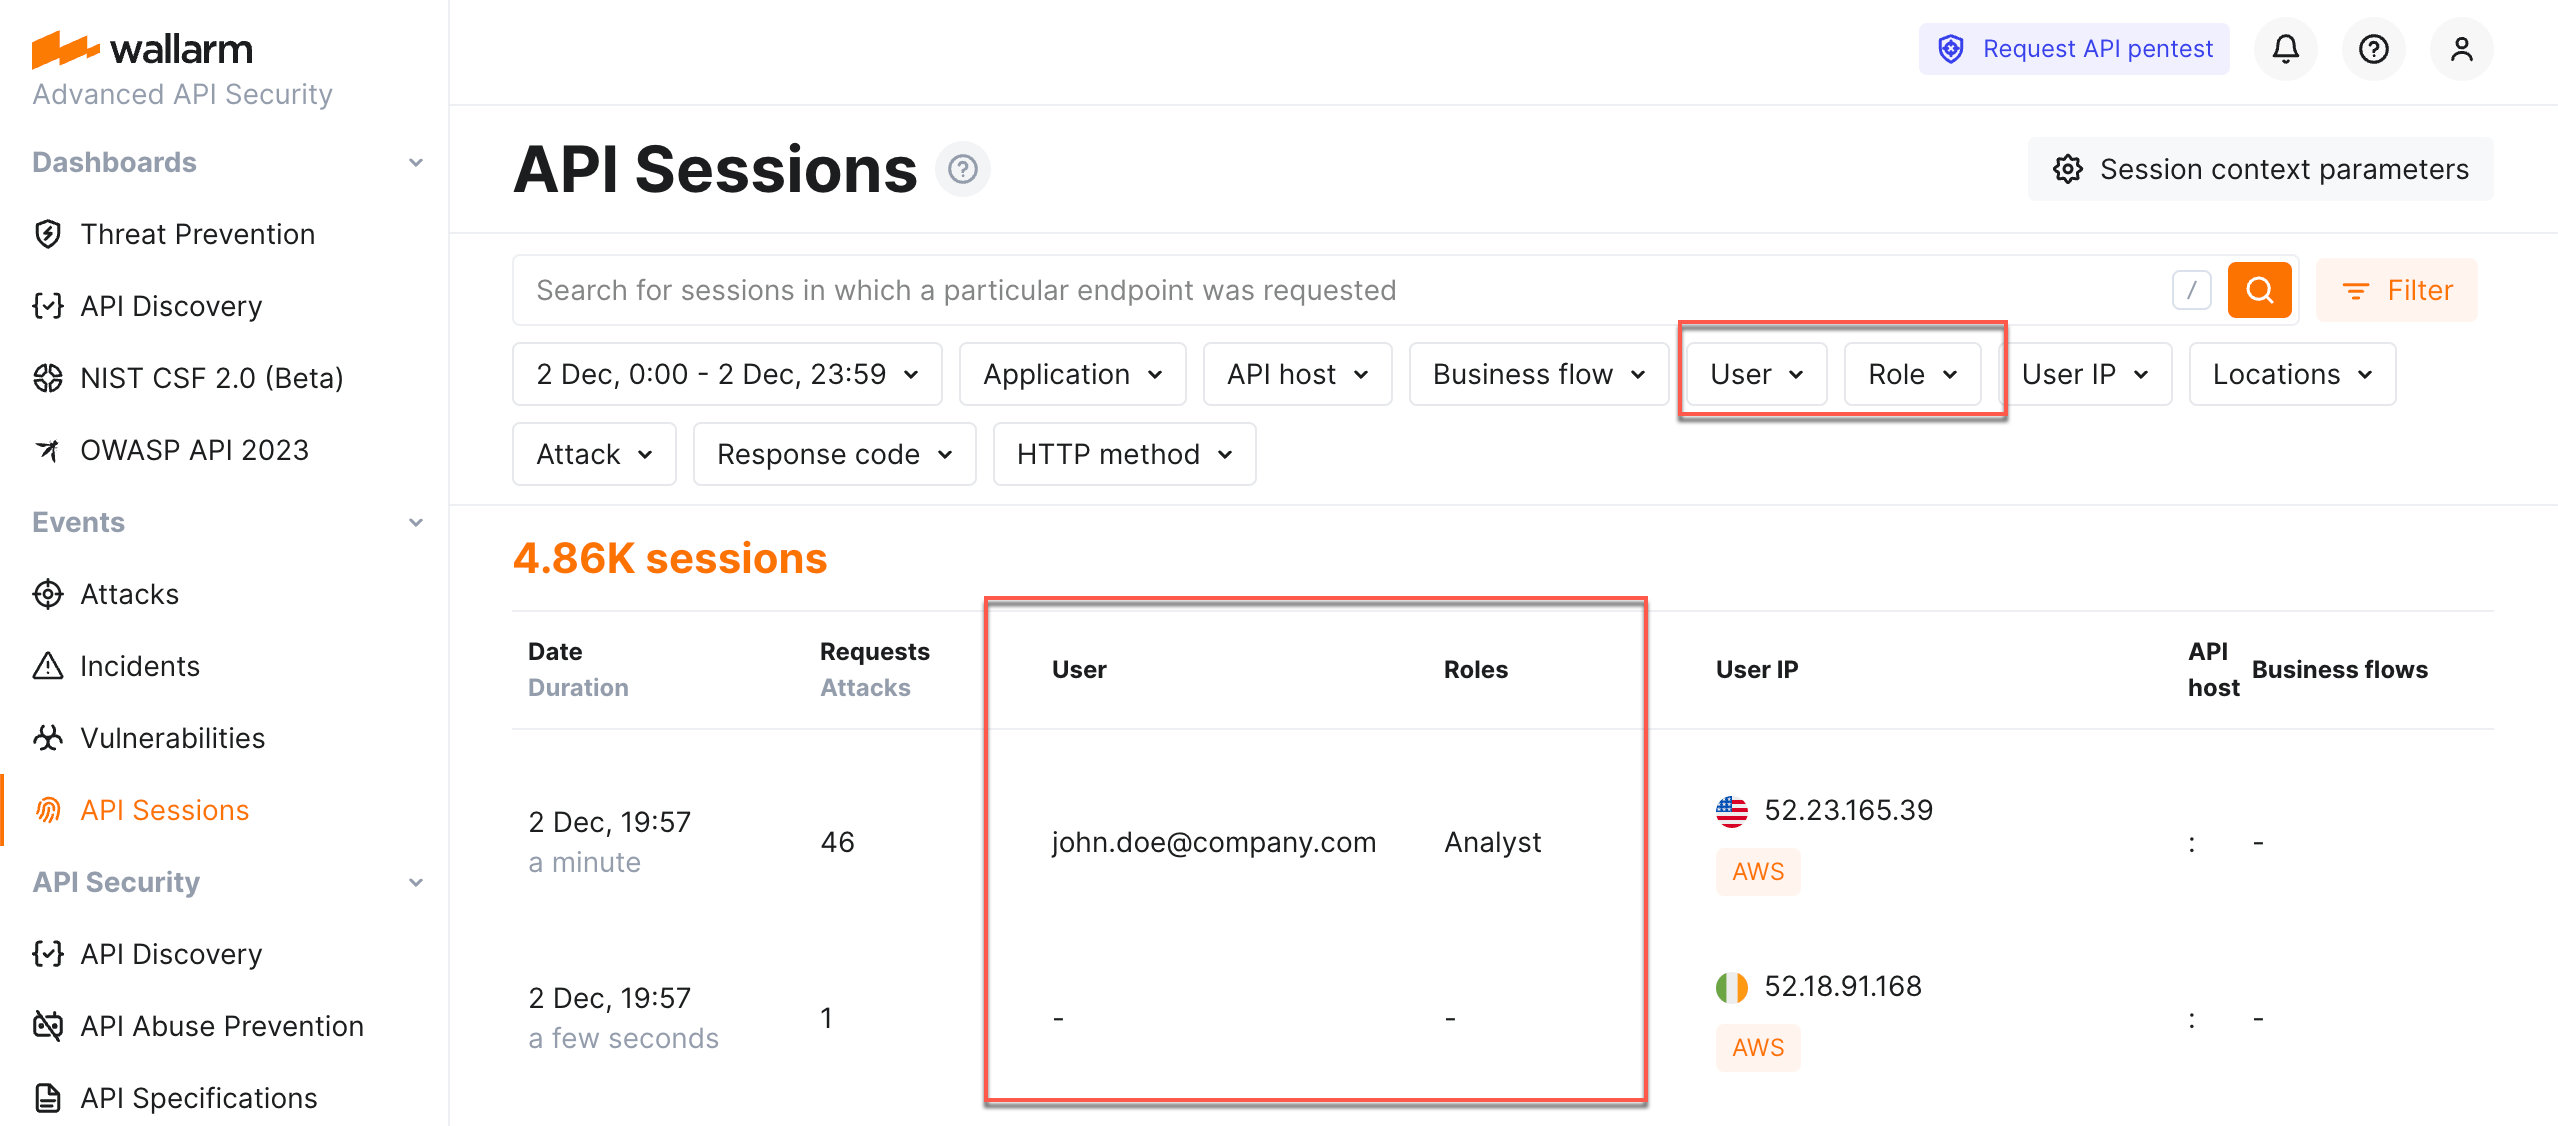
Users and roles
You can highlight session parameters, that should be used for naming the session user and its role. To do so, in Wallarm Console → API Sessions → Session context parameters, add your parameter, then from Type, select User or Role.

Once you configured parameters to be used for user and his/her role identification, these parameters are started to be filled for the sessions. You can filter sessions by users and roles.
Mitigation controls
Mitigation controls are capable of adding more parameters to session context, for example, the BOLA protection mitigation control may want to use the object_id parameter as tracked for enumeration or as filter for scope; if such parameter is not added in API Sessions → Session context parameters, it can be added directly in mitigation control configuration: in API Session, it will be added hidden, meaning you will see these parameters in session details if they are presented in requests, but you will not see them in Session context parameters configuration.
Hidden parameters do not take anything from 20 parameter quota. Parameters are hidden to avoid their deletion as such deletion can lead to ceasing protection provided by mitigation control.
Enabling JA3 fingerprinting
It is recommended to enable JA3 fingerprinting for better identification of the unauthenticated traffic.
Data protection
For API Sessions, from node to the Cloud, Wallarm only exports parameters selected by you. If they contain sensitive data, be sure to hash it before exporting. Note that hashing will transform the actual value into unreadable - the presence of parameter and particular but unknown value will provide the limited information for the analysis.
To hash the sensitive parameters, once they are added in Wallarm Console → API Sessions → Session context parameters, select the Hashing (secret) option for them.
Wallarm hashes the selected parameters before export.
Analyzed traffic
API Sessions analyze all traffic that Wallarm node is enabled to secure to organize it into sessions. You can contact the Wallarm support team to request limiting analysis to the selected applications/hosts.
Storage period
The API Sessions section stores and displays sessions for the last week. The older sessions are deleted to provide an optimal performance and resource consumption.