| Control |
Specifics |
Enumerates |
Attack |
| Brute force protection |
Counts the number of unique values seen for each parameter within a specified timeframe. |
password |
Brute force |
| BOLA protection |
object ID, user ID |
BOLA |
| Enumeration attack protection |
Any parameter |
Enum |
| Forced browsing protection |
Counts the number of unique endpoints accessed in a configured timeframe. |
URLs |
Forced browsing |
Thus:
* If you want to prevent enumeration of your non-public URLs, use the **Forced browsing protection** control.
* To prevent enumeration of any parameters you can use the **Enumeration attack protection** control (this is all-in-one solution).
* If you want to specifically highlight the attempts to get valid passwords by trying variants, use the **Brute force protection** control.
* If you want to specifically highlight the attempts to enumerate valid user or object ID - the **BOLA protection** control.
!!! info "Predecessors"
Mitigation controls are sophisticated tools available in the [Advanced API Security](https://docs.wallarm.com/about-wallarm/subscription-plans.md#core-subscription-plans) subscription. In [Cloud Native WAAP](https://docs.wallarm.com/about-wallarm/subscription-plans.md#core-subscription-plans) subscription, [brute force protection](https://docs.wallarm.com/admin-en/configuration-guides/protecting-against-bruteforce.md), [forced browsing protection](https://docs.wallarm.com/admin-en/configuration-guides/protecting-against-forcedbrowsing.md), and [BOLA protection](https://docs.wallarm.com/admin-en/configuration-guides/protecting-against-bola-trigger.md) is configured with triggers.
## Default protection
Wallarm provides [default](https://docs.wallarm.com/about-wallarm/mitigation-controls-overview.md#default-controls) mitigation controls for enumeration protection. You can duplicate or edit default controls or disable them.
!!! info "Subject to change"
The list of default mitigation controls is subject to change:
* New controls may be introduced over time.
* If a mitigation control is disabled, Wallarm may still update its parameters to improve quality and performance.
### Brute force
**Brute force protection** [default](#default-protection) mitigation controls provide generic configuration to detect attempts of enumeration of passwords, OTPs, and authentication codes and enabled for all traffic in the `Monitoring` [mode](https://docs.wallarm.com/about-wallarm/mitigation-controls-overview.md#mitigation-mode).
To review brute force default controls, in Wallarm Console → **Security Controls** → **Mitigation Controls**, in **Brute force protection** section check controls with the `Default` label.
Editing allows you to customize a default control based on the specific needs of the application, traffic patterns, or business context. For example, you can adjust thresholds.
### BOLA
**BOLA protection** [default](#default-protection) mitigation controls provide generic configuration to detect attempts of enumeration of user IDs, object IDs, and filenames, and enabled for all traffic in the `Monitoring` [mode](https://docs.wallarm.com/about-wallarm/mitigation-controls-overview.md#mitigation-mode).
To review BOLA default controls, in Wallarm Console → **Security Controls** → **Mitigation Controls**, in **BOLA protection** section check controls with the `Default` label.
Editing allows you to customize a default control based on the specific needs of the application, traffic patterns, or business context. For example, you can adjust thresholds or parameters tracked for enumeration.
### Generic enumeration
**Enumeration attack protection** [default](#default-protection) mitigation controls provide generic configuration to detect attempts of enumeration:
* User/email enumeration
* SSRF (Server-Side Request Forgery) enumeration
* User-agent rotation
It is enabled for all traffic in the `Monitoring` [mode](https://docs.wallarm.com/about-wallarm/mitigation-controls-overview.md#mitigation-mode).
To review generic enumeration default controls, in Wallarm Console → **Security Controls** → **Mitigation Controls**, in **Enumeration attack protection** section check controls with the `Default` label.
Editing allows you to customize a default control based on the specific needs of the application, traffic patterns, or business context. For example, you can adjust thresholds or parameters tracked for enumeration.
### Forced browsing
**Forced browsing protection** [default](#default-protection) mitigation controls provide generic configuration to detect attempts of enumeration of your non-public URLs, and enabled for all traffic in the `Monitoring` [mode](https://docs.wallarm.com/about-wallarm/mitigation-controls-overview.md#mitigation-mode).
To review forced browsing default controls, in Wallarm Console → **Security Controls** → **Mitigation Controls**, in **Forced browsing protection** section check controls with the `Default` label.
Editing allows you to customize a default control based on the specific needs of the application, traffic patterns, or business context. For example, you can adjust thresholds or **Scope**.
## Creating and applying mitigation control
To create and apply a new mitigation control:
1. Proceed to Wallarm Console → **Mitigation Controls**.
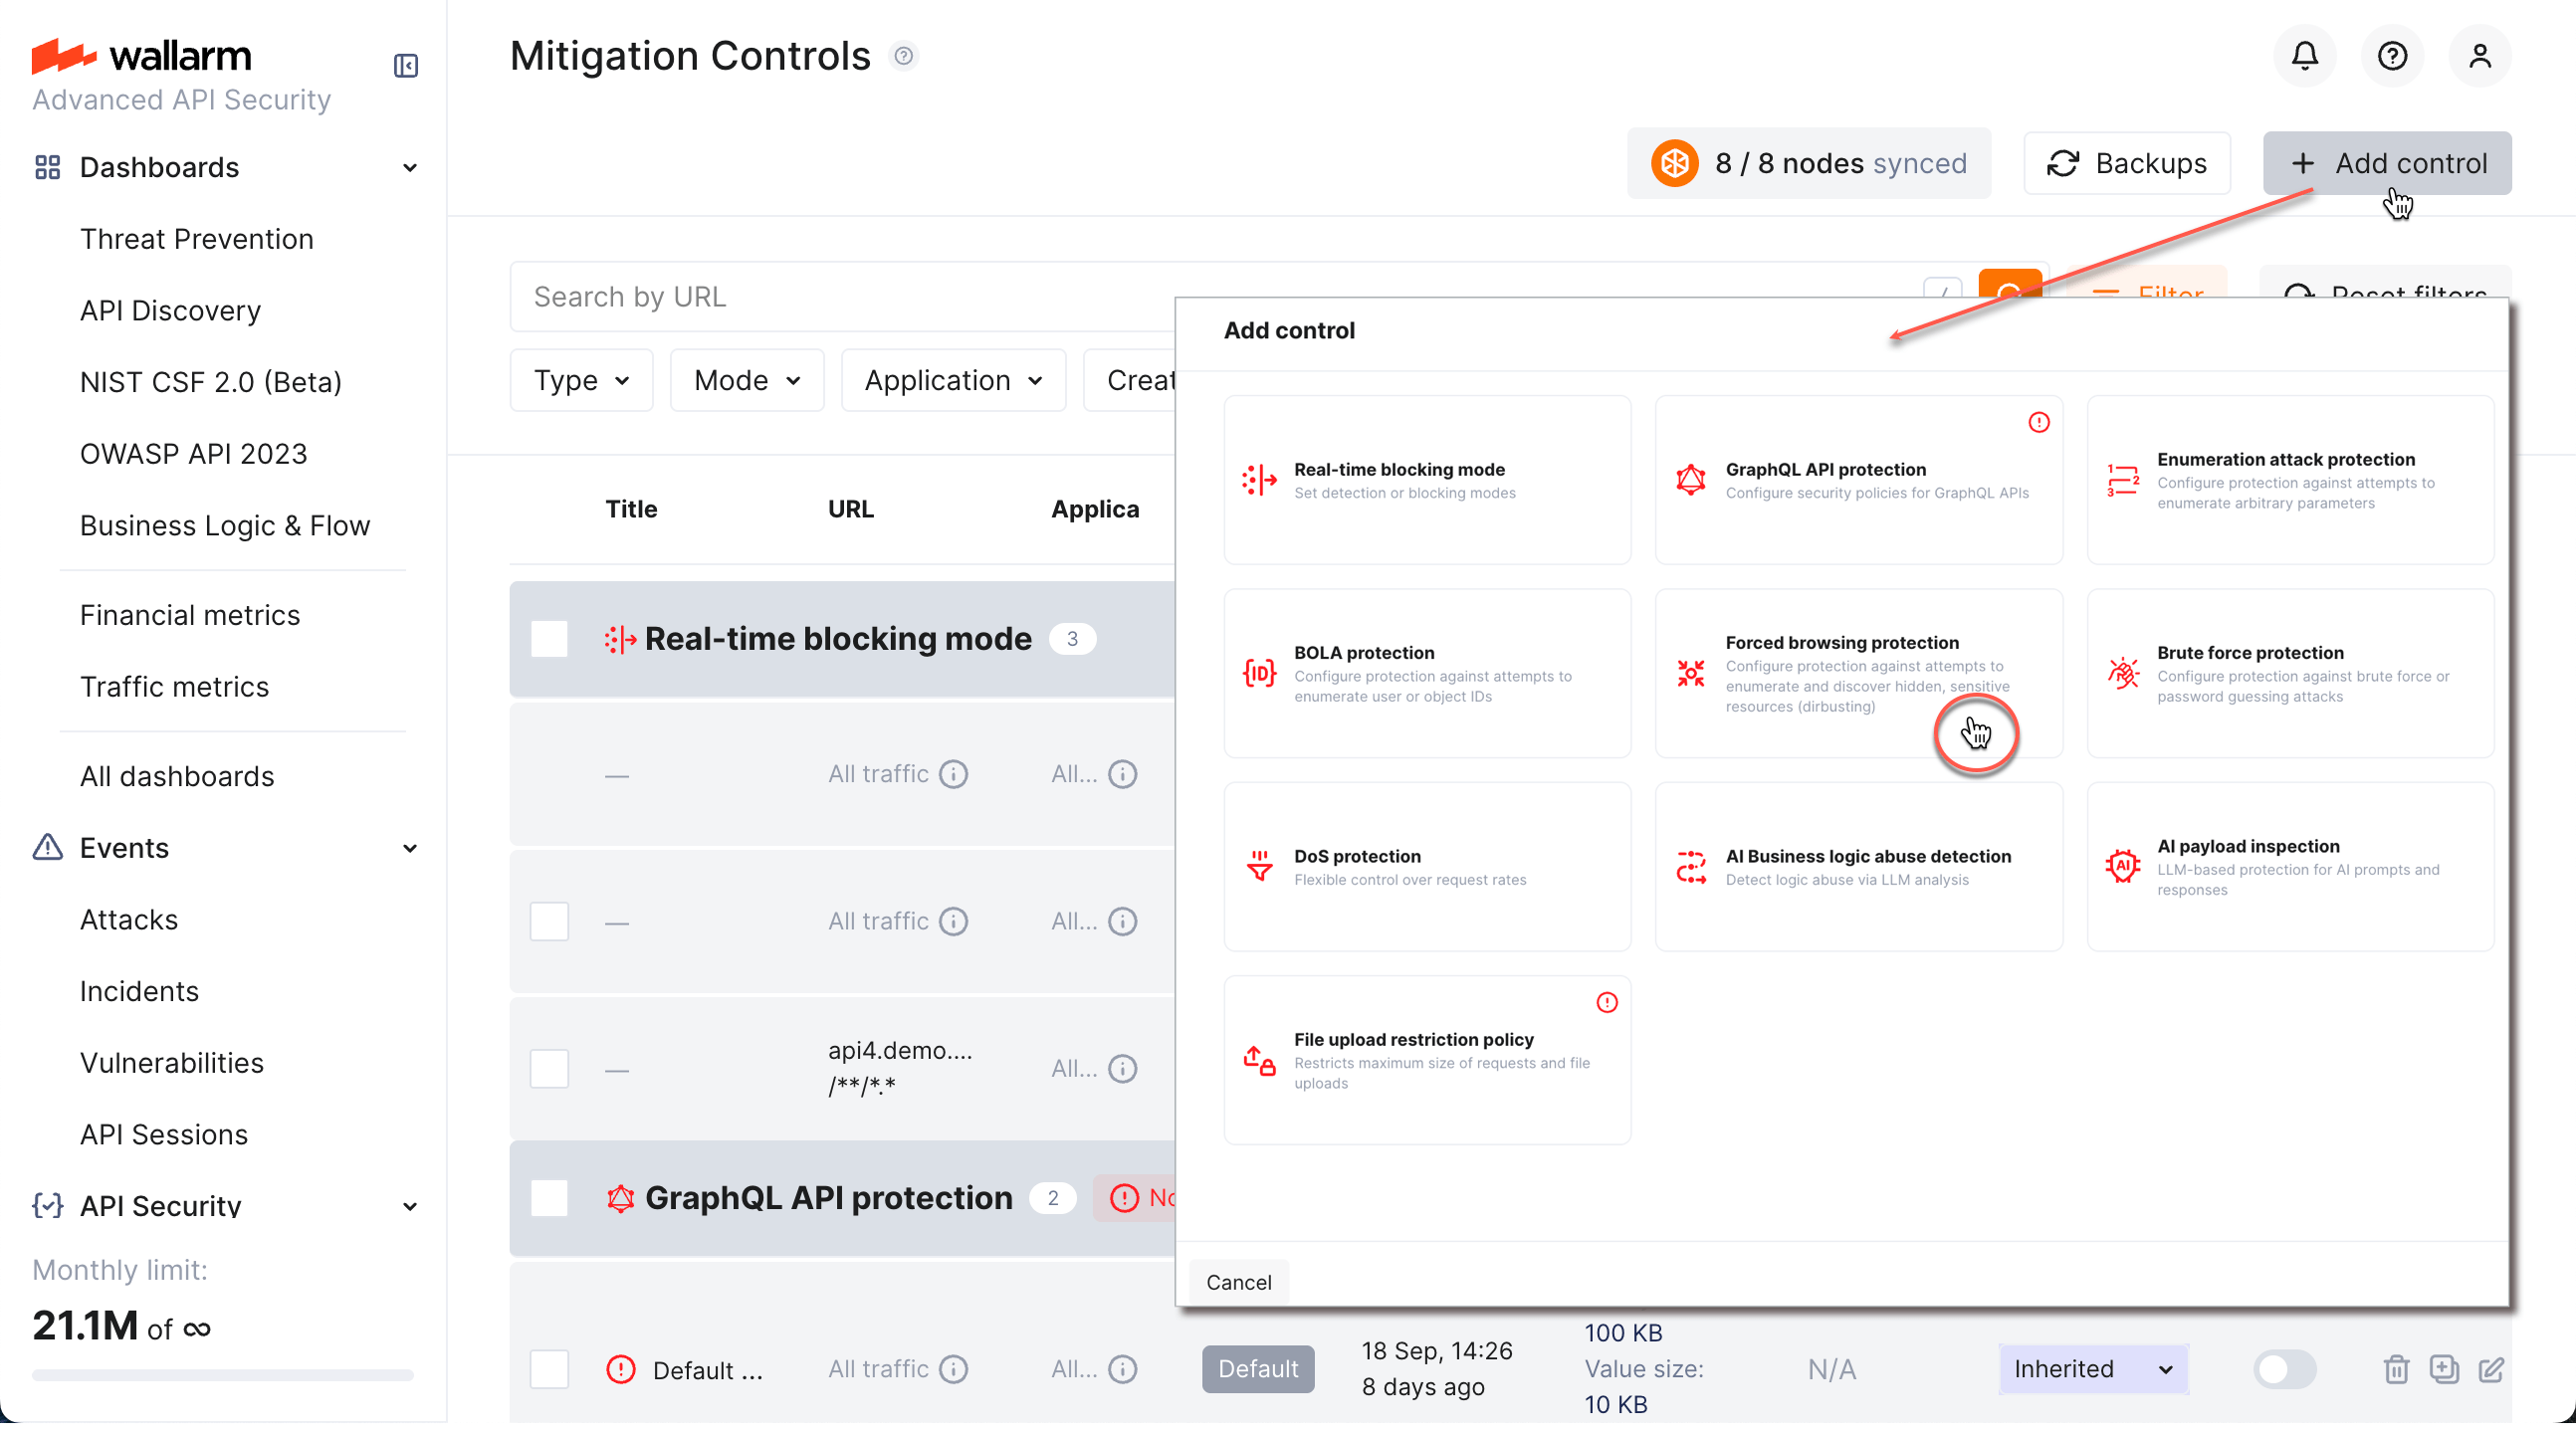
1. Click **Add control**.
1. In the **Add control** dialog, select the type of enumeration control you want to create:
* **Brute force protection**
* **BOLA protection**
* **Forced browsing protection**
* Generic **Enumeration attack protection**
1. [Configure](#configuration) your control.
1. Click **Add**. The created control is displayed in the list. It immediately goes into action and performs in accordance with the selected **Mitigation mode**.
You can temporarily turn off the control right after creation or at any moment later using the **On/Off** switcher.
## Configuration
Configure enumeration protection fulfilling the following steps:
* Define **Scope** to apply control to (endpoints, only specific requests).
* Select **Enumerated parameters** - ones to be tracked for enumeration attempts.
* Set **Enumeration threshold** - control will act if threshold is exceeded.
* If scope does not cover all your needs, set **Scope filters**.
* Set action in **Mitigation mode**.
Note that you can use [regular expressions](#regular-expressions) to set scope and advanced conditions and select parameters tracked for enumeration.
### Scope
**Scope** defines which requests the control applies to (based on URI and other parameters). It’s configured the same way as request conditions in rules. See details [here](https://docs.wallarm.com/user-guides/rules/rules.md#configuring).
If you leave the **Scope** section blank, mitigation control is applied to **all traffic** and **all applications**; such controls are inherited by all [branches](https://docs.wallarm.com/about-wallarm/mitigation-controls-overview.md#mitigation-control-branches).
### Scope filters
If [Scope](#scope) does not cover all your needs, you can define other conditions that requests must meet to be covered by the protection mechanism.
As conditions, you can use values or value patters of:
* Built-in parameters of requests - elements of meta information presented in each request handled by Wallarm filtering node.
* **Session context parameters** - quickly select parameters from the list of ones, that were [defined as important](https://docs.wallarm.com/api-sessions/setup.md#session-context) in **API Sessions**. Use the **Add custom** option in this section to add as filters the parameters that are currently not presented in **API Sessions**. If you do so, these parameters will be added to **API Sessions**' context parameters as well (hidden, meaning you will see these parameters in session details if they are presented in requests, but you will not see them in API Session [context parameter configuration](https://docs.wallarm.com/api-sessions/setup.md#session-context)).
!!! info "Performance note"
As **Scope** settings are less demanding from the productivity perspective, it is always recommended to use them if it is enough for your goals, and only use **Scope filters** for the complex conditioning.
**Example: scope filters usage logic**
Let's say you want to provide protection from brute force for all your resources and wherever the requests origin from, but `1.1.1.1` origin IP should be excluded from this protection (it is your testing bot):
1. Does **Scope** allow controlling origin IPs? No, it is about **target** of requests → expand and check **Scope filters**.
1. In **Scope filters**, find the **IP** condition, select `!=` (not equal) operator and set value to `1.1.1.1`.
1. The control will work for everything except `1.1.1.1` origin IP.
### Enumerated parameters
In the **Enumerated parameters** section, you need to select parameters that will be monitored for enumeration. Select set of parameters to be monitored via exact or or [regex](#regular-expressions) match (only one approach can be used within single mitigation control).
For exact match, you can use the **Add custom** option to add as tracked for enumeration the parameters that are currently [not presented](https://docs.wallarm.com/api-sessions/setup.md#session-context) in **API Sessions**. If you do so, these parameters will be added to **API Sessions**' context parameters as well (hidden, meaning you will see these parameters in session details if they are presented in requests, but you will not see them in API Session [context parameter configuration](https://docs.wallarm.com/api-sessions/setup.md#session-context)).
If for regex you specify both **Filter by parameter name** and **Filter by parameter value**, they combine (`AND` operator), for example `(?i)id` for name and `\d*` for value will catch the `userId` parameter but only count requests having combination of digits as a parameter values.
When some request meets [scope](#scope) and [advanced filters](#scope-filters) and **contains** unique value for the parameter monitored for enumeration, this parameter's counter gets `+1`.
### Enumeration threshold
**Brute force, BOLA and generic enumeration protection**
These kinds of protection count the number of unique values seen for each [enumerated parameter](#enumerated-parameters) within a specified timeframe. Each parameter listed in the **Enumerated parameters** section is tracked independently.
Once threshold is reached by any of parameters, Wallarm performs action in accordance with the [Mitigation mode](#mitigation-mode).
**Forced browsing protection**
This protection counts the number of unique endpoints accessed in a configured timeframe (in seconds). Once threshold is reached, Wallarm performs action in accordance with the [Mitigation mode](#mitigation-mode).
### Mitigation mode
When any of the counters exceeds the threshold, the selected action is performed:
* **Monitoring** - the attack is registered, requests that are the part of this attack are marked in [API Sessions](https://docs.wallarm.com/api-sessions/overview.md) as belonging to `Brute force`, `Forced browsing`, `BOLA` or generic `Enum` attack but the requests are not blocked.
* **Blocking** → **Block IP address** - the attack is registered, requests that are the part of this attack are marked in API Sessions as belonging to this attack, all source IPs of these requests are placed into [IP Denylist](https://docs.wallarm.com/user-guides/ip-lists/overview.md) for the selected period of time.
* **Blocking** → **Block session** - the attack is registered, the session that requests belong to is placed into [Session Denylist](https://docs.wallarm.com/api-sessions/blocking.md#blocking-sessions) for the selected period of time.
### Regular expressions
The **Scope** section uses [PIRE](https://docs.wallarm.com/user-guides/rules/rules.md#condition-type-regex) regular expression library, while advanced conditions use [PCRE](https://www.pcre.org/). Use the following operators to involve regular expression:
| Operator | Description |
| --- | --- |
| ~ (Aa) | Find something by case insensitive regexp. |
| !~ (Aa) | Exclude something by case insensitive regexp. |
| ~ | Find something by case sensitive regexp. |
| !~ | Exclude something by case sensitive regexp. |
## Example
Let us say your e-commerce `E-APPC` application stores information about each user's orders under `/users/*/orders`. You want to prevent malicious actors from getting the list of IDs of that orders. Such list can be obtained via a script trying different combinations of digits. To prevent this, for routes storing orders under each user account, you can set a counter `more than 2 unique values` `in minute` - if exceeded, the activity should be marked as attempt to enumerate object's (user order's) IDs (BOLA attack) and source IP should be blocked for 1 hour.
To achieve that, configure the **BOLA protection** mitigation control as displayed on the screenshot:
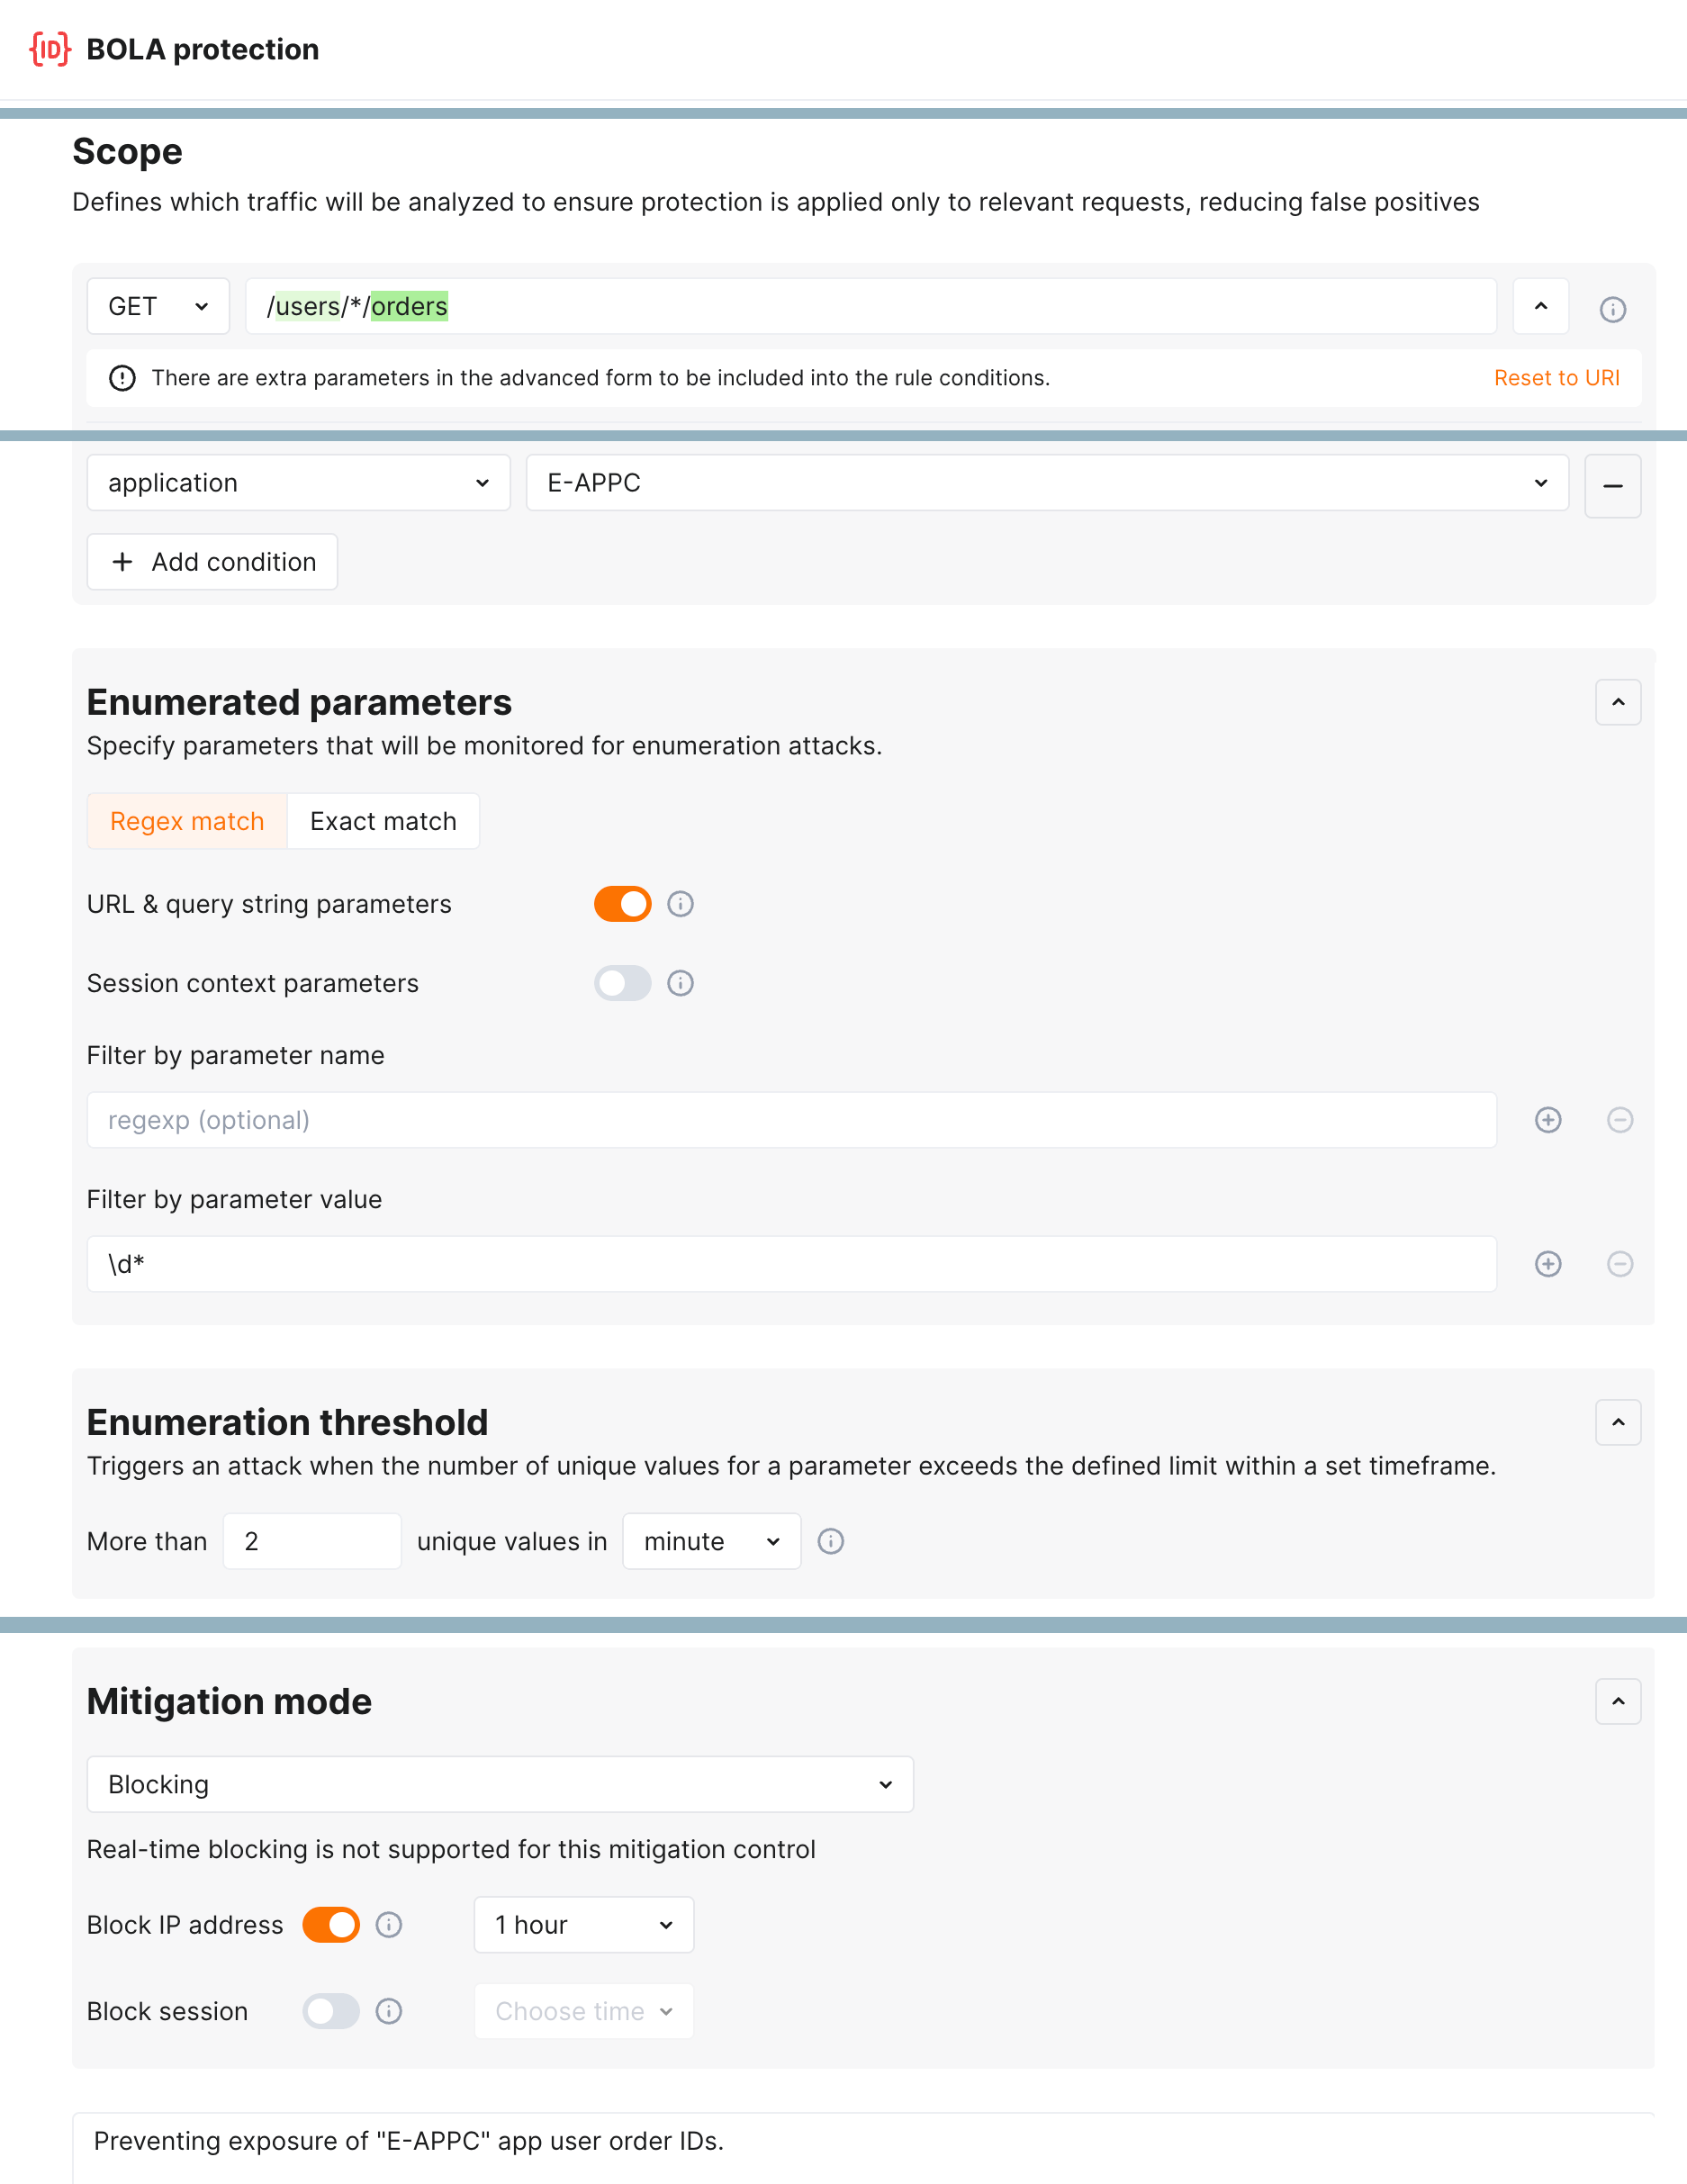
In this example, the `\d*` regex in parameter values stands for `zero or more digits` - the attempt to enumerate object ID composed of digits.
## Viewing detected attacks
When enumeration attacks are detected or blocked in accordance with the [mitigation mode](#mitigation-mode), they are displayed in the [API Sessions](https://docs.wallarm.com/api-sessions/exploring.md) section:
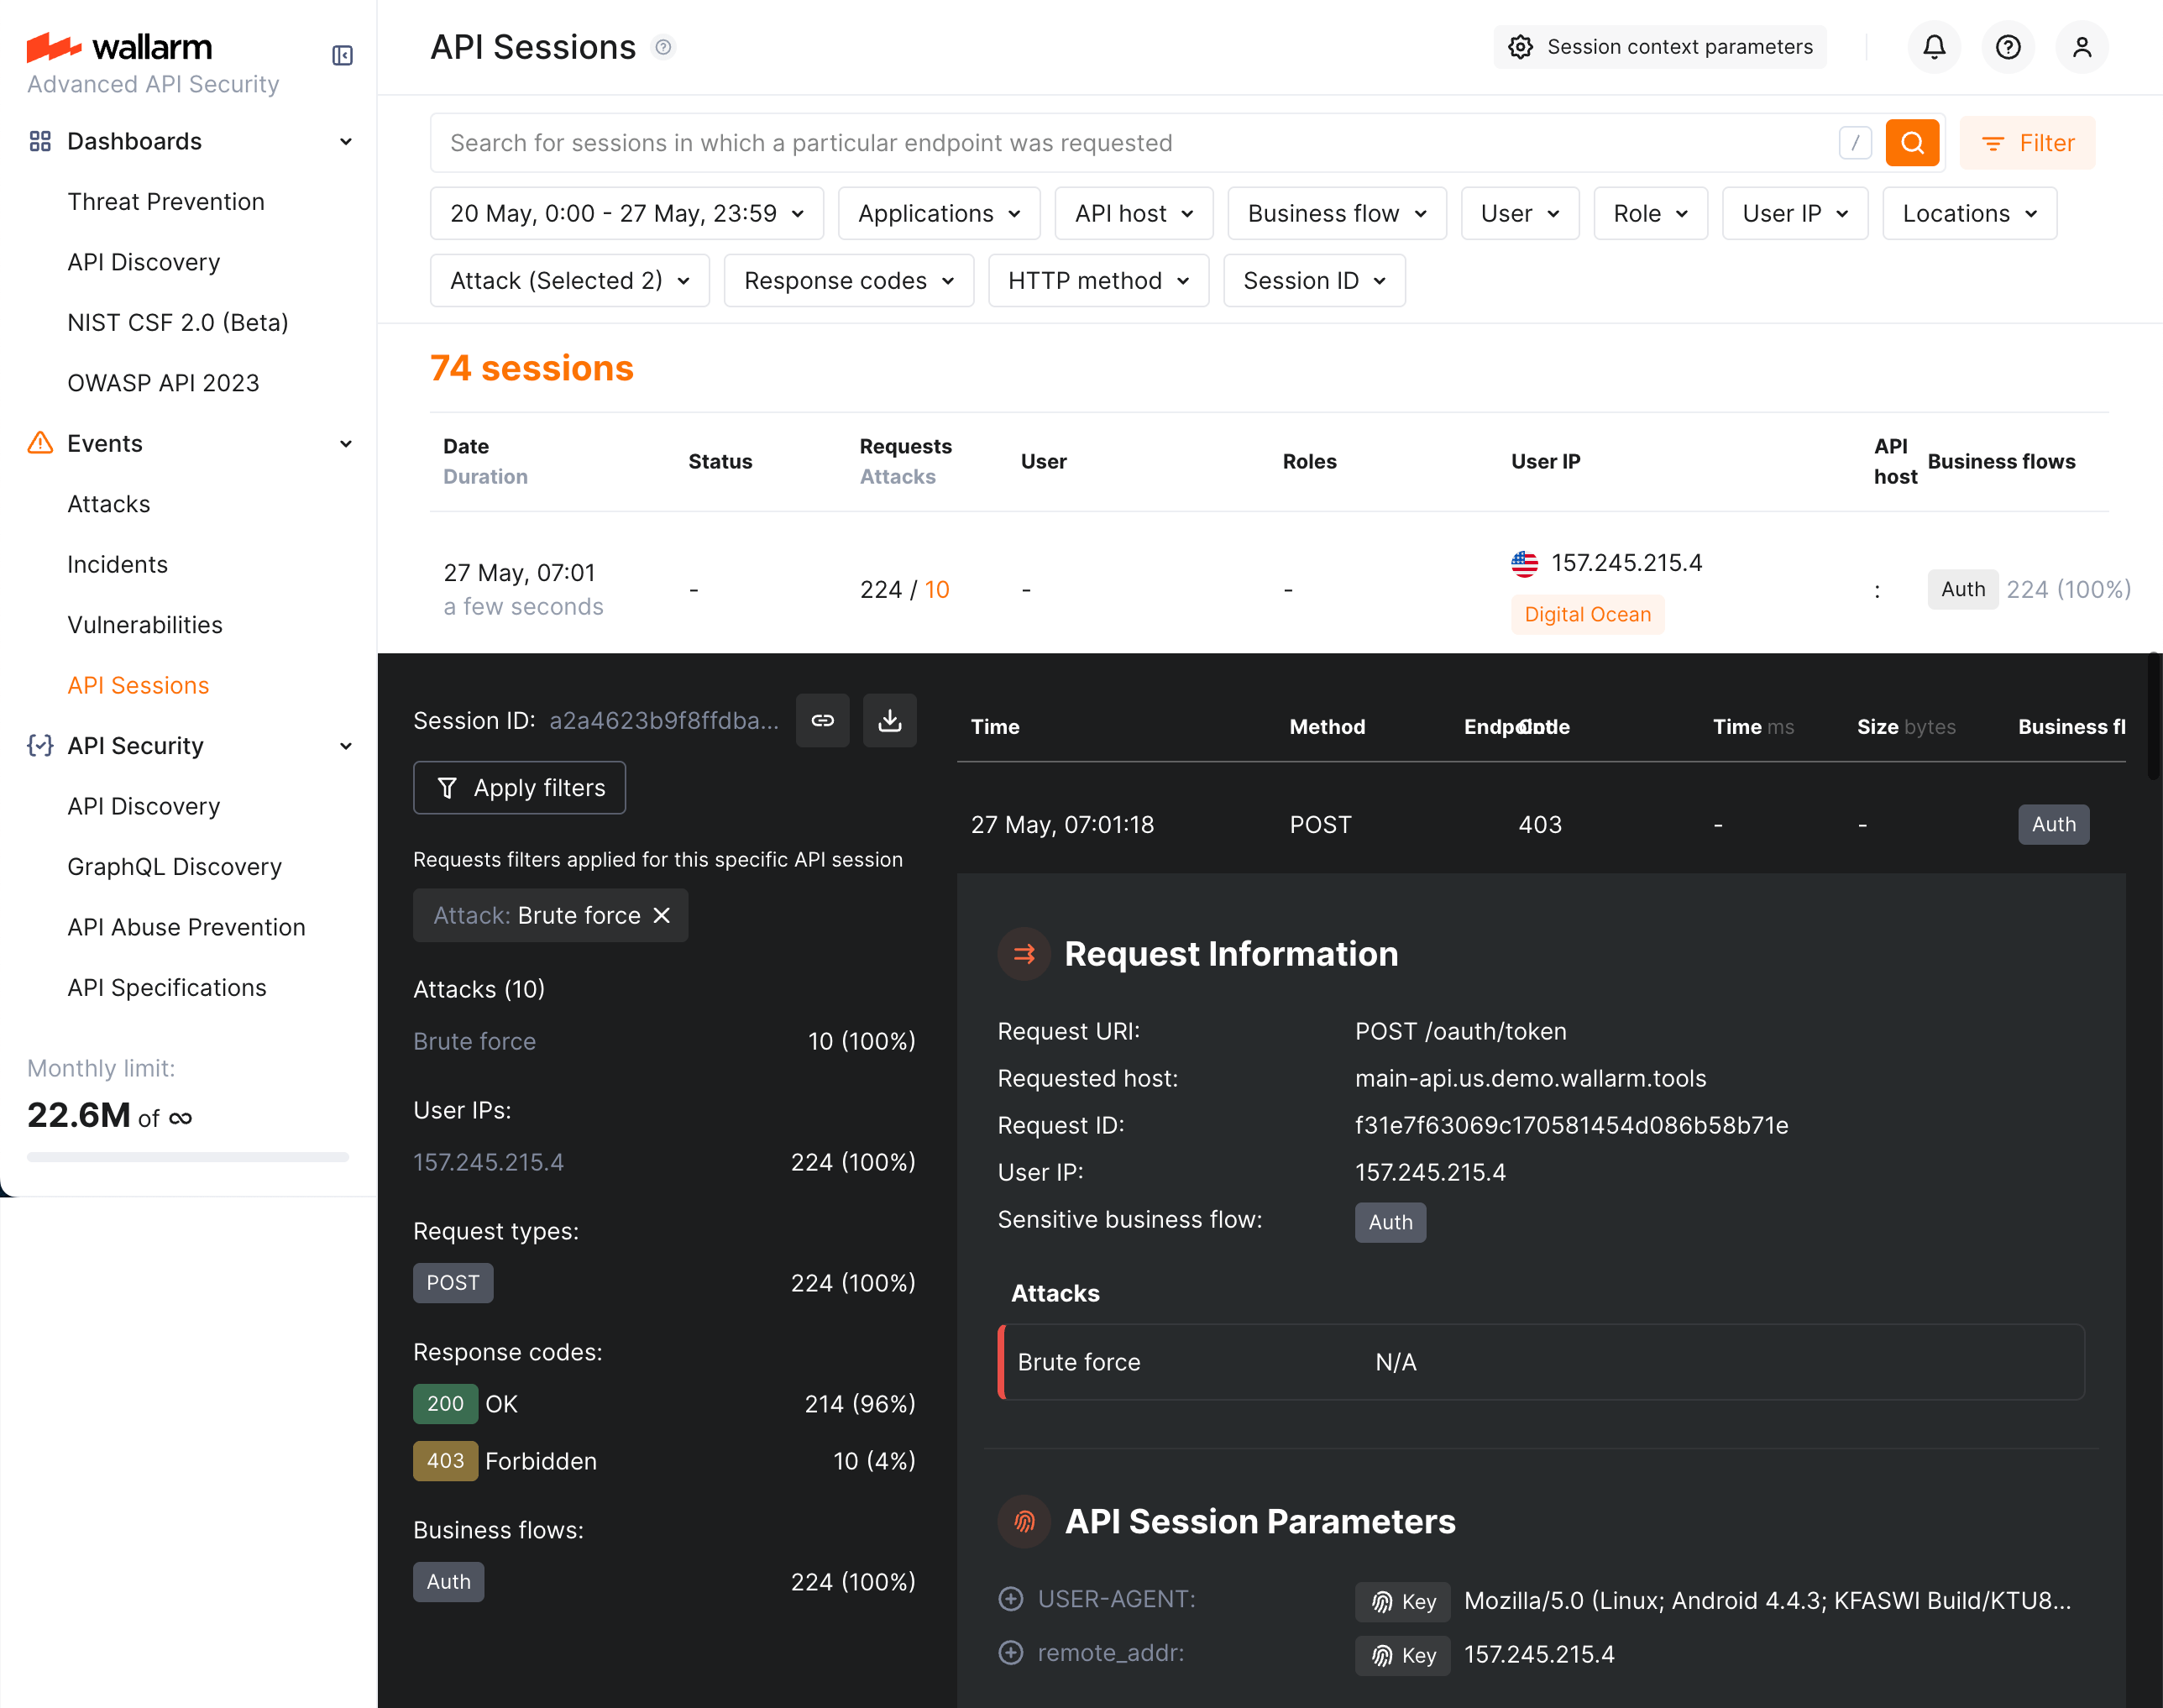
You can find sessions with corresponding attack types using the **Attack** filter; also, if necessary, filter inside session details to see only requests related to the enumeration attack.
Note that enumeration mitigation controls described in this article base their traffic analysis and corresponding actions entirely on [API sessions](https://docs.wallarm.com/api-sessions/overview.md) which significantly improve their work: if previously you had several nodes and, for example, a brute force [rule](https://docs.wallarm.com/user-guides/rules/rules.md), your network load balancer could separate attack requests into different nodes and for each node the brute force counter worked separately. This could lead to missing some brute force attacks. The improved approach of mitigation control in this example is that it relies on session, no matter which node the traffic went through.
Because of that, the attacks found by these mitigation controls are displayed exclusively in the **API Sessions** section (and not displayed in the [**Attacks**](https://docs.wallarm.com/user-guides/events/check-attack.md) section).
