Skip to content

Upgrading Wallarm NGINX modules

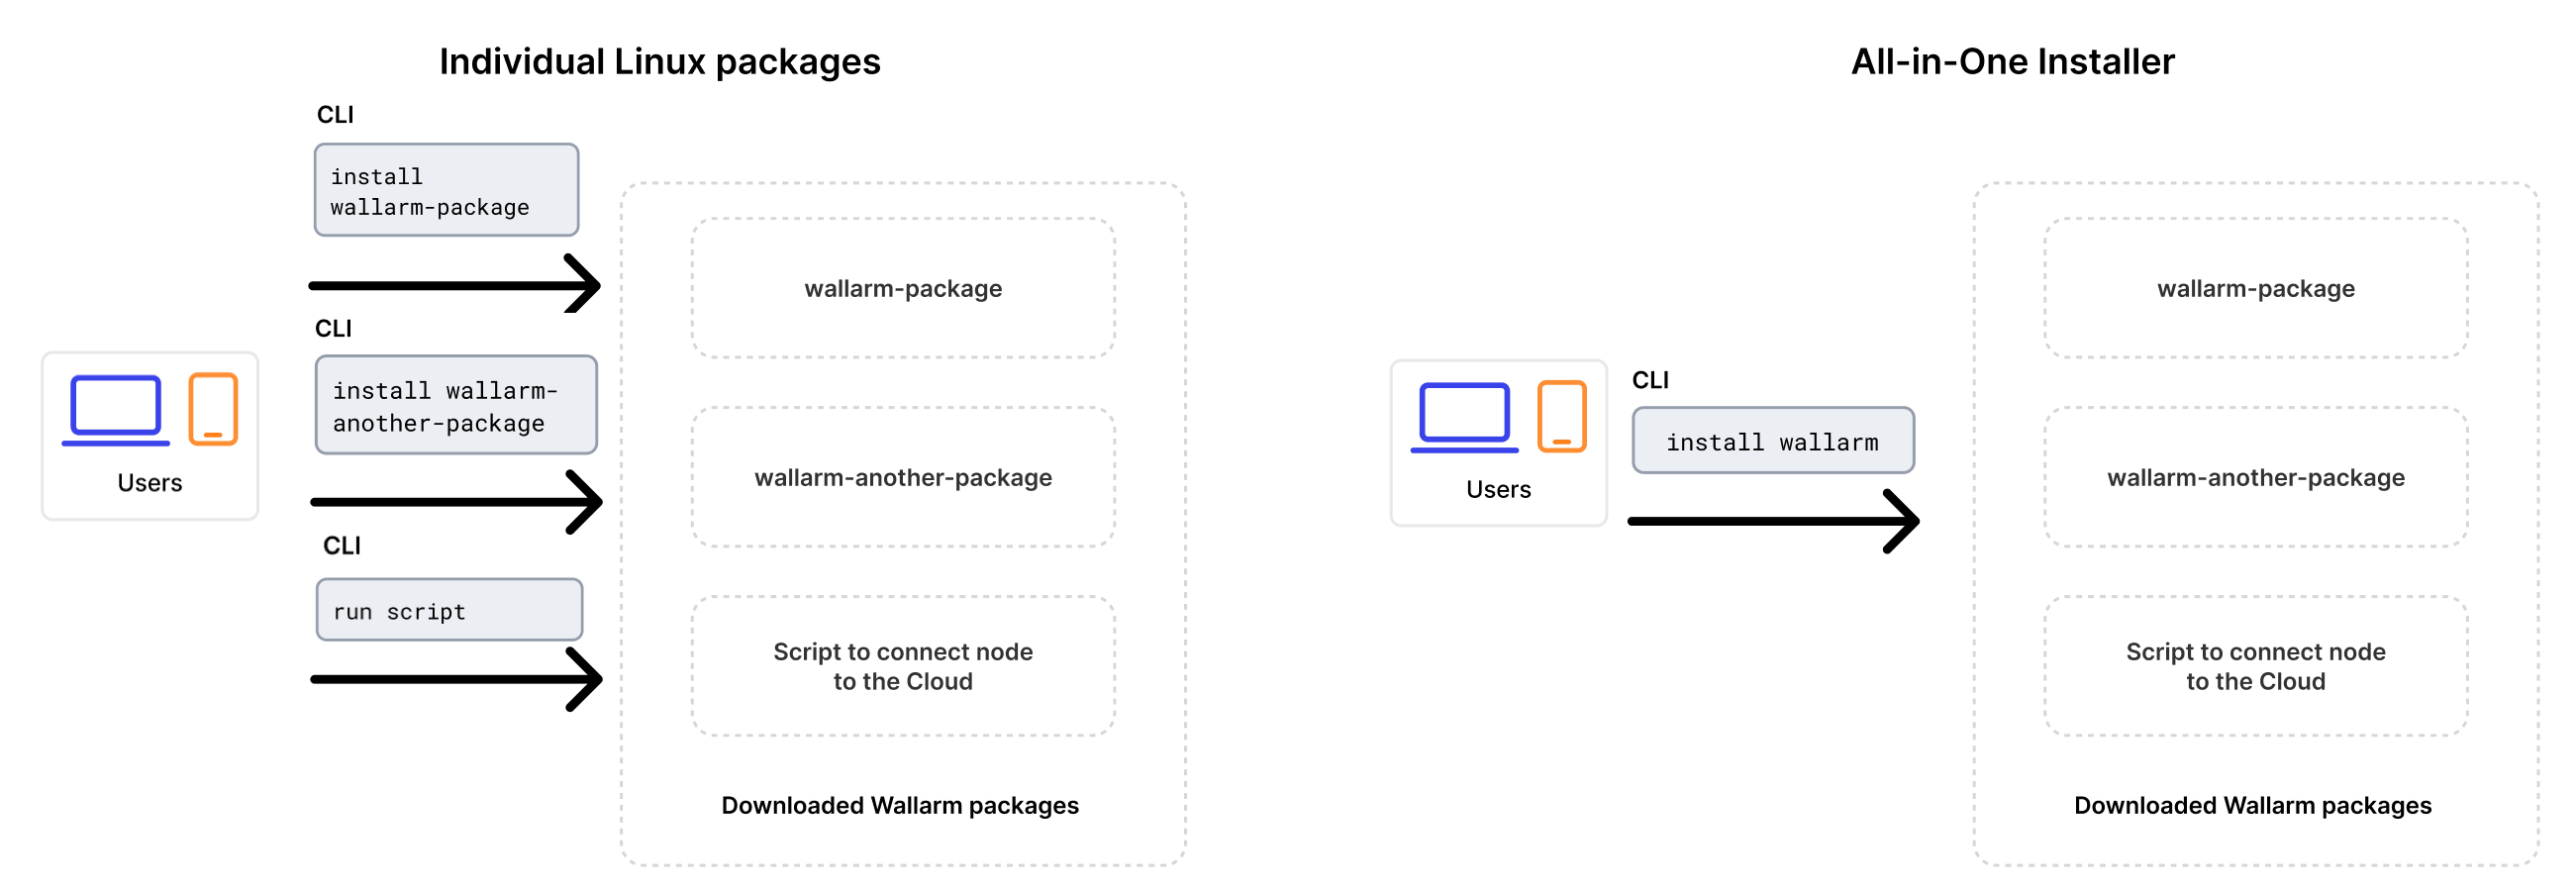
These instructions describe the steps to upgrade the Wallarm NGINX modules 4.x installed from the individual packages to version 4.10. These are the modules installed in accordance with one of the following instructions:

To upgrade the end‑of‑life node (3.6 or lower), please use the different instructions.

Upgrade methods

You can upgrade in two different ways:

  • Migrate to the all-in-one installer usage during the upgrade procedure. This is the recommended approach as it automates various node installation and upgrade activities, such as NGINX and OS version identification, adding appropriate Wallarm repositories, installing packages, and others.

  • Keep using the current manual installation method via individual DEB/RPM packages. However, it's important to note that in further upgrades this approach will require additional effort and manual configuration in comparison to the new method.

Upgrade with all-in-one installer

Use the procedure below to upgrade the Wallarm NGINX modules 4.x to version 4.10 using all-in-one installer.

Requirements for upgrade using all-in-one installer

  • Access to the account with the Administrator role in Wallarm Console for the US Cloud or EU Cloud.

  • Access to https://meganode.wallarm.com to download all-in-one Wallarm installer. Ensure the access is not blocked by a firewall.

  • Access to https://us1.api.wallarm.com for working with US Wallarm Cloud or to https://api.wallarm.com for working with EU Wallarm Cloud. If access can be configured only via the proxy server, then use the instructions.

  • Executing all commands as a superuser (e.g. root).

Upgrade procedure

  • If filtering node and postanalytics modules are installed on the same server, then follow the instructions below to upgrade all.

    You will need to run a node of the newer version using all-in-one installer on a clean machine, test that it works well and stop the previous one and configure traffic to flow through the new machine instead of the previous one.

  • If filtering node and postanalytics modules are installed on different servers, first upgrade the postanalytics module and then the filtering module following these instructions.

Step 1: Prepare clean machine

When upgrading modules 4.x with all-in-one installer, you cannot upgrade an old package installation - instead you need to use a clean machine. Thus, as step 1, prepare a machine with one of the supported OS:

  • Debian 10, 11 and 12.x

  • Ubuntu LTS 18.04, 20.04, 22.04

  • CentOS 7, 8 Stream, 9 Stream

  • Alma/Rocky Linux 9

  • RHEL 8.x

  • Oracle Linux 8.x

  • Redos

  • SuSe Linux

  • Others (the list is constantly widening, contact Wallarm support team to check if your OS is in the list)

Using new clean machine will lead to that at some moment you will have both old and new node, which is good: you can test the new one working properly without stopping the old one.

Step 2: Install NGINX and dependencies

Install the latest NGINX version of:

  • NGINX stable - see how to install it in the NGINX documentation.

  • NGINX Mainline - see how to install it in the NGINX documentation.

  • NGINX Plus - see how to install it in the NGINX documentation.

  • Distribution-Provided NGINX - to install, use the following commands:

    sudo apt-get update 
    sudo apt -y install --no-install-recommends nginx
    
    sudo apt update 
    sudo apt -y install --no-install-recommends nginx
    
    sudo yum -y update 
    sudo yum install -y nginx
    
    sudo yum -y update 
    sudo yum install -y nginx
    
    sudo yum -y update 
    sudo yum install -y nginx
    

Step 3: Prepare Wallarm token

To install node, you will need a Wallarm token of the appropriate type. To prepare a token:

  1. Open Wallarm Console → SettingsAPI tokens in the US Cloud or EU Cloud.
  2. Find or create API token with the Deploy source role.
  3. Copy this token.
  1. Open Wallarm Console → Nodes in the US Cloud or EU Cloud.
  2. Do one of the following:
    • Create the node of the Wallarm node type and copy the generated token.
    • Use existing node group - copy token using node's menu → Copy token.

Step 4: Download all-in-one Wallarm installer

Wallarm suggests all-in-one installations for the following processors:

  • x86_64

  • ARM64 (beta)

To download all-in-one Wallarm installation script, execute the command:

curl -O https://meganode.wallarm.com/4.10/wallarm-4.10.4.x86_64-glibc.sh
curl -O https://meganode.wallarm.com/4.10/wallarm-4.10.4.aarch64-glibc.sh

Step 5: Run all-in-one Wallarm installer

Filtering node and postanalytics on the same server

  1. Run downloaded script:

    # If using the x86_64 version:
    sudo env WALLARM_LABELS='group=<GROUP>' sh wallarm-4.10.4.x86_64-glibc.sh
    
    # If using the ARM64 version:
    sudo env WALLARM_LABELS='group=<GROUP>' sh wallarm-4.10.4.aarch64-glibc.sh
    

    The WALLARM_LABELS variable sets group into which the node will be added (used for logical grouping of nodes in the Wallarm Console UI).

    # If using the x86_64 version:
    sudo sh wallarm-4.10.4.x86_64-glibc.sh
    
    # If using the ARM64 version:
    sudo sh wallarm-4.10.4.aarch64-glibc.sh
    
  2. Select US Cloud or EU Cloud.

  3. Enter Wallarm token.

Filtering node and postanalytics on different servers

Sequence of steps to upgrade the filtering node and postanalytics modules

If the filtering node and postanalytics modules are installed on different servers, then it is required to upgrade the postanalytics packages before updating the filtering node packages.

  1. Upgrade postanalytics module following these instructions.

  2. Upgrade filtering node:

    # If using the x86_64 version:
    sudo env WALLARM_LABELS='group=<GROUP>' sh wallarm-4.10.4.x86_64-glibc.sh filtering
    
    # If using the ARM64 version:
    sudo env WALLARM_LABELS='group=<GROUP>' sh wallarm-4.10.4.aarch64-glibc.sh filtering
    

    The WALLARM_LABELS variable sets group into which the node will be added (used for logical grouping of nodes in the Wallarm Console UI).

    # If using the x86_64 version:
    sudo sh wallarm-4.10.4.x86_64-glibc.sh filtering
    
    # If using the ARM64 version:
    sudo sh wallarm-4.10.4.aarch64-glibc.sh filtering
    

Step 6: Transfer NGINX and postanalytics configuration from old node machine to new

Transfer node-related NGINX configuration and postanalytics configuration from the configuration files on the old machine to the files on a new machine. You can do that by copying the required directives.

Source files

On an old machine, depending on OS and NGINX version, the NGINX configuration files may be located in different directories and have different names. Most common are the following:

  • /etc/nginx/conf.d/default.conf with NGINX settings

  • /etc/nginx/conf.d/wallarm-status.conf with Wallarm node monitoring settings. Detailed description is available within the link

Also, the configuration of the postanalytics module (Tarantool database settings) is usually located here:

  • /etc/default/wallarm-tarantool or

  • /etc/sysconfig/wallarm-tarantool

Target files

As all-in-one installer works with different combinations of OS and NGINX versions, on your new machine, the target files may have different names and be located in different directories.

Step 7: Restart NGINX

Restart NGINX using the following command:

sudo systemctl restart nginx

Step 8: Test Wallarm node operation

To test the new node operation:

  1. Send the request with test SQLI and XSS attacks to the protected resource address:

    curl http://localhost/?id='or+1=1--a-<script>prompt(1)</script>'
    
  2. Open the Wallarm Console → Attacks section in the US Cloud or EU Cloud and ensure attacks are displayed in the list.

  3. As soon as your Cloud stored data (rules, IP lists) is synchronized to the new node, perform some test attacks to make sure your rules work as expected.

Step 9: Configure sending traffic to Wallarm node

Depending on the deployment approach being used, perform the following settings:

Update targets of your load balancer to send traffic to the Wallarm instance. For details, please refer to the documentation on your load balancer.

Before full redirecting of the traffic to the new node, it is recommended to first redirect it partially and check that the new node behaves as expected.

Configure your web or proxy server (e.g. NGINX, Envoy) to mirror incoming traffic to the Wallarm node. For configuration details, we recommend to refer to your web or proxy server documentation.

Inside the link, you will find the example configuration for the most popular of web and proxy servers (NGINX, Traefik, Envoy).

Step 10: Remove old node

  1. Delete old node in Wallarm Console → Nodes by selecting your node and clicking Delete.

  2. Confirm the action.

    When the node is deleted from Cloud, it will stop filtration of requests to your applications. Deleting the filtering node cannot be undone. The node will be deleted from the list of nodes permanently.

  3. Delete machine with the old node or just clean it from Wallarm node components:

    sudo apt remove wallarm-node nginx-module-wallarm
    
    sudo apt remove wallarm-node nginx-module-wallarm
    
    sudo yum remove wallarm-node nginx-module-wallarm
    
    sudo yum remove wallarm-node nginx-module-wallarm
    
    sudo yum remove wallarm-node nginx-module-wallarm
    

Manual upgrade

Use the procedure below to manually upgrade the Wallarm NGINX modules 4.x to version 4.8.

Support for 4.10

The DEB/RPM packages for manual node installation have not been updated to the 4.10 release yet.

Requirements for manual upgrade

  • Access to the account with the Administrator role in Wallarm Console in the US Cloud or EU Cloud

  • Access to https://us1.api.wallarm.com if working with US Wallarm Cloud or to https://api.wallarm.com if working with EU Wallarm Cloud. Please ensure the access is not blocked by a firewall

Upgrade procedure

  • If filtering node and postanalytics modules are installed on the same server, then follow the instructions below to upgrade all packages.

  • If filtering node and postanalytics modules are installed on different servers, first upgrade the postanalytics module following these instructions and then perform the steps below for filtering node modules.

Step 1: Upgrade NGINX to the latest version

Upgrade NGINX to the latest version using the relevant instructions:

DEB-based distributions:

sudo apt update
sudo apt -y install nginx

RPM-based distributions:

sudo yum update
sudo yum install -y nginx

For NGINX Plus, please follow the official upgrade instructions.

For NGINX installed from Debian/CentOS repository, please skip this step. The installed NGINX version will be upgraded later along with the Wallarm modules.

If your infrastructure needs to use a specific version of NGINX, please contact the Wallarm technical support to build the Wallarm module for a custom version of NGINX.

Step 2: Add new Wallarm repository

Delete the previous Wallarm repository address and add a repository with a new Wallarm node version package. Please use the commands for the appropriate platform.

CentOS and Amazon Linux 2.0.2021x and lower

sudo yum remove wallarm-node-repo
sudo yum clean all
sudo rpm -i https://repo.wallarm.com/centos/wallarm-node/7/4.8/x86_64/wallarm-node-repo-4.8-0.el7.noarch.rpm
sudo yum remove wallarm-node-repo
sudo yum clean all
sudo rpm -i https://repo.wallarm.com/centos/wallarm-node/8/4.8/x86_64/wallarm-node-repo-4.8-0.el8.noarch.rpm
sudo yum remove wallarm-node-repo
sudo yum clean all
sudo rpm -i https://repo.wallarm.com/centos/wallarm-node/8/4.8/x86_64/wallarm-node-repo-4.8-0.el8.noarch.rpm

Debian and Ubuntu

  1. Open the file with the Wallarm repository address in the installed text editor. In these instructions, vim is used.

    sudo vim /etc/apt/sources.list.d/wallarm.list
    
  2. Comment out or delete the previous repository address.

  3. Add a new repository address:

    Unsupported by NGINX stable and NGINX Plus

    Official NGINX versions (stable and Plus) and, as a result, Wallarm node 4.4 and above cannot be installed on Debian 10.x (buster). Please use this OS only if NGINX is installed from Debian/CentOS repositories.

    deb https://repo.wallarm.com/debian/wallarm-node buster/4.8/
    
    deb https://repo.wallarm.com/debian/wallarm-node bullseye/4.8/
    
    deb https://repo.wallarm.com/ubuntu/wallarm-node bionic/4.8/
    
    deb https://repo.wallarm.com/ubuntu/wallarm-node focal/4.8/
    

Step 3: Upgrade Wallarm packages

Filtering node and postanalytics on the same server

  1. Execute the following command to upgrade the filtering node and postanalytics modules:

    sudo apt update
    sudo apt dist-upgrade
    

    The error "signatures couldn't be verified"

    If added GPG keys expired, the following error would be returned:

    W: GPG error: https://repo.wallarm.com/ubuntu/wallarm-node focal/4.8/ Release:The following
    signatures couldn't be verified because the public key is not available: NO_PUBKEY 1111FQQW999
    E: The repository 'https://repo.wallarm.com/ubuntu/wallarm-node focal/4.8/ Release' is not signed.
    N: Updating from such a repository can't be done securely, and is therefore disabled by default.
    N: See apt-secure(8) manpage for repository creation and user configuration details.
    

    To fix the problem, please import new GPG keys for the Wallarm packages and then upgrade the packages using the following commands:

    curl -fsSL https://repo.wallarm.com/wallarm.gpg | sudo apt-key add -
    sudo apt update
    sudo apt dist-upgrade
    

    Upgrading Wallarm dependencies

    The sudo apt dist-upgrade command upgrades both the Wallarm packages and filtering node dependencies. It is the recommended upgrade option providing correct operation of the newer filtering node version.

    sudo apt update
    sudo apt dist-upgrade
    

    The error "signatures couldn't be verified"

    If added GPG keys expired, the following error would be returned:

    W: GPG error: https://repo.wallarm.com/ubuntu/wallarm-node focal/4.8/ Release:The following
    signatures couldn't be verified because the public key is not available: NO_PUBKEY 1111FQQW999
    E: The repository 'https://repo.wallarm.com/ubuntu/wallarm-node focal/4.8/ Release' is not signed.
    N: Updating from such a repository can't be done securely, and is therefore disabled by default.
    N: See apt-secure(8) manpage for repository creation and user configuration details.
    

    To fix the problem, please import new GPG keys for the Wallarm packages and then upgrade the packages using the following commands:

    curl -fsSL https://repo.wallarm.com/wallarm.gpg | sudo apt-key add -
    sudo apt update
    sudo apt dist-upgrade
    

    Upgrading Wallarm dependencies

    The sudo apt dist-upgrade command upgrades both the Wallarm packages and filtering node dependencies. It is the recommended upgrade option providing correct operation of the newer filtering node version.

    sudo yum update
    
    sudo yum update
    
    sudo yum update
    
  2. If the package manager asks for confirmation to rewrite the content of the configuration file /etc/cron.d/wallarm-node-nginx, send the option Y.

    The /etc/cron.d/wallarm-node-nginx content should be updated for the new script counting RPS to be downloaded.

    By default, the package manager uses the option N but the option Y is required for correct RPS counting.

Filtering node and postanalytics on different servers

Sequence of steps to upgrade the filtering node and postanalytics modules

If the filtering node and postanalytics modules are installed on different servers, then it is required to upgrade the postanalytics packages before updating the filtering node packages.

  1. Upgrade postanalytics packages following these instructions.

  2. Upgrade Wallarm node packages:

    sudo apt update
    sudo apt dist-upgrade
    

    The error "signatures couldn't be verified"

    If added GPG keys expired, the following error would be returned:

    W: GPG error: https://repo.wallarm.com/ubuntu/wallarm-node focal/4.8/ Release:The following
    signatures couldn't be verified because the public key is not available: NO_PUBKEY 1111FQQW999
    E: The repository 'https://repo.wallarm.com/ubuntu/wallarm-node focal/4.8/ Release' is not signed.
    N: Updating from such a repository can't be done securely, and is therefore disabled by default.
    N: See apt-secure(8) manpage for repository creation and user configuration details.
    

    To fix the problem, please import new GPG keys for the Wallarm packages and then upgrade the packages using the following commands:

    curl -fsSL https://repo.wallarm.com/wallarm.gpg | sudo apt-key add -
    sudo apt update
    sudo apt dist-upgrade
    

    Upgrading Wallarm dependencies

    The sudo apt dist-upgrade command upgrades both the Wallarm packages and filtering node dependencies. It is the recommended upgrade option providing correct operation of the newer filtering node version.

    sudo apt update
    sudo apt dist-upgrade
    

    The error "signatures couldn't be verified"

    If added GPG keys expired, the following error would be returned:

    W: GPG error: https://repo.wallarm.com/ubuntu/wallarm-node focal/4.8/ Release:The following
    signatures couldn't be verified because the public key is not available: NO_PUBKEY 1111FQQW999
    E: The repository 'https://repo.wallarm.com/ubuntu/wallarm-node focal/4.8/ Release' is not signed.
    N: Updating from such a repository can't be done securely, and is therefore disabled by default.
    N: See apt-secure(8) manpage for repository creation and user configuration details.
    

    To fix the problem, please import new GPG keys for the Wallarm packages and then upgrade the packages using the following commands:

    curl -fsSL https://repo.wallarm.com/wallarm.gpg | sudo apt-key add -
    sudo apt update
    sudo apt dist-upgrade
    

    Upgrading Wallarm dependencies

    The sudo apt dist-upgrade command upgrades both the Wallarm packages and filtering node dependencies. It is the recommended upgrade option providing correct operation of the newer filtering node version.

    sudo yum update
    
    sudo yum update
    
    sudo yum update
    
  3. If the package manager asks for confirmation to rewrite the content of the configuration file /etc/cron.d/wallarm-node-nginx, send the option Y.

    The /etc/cron.d/wallarm-node-nginx content should be updated for the new script counting RPS to be downloaded.

    By default, the package manager uses the option N but the option Y is required for correct RPS counting.

Step 4: Update the node type

Only for nodes installed using the addnode script

Only follow this step if a node of a previous version is connected to the Wallarm Cloud using the addnode script. This script has been removed and replaced by the register-node, which requires a token to register the node in the Cloud.

  1. Make sure that your Wallarm account has the Administrator role by navigating to the user list in the US Cloud or EU Cloud.

    User list in Wallarm console

  2. Open Wallarm Console → Nodes in the US Cloud or EU Cloud and create the node of the Wallarm node type.

    Wallarm node creation

    If the postanalytics module is installed on a separate server

    If the initial traffic processing and postanalytics modules are installed on separate servers, it is recommended to connect these modules to the Wallarm Cloud using the same node token. The Wallarm Console UI will display each module as a separate node instance, e.g.:

    Node with several instances

    The Wallarm node has already been created during the separate postanalytics module upgrade. To connect the initial traffic processing module to the Cloud using the same node credentials:

    1. Copy the node token generated during the separate postanalytics module upgrade.
    2. Proceed to the 4th step in the list below.
  3. Copy the generated token.

  4. Pause the NGINX service to mitigate the risk of incorrect RPS calculation:

    sudo systemctl stop nginx
    
    sudo service nginx stop
    
    sudo systemctl stop nginx
    
    sudo systemctl stop nginx
    
    sudo systemctl stop nginx
    
  5. Execute the register-node script to run the Wallarm node:

    sudo /usr/share/wallarm-common/register-node -t <TOKEN> -H us1.api.wallarm.com --force
    
    sudo /usr/share/wallarm-common/register-node -t <TOKEN> --force
    
    • <TOKEN> is the copied value of the node token or API token with the Deploy role.
    • The --force option forces rewriting of the Wallarm Cloud access credentials specified in the /etc/wallarm/node.yaml file.

Step 5: Update the Wallarm blocking page

In new node version, the Wallarm sample blocking page has been changed. The logo and support email on the page are now empty by default.

If the page &/usr/share/nginx/html/wallarm_blocked.html was configured to be returned in response to blocked requests, copy and customize the new version of a sample page.

Step 6: Restart NGINX

sudo systemctl restart nginx
sudo service nginx restart
sudo systemctl restart nginx

Step 7: Test Wallarm node operation

  1. Send the request with test Path Traversal attack to a protected resource address:

    curl http://localhost/etc/passwd
    
  2. Open Wallarm Console → Attacks section in the US Cloud or EU Cloud and make sure the attack is displayed in the list.
    Attacks in the interface

Settings customization

The Wallarm modules are updated to version 4.8. Previous filtering node settings will be applied to the new version automatically. To make additional settings, use the available directives.

Common customization options: