Separate Postanalytics Module Installation
In Wallarm's request processing, two stages are involved, including the postanalytics stage for statistical request analysis. Postanalytics is memory-intensive, which may require it to be performed on a dedicated server for optimized performance. This article explains how to install the postanalytics module on a separate server.
Overview
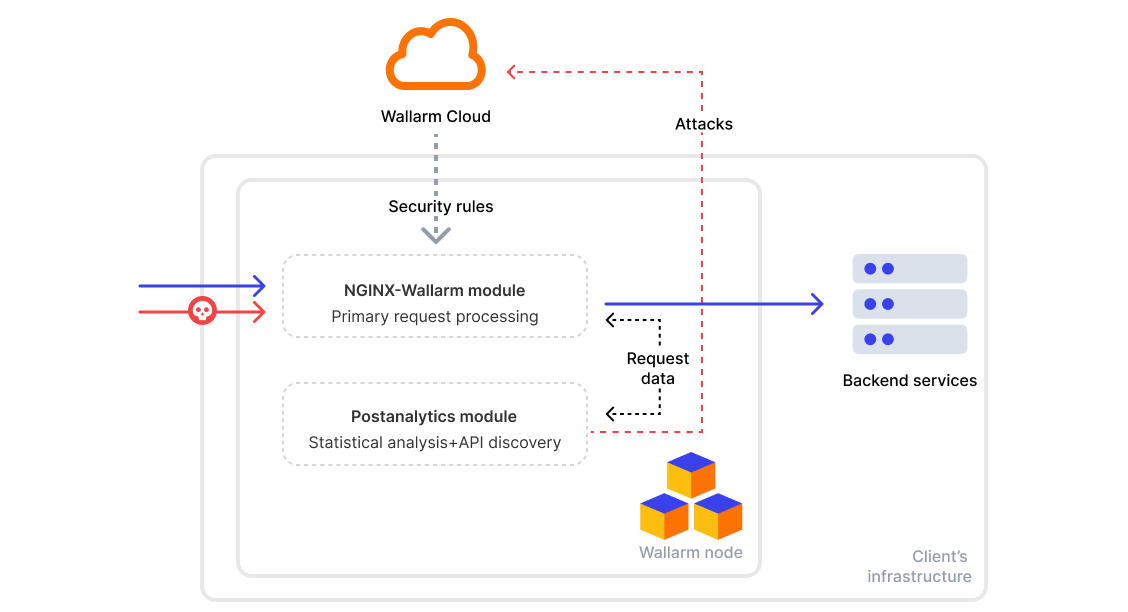
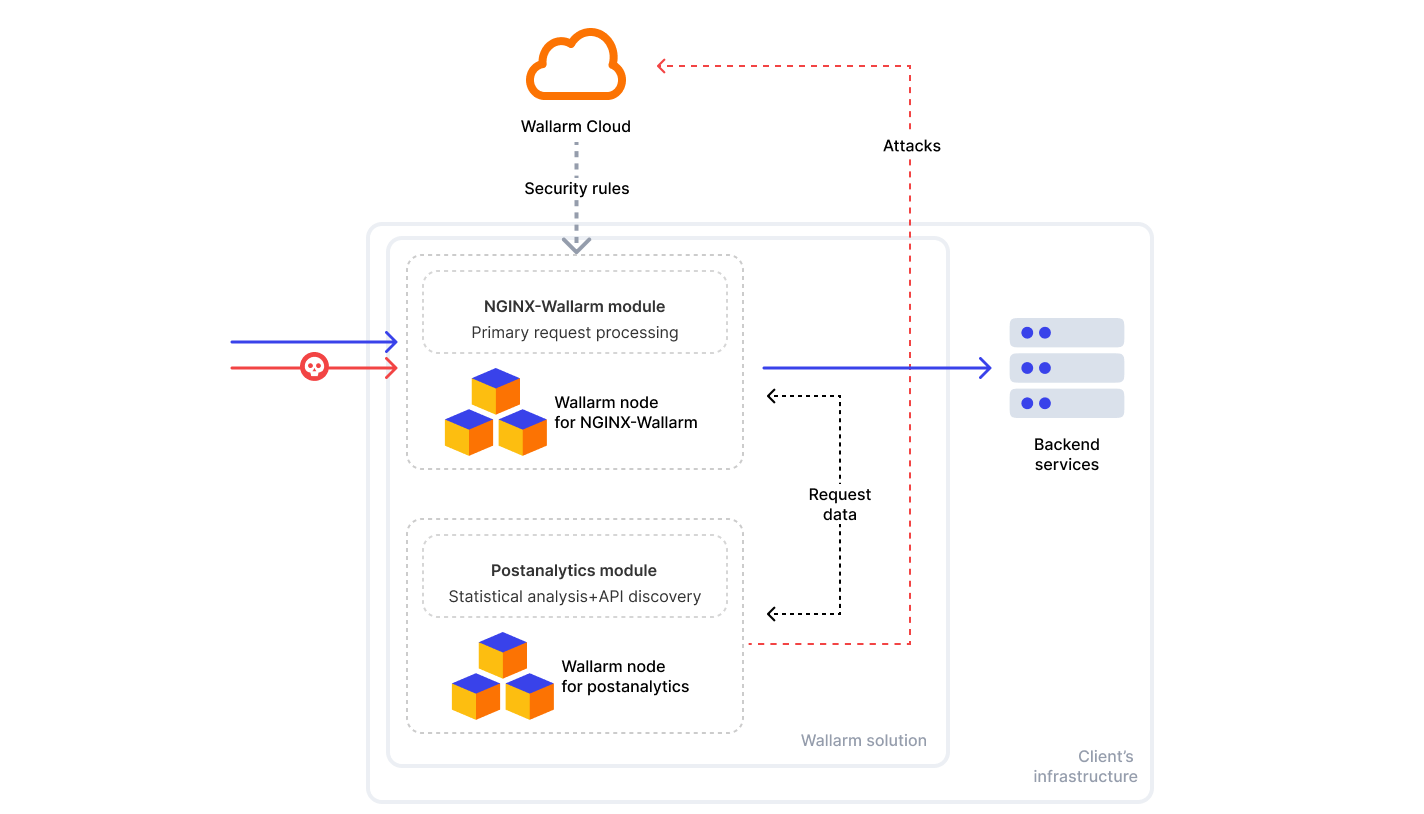
The processing of requests in the Wallarm node consists of two stages:
-
Primary processing in the NGINX-Wallarm module, which is not memory demanding and can be executed on frontend servers without altering server requirements.
-
Statistical analysis of the processed requests in the postanalytics module which is memory demanding.
The schemes below depict module interaction in two scenarios: when installed on the same server and on different servers.
Requirements
-
Access to the account with the Administrator role in Wallarm Console for the US Cloud or EU Cloud
-
Executing all commands as a superuser (e.g.
root) -
Access to
https://meganode.wallarm.comto download the all-in-one Wallarm installer. Ensure the access is not blocked by a firewall -
Access to
https://us1.api.wallarm.comif working with US Wallarm Cloud or tohttps://api.wallarm.comif working with EU Wallarm Cloud. If access can be configured only via the proxy server, then use the instructions -
Installed text editor vim, nano, or any other. In the commands in this article, vim is used
Step 1: Download all-in-one Wallarm installer
To download all-in-one Wallarm installation script, execute the command:
Step 2: Prepare Wallarm token
To install node, you will need a Wallarm token of the appropriate type. To prepare a token:
Step 3: Run all-in-one Wallarm installer to install postanalytics
To install postanalytics separately with all-in-one installer, use:
If using the x86_64 version:
If using the ARM64 version:
The WALLARM_LABELS variable sets the group into which the node will be added (used for logical grouping of nodes in the Wallarm Console UI).
Step 4: Configure the postanalytics module
Resources and memory
To change how much memory wstore uses, look for the SLAB_ALLOC_ARENA setting in the /opt/wallarm/env.list file. It is set to use 1 GB by default. If you need to change this, you can adjust the number to match the amount of memory wstore actually needs. For help on how much to set, see our recommendations.
To change allocated memory:
-
Open for editing the
/opt/wallarm/env.listfile: -
Set the
SLAB_ALLOC_ARENAattribute to memory size. The value can be an integer or a float (a dot.is a decimal separator). For example:
Host and port
By default, the postanalytics module is set to accept connections on all IPv4 addresses of the host (0.0.0.0) using port 3313. It is recommended to retain the default configuration unless a change is necessary.
However, if you need to change the default configuration:
-
On the machine with the postanalytics service, open for editing the
/opt/wallarm/wstore/wstore.yamlfile: -
Specify the new IP address and port values in the
service.addressparameter, e.g.:The
service.addressparameter allows the following value formats:- IP address:Port, e.g.
192.158.1.38:3313 - Specific port on all IPs, e.g.
:3313
- IP address:Port, e.g.
-
On the machine with the postanalytics service, open for editing the
/opt/wallarm/etc/wallarm/node.yamlfile: -
Specify the new IP address and port values in the
wstore.hostandwstore.portparameters, e.g.:
Step 5: Enable inbound connections for the postanalytics module
The postanalytics module uses port 3313 by default, but some cloud platforms may block inbound connections on this port.
To guarantee integration, allow inbound connections on port 3313 or your custom port. This step is essential for the NGINX-Wallarm module, installed separately, to connect with the wstore instance.
Step 6: Restart the Wallarm services
After making the necessary changes, restart the Wallarm services on the machine hosting the postanalytics module to apply the updates:
Step 7: Install the NGINX-Wallarm module on a separate server
Once the postanalytics module is installed on the separate server:
-
Install the NGINX-Wallarm module on a different server following the corresponding guide.
-
When launching the installation script for the NGINX-Wallarm module on a separate server, include the
filteringoption, for example:If using the x86_64 version:
If using the ARM64 version:
The
WALLARM_LABELSvariable sets the group into which the node will be added (used for logical grouping of nodes in the Wallarm Console UI).
Step 8: Connect the NGINX-Wallarm module to the postanalytics module
On the machine with the NGINX-Wallarm module, in the NGINX configuration file (typically located at /etc/nginx/nginx.conf), specify the postanalytics module server address:
http {
    # omitted

    upstream wallarm_wstore {
        server <ip1>:3313 max_fails=0 fail_timeout=0 max_conns=1;
        server <ip2>:3313 max_fails=0 fail_timeout=0 max_conns=1;

        keepalive 2;
    }

    wallarm_wstore_upstream wallarm_wstore;

    # omitted
}
-
max_connsvalue must be specified for each of the upstream wstore servers to prevent the creation of excessive connections. -
keepalivevalue must not be lower than the number of the wstore servers.
Once the configuration file is changed, restart NGINX/NGINX Plus on the NGINX-Wallarm module server:
Step 9: Check the NGINX‑Wallarm and separate postanalytics modules interaction
To check the NGINX‑Wallarm and separate postanalytics modules interaction, you can send the request with test attack to the address of the protected application:
If the NGINX‑Wallarm and separate postanalytics modules are configured properly, the attack will be uploaded to the Wallarm Cloud and displayed in the Attacks section of Wallarm Console:

If the attack was not uploaded to the Cloud, please check that there are no errors in the services operation:
-
Analyze the postanalytics module logs
If there is the record like
SystemError binary: failed to bind: Cannot assign requested address, make sure that the server accepts connections on the specified address and port. -
On the server with the NGINX‑Wallarm module, analyze the NGINX logs:
If there is the record like
[error] wallarm: <address> connect() failed, make sure that the address of separate postanalytics module is specified correctly in the NGINX‑Wallarm module configuration files and the separate postanalytics server accepts connections on the specified address and port. -
On the server with the NGINX‑Wallarm module, get the statistics on processed requests using the command below and make sure that the value of
tnt_errorsis 0Description of all parameters returned by the statistics service →
SSL/TLS and mTLS between the NGINX-Wallarm module and the postanalytics module
Optionally, you can establish a secure connection between the NGINX-Wallarm module and postanalytics over SSL/TLS. Both one-way server certificate validation and mutual TLS are supported.
Available from release 6.2.0 onwards.
SSL/TLS connection to the postanalytics module
To enable a secure SSL/TLS connection from the NGINX-Wallarm module to the postanalytics module:
-
Issue a server certificate for the FQDN or IP address of the running postanalytics module's host.
-
On the postanalytics server, enable SSL/TLS in the
/opt/wallarm/wstore/wstore.yamlfile:service: TLS: enabled: true address: 0.0.0.0:6388 certFile: "/opt/wallarm/wstore/wstore.crt" keyFile: "/opt/wallarm/wstore/wstore.key" # caCertFile: "/opt/wallarm/wstore/wstore-ca.crt"enabled: enables or disables SSL/TLS for the postanalytics module. Default isfalse.address: address and port on which the postanalytics module accepts incoming TLS connections. The specified address must allow inbound connections.certFile: path to the server certificate presented to the client (NGINX-Wallarm module) during the TLS handshake.keyFile: path to the private key corresponding to the server certificate.caCertFile(optional): path to the custom CA certificate for the server.
-
On the postanalytics server, restart the Wallarm services:
-
On the NGINX-Wallarm server, in the NGINX configuration file (typically,
/etc/nginx/nginx.conf):- Configure the upstream used for postanalytics via TLS.
- Add the
ssl=onoption towallarm_wstore_upstream. -
If the postanalytics module uses a certificate issued by a custom CA, upload the CA certificate to the NGINX-Wallarm server and specify the path in
wallarm_wstore_ssl_ca_cert_file.This file must match the
service.TLS.caCertFileconfigured on the postanalytics server.
-
On the NGINX-Wallarm server, restart NGINX:
Mutual TLS (mTLS)
To enable mutual authentication, where both the NGINX-Wallarm module and the postanalytics module verify each other's certificates:
-
Enable SSL/TLS connection to the postanalytics module as described above.
-
Issue a client certificate for the FQDN or IP address of the running NGINX-Wallarm module's host.
-
On the NGINX-Wallarm server, upload the client certificate and private key and specify their paths in
wallarm_wstore_ssl_cert_fileandwallarm_wstore_ssl_key_file:http { upstream wallarm_wstore { server postanalytics.server.com:6388 max_fails=0 fail_timeout=0 max_conns=1; keepalive 1; } wallarm_wstore_upstream wallarm_wstore ssl=on; wallarm_wstore_ssl_cert_file /path/to/client.crt; wallarm_wstore_ssl_key_file /path/to/client.key; # wallarm_wstore_ssl_ca_cert_file /path/to/wstore-ca.crt; }Then, restart NGINX:
-
On the postanalytics server, enable mTLS in
/opt/wallarm/wstore/wstore.yaml:service: TLS: enabled: true address: 0.0.0.0:6388 certFile: "/opt/wallarm/wstore/wstore.crt" keyFile: "/opt/wallarm/wstore/wstore.key" # caCertFile: "/opt/wallarm/wstore/wstore-ca.crt" mutualTLS: enabled: true # clientCACertFile: "/opt/wallarm/wstore/client-ca.crt"mutualTLS.enabled: enables or disables mTLS. Default isfalse.mutualTLS.clientCACertFile(optional): path to the custom CA certificate for the NGINX‑Wallarm client.
Then, restart the Wallarm services:
Postanalytics module protection
Protect installed postanalytics module
We highly recommend protecting a newly installed Wallarm postanalytics module with a firewall. Otherwise, there is a risk of getting unauthorized access to the service that may result in:
- Disclosure of information about processed requests
- Possibility of executing arbitrary Lua code and operating system commands
Note that no such risk exists if you are deploying the postanalytics module alongside the NGINX-Wallarm module on the same server. This holds true because the postanalytics module will listen to the port 3313.
Here are the firewall settings that should be applied to the separately installed postanalytics module:
- Allow the HTTPS traffic to and from the Wallarm API servers, so the postanalytics module can interact with these servers:
us1.api.wallarm.comis the API server in the US Wallarm Cloudapi.wallarm.comis the API server in the EU Wallarm Cloud
- Restrict the access to the
3313wstore port via TCP and UDP protocols by allowing connections only from the IP addresses of the Wallarm filtering nodes.