Deploying Kong Ingress Controller with Integrated Wallarm Services
To secure APIs managed by Kong API Gateway, you can deploy the Kong Ingress controller with integrated Wallarm services in a Kubernetes cluster. The solution involves the default Kong API Gateway functionality with the layer of real-time malicious traffic mitigation.
The solution is deployed from the Wallarm Helm chart.
The key features of the Kong Ingress Controller with integrated Wallarm services:
-
Real-time attack detection and mitigation
-
The Wallarm services are integrated natively into both the Open-Source and Enterprise Kong API Gateway editions
-
This solution is based on the official Kong Ingress Controller for Kong API Gateway that provides full support for features of Kong API Gateway
-
Support for Kong API Gateway 3.1.x (for both the Open-Source and Enterprise editions)
-
Fine-tuning the Wallarm layer via the Wallarm Console UI and on a per-Ingress basis via annotations
Annotation support
Ingress annotation is supported only by the solution based on the Open-Source Kong Ingress controller. The list of supported annotations is limited.
-
Provides a dedicated entity for the postanalytics module that is the local data analytics backend for the solution consuming most of the CPU
Use cases
Among all supported Wallarm deployment options, this solution is the recommended one for the following use cases:
-
There is no Ingress controller and security layer routing traffic to Ingress resources managed by Kong.
-
You are using either the Open-Source or Enterprise official Kong Ingress controller and looking for a security solution compatible with your technology stack.
You can seamlessly replace the deployed Kong Ingress Controller with the one these instructions describe by only moving your configuration to a new deployment.
Solution architecture
The solution has the following architecture:
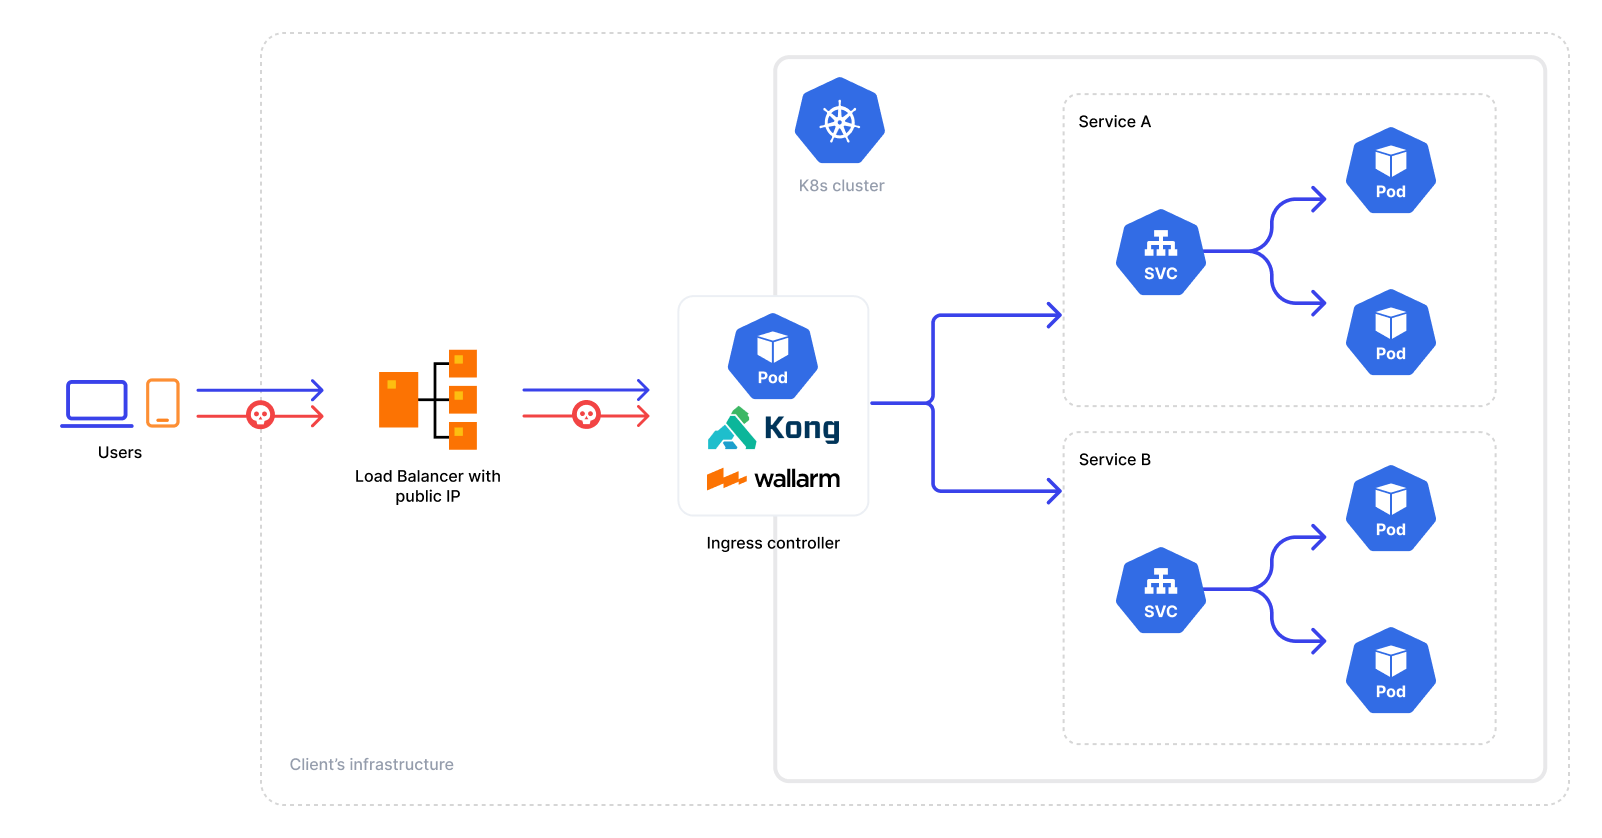
The solution is based on the official Kong Ingress Controller, its architecture is described in the official Kong documentation.
Kong Ingress Controller with integrated Wallarm services is arranged by the following Deployment objects:
-
Ingress controller (
wallarm-ingress-kong) that injects the Kong API Gateway and Wallarm resources into the K8s cluster configuring it based on the Helm chart values and connecting the node components to the Wallarm Cloud. -
Postanalytics module (
wallarm-ingress-kong-wallarm-tarantool) is the local data analytics backend for the solution. The module uses the in-memory storage Tarantool and the set of some helper containers (like the collectd, attack export services).
Limitations
The described solution for the Enterprise Kong Ingress controller allows the Wallarm layer fine‑tuning only via the Wallarm Console UI.
However, some features of the Wallarm platform require configuration files to be changed that is unsupported in the current Enterprise solution implementation. It makes the following Wallarm features unavailable:
-
Custom blocking page and code setup - not supported by both the Enterprise and Open-Source Kong Ingress controllers with Wallarm services
-
Credential stuffing detection - not supported by both the Enterprise and Open-Source Kong Ingress controllers with Wallarm services
As for the Open-Source Kong Ingress controller with Wallarm services, it supports the multitenancy and application configuration on a per-Ingress basis via annotations.
Requirements
-
Kubernetes platform version 1.22-1.26
-
K8s Ingress resources that configure Kong to route API calls to the microservices you want to protect
-
Compatibility of K8s Ingress resources with Kong 3.1.x
-
Helm v3 package manager
-
Access to
https://us1.api.wallarm.comfor working with US Wallarm Cloud or tohttps://api.wallarm.comfor working with EU Wallarm Cloud -
Access to
https://charts.wallarm.comto add the Wallarm Helm charts -
Access to the Wallarm repositories on Docker Hub
https://hub.docker.com/r/wallarm -
Access to the IP addresses of Google Cloud Storage listed within the link. When you allowlist, denylist, or graylist entire countries, regions, or data centers instead of individual IP addresses, the Wallarm node retrieves precise IP addresses related to the entries in the IP lists from the aggregated database hosted on Google Storage
-
Access to the account with the Administrator role in Wallarm Console for the US Cloud or the EU Cloud
Deployment
To deploy Kong Ingress Controller with integrated Wallarm services:
-
Create the Wallarm node.
-
Deploy the Wallarm Helm chart with the Kong Ingress Controller and Wallarm services.
-
Enable traffic analysis for your Ingress.
-
Test Kong Ingress Controller with integrated Wallarm services.
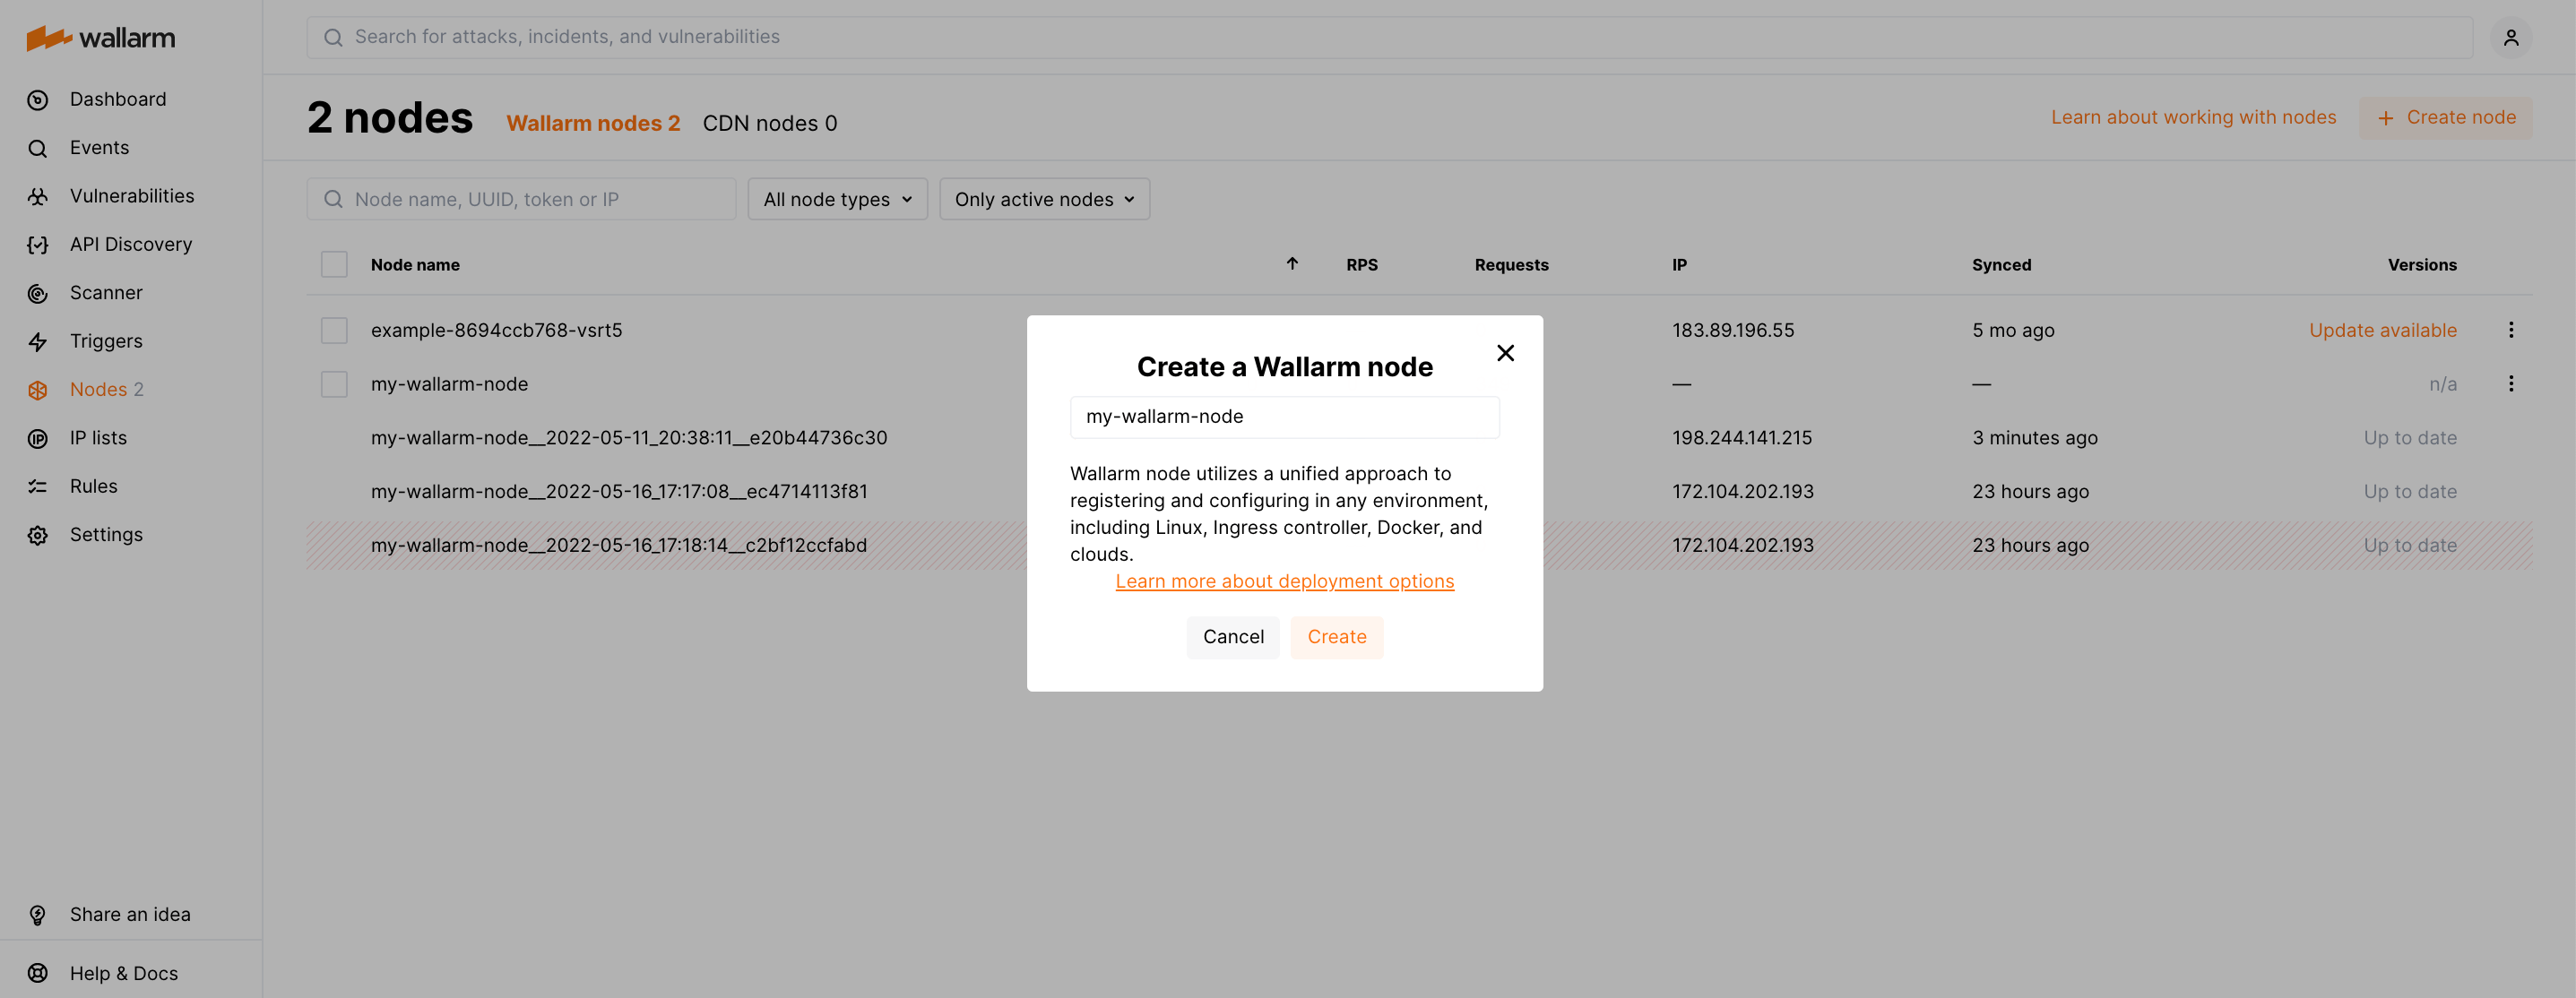
Step 1: Create the Wallarm node
-
Open Wallarm Console → Nodes via the link below:
- https://us1.my.wallarm.com/nodes for the US Cloud
- https://my.wallarm.com/nodes for the EU Cloud
-
Create a filtering node with the Wallarm node type and copy the generated token.
Step 2: Deploy the Wallarm Helm chart
-
Add the Wallarm chart repository:
-
Create the
values.yamlfile with the solution configuration.Example of the file with the minimum configuration to run the Open-Source Kong Ingress controller with integrated Wallarm services:
Example of the file with the minimum configuration to run Enterprise Kong Ingress controller with integrated Wallarm services:
wallarm: token: "<NODE_TOKEN>" apiHost: us1.api.wallarm.com image: repository: wallarm/kong-ee-preview license_secret: "<KONG-ENTERPRISE-LICENSE>" vitals: enabled: false portal: enabled: false rbac: enabled: false enterprise: enabled: true ingressController: enabled: true installCRDs: false image: repository: kong/kubernetes-ingress-controllerwallarm: token: "<NODE_TOKEN>" image: repository: wallarm/kong-ee-preview license_secret: "<KONG-ENTERPRISE-LICENSE>" vitals: enabled: false portal: enabled: false rbac: enabled: false enterprise: enabled: true ingressController: enabled: true installCRDs: false image: repository: kong/kubernetes-ingress-controller-
<NODE_TOKEN>is the Wallarm node token you copied from the Wallarm Console UIUsing one token for several installations
You can use one token in several installations regardless of the selected platform. It allows logical grouping of node instances in the Wallarm Console UI. Example: you deploy several Wallarm nodes to a development environment, each node is on its own machine owned by a certain developer.
-
<KONG-ENTERPRISE-LICENSE>is the Kong Enterprise License
-
-
Deploy the Wallarm Helm chart:
helm install --version 4.6.3 <RELEASE_NAME> wallarm/kong -n <KUBERNETES_NAMESPACE> -f <PATH_TO_VALUES><RELEASE_NAME>is the name for the Helm release of the Kong Ingress Controller chart<KUBERNETES_NAMESPACE>is the new namespace to deploy the Helm release with the Kong Ingress Controller chart<PATH_TO_VALUES>is the path to thevalues.yamlfile
Step 3: Enable traffic analysis for your Ingress
If the deployed solution is based on the Open-Source Kong Ingress controller, enable traffic analysis for your Ingress by setting the Wallarm mode to monitoring:
kubectl annotate ingress <KONG_INGRESS_NAME> -n <KONG_INGRESS_NAMESPACE> wallarm.com/wallarm-mode=monitoring
Where <KONG_INGRESS_NAME> is the name of the K8s Ingress resource routing API calls to the microservices you want to protect.
As for the Enterprise Kong Ingress controller, traffic analysis in the monitoring mode is enabled globally for all Ingress resources by default.
Step 4: Test Kong Ingress Controller with integrated Wallarm services
To test that Kong Ingress Controller with integrated Wallarm services operates correctly:
-
Get the Wallarm pod details to check they have been successfully started:
Each pod should display the following: READY: N/N and STATUS: Running, e.g.:
-
Send the test Path Traversal attacks to the Kong Ingress Controller Service:
Since the Wallarm layer operates in the monitoring filtration mode, the Wallarm node will not block the attack but will register it.
To check that the attack has been registered, proceed to Wallarm Console → Attacks:

Customization
Wallarm pods have been injected based on the default values.yaml and the custom configuration you specified on the 2nd deployment step.
You can customize both the Kong API Gateway and Wallarm behavior even more and get the most out of Wallarm for your company.
Just proceed to the Kong Ingress Controller solution customization guide.