Deploying Wallarm Sidecar
To secure an application deployed as a Pod in a Kubernetes cluster, you can run the NGINX-based Wallarm node in front of the application as a sidecar controller. Wallarm sidecar controller will filter incoming traffic to the application Pod by allowing only legitimate requests and mitigating malicious ones.
The key features of the Wallarm Sidecar solution:
-
Simplifies protection of discrete microservices and their replicas and shards by providing the deployment format that is similar to applications
-
Fully compatible with any Ingress controller
-
Works stably under high loads that are usually common for the service mesh approach
-
Requires minimum service configuration to secure your apps; just add some annotations and labels for the application pod to protect it
-
Supports two modes of the Wallarm container deployment: for medium loads with the Wallarm services running in one container and for high loads with the Wallarm services split into several containers
-
Provides a dedicated entity for the postanalytics module that is the local data analytics backend for the Wallarm sidecar solution consuming most of the memory
Use cases
Among all supported Wallarm deployment options, this solution is the recommended one for the following use cases:
-
You are looking for the security solution to be deployed to the infrastructure with the existing Ingress controller (e.g. AWS ALB Ingress Controller) preventing you from deployment of either Wallarm NGINX-based Ingress Controller or Wallarm connector for Kong Ingress controller
-
Zero-trust environment that requires each microservice (including internal APIs) to be protected by the security solution
Traffic flow
Traffic flow with Wallarm Sidecar:
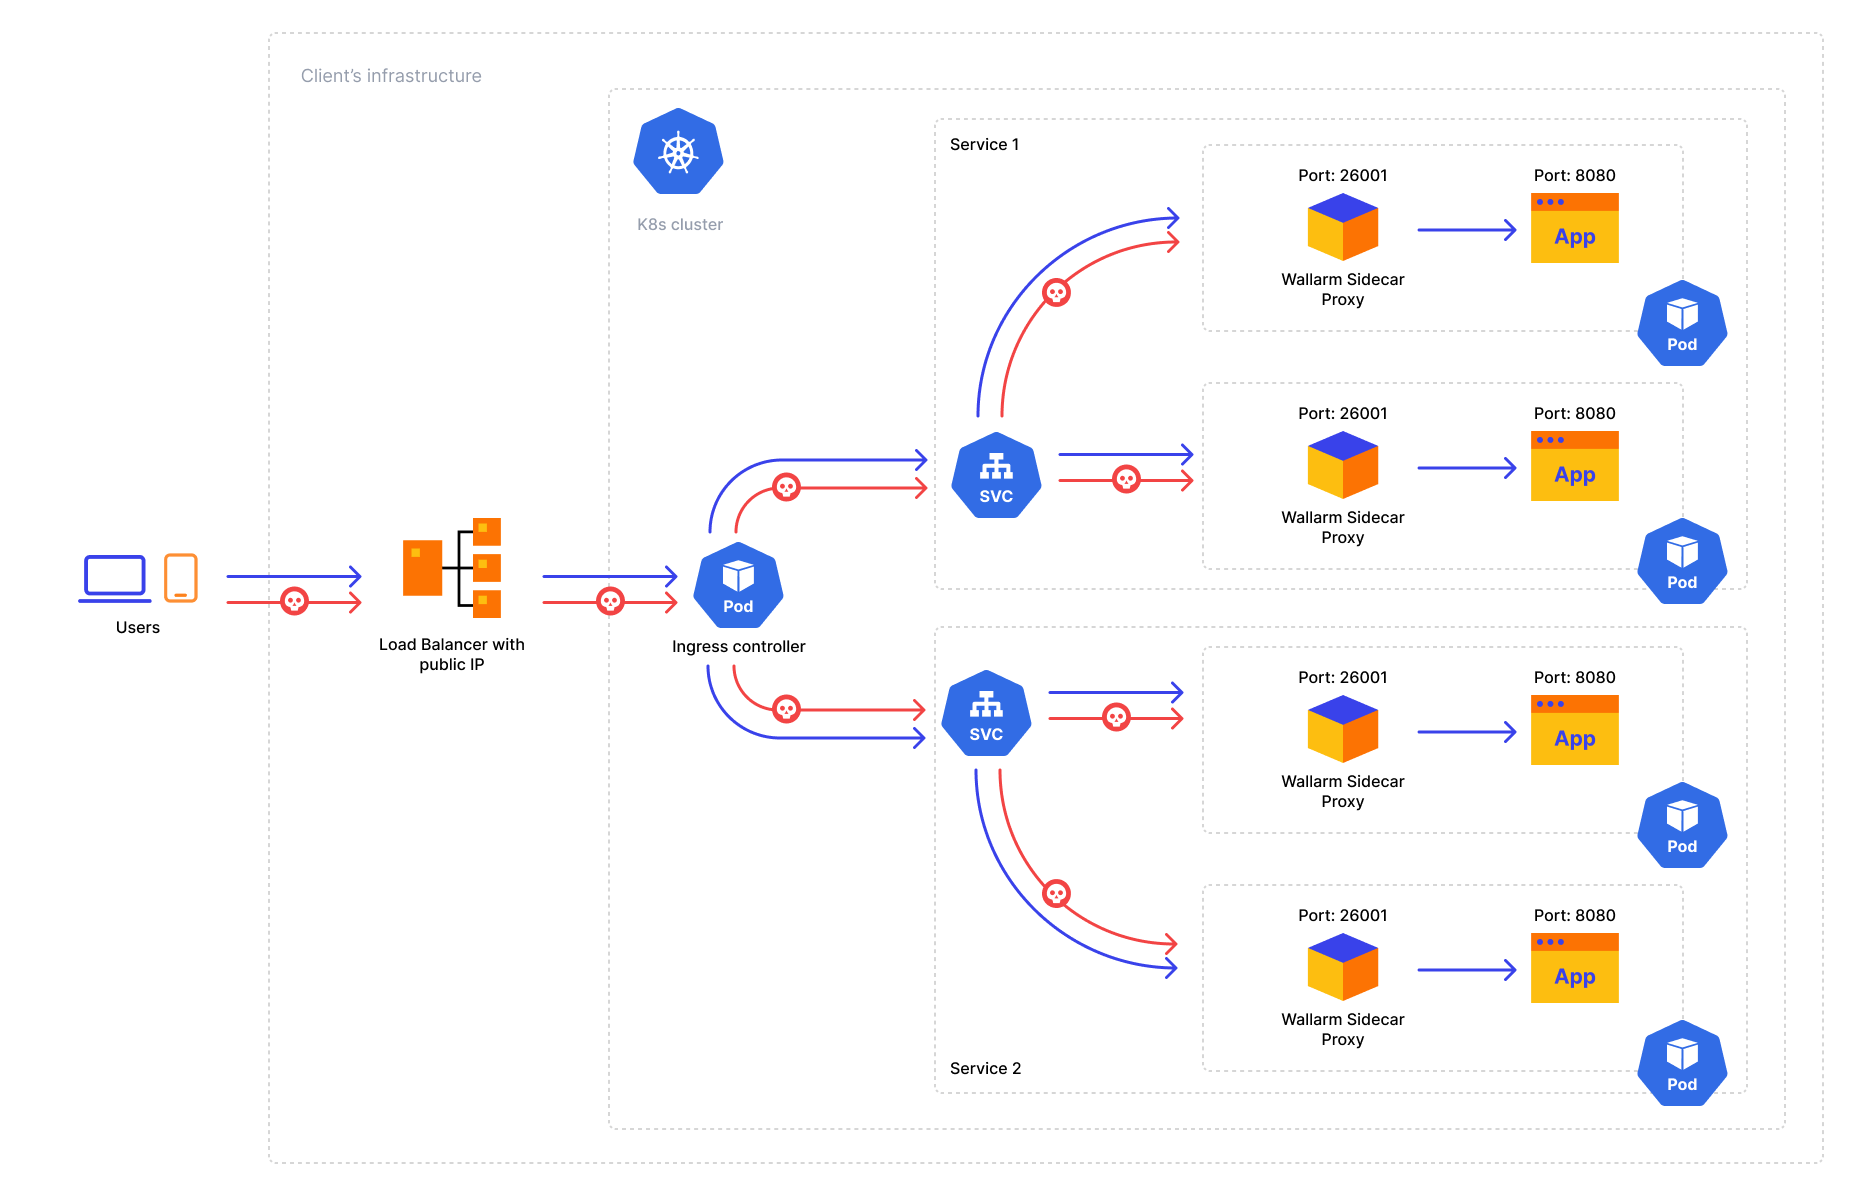
Solution architecture
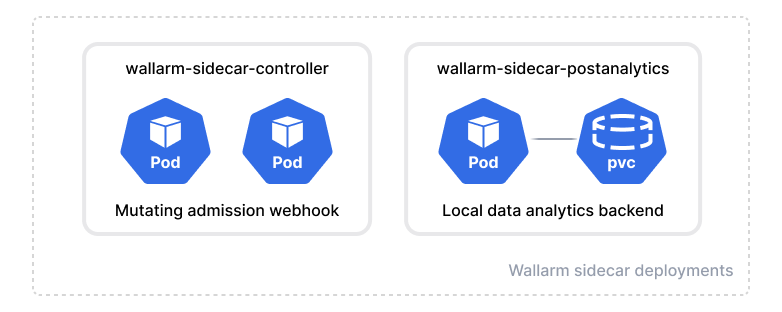
The Wallarm Sidecar solution is arranged by the following Deployment objects:
-
Sidecar controller (
wallarm-sidecar-controller) is the mutating admission webhook that injects Wallarm sidecar resources into the Pod configuring it based on the Helm chart values and pod annotations and connecting the node components to the Wallarm Cloud.Once a new pod with the
wallarm-sidecar: enabledlabel in Kubernetes starts, the controller automatically injects the additional container filtering incoming traffic into the pod. -
Postanalytics module (
wallarm-sidecar-postanalytics) is the local data analytics backend for the Wallarm sidecar solution. The module uses the in-memory storage wstore and the set of some helper containers such as attack export services.
The Wallarm Sidecar has 2 standard stages in its lifecycle:
-
At the initial stage, the controller injects Wallarm sidecar resources into the Pod configuring it based on the Helm chart values and pod annotations and connecting the node components to the Wallarm Cloud.
-
At the runtime stage, the solution analyzes and proxies/forwards requests involving the postanalytics module.
The solution uses Docker images based on Alpine Linux and the NGINX version provided by Alpine. Currently, the latest images use Alpine Linux version 3.23, which includes NGINX stable version 1.28.3.
Requirements
-
Kubernetes platform version 1.19-1.29
-
Helm v3 package manager
-
An application deployed as a Pod in a Kubernetes cluster
-
Access to the Wallarm API host for your Cloud:
https://us1.api.wallarm.comorhttps://api.wallarm.com -
Access to
https://charts.wallarm.comto add the Wallarm Helm charts -
Access to the Wallarm repositories on Docker Hub
https://hub.docker.com/r/wallarm -
Access to the IP addresses and their corresponding hostnames (if any) listed below. This is needed for downloading updates to attack detection rules and API specifications, as well as retrieving precise IPs for your allowlisted, denylisted, or graylisted countries, regions, or data centers
-
Access to the account with the Administrator role in Wallarm Console for the US Cloud or the EU Cloud
Deployment
To deploy the Wallarm Sidecar solution:
-
Generate a filtering node token.
-
Deploy the Wallarm Helm chart.
-
Attach the Wallarm Sidecar to the application Pod.
-
Test the Wallarm Sidecar operation.
Step 1: Generate a filtering node token
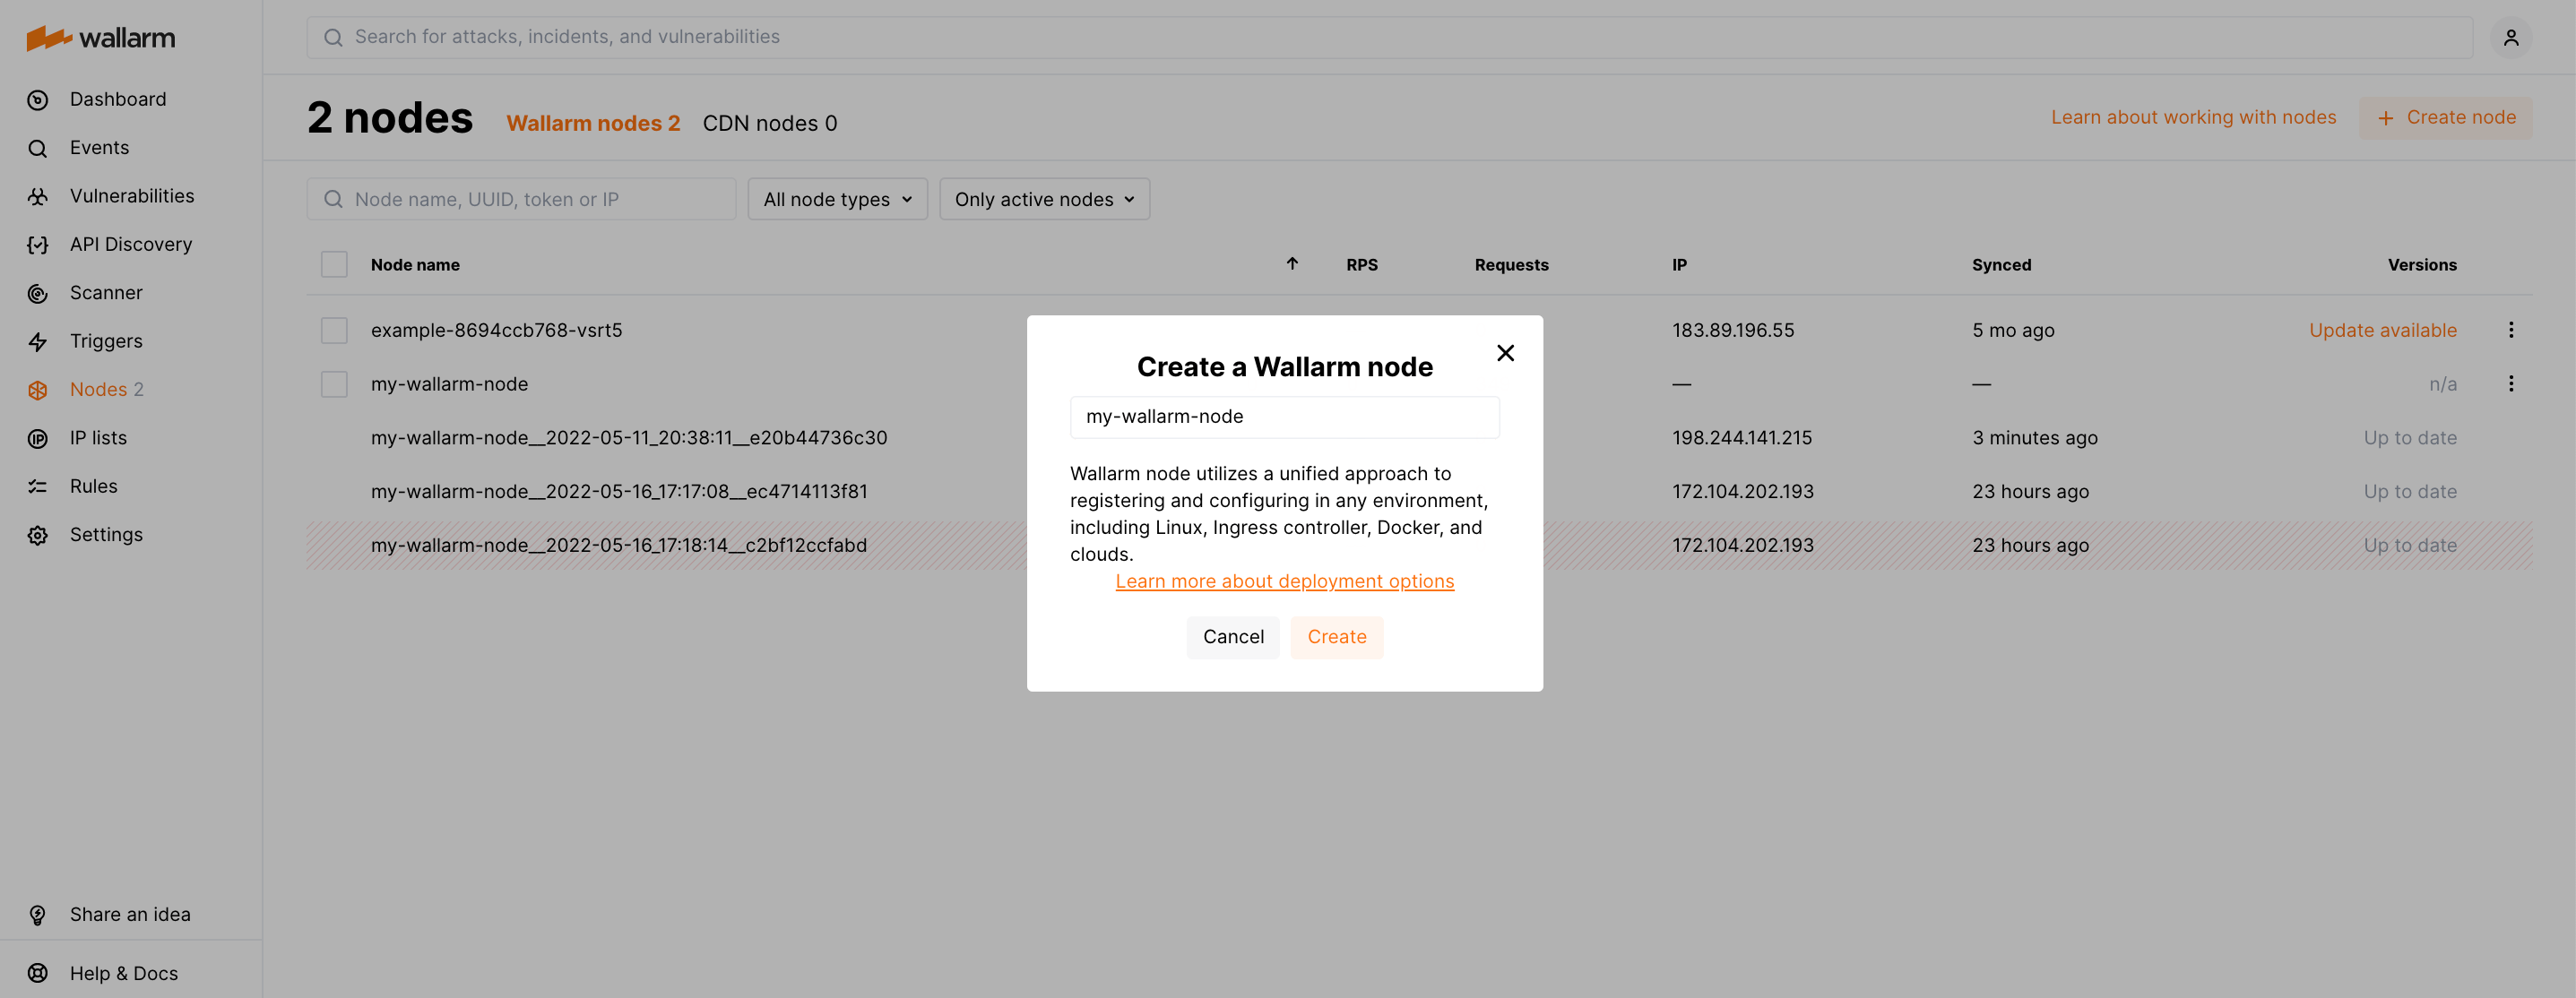
Generate a filtering node token of the appropriate type to connect the sidecar pods to the Wallarm Cloud:
Step 2: Deploy the Wallarm Helm chart
-
Add the Wallarm chart repository:
-
Create the
values.yamlfile with the Wallarm Sidecar configuration. Example of the file with the minimum configuration is below.When using an API token, specify a node group name in the
nodeGroupparameter. Your nodes created for the sidecar pods will be assigned to this group, shown in the Wallarm Console's Nodes section. The default group name isdefaultSidecarGroup. If required, you can later set filtering node group names individually for the pods of the applications they protect, using thesidecar.wallarm.io/wallarm-node-groupannotation.<NODE_TOKEN>is the token of the Wallarm node to be run in Kubernetes.Using one token for several installations
You can use one token in several installations regardless of the selected platform. It allows logical grouping of node instances in the Wallarm Console UI. Example: you deploy several Wallarm nodes to a development environment, each node is on its own machine owned by a certain developer.
-
Deploy the Wallarm Helm chart:
helm install --version 6.12.7 <RELEASE_NAME> wallarm/wallarm-sidecar --wait -n wallarm-sidecar --create-namespace -f <PATH_TO_VALUES><RELEASE_NAME>is the name for the Helm release of the Wallarm Sidecar chartwallarm-sidecaris the new namespace to deploy the Helm release with the Wallarm Sidecar chart, it is recommended to deploy it to a separate namespace<PATH_TO_VALUES>is the path to thevalues.yamlfile
Step 3: Attach the Wallarm Sidecar to the application Pod
For Wallarm to filter application traffic, add the wallarm-sidecar: enabled label to the corresponding application Pod:
apiVersion: apps/v1
kind: Deployment
metadata:
  name: myapp
  namespace: default
spec:
  replicas: 1
  selector:
    matchLabels:
      app: myapp
  template:
    metadata:
      labels:
        app: myapp
        wallarm-sidecar: enabled
    spec:
      containers:
        - name: application
          image: kennethreitz/httpbin
          ports:
            - name: http
              containerPort: 80
-
If the
wallarm-sidecarapplication Pod label is either set todisabledor not explicitly specified, the Wallarm Sidecar container is not injected into a pod and therefore Wallarm does not filter traffic. -
If the
wallarm-sidecarapplication Pod label is set toenabled, the Wallarm Sidecar container is injected into a pod and therefore Wallarm filters incoming traffic.
Step 4: Test the Wallarm Sidecar operation
To test that the Wallarm Sidecar operates correctly:
-
Get the Wallarm control plane details to check it has been successfully started:
Each pod should display the following: READY: N/N and STATUS: Running, e.g.:
-
Get the application pod details to check the Wallarm sidecar container has been successfully injected:
The output should display READY: 2/2 pointing to successful sidecar container injection and STATUS: Running pointing to successful connection to the Wallarm Cloud:
-
Send the test Path Traversal attack to the application cluster address Wallarm is enabled to filter traffic:
Since the Wallarm proxy operates in the monitoring filtration mode by default, the Wallarm node will not block the attack but will register it.
To check that the attack has been registered, proceed to Wallarm Console → Attacks:

ARM64 deployment
With the Sidecar proxy's Helm chart version 4.10.2, ARM64 processor compatibility is introduced. Initially set for x86 architectures, deploying on ARM64 nodes involves modifying the Helm chart parameters.
In ARM64 settings, Kubernetes nodes often carry an arm64 label. To assist the Kubernetes scheduler in allocating the Wallarm workload to the appropriate node type, reference this label using nodeSelector, tolerations, or affinity rules in the Wallarm Helm chart configuration.
Below is the Wallarm Helm chart example for Google Kubernetes Engine (GKE), which uses the kubernetes.io/arch: arm64 label for relevant nodes. This template is modifiable for compatibility with other cloud setups, respecting their ARM64 labeling conventions.
config:
  wallarm:
    api:
      token: "<NODE_TOKEN>"
      # If using an API token, uncomment the following line and specify your node group name
      # nodeGroup: "defaultSidecarGroup"
  postanalytics:
    tolerations:
      - key: kubernetes.io/arch
        operator: Equal
        value: arm64
        effect: NoSchedule
  controller:
    tolerations:
      - key: kubernetes.io/arch
        operator: Equal
        value: arm64
        effect: NoSchedule
Security Context Constraints (SCC) in OpenShift
When deploying the Sidecar solution on OpenShift, it is necessary to define a custom Security Context Constraint (SCC) to suit the security requirements of the platform. The default constraints may be insufficient for the Wallarm solution, potentially leading to errors.
Below is the recommended custom SCC for the Wallarm Sidecar solution tailored for OpenShift. This configuration is designed for running the solution in non-privileged mode without iptables usage.
Apply the SCC before deploying the Sidecar
Ensure the SCC is applied prior to deploying the Wallarm Sidecar solution.
-
Define the custom SCC in the
wallarm-scc.yamlfile as follows:allowHostDirVolumePlugin: false allowHostIPC: false allowHostNetwork: false allowHostPID: false allowHostPorts: false allowPrivilegeEscalation: false allowPrivilegedContainer: false allowedCapabilities: - NET_BIND_SERVICE apiVersion: security.openshift.io/v1 defaultAddCapabilities: null fsGroup: type: MustRunAs groups: [] kind: SecurityContextConstraints metadata: annotations: kubernetes.io/description: wallarm-sidecar-deployment name: wallarm-sidecar-deployment priority: null readOnlyRootFilesystem: false requiredDropCapabilities: - ALL runAsUser: type: MustRunAsRange uidRangeMin: 101 uidRangeMax: 65532 seLinuxContext: type: MustRunAs seccompProfiles: - runtime/default supplementalGroups: type: RunAsAny users: [] volumes: - configMap - emptyDir - secret -
Apply this policy to a cluster:
-
Create a Kubernetes namespace where the Sidecar will be deployed, e.g.:
-
Allow the Wallarm Sidecar workloads to use the SCC policy:
oc adm policy add-scc-to-user wallarm-sidecar-deployment \ -z <RELEASE_NAME>-wallarm-sidecar-postanalytics -n wallarm-sidecar oc adm policy add-scc-to-user wallarm-sidecar-deployment \ -z <RELEASE_NAME>-wallarm-sidecar-admission -n wallarm-sidecar-
<RELEASE_NAME>: Helm release name that you will use duringhelm install.If the release name includes
wallarm-sidecarWhen the release name contains
wallarm-sidecar, omit it from the service account names.The accounts will be
wallarm-sidecar-postanalyticsandwallarm-sidecar-admission. -
-n wallarm-sidecar: namespace where the Sidecar will be deployed (created above).
For example, with the namespace
wallarm-sidecarand the Helm release namewlrm-sidecar: -
-
Deploy the Wallarm Sidecar using the same namespace and Helm release name specified above.
-
Disable the usage of iptables to avoid running a privileged iptables container. This can be done globally in
values.yamlor per pod via annotations.-
In the
values.yaml, setconfig.injectionStrategy.iptablesEnabletofalse. -
In your application Service manifest, set
spec.ports.targetPorttoproxy. With iptables disabled, the Sidecar exposes this port.apiVersion: v1 kind: Service metadata: name: myapp-svc namespace: default spec: ports: - port: 80 targetPort: proxy protocol: TCP name: http selector: app: myappWhen exposing the application via an OpenShift Route, set
spec.ports.targetPortto26001.
- Disable iptables on a per-pod basis by setting the Pod's annotation
sidecar.wallarm.io/sidecar-injection-iptables-enableto"false". - In your application Service manifest, set
spec.ports.targetPorttoproxy. With iptables disabled, the Sidecar exposes this port.
apiVersion: apps/v1
kind: Deployment
metadata:
  name: myapp
  namespace: default
spec:
  replicas: 1
  selector:
    matchLabels:
      app: myapp
  template:
    metadata:
      labels:
        app: myapp
        wallarm-sidecar: enabled
      annotations:
        sidecar.wallarm.io/sidecar-injection-iptables-enable: "false"
    spec:
      containers:
        - name: application
          image: kennethreitz/httpbin
          ports:
            - name: http
              containerPort: 80
---
apiVersion: v1
kind: Service
metadata:
  name: myapp-svc
  namespace: default
spec:
  ports:
    - port: 80
      targetPort: proxy
      protocol: TCP
      name: http
  selector:
    app: myapp
When exposing the application via an OpenShift Route, set
spec.ports.targetPortto26001. -
-
Deploy the application with the updated configuration:
-
Verify that the correct SCC is applied to Wallarm pods:
WALLARM_SIDECAR_NAMESPACE="wallarm-sidecar"
POD=$(kubectl -n ${WALLARM_SIDECAR_NAMESPACE} get pods -o name -l "app.kubernetes.io/component=postanalytics" | cut -d '/' -f 2)
kubectl -n ${WALLARM_SIDECAR_NAMESPACE}  get pod ${POD} -o jsonpath='{.metadata.annotations.openshift\.io\/scc}{"\n"}'
The expected output is
wallarm-sidecar-deployment. -
Grant your application pod the same SCC as
wallarm-sidecar-deployment, ensuring it allows the required UID range. This is necessary as the injected Sidecar container runs under this UID range.Use the command below to assign the
wallarm-sidecar-deploymentpolicy:APP_NAMESPACE=<APP_NAMESPACE> POD_NAME=<POD_NAME> APP_POD_SERVICE_ACCOUNT_NAME=$(oc get pod $POD_NAME -n $APP_NAMESPACE -o jsonpath='{.spec.serviceAccountName}') oc adm policy add-scc-to-user wallarm-sidecar-deployment \ system:serviceaccount:$APP_NAMESPACE:$APP_POD_SERVICE_ACCOUNT_NAMEIn production, create a custom SCC tailored to your application's and Wallarm's needs.
Customization
Wallarm pods have been injected based on the default values.yaml and the custom configuration you specified on the 2nd deployment step.
You can customize the Wallarm proxy behavior even more on both the global and per-pod levels and get the most out of the Wallarm solution for your company.
Just proceed to the Wallarm proxy solution customization guide.