Enabling JA3 Fingerprinting
This article describes how to enable JA3 fingerprinting for the most popular software such as NGINX and infrastructure such as AWS, Google Cloud, and Azure.
Overview
Attackers frequently employ various techniques to bypass security measures, such as user agent (UA) spoofing and IP rotation. These methods make it challenging to detect behavioral attacks in the unauthenticated traffic. JA3 fingerprinting generates an MD5 hash for specific parameters defined during the TLS negotiation between client and server. This fingerprinting method can enhance the identification of threat actors as part of API session processing and contribute to building a behavioral profile for API abuse prevention.
NGINX
An ability to get a JA3 fingerprint from NGINX makes this identification method available in all NGINX-based Wallarm deployment options. There are two NGINX modules for JA3:
| Module | Description | Installation |
|---|---|---|
| nginx-ssl-ja3 | Main nginx module for JA3. Has the THIS IS NOT PRODUCTION mark. So there is no guarantee of success. | Instructions |
| nginx-ssl-fingerprint | Second nginx module for JA3. It has the high performance label and also has likes and forks. | Instructions |
In both modules, we need to patch OpenSSL and NGINX.
An example of module installation (from the nginx-ssl-fingerprint module):
# Clone

$ git clone -b OpenSSL_1_1_1-stable --depth=1 https://github.com/openssl/openssl
$ git clone -b release-1.23.1 --depth=1 https://github.com/nginx/nginx
$ git clone https://github.com/phuslu/nginx-ssl-fingerprint

# Patch

$ patch -p1 -d openssl < nginx-ssl-fingerprint/patches/openssl.1_1_1.patch
$ patch -p1 -d nginx < nginx-ssl-fingerprint/patches/nginx.patch

# Configure & Build

$ cd nginx
$ ASAN_OPTIONS=symbolize=1 ./auto/configure --with-openssl=$(pwd)/../openssl --add-module=$(pwd)/../nginx-ssl-fingerprint --with-http_ssl_module --with-stream_ssl_module --with-debug --with-stream --with-cc-opt="-fsanitize=address -O -fno-omit-frame-pointer" --with-ld-opt="-L/usr/local/lib -Wl,-E -lasan"
$ make

# Test

$ objs/nginx -p . -c $(pwd)/../nginx-ssl-fingerprint/nginx.conf
$ curl -k https://127.0.0.1:8444
Example NGINX configuration:
server {
  listen 80;
  server_name example.com;
  …
  # Proxy pass the JA3 fingerprint header to another app.
  proxy_set_header X-Client-TLS-FP-Value $http_ssl_ja3_hash;
  proxy_set_header X-Client-TLS-FP–Raw-Value $http_ssl_ja3;

  # Proxy the request to the proxied app.
  proxy_pass http://app:8080;
}
AWS
You can configure getting JA3 fingerprints from AWS CloudFront.
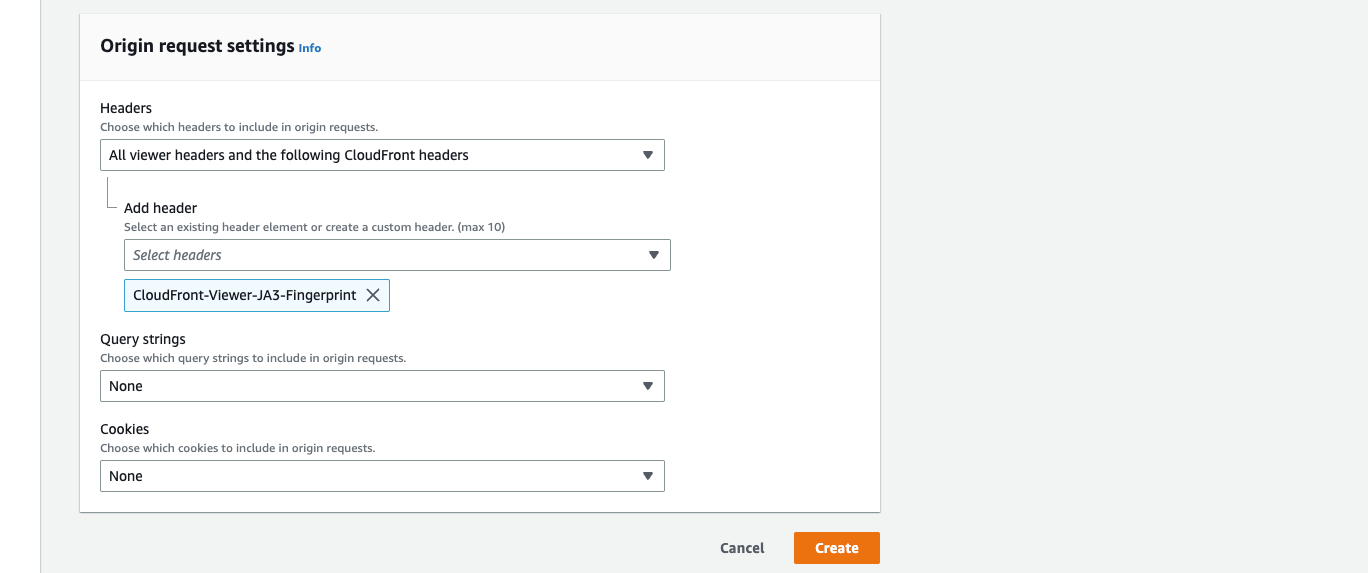
Wallarm can integrate with CloudFront to get the CloudFront-Viewer-JA3-Fingerprint and CloudFront-Viewer-TLS JA3 headers:
-
Go to the CloudFront console and select the Origin Request Policies tab.
-
Click Create Origin Request Policy and set the policy details.
-
In the Actions section, select Add Header.
-
In the Header Name field, enter
CloudFront-Viewer-JA3-Fingerprint. -
Click Create. Your origin request policy is now created.
-
To attach the created request policy to your CloudFront distribution, follow the steps below.
-
In CloudFront console, select the distribution to which you want to attach the policy.
-
Click the Edit button next to Origin Request Policies.
-
Select the checkbox next to the policy you created and save the changes.
Your origin request policy is now attached to your CloudFront distribution. Clients that make requests to your distribution will now have the
CloudFront-Viewer-JA3-Fingerprintheader added to their requests.
Google Cloud
You can configure getting JA3 fingerprints from the classic Google Cloud Application Load Balancer by configuring custom header and getting its value via the tls_ja3_fingerprint variable:
-
Go to the Google Cloud console → Load balancing.
-
Click Backends.
-
Click the name of a backend service and then Edit.
-
Click Advanced configurations.
-
Under Custom request headers, click Add header.
-
Enter the Header name and set the Header value to
tls_ja3_fingerprint. -
Save changes.
See detailed instructions here.
Example configuration request:
PATCH https://compute.googleapis.com/compute/v1/projects/PROJECT_ID/global/backendServices/BACKEND_SERVICE_NAME
"customRequestHeaders": [
   "X-Client-TLS-FP-Value: {tls_ja3_fingerprint}"
]
Azure
For Azure Wallarm deployment, use getting a JA3 fingerprint from NGINX method described above.


