# Filtration Mode
Filtration mode defines the filtering node behavior when processing incoming requests. These instructions describe available filtration modes and their configuration methods.
## Available filtration modes
The Wallarm filtering node can process incoming requests in the following modes (from the mildest to the strictest):
* `off` - requests are not processed at all; requests to resources with this mode are not counted against [quota](https://docs.wallarm.com/about-wallarm/subscription-plans.md).
* `monitoring`
* `safe_blocking` - blocks only where it is safe to block ([graylist](https://docs.wallarm.com/user-guides/ip-lists/overview.md)).
* `block`
| Wallarm node behavior | `off` | `monitoring` | `safe_blocking` |`block` |
| -------- | - | - | - | -|
| Analyzes incoming requests for [input validation](https://docs.wallarm.com/attacks-vulns-list.md#attack-types), [virtual patch](https://docs.wallarm.com/user-guides/rules/vpatch-rule.md), and [regex-based](https://docs.wallarm.com/user-guides/rules/regex-rule.md) malicious payloads | - | + | + | + |
| Uploads malicious requests to the Wallarm Cloud so that they are displayed in the event list | - | + | + | + |
| Blocks malicious requests | - | - | Only those originated from [graylisted IPs](https://docs.wallarm.com/user-guides/ip-lists/overview.md) | + |
| Blocks requests originated from [denylisted IPs](https://docs.wallarm.com/user-guides/ip-lists/overview.md)see exception
(IPs added manually and automatically by [multi-attack protection](https://docs.wallarm.com/admin-en/configuration-guides/protecting-with-thresholds.md) and behavioral protection: [API abuse prevention](https://docs.wallarm.com/api-abuse-prevention/setup.md), [manual BOLA](https://docs.wallarm.com/admin-en/configuration-guides/protecting-against-bola-trigger.md), [brute force](https://docs.wallarm.com/admin-en/configuration-guides/protecting-against-bruteforce.md) and [forced browsing](https://docs.wallarm.com/admin-en/configuration-guides/protecting-against-forcedbrowsing.md)) | - | + | + | + |
| Blocks requests originated from [graylisted IPs](https://docs.wallarm.com/user-guides/ip-lists/overview.md)
(IPs added manually and automatically by the same protection measures as for denylist) | - | - | Only those containing malicious payloads | - |
| Allows requests originated from [allowlisted IPs](https://docs.wallarm.com/user-guides/ip-lists/overview.md) | - | + | + | + |
!!! warning "Exception for denylist"
If [`wallarm_acl_access_phase off`](https://docs.wallarm.com/admin-en/configure-parameters-en.md#wallarm_acl_access_phase), the Wallarm node does not block requests from denylisted IPs in the `monitoring` mode.
## Configuration methods
The filtration mode can be configured in the following ways:
* [Set the `wallarm_mode` directive on the node side](#setting-wallarm_mode-directive)
* [Define the general filtration mode in Wallarm Console](#general-filtration-mode)
* [Define the conditioned filtration mode settings in Wallarm Console](#conditioned-filtration-mode)
Priorities of the filtration mode configuration methods are determined in the [`wallarm_mode_allow_override` directive](#prioritization-of-methods). By default, the settings specified in Wallarm Console have a higher priority than the `wallarm_mode` directive regardless of its value severity.
### Setting `wallarm_mode` directive
You can set the node filtration mode on the node side using the [`wallarm_mode`](https://docs.wallarm.com/admin-en/configure-parameters-en.md#wallarm_mode) directive. Peculiarities of how the `wallarm_mode` directive is set in different deployments are described below.
Note that described configuration is applicable only for [in-line](https://docs.wallarm.com/installation/inline/overview.md) deployments - for [out-of-band (OOB)](https://docs.wallarm.com/installation/oob/overview.md) solutions only the `monitoring` mode can be active.
**All-in-one installer:**
For the NGINX-based nodes installed on Linux with [all-in-one installer](https://docs.wallarm.com/installation/nginx/all-in-one.md), you can set the `wallarm_mode` directive in the filtering node configuration file. You can define filtration modes for different contexts. These contexts are ordered from the most global to the most local in the following list:
* `http`: the directives are applied to the requests sent to the HTTP server.
* `server`: the directives are applied to the requests sent to the virtual server.
* `location`: the directives are only applied to the requests containing that particular path.
If different `wallarm_mode` directive values are defined for the `http`, `server`, and `location` blocks, the most local configuration has the highest priority.
See [configuration example](#configuration-example) below.
**Docker NGINX‑based image:**
When deploying the NGINX-based Wallarm nodes via docker containers, [pass](https://docs.wallarm.com/admin-en/installation-docker-en.md#run-the-container-passing-the-environment-variables) the `WALLARM_MODE` environment variable:
```
docker run -d -e WALLARM_API_TOKEN='XXXXXXX' -e WALLARM_LABELS='group=' -e NGINX_BACKEND='example.com' -e WALLARM_API_HOST='us1.api.wallarm.com' -e WALLARM_MODE='monitoring' -p 80:80 wallarm/node:6.12.3
```
Alternatively, [include](https://docs.wallarm.com/admin-en/installation-docker-en.md#run-the-container-mounting-the-configuration-file) the corresponding parameter in the configuration file and run the container mounting this file.
**NGINX Ingress controller:**
For NGINX Ingress controller, use the `wallarm-mode` annotation:
```
kubectl annotate ingress -n nginx.ingress.kubernetes.io/wallarm-mode=monitoring
```
See example of how traffic analysis for your NGINX-based Ingress controller [is enabled](https://docs.wallarm.com/admin-en/installation-kubernetes-en.md#step-2-enabling-traffic-analysis-for-your-ingress) by setting the filtration mode to `monitoring`.
**Sidecar:**
For the Wallarm Sidecar solution, in the Wallarm-specific part of the default `values.yaml`, set the `mode` parameter:
```
config:
wallarm:
...
mode: monitoring
modeAllowOverride: "on"
```
See details on specifying the filtration mode for Sidecar [here](https://docs.wallarm.com/installation/kubernetes/sidecar-proxy/helm-chart-for-wallarm.md).
**Edge Connectors:**
For [Security Edge connectors](https://docs.wallarm.com/installation/security-edge/se-connector.md), you specify the `wallarm_mode` value in the **Filtration mode** selector during the connector deployment.
**Native Node:**
* For Native Node all-in-one installer and Docker image, use the [`route_config.wallarm_mode`](https://docs.wallarm.com/installation/native-node/all-in-one-conf.md#route_configwallarm_mode) parameter.
* For Native Node Helm chart, use the [`config.connector.route_config.wallarm_mode`](https://docs.wallarm.com/installation/native-node/helm-chart-conf.md#configconnectorroute_configwallarm_mode) parameter.
### General filtration mode
You can define the general filtration mode for all incoming requests using mitigation controls ([Advanced API Security](https://docs.wallarm.com/about-wallarm/subscription-plans.md#core-subscription-plans) subscription) or WAF rules ([Cloud Native WAAP](https://docs.wallarm.com/about-wallarm/subscription-plans.md#core-subscription-plans) subscription).
**Mitigation controls:**
The general filtration mode for all incoming requests is defined by "all traffic" **Real-time blocking mode** [mitigation control](https://docs.wallarm.com/about-wallarm/mitigation-controls-overview.md):
| Setting | Filtration mode |
| --- | --- |
| **Inherited** | Filtration mode is inherited from the [all-traffic **Real-time blocking mode**](https://docs.wallarm.com/admin-en/configure-wallarm-mode.md#general-filtration-mode) and the [configuration](https://docs.wallarm.com/admin-en/configure-wallarm-mode.md#setting-wallarm_mode-directive) of the Wallarm node. |
| **Excluding** | `off` |
| **Monitoring** | `monitoring` |
| **Safe blocking** | `safe_blocking` |
| **Blocking** | `block` |
**Inherited** is default. You can change the global mode at any moment.
**Rules:**
You can define the general filtration mode for all incoming requests in **Settings** → **General** in the [US](https://us1.my.wallarm.com/settings/general) or [EU](https://my.wallarm.com/settings/general), or [ME](https://me1.my.wallarm.com/settings/general) Cloud.
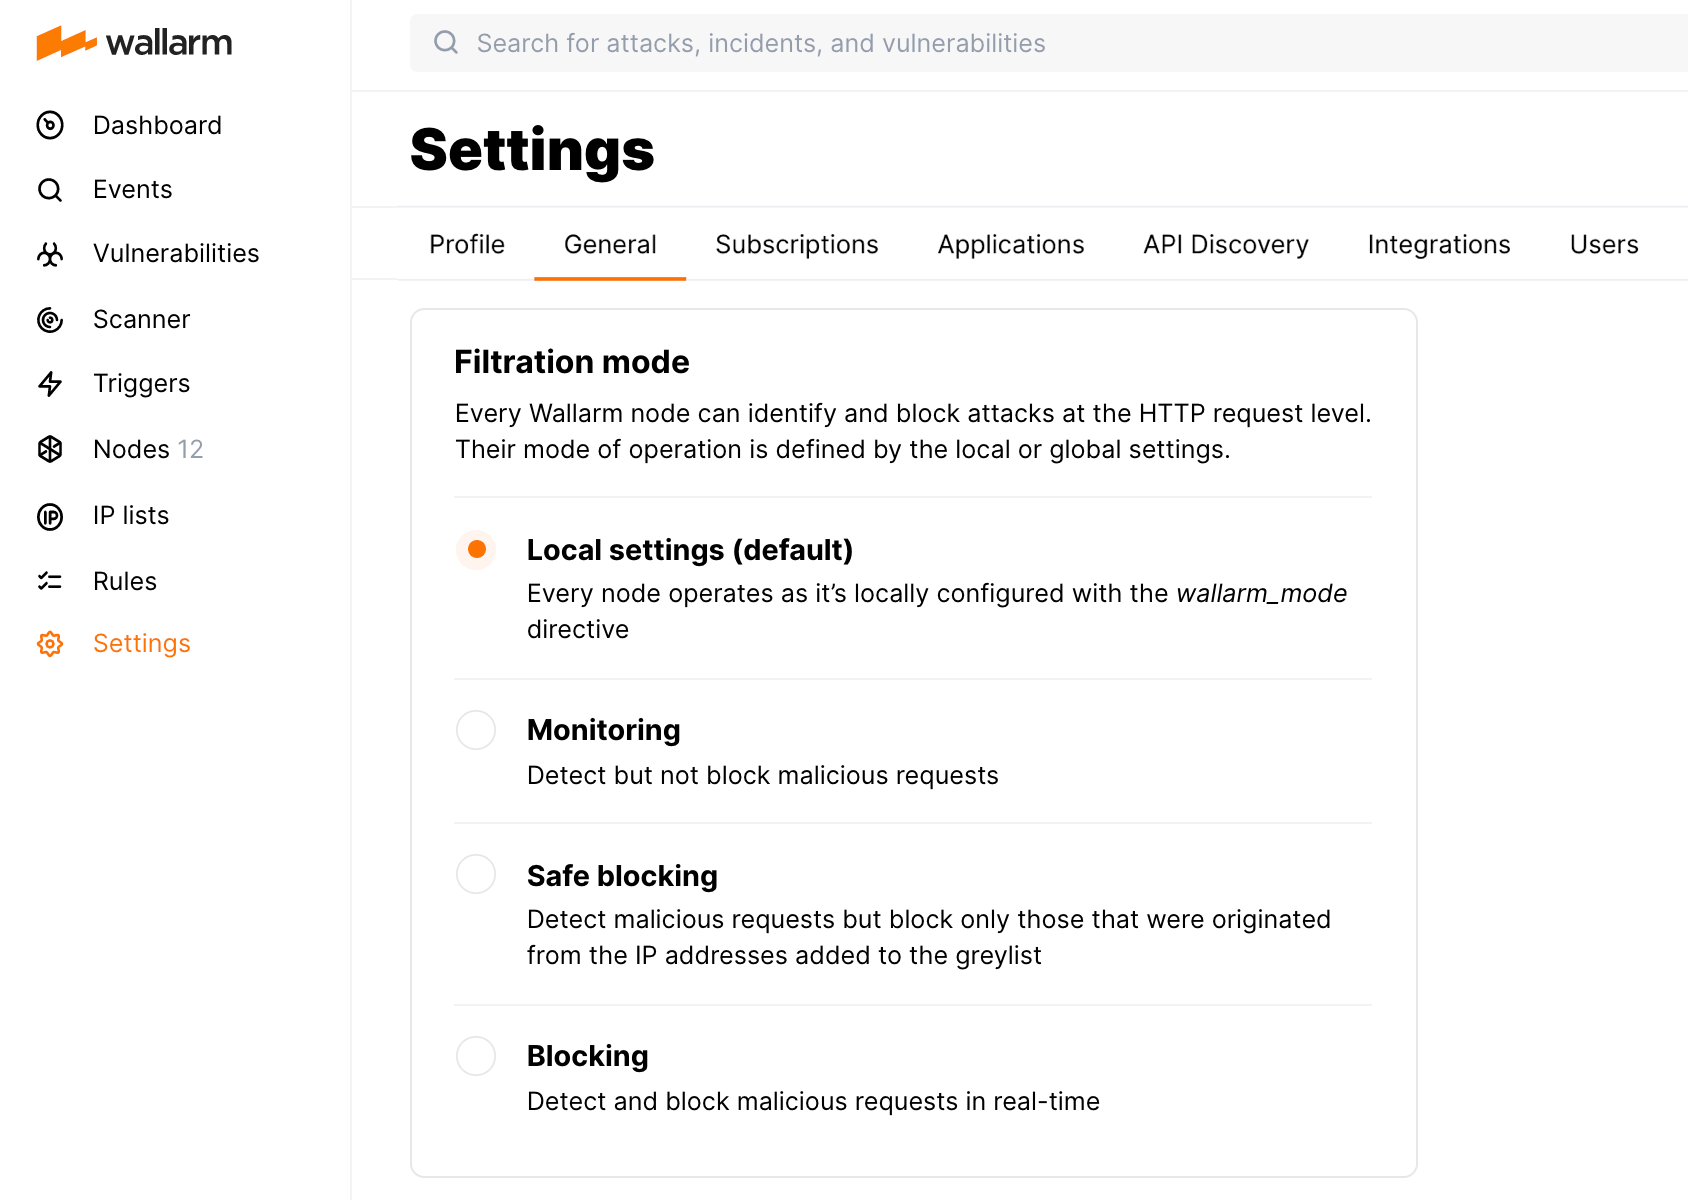
The general filtration mode setting is represented as **Set filtration mode** [default](https://docs.wallarm.com/user-guides/rules/rules.md#default-rules) rule in the **Rules WAF** section. Note that endpoint-targeted filtration rules in this section have higher priority.
### Conditioned filtration mode
You can set filtration mode for specific branches, endpoints and relying on other conditions using mitigation controls ([Advanced API Security](https://docs.wallarm.com/about-wallarm/subscription-plans.md#core-subscription-plans) subscription) or WAF rules ([Cloud Native WAAP](https://docs.wallarm.com/about-wallarm/subscription-plans.md#core-subscription-plans) subscription).
**Mitigation controls:**
You can set filtration mode for specific branches, endpoints and relying on other conditions. Wallarm provides the **Real-time blocking mode** [mitigation control](https://docs.wallarm.com/about-wallarm/mitigation-controls-overview.md).
Before proceeding: use the [Mitigation Controls](https://docs.wallarm.com/about-wallarm/mitigation-controls-overview.md#configuration) article to get familiar with how **Scope** and **Mitigation mode** are set for any mitigation control.
To create a new filtration mode mitigation control:
1. Proceed to Wallarm Console → **Mitigation Controls**.
1. Use **Add control** → **Real-time blocking mode**.
1. Describe the **Scope** to apply the mitigation control to.
1. In the **Mitigation mode** section, select filtration mode for the specified scope:
| Setting | Filtration mode |
| --- | --- |
| **Inherited** | Filtration mode is inherited from the [all-traffic **Real-time blocking mode**](https://docs.wallarm.com/admin-en/configure-wallarm-mode.md#general-filtration-mode) and the [configuration](https://docs.wallarm.com/admin-en/configure-wallarm-mode.md#setting-wallarm_mode-directive) of the Wallarm node. |
| **Excluding** | `off` |
| **Monitoring** | `monitoring` |
| **Safe blocking** | `safe_blocking` |
| **Blocking** | `block` |
1. Save changes and wait for the [mitigation control compilation to complete](https://docs.wallarm.com/about-wallarm/mitigation-controls-overview.md#ruleset-lifecycle).
**Rules:**
You can set filtration mode for specific branches, endpoints and relying on other conditions. Wallarm provides the **Set filtration mode** [rule](https://docs.wallarm.com/user-guides/rules/rules.md) to do this. Such rules have higher priority than the [general filtration rule set in Wallarm Console](#general-filtration-mode).
To create a new filtration mode rule:
1. Proceed to Wallarm Console:
* **Rules WAF** → **Add rule** or your branch → **Add rule**.
* **Attacks** / **Incidents** → attack/incident → hit → **Rule**.
* **API Discovery** (if [enabled](https://docs.wallarm.com/api-discovery/setup.md)) → your endpoint → **Create rule**.
1. Choose **Fine-tuning attack detection** → **Override filtration mode**.
1. In **If request is**, [describe](https://docs.wallarm.com/user-guides/rules/rules.md#configuring) the scope to apply the rule to. If you initiated the rule for specific branch, hit or endpoint, they will define the scope - if necessary, you can add more conditions.
1. Select filtration mode for the specified scope:
| Setting | Filtration mode |
| --- | --- |
| **Default** | Filtration mode is inherited from the [global filtration mode setting](https://docs.wallarm.com/admin-en/configure-wallarm-mode.md#general-filtration-mode) and the [configuration](https://docs.wallarm.com/admin-en/configure-wallarm-mode.md#setting-wallarm_mode-directive) of the Wallarm node. |
| **Disabled** | `off` |
| **Monitoring** | `monitoring` |
| **Safe blocking** | `safe_blocking` |
| **Blocking** | `block` |
1. Save changes and wait for the [rule compilation to complete](https://docs.wallarm.com/user-guides/rules/rules.md#ruleset-lifecycle).
Note that to create a filtration mode rule, you can also [call the Wallarm API directly](https://docs.wallarm.com/api/request-examples.md#create-the-rule-setting-filtration-mode-to-monitoring-for-the-specific-application).
### Prioritization of methods
!!! warning "Support of the `wallarm_mode_allow_override` directive on the Edge node"
Please note that the `wallarm_mode_allow_override` directive cannot be customized on the Wallarm Edge [inline](https://docs.wallarm.com/installation/security-edge/inline/deployment.md) and [connector](https://docs.wallarm.com/installation/security-edge/se-connector.md) nodes.
The `wallarm_mode_allow_override` directive manages the ability to apply mode rules/mitigation controls that are defined on Wallarm Console instead of using the `wallarm_mode` directive values from the filtering node configuration file.
The following values are valid for the `wallarm_mode_allow_override` directive:
* `off`: mode rules/mitigation controls specified in Wallarm Console are ignored. Rules specified by the `wallarm_mode` directive in the configuration file are applied.
* `strict`: only the mode rules/mitigation controls specified in the Wallarm Cloud that define stricter filtration modes than those defined by the `wallarm_mode` directive in the configuration file are applied.
The available filtration modes ordered from the mildest to the strictest are listed [above](#available-filtration-modes).
* `on` (by default): mode rules/mitigation controls specified in Wallarm Console are applied. Rules specified by the `wallarm_mode` directive in the configuration file are ignored.
The contexts in which the `wallarm_mode_allow_override` directive value can be defined, in order from the most global to the most local, are presented in the following list:
* `http`: the directives inside the `http` block are applied to the requests sent to the HTTP server.
* `server`: the directives inside the `server` block are applied to the requests sent to the virtual server.
* `location`: the directives inside the `location` block are only applied to the requests containing that particular path.
If different `wallarm_mode_allow_override` directive values are defined in the `http`, `server`, and `location` blocks, then the most local configuration has the highest priority.
**The `wallarm_mode_allow_override` directive usage example:**
```bash
http {
wallarm_mode monitoring;
server {
server_name SERVER_A;
wallarm_mode_allow_override off;
}
server {
server_name SERVER_B;
wallarm_mode_allow_override on;
location /main/login {
wallarm_mode_allow_override strict;
}
}
}
```
This configuration example results in the following applications of the filtration mode rules from Wallarm Console:
1. The filtration mode rules defined/mitigation controls in Wallarm Console are ignored for requests sent to the virtual server `SERVER_A`. There is no `wallarm_mode` directive specified in the `server` block that corresponds to the `SERVER_A` server, which is why the `monitoring` filtration mode specified in the `http` block is applied for such requests.
2. The filtration mode rules/mitigation controls defined in Wallarm Console are applied to the requests sent to the virtual server `SERVER_B` except for the requests that contain the `/main/login` path.
3. For those requests that are sent to the virtual server `SERVER_B` and contain the `/main/login` path, the filtration mode rules defined in Wallarm Console are only applied if they define a filtration mode that is stricter than the `monitoring` mode.
## Configuration example
Let us consider the example of a filtration mode configuration that uses all of the methods mentioned above.
### Node configuration file
```bash
http {
wallarm_mode block;
server {
server_name SERVER_A;
wallarm_mode monitoring;
wallarm_mode_allow_override off;
location /main/login {
wallarm_mode block;
wallarm_mode_allow_override strict;
}
location /main/signup {
wallarm_mode_allow_override strict;
}
location /main/apply {
wallarm_mode block;
wallarm_mode_allow_override on;
}
location /main/feedback {
wallarm_mode safe_blocking;
wallarm_mode_allow_override off;
}
}
}
```
### Settings in Wallarm Console
* [General filtration mode](#general-filtration-mode): **Monitoring**.
* [Conditioned filtration mode settings](#conditioned-filtration-mode):
* If the request meets the following conditions:
* Method: `POST`
* First part of the path: `main`
* Second part of the path: `apply`,
then apply the **Default** filtration mode.
* If the request meets the following condition:
* First part of the path: `main`,
then apply the **Blocking** filtration mode.
* If the request meets the following conditions:
* First part of the path: `main`
* Second part of the path: `login`,
then apply the **Monitoring** filtration mode.
### Request examples
Examples of the requests sent to the configured server `SERVER_A` and the actions that the Wallarm filtering node applies to them are the following:
* The malicious request with the `/news` path is processed but not blocked due to the `wallarm_mode monitoring;` setting for the server `SERVER_A`.
* The malicious request with the `/main` path is processed but not blocked due to the `wallarm_mode monitoring;` setting for the server `SERVER_A`.
The **Blocking** rule defined in Wallarm Console is not applied to it due to the `wallarm_mode_allow_override off;` setting for the server `SERVER_A`.
* The malicious request with the `/main/login` path is blocked due to the `wallarm_mode block;` setting for the requests with the `/main/login` path.
The **Monitoring** rule defined in Wallarm Console is not applied to it due to the `wallarm_mode_allow_override strict;` setting in the filtering node configuration file.
* The malicious request with the `/main/signup` path is blocked due to the `wallarm_mode_allow_override strict;` setting for the requests with the `/main/signup` path and the **Blocking** rule defined in Wallarm Console for the requests with the `/main` path.
* The malicious request with the `/main/apply` path and the `GET` method is blocked due to the `wallarm_mode_allow_override on;` setting for the requests with the `/main/apply` path and the **Blocking** rule defined in Wallarm Console for the requests with the `/main` path.
* The malicious request with the `/main/apply` path and the `POST` method is blocked due to the `wallarm_mode_allow_override on;` setting for those requests with the `/main/apply` path, the **Default** rule defined in Wallarm Console, and the `wallarm_mode block;` setting for the requests with the `/main/apply` path in the filtering node configuration file.
* The malicious request with the `/main/feedback` path is blocked only if it originates from a [graylisted IP](https://docs.wallarm.com/user-guides/ip-lists/overview.md) due to the `wallarm_mode safe_blocking;` setting for the requests with the `/main/feedback` path in the filtering node configuration file
The **Monitoring** rule defined in Wallarm Console is not applied to it due to the `wallarm_mode_allow_override off;` setting in the filtering node configuration file.
## Best practices on gradual filtration mode application
For a successful onboarding of a new Wallarm node, follow these step-by-step recommendations to switch filtration modes:
1. Deploy Wallarm filtering nodes in your non-production environments with the operation mode set to `monitoring`.
1. Deploy Wallarm filtering nodes in your production environment with the operation mode set to `monitoring`.
1. Keep the traffic flowing via the filtering nodes in all your environments (including testing and production) for 7‑14 days to give the Wallarm cloud-based backend some time to learn about your application.
1. Enable Wallarm `block` mode in all your non-production environments and use automated or manual tests to confirm that the protected application is working as expected.
1. Enable Wallarm `block` mode in the production environment and use available methods to confirm that the application is working as expected.