SAML SSO Authentication Setup
This article describes the generic flow of enabling and configuring Wallarm's SAML SSO Authentication.
You can also get acquainted with examples for G Suite and Okta SAML SSO solutions.
Step 1: Activate SSO service
By default, SSO service for authentication in Wallarm is not active, corresponding blocks are not visible in the Integrations section in Wallarm Console.
To activate the SSO service, contact the Wallarm support team. SSO with provisioning will be suggested by default:
-
No users will be able to authenticate with login and password after enabling. Request fallback account if necessary - it will retain login/password enter.
-
No users can be disabled or deleted from Wallarm side.
Step 2 (Wallarm): Generate metadata
You need Wallarm metadata to enter on the SAML SSO solution side:
-
Make sure you are logged in Wallarm Console with administrative privileges.
-
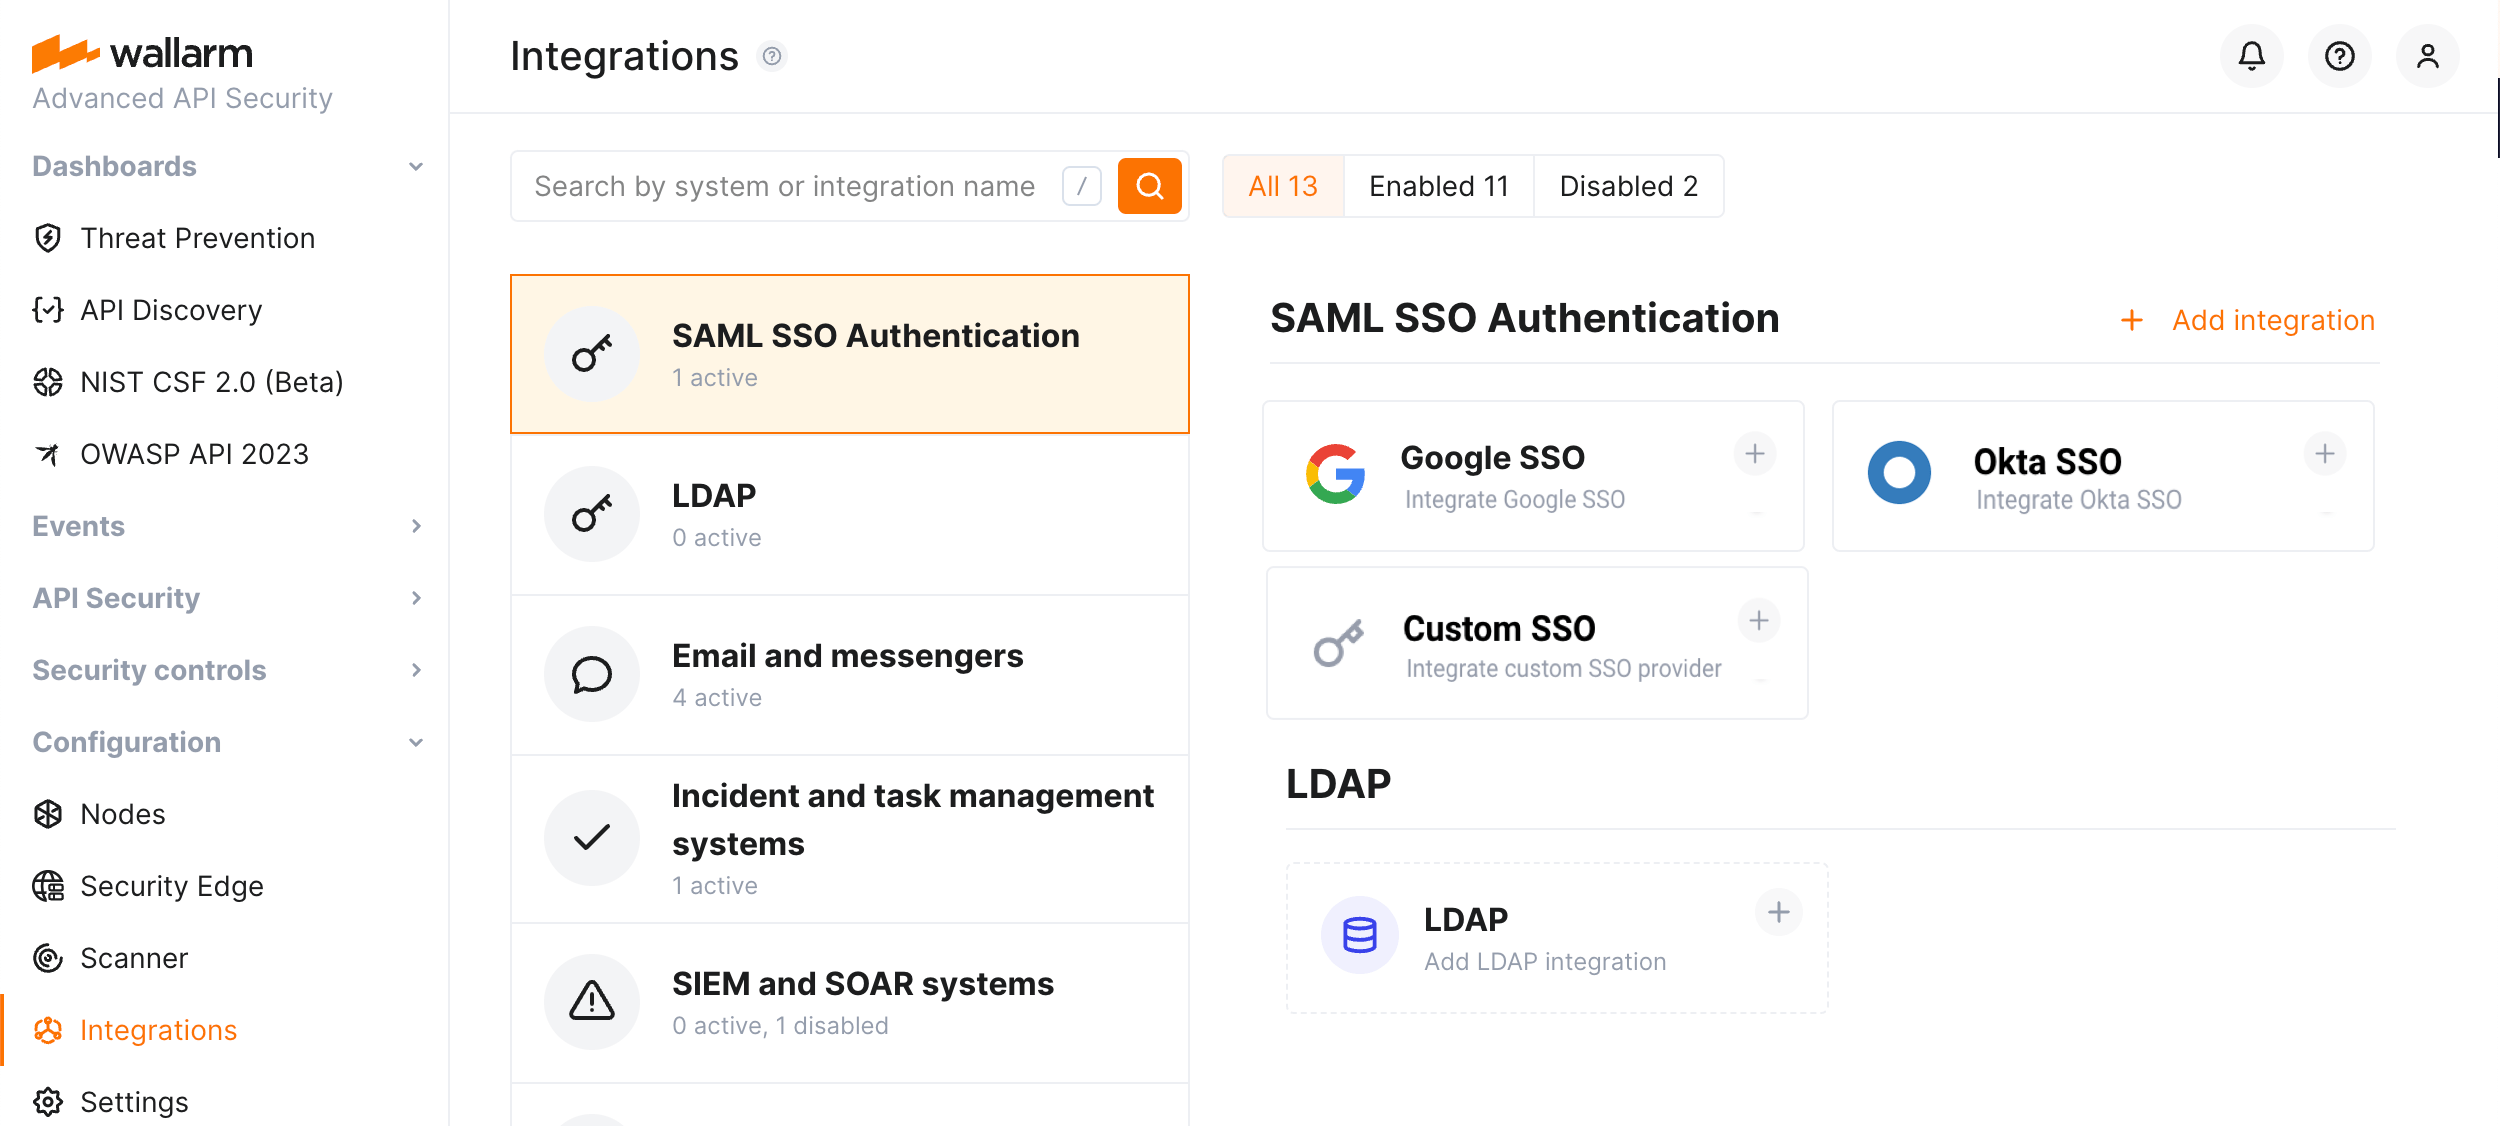
In Wallarm Console, go to Integrations → SSO SAML AUTHENTICATION and initiate the appropriate integration.
You can integrate Google, Okta or any other (Custom) SAML SSO solution. Note that only one SSO integration can be active at the moment.
-
In the SSO configuration wizard, at the Send details step, overview the metadata to be sent to your SAML SSO solution.
-
Copy metadata or save them as XML.
-
If SAML SSO solution requires additional validation for SSO data exchange, select the Extended security checkbox.
Step 3 (SAML SSO solution): Configure application
-
Log in to your SAML SSO solution.
-
Configure application that will provide access to Wallarm.
-
Copy the application's metadata or save them as XML.
-
Make sure the application is activated and users have access to it.
Step 4 (SAML SSO solution): Configure provisioning
The provisioning is an automatic transfer of data from SAML SSO solution to Wallarm: your SAML SSO solution users and their group membership define access to Wallarm and permissions there; all user management is performed on SAML SSO solution side.
For this to work, provide the attribute mapping:
-
In the application providing access to Wallarm, map the attributes:
emailfirst_namelast_name-
user group(s) to
wallarm_role:[role]whereroleis:admin(Administrator)analytic(Analyst)api_developer(API Developer)auditor(Read Only)partner_admin(Global Administrator)partner_analytic(Global Analyst)-
partner_auditor(Global Read Only)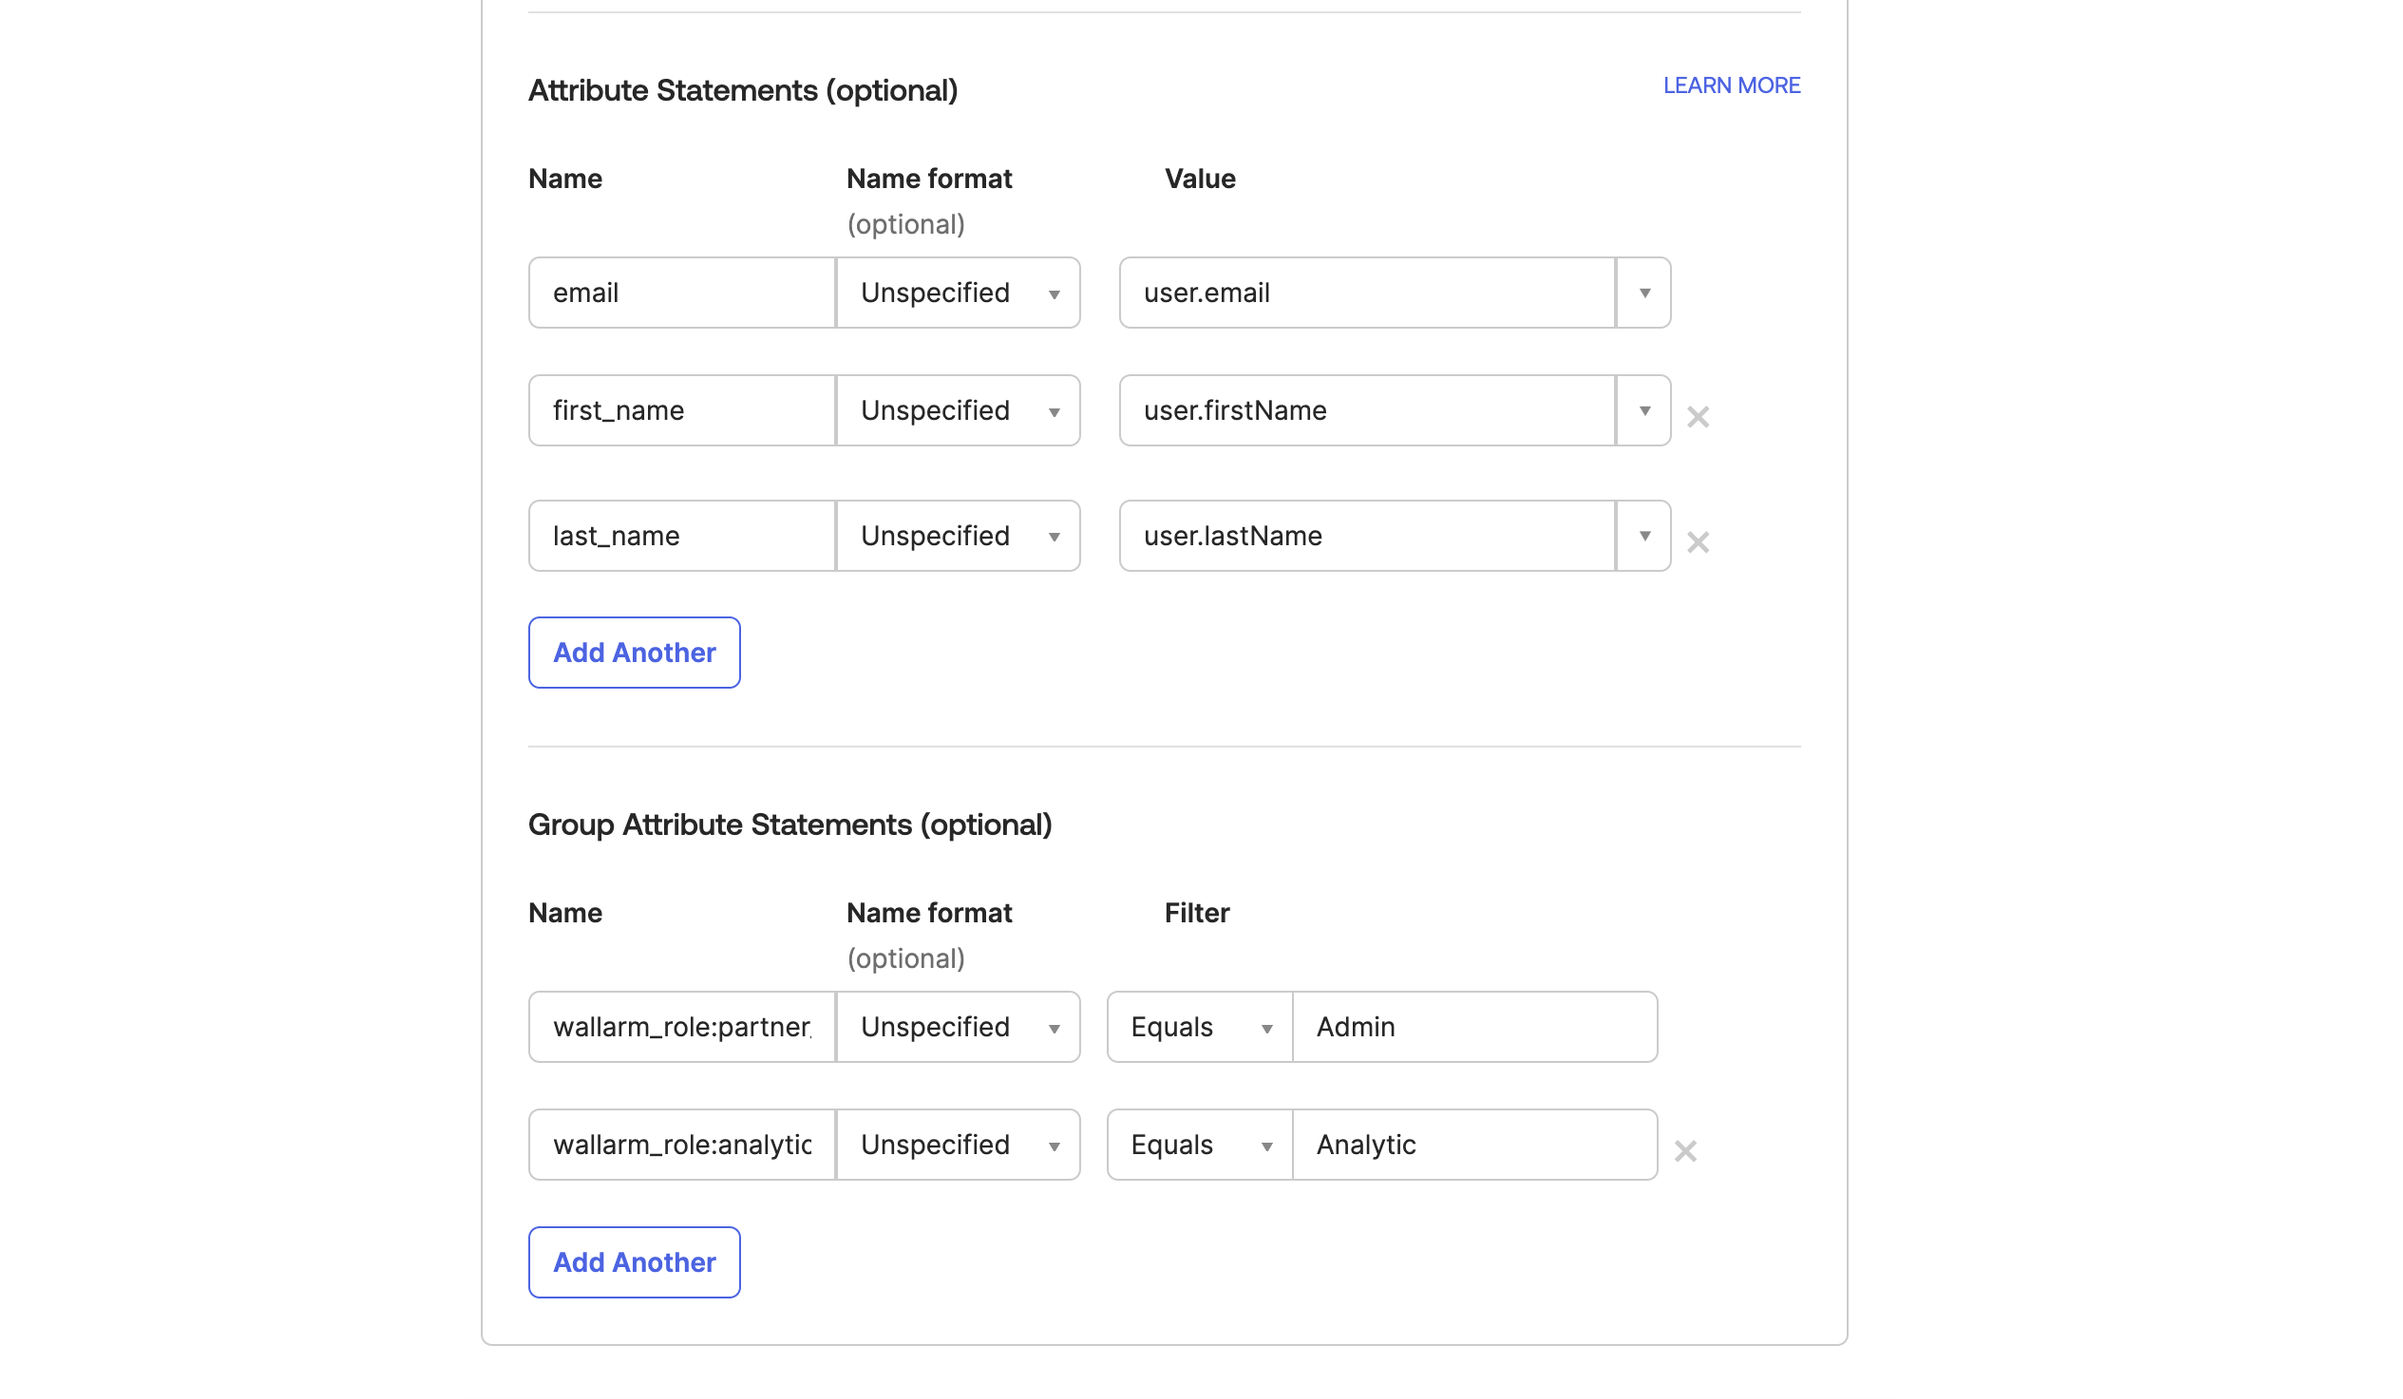
See all role descriptions here.
If your SAML SSO solution does not support mapping of groups to different attributes, map all groups to
wallarm_rolestag (like in case of Google), and then map groups to roles on the Wallarm side - see step 6.Overriding option
If you have the different permissions in different tenants option enabled, the mapping of groups to roles is configured differently and overrides the basic mapping.
-
Save the changes.
Turning provisioning off
You can turn the provisioning option off by contacting the Wallarm support team. If it is off, for users that you have in your SAML SSO solution, you will need to create corresponding users in Wallarm. User roles should also be defined in Wallarm Console.
With provisioning turned off, you should manually create users, set their roles and select users that should login via SSO - the remaining will use login/password. By your request, Wallarm support can also turn on Strict SSO option which enables SSO authentication for all company account users at once. Other characteristics of Strict SSO are:
-
The authentication method for all existing users of the account is switched to SSO.
-
All new users get the SSO as the authentication method by default.
-
Authentication method cannot be switched to anything different from SSO for any user.
When provisioning is off, user management is performed in Wallarm Console → Settings → Users as described here. Mapping with SAML SSO solution uses only the email attribute.
Step 5 (Wallarm): Enter SSO SAML solution metadata
-
In Wallarm Console, in the SSO configuration wizard, proceed to the Upload metadata step.
-
Do one of the following:
- Upload G Suite metadata as an XML file.
- Enter metadata manually.
Step 6 (Wallarm): Configure provisioning (optional)
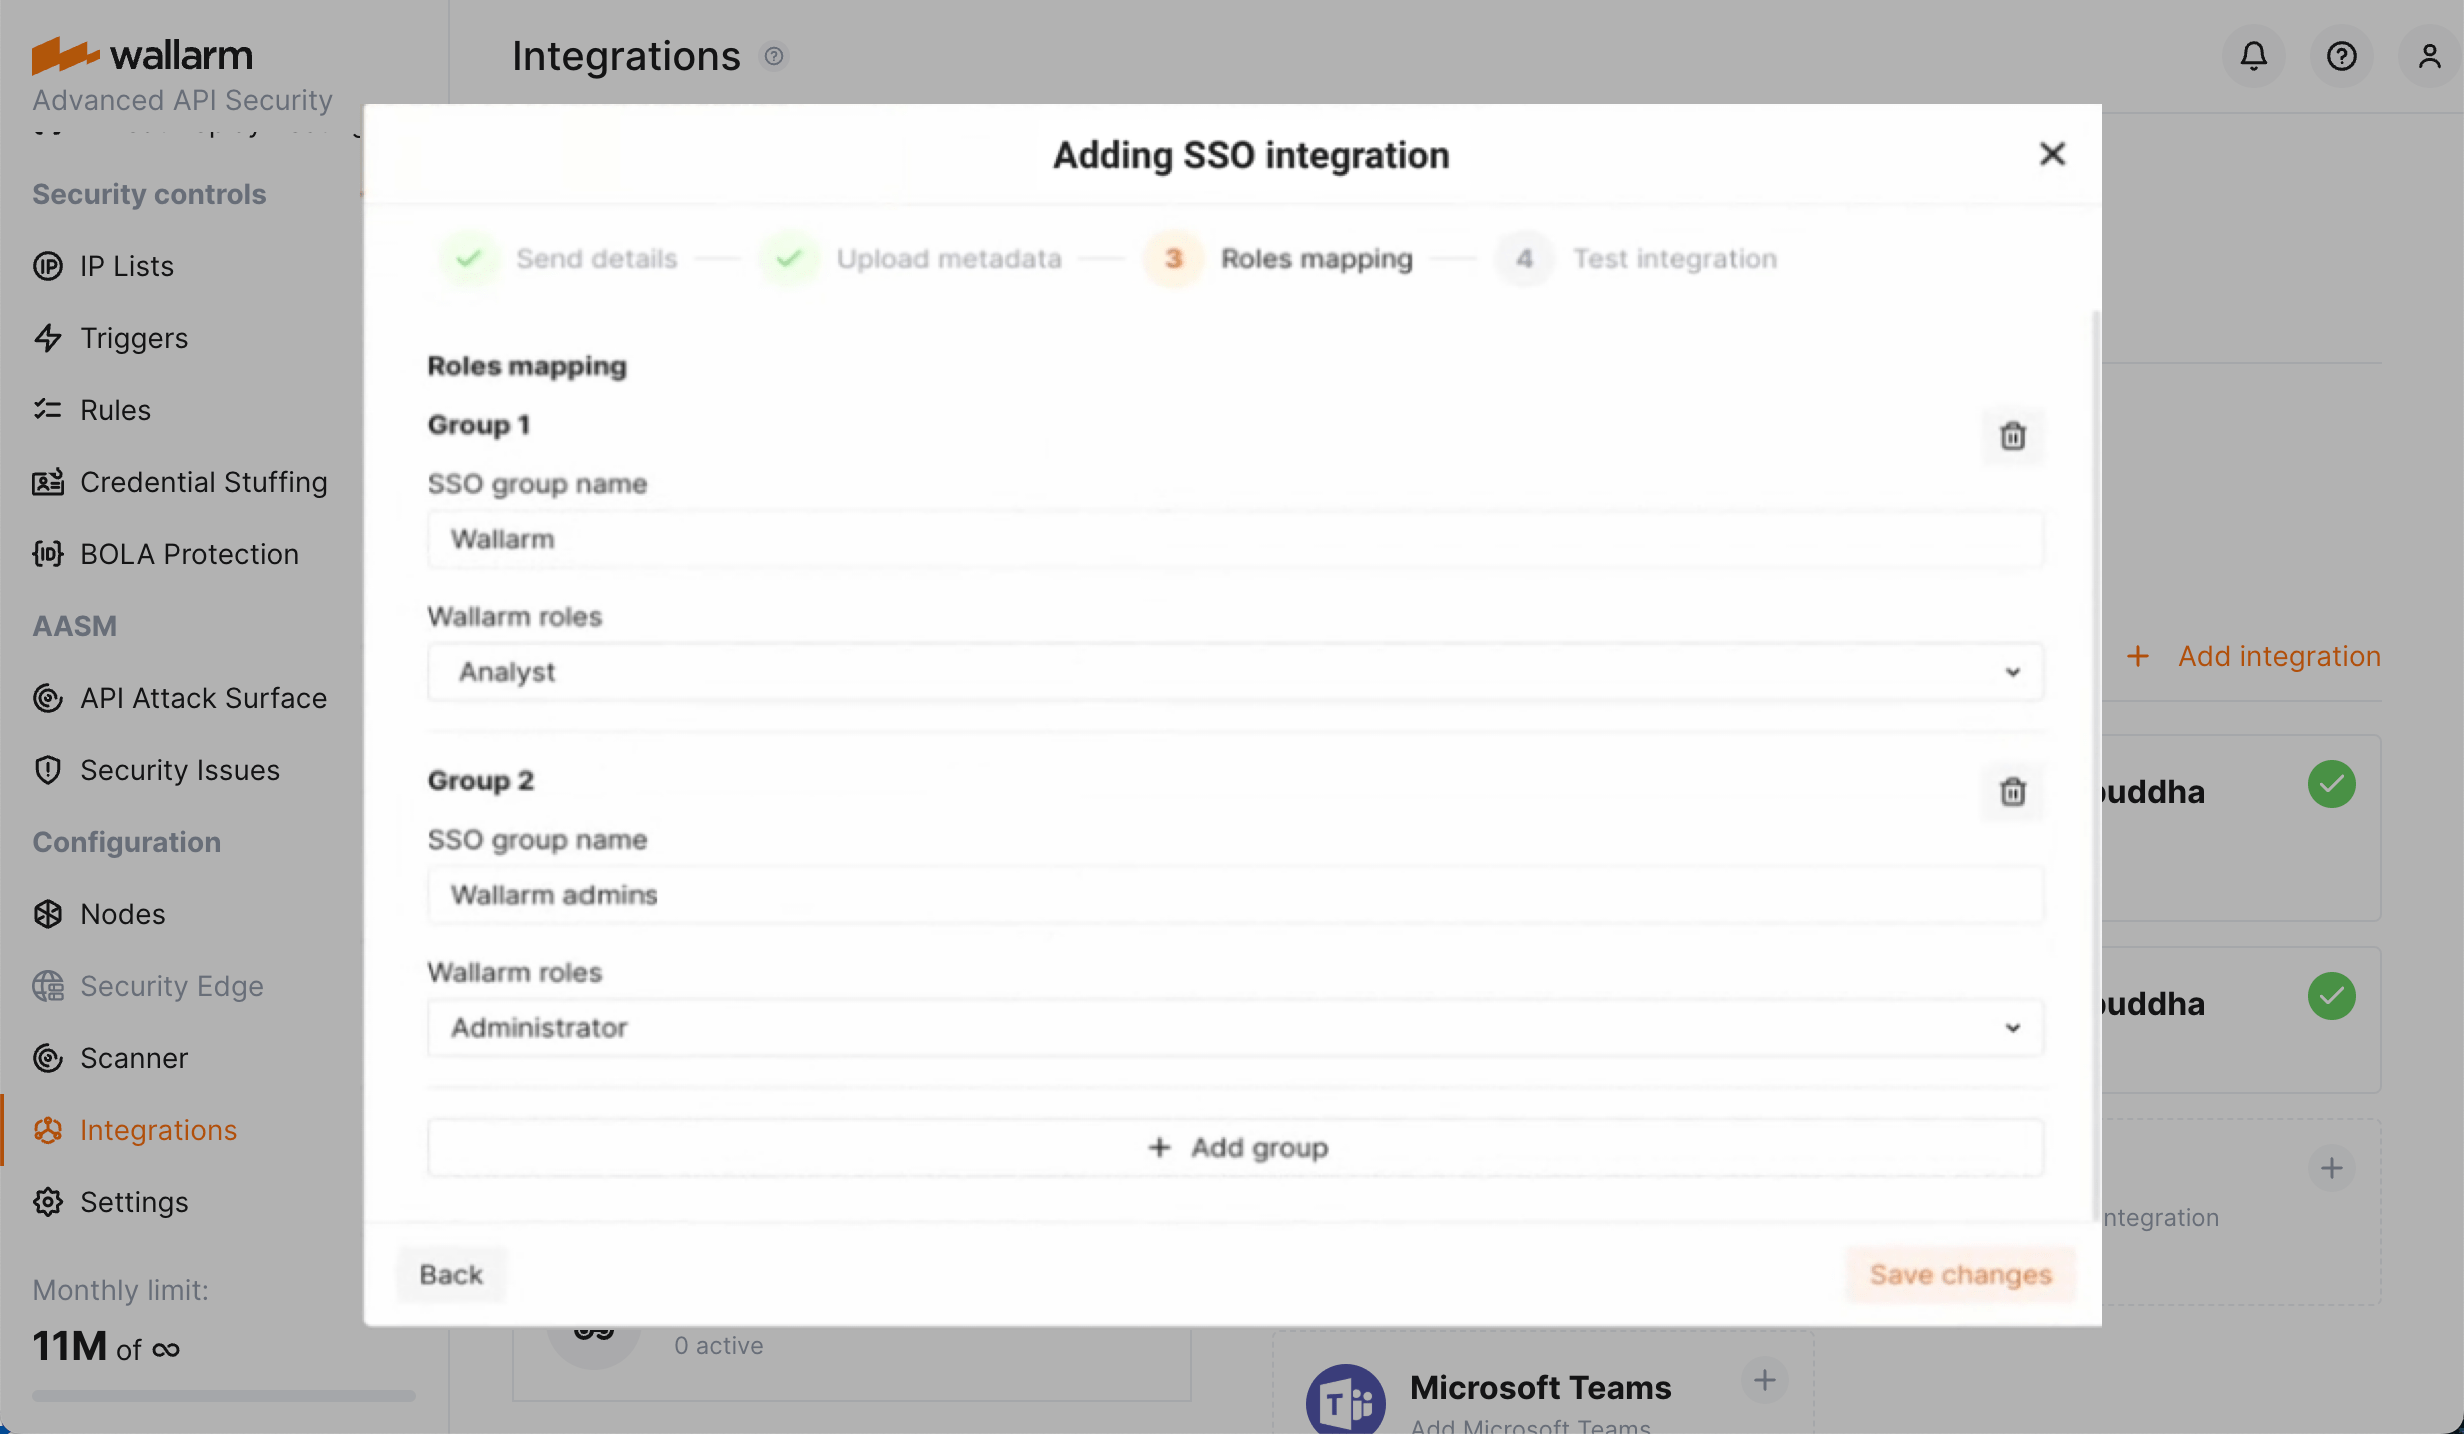
This step only should be fulfilled if your SAML SSO solution does not support mapping of groups to different attributes and all groups are mapped to wallarm_roles tag (like in case of Google).
-
Proceed to the Roles mapping step.
-
Map one or several SSO groups to Wallarm roles. Available roles are:
admin(Administrator)analytic(Analyst)api_developer(API Developer)auditor(Read Only)partner_admin(Global Administrator)partner_analytic(Global Analyst)-
partner_auditor(Global Read Only)See all role descriptions here.
-
Complete SSO configuration wizard. Wallarm will test if data to/from your SAML SSO Solution can now be transferred.
Extended security
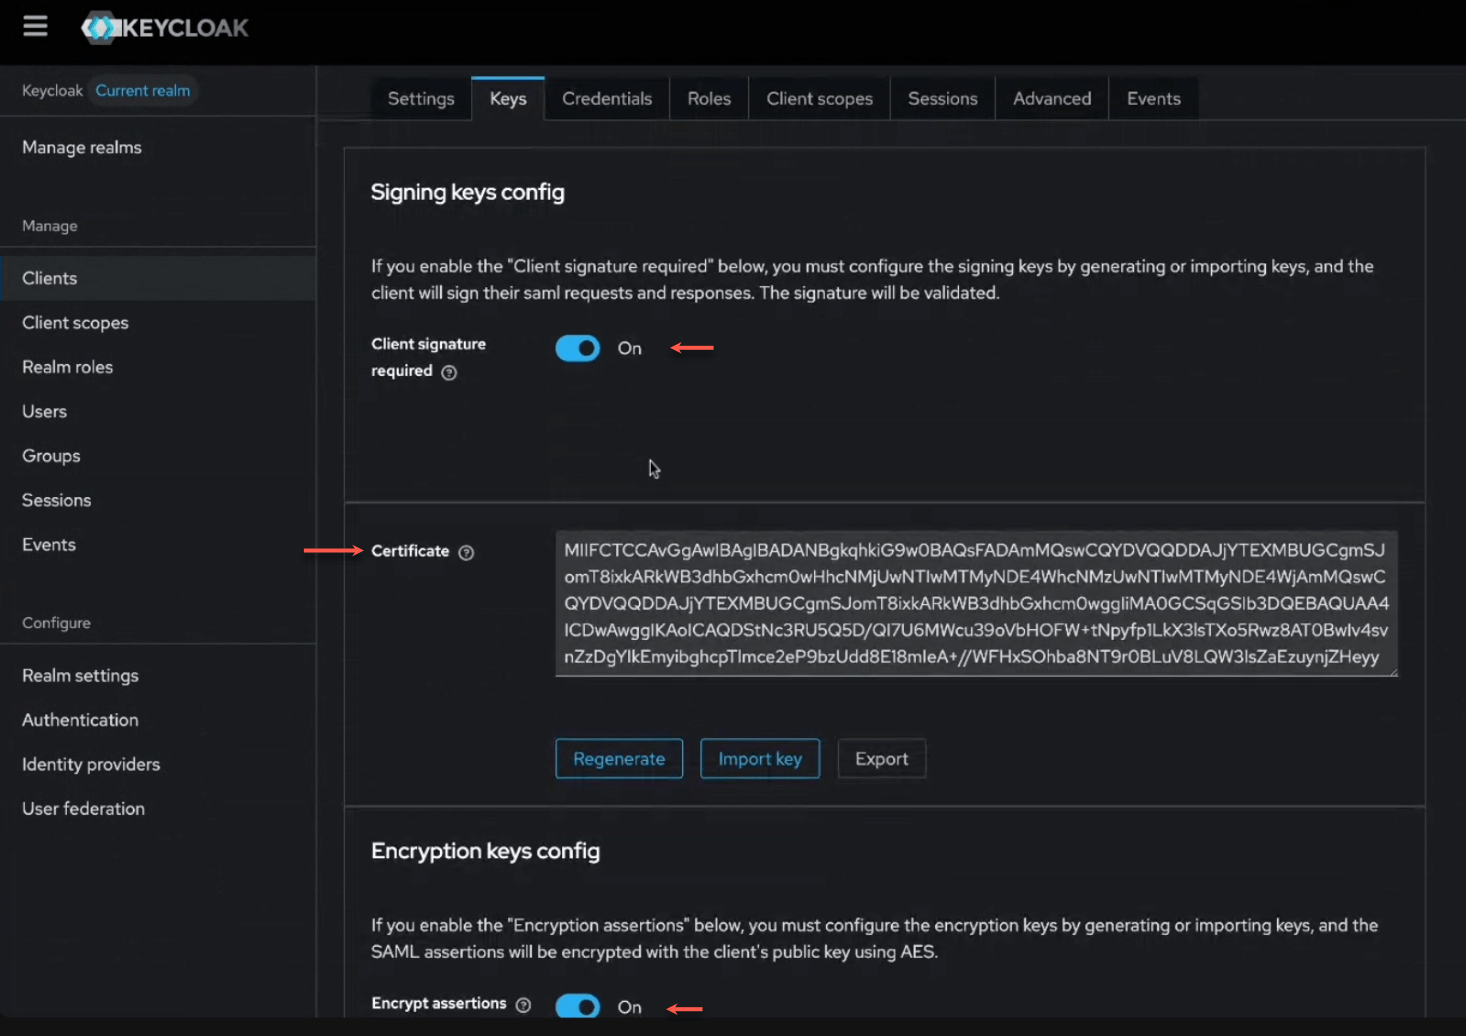
Your SAML SSO solution (like Keycloak or Okta) may require additional security validation when connecting with applications, including Wallarm. This may include:
-
Requirements for validation of SAML requests and responses by signature
-
Requirements for encryption of SAML requests and responses
To provide integration with such SAML SSO solution, Wallarm has the Extended security feature. How to use:
-
In Wallarm, at Generate metadata step, select the Extended security option.
-
Save metadata as XML, certificate data and appropriate configuration for your SAML SSO solutioin will be added to it.
-
In SAML SSO solution, at Configure application step, import provided XML to automatically get all options correctly configured. See Keycloak example below.
Tenant dependent permissions
If the different permissions in different tenants option is enabled, configure these permissions as follows:
-
Make sure you are logged in Wallarm Console as Global administrator.
-
Go to Settings → Groups.
-
Click Add group and bind it to your SAML SSO solution group name.
-
Set role, click Add.
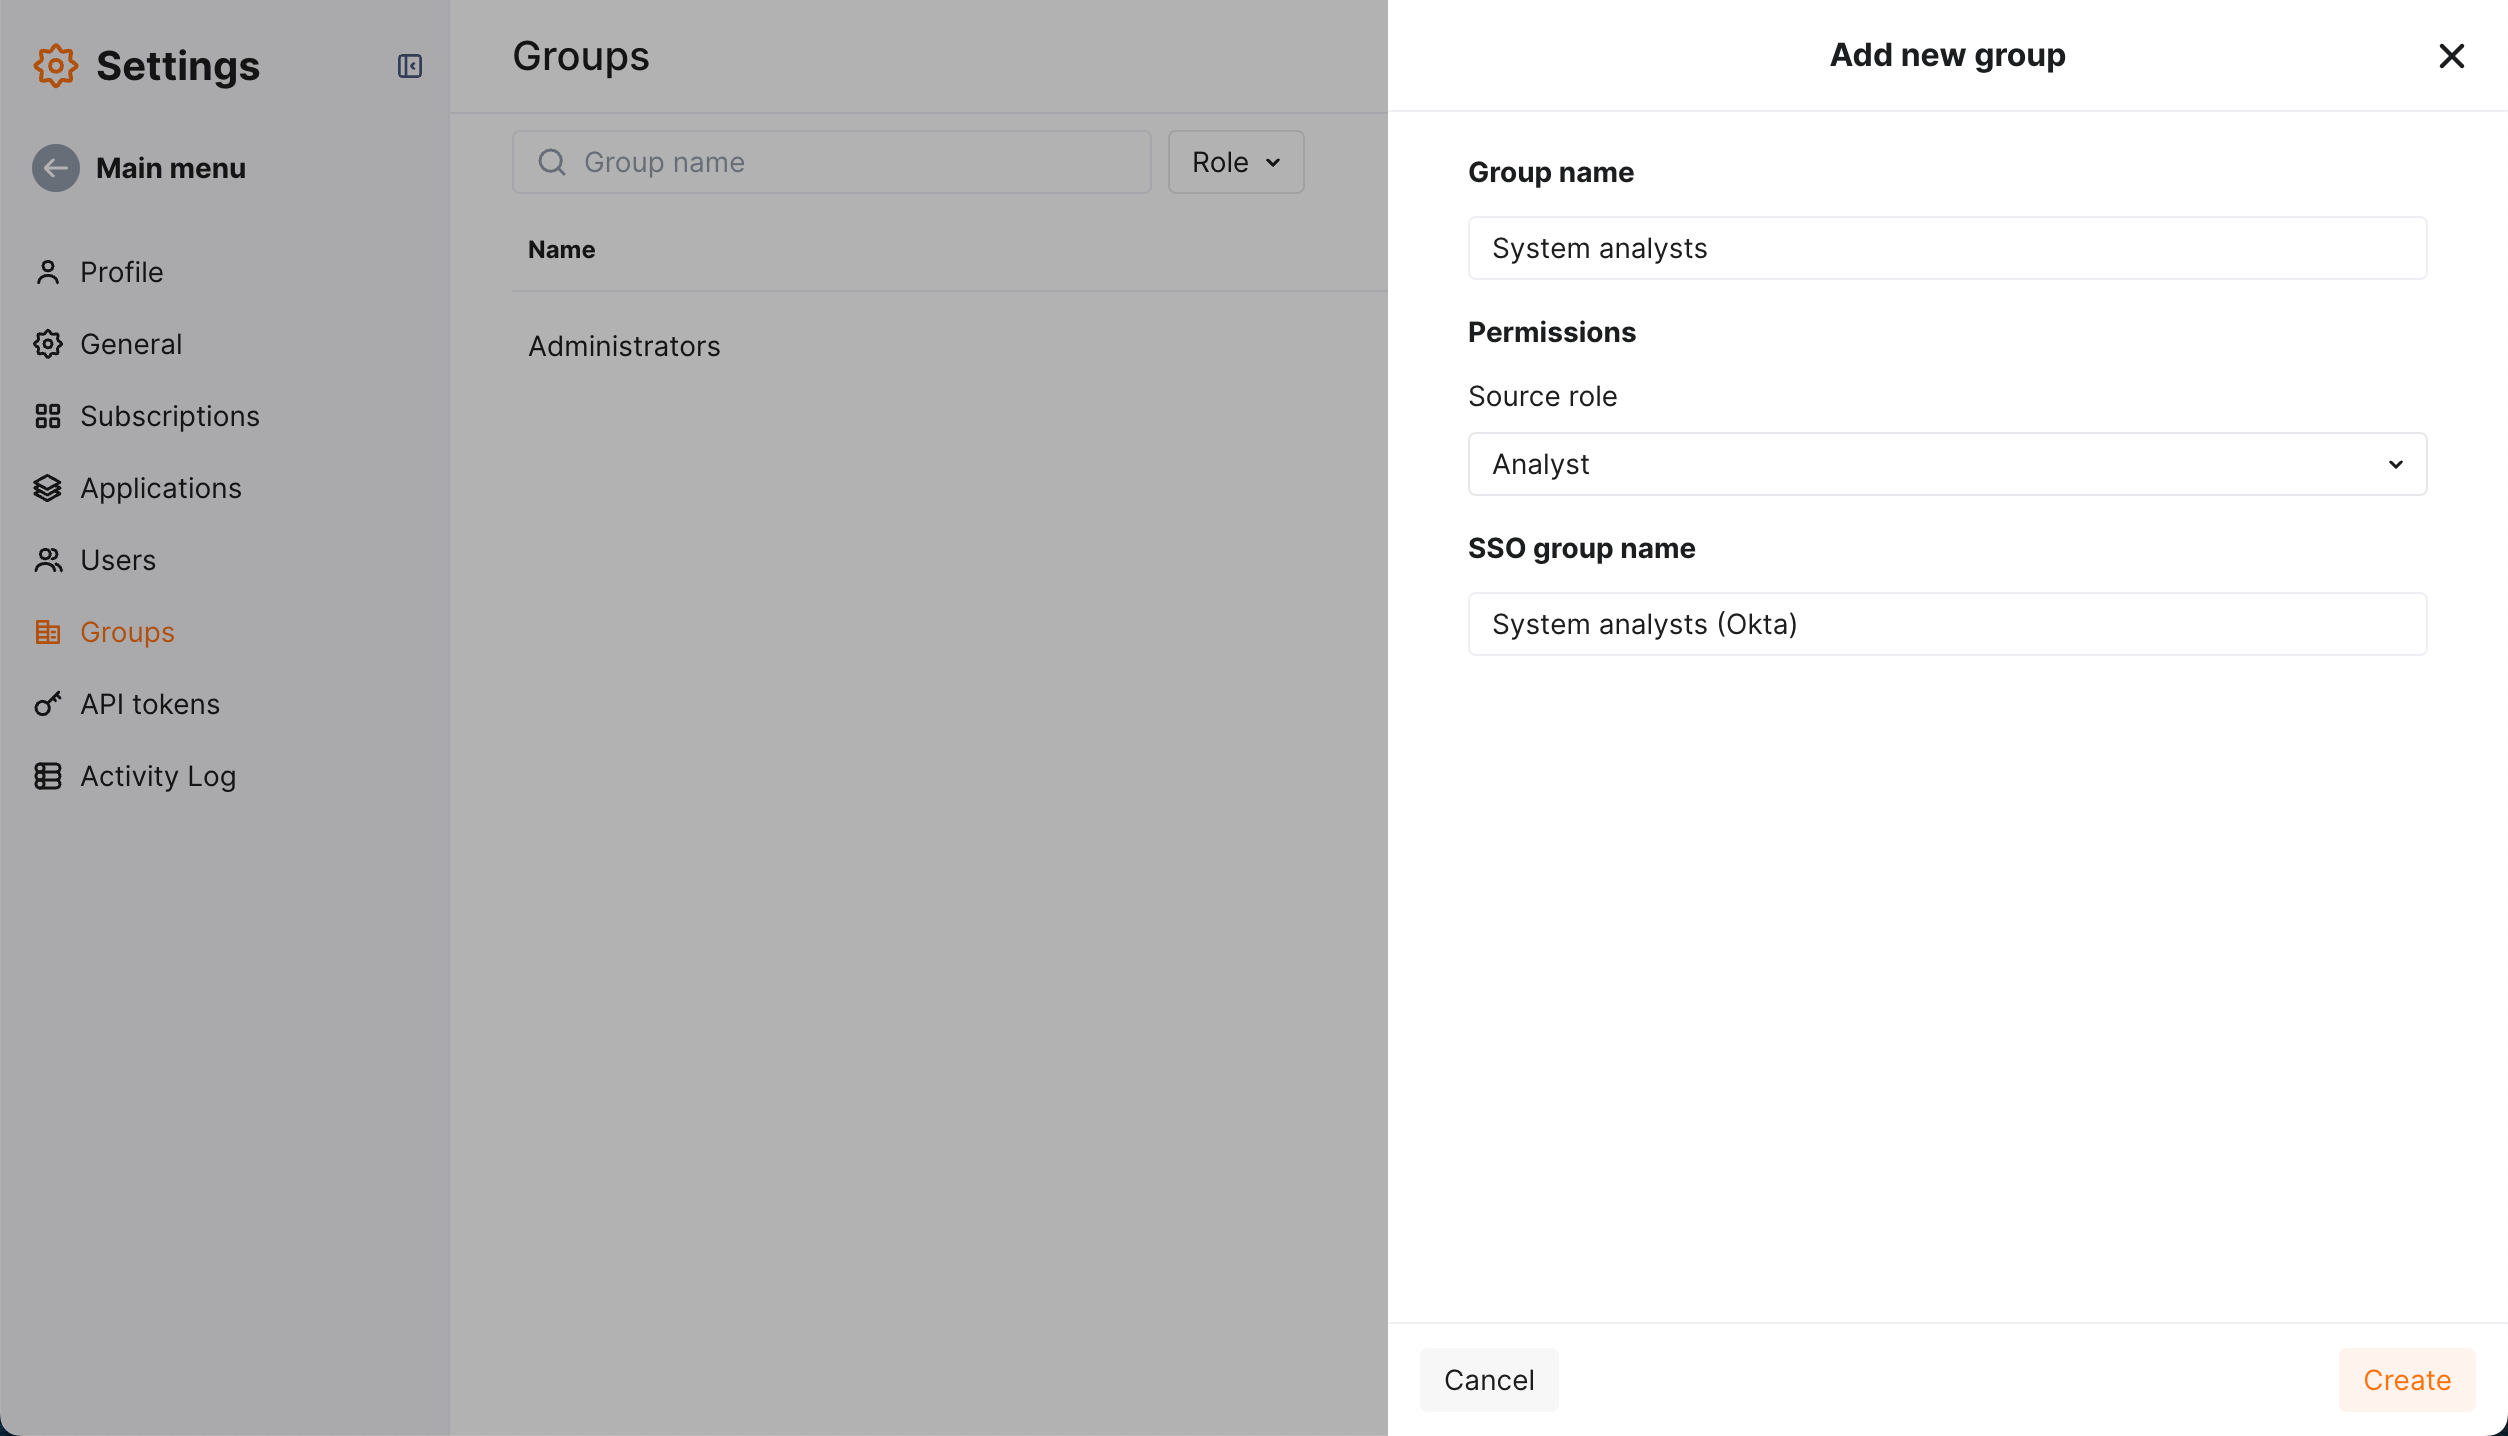
The group is created and displayed in the list of groups.
-
From the group menu, select Edit group settings.
-
Your group page displayed. Set list of tenants.
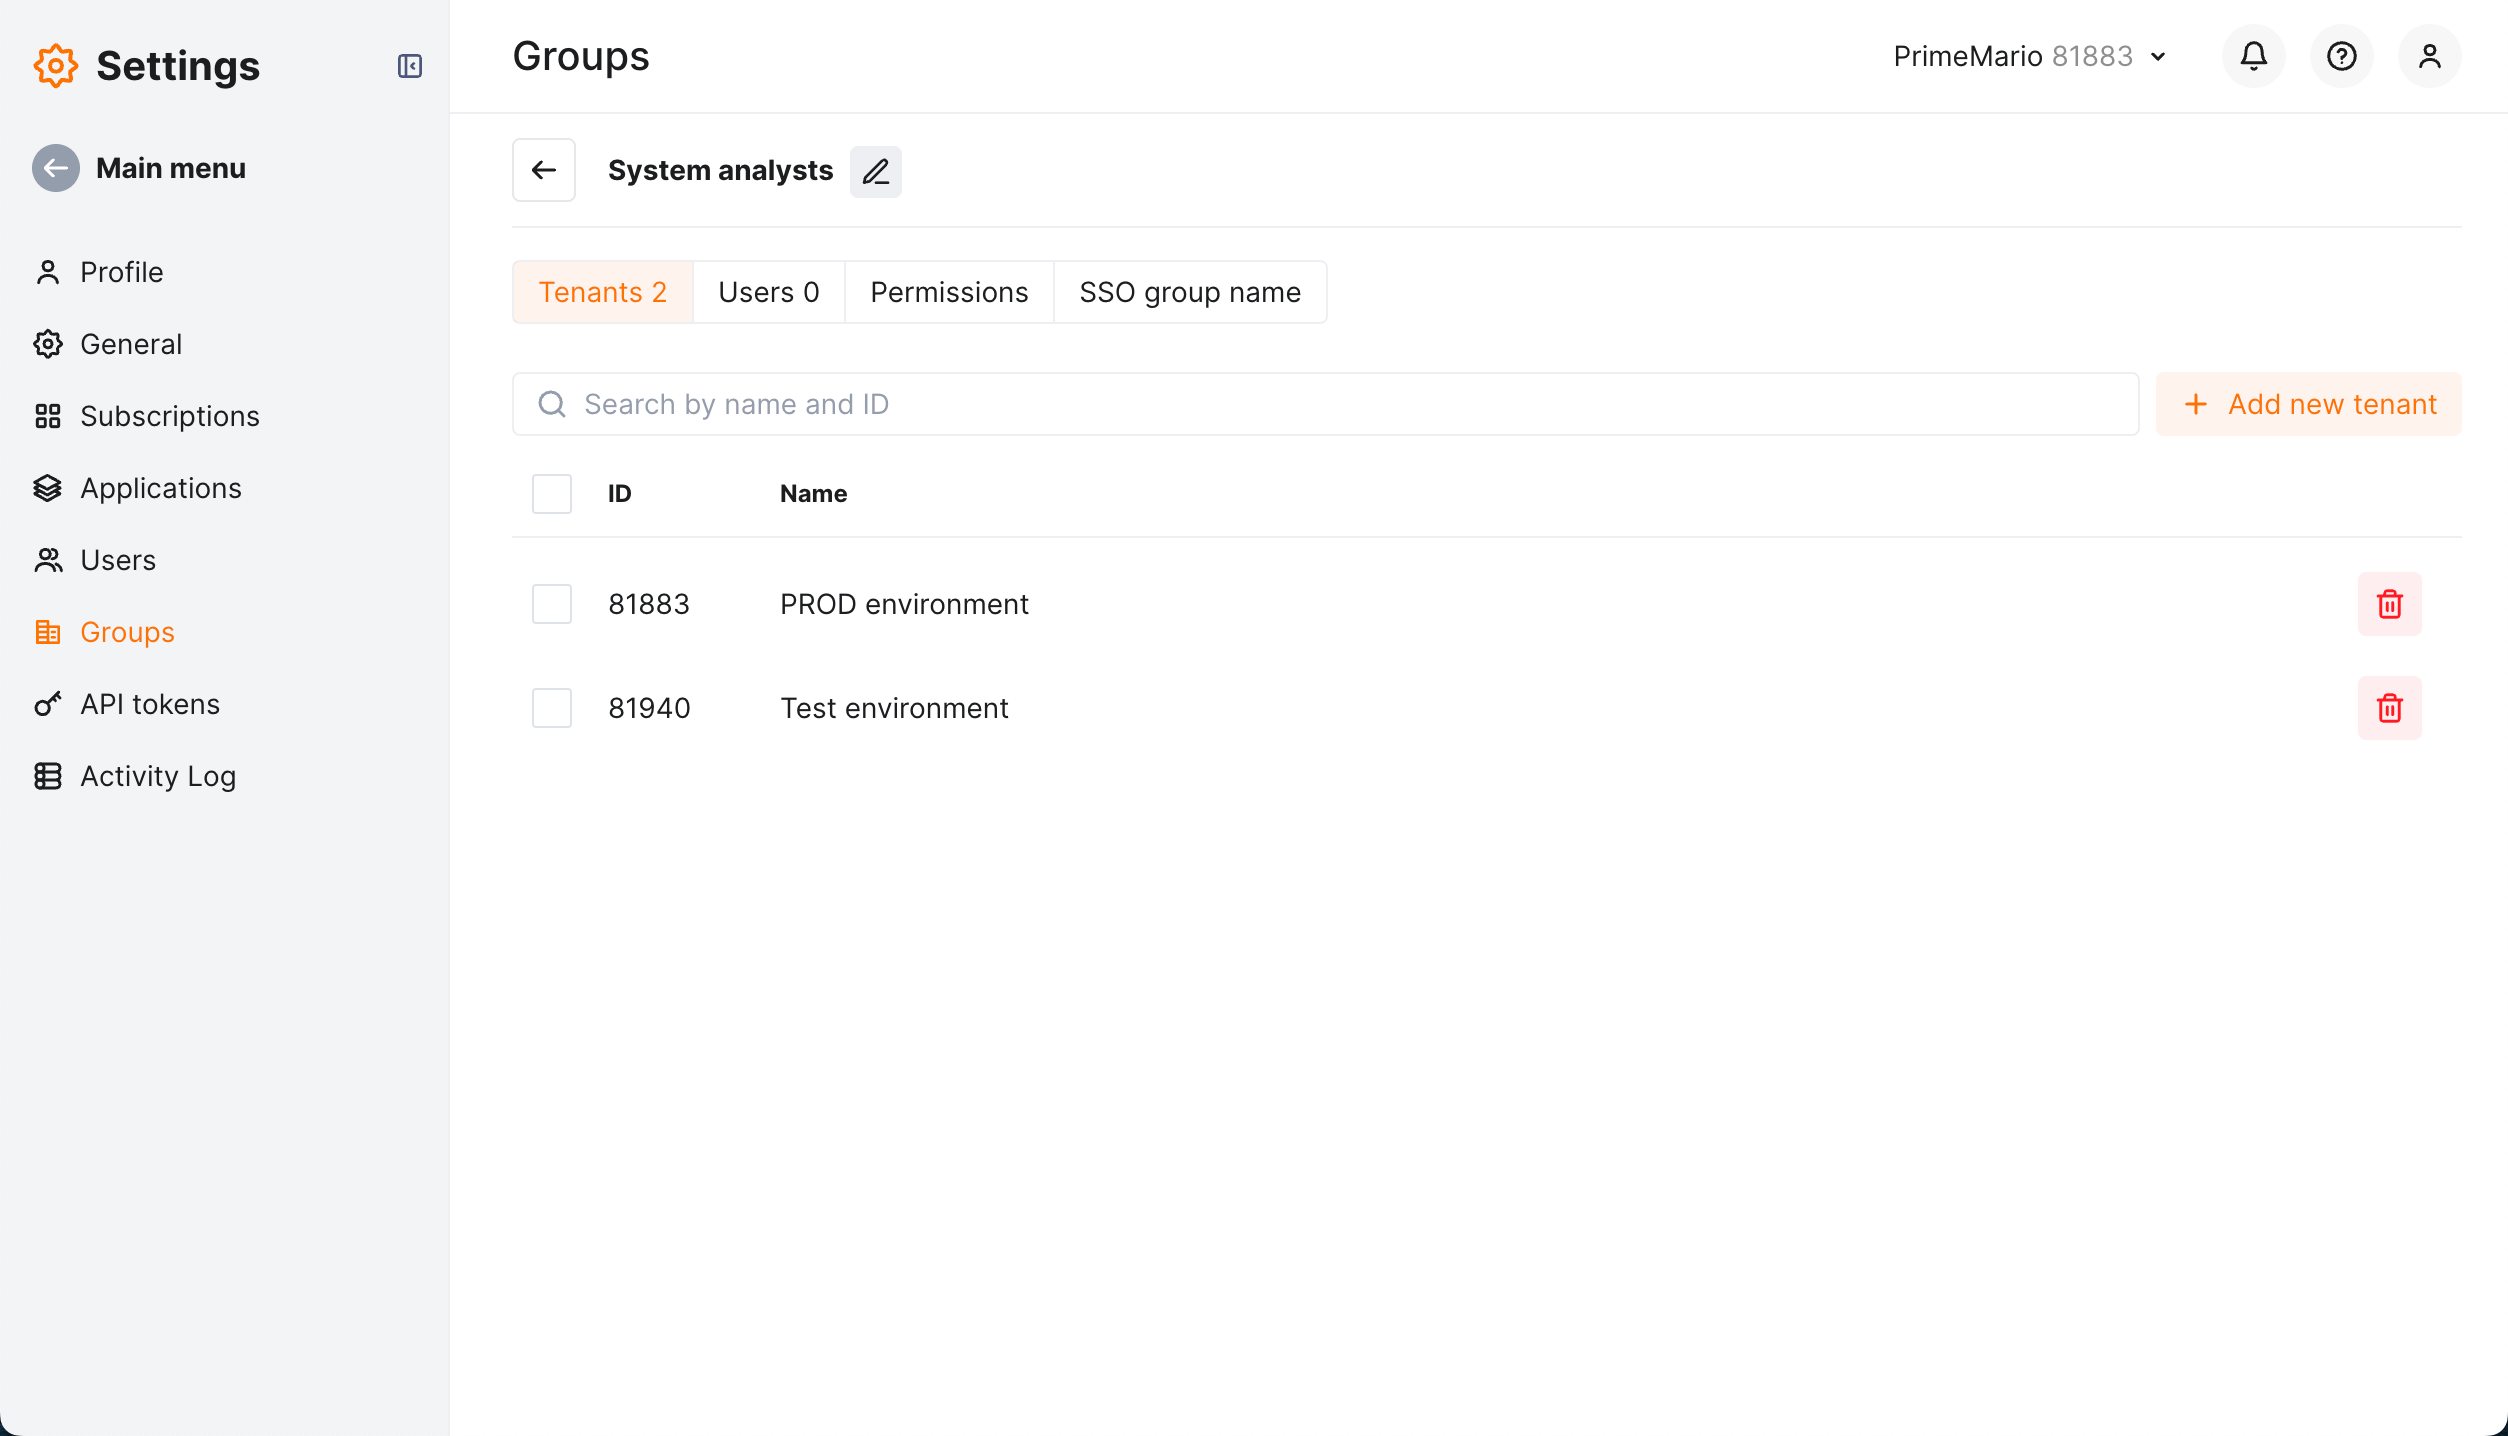
This will result in users of your SAML SSO solution group will have access to the listed tenants with specified set of permissions (role).
-
Add other group and bind it to the same SAML SSO solution group name.
-
Set different role.
-
Set different list of tenants.
This will result in users of your SAML SSO solution group will have access to these other tenants with different set of permissions (another role).
Access only to specific tenants: you can also configure users of different SAML SSO solution groups have access only to specific tenants, and not to others.
If the same SAML SSO user belongs to several groups providing access to the same tenant with different permissions the wider permission will be applied.
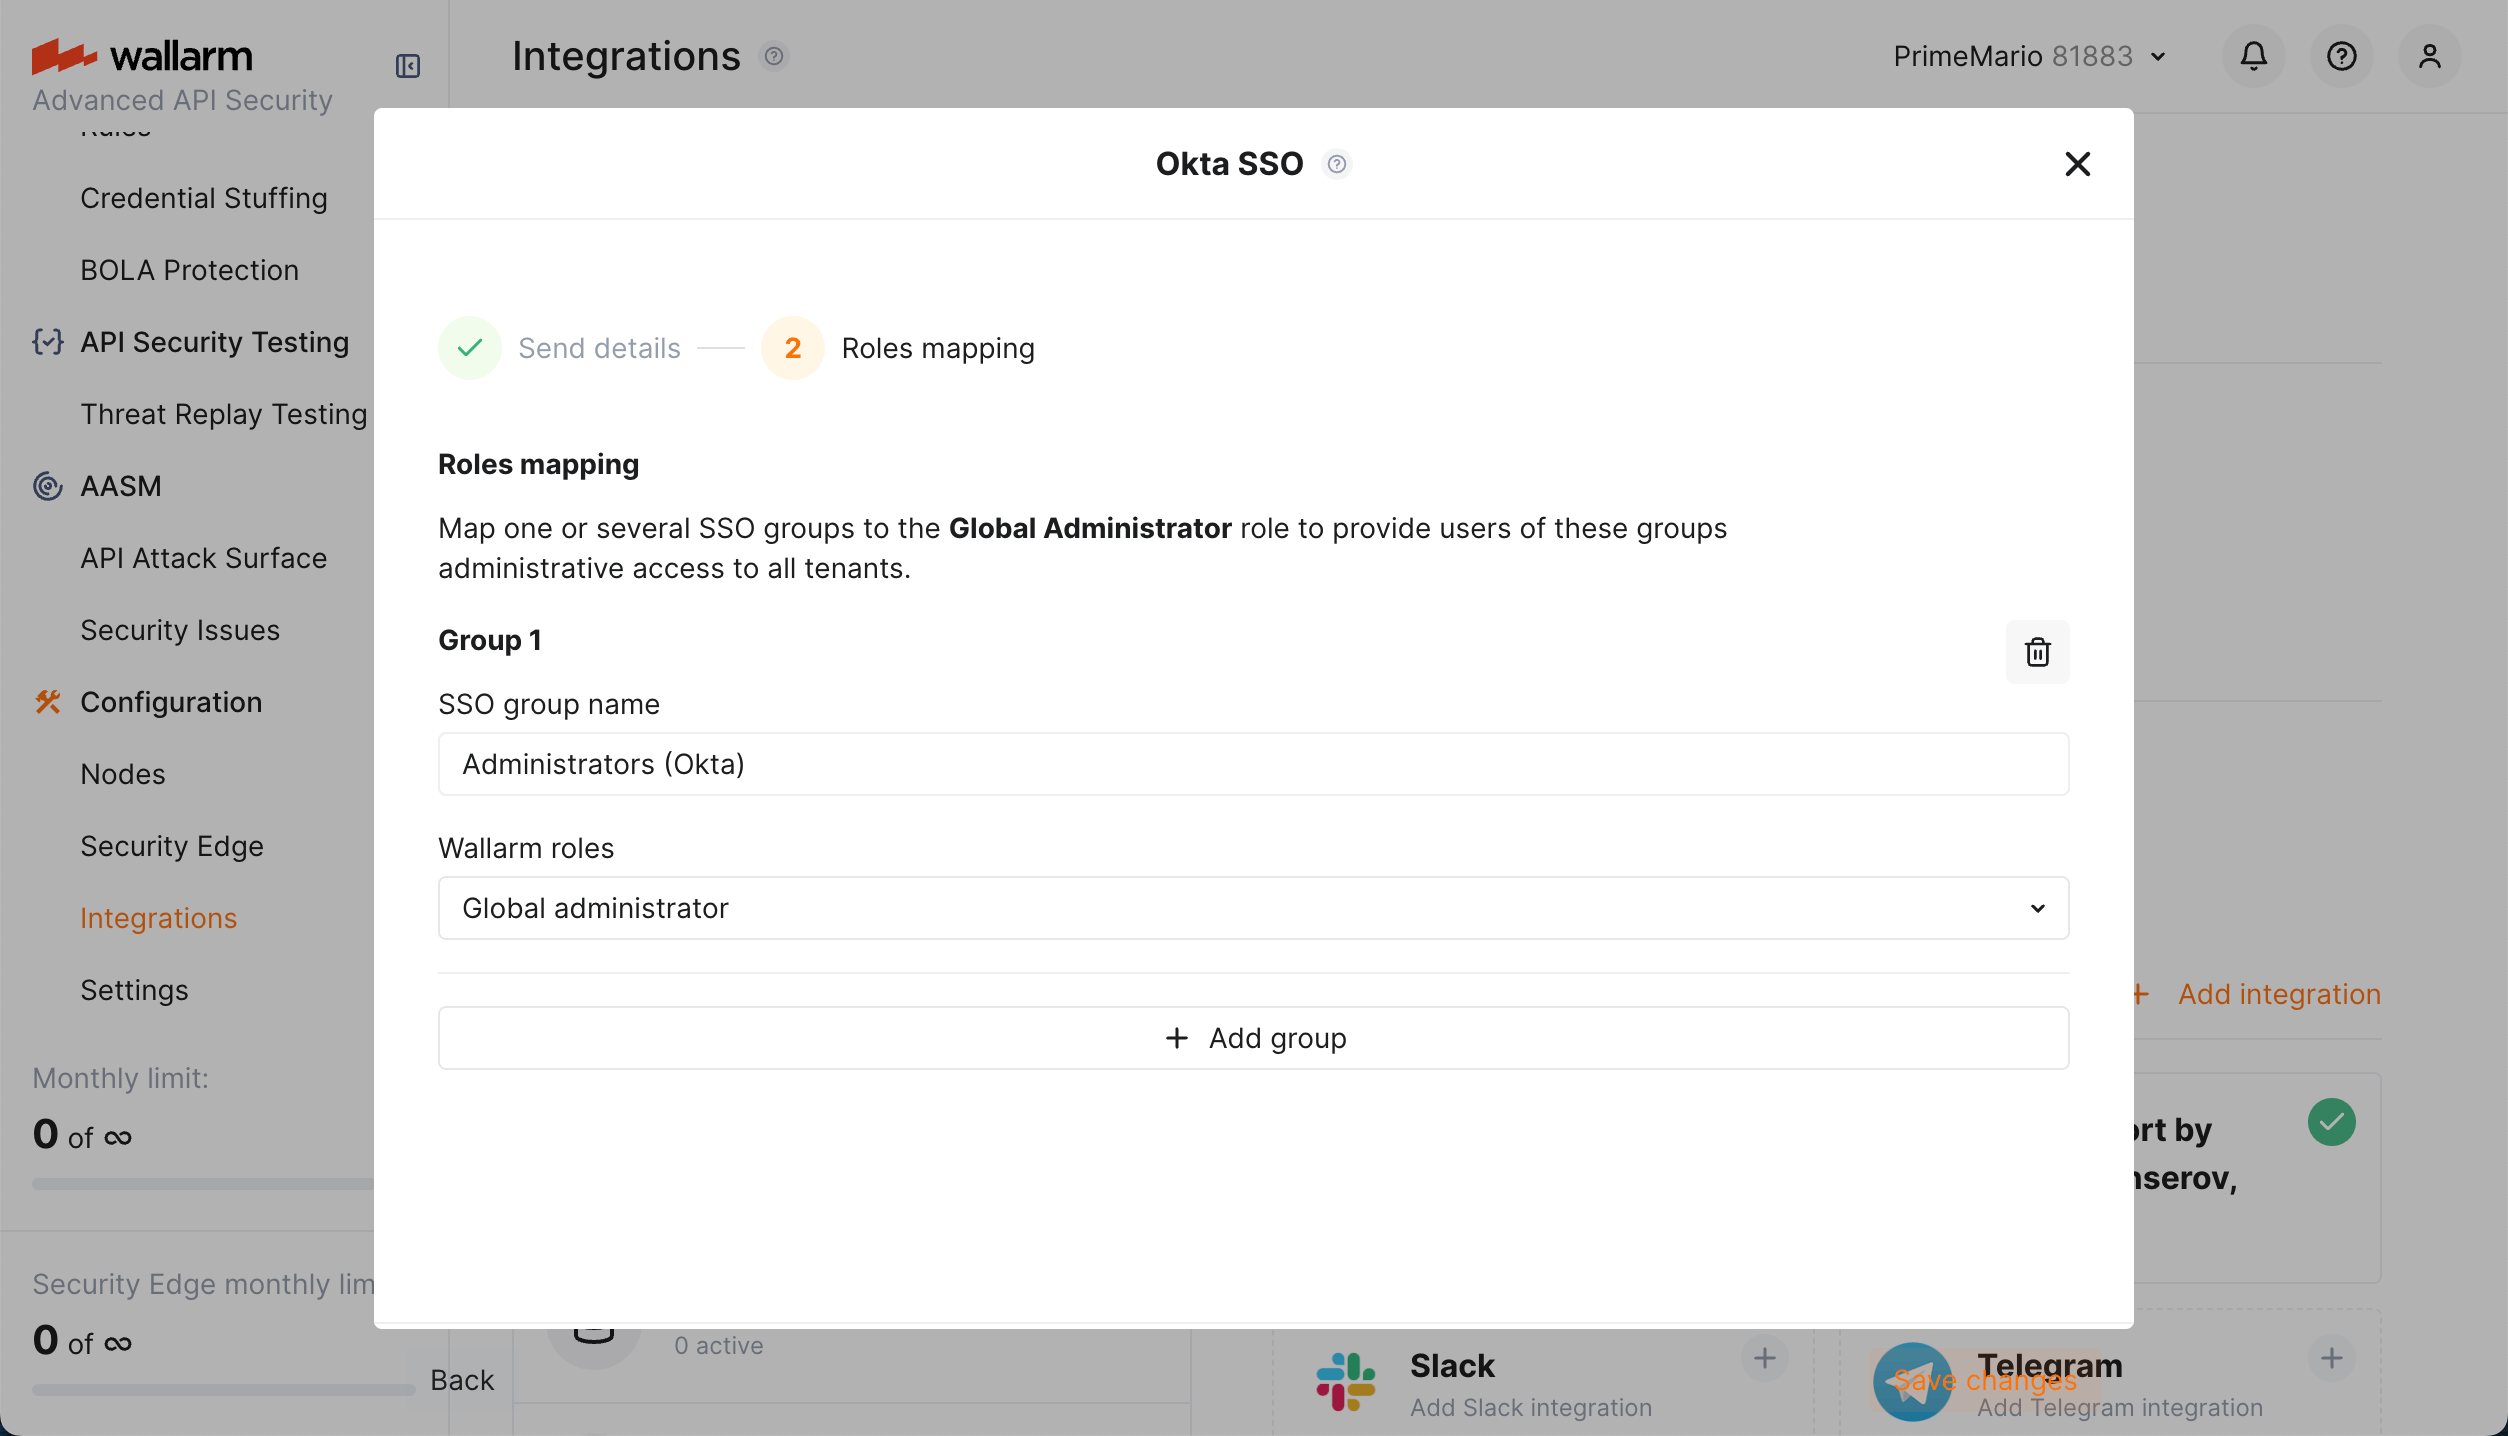
Your administrators
If you want to provide a privileged (administrative) access to Wallarm (all tenants) for users of some of your SAML SSO solution group, in Wallarm Console, in the SSO configuration wizard, proceed to the Roles mapping step and bind your SSO group(s) to the Global administrator role.
Note that users of this SAML SSO solution group cannot be anyhow restricted, even if they are included into any other SAML SSO solution groups.
Note that the enabled different permissions in different tenants option overrides the general mapping, for example:
-
If you have your
Analyticgroups generally mapped towallarm_role:analytic, and 5 tenants, if you later enable the different permissions in different tenants option, users ofAnalyticgroup will lose access to any tenants until you create and manage Groups (general mapping is now ignored). -
If you later create the group providing access for
Analyticgroups to 3 of 5 tenants, other 2 will stay unavailable to them (general mapping is ignored). -
If you want to provide users of some groups with non-administrative access to all tenants, create group with Global something role to access the technical tenant account.
Disabling and deletion
You can disable and delete SSO in the Integrations section only when provisioning is off. To turn it off, contact the Wallarm support team.