Brute Force Protection
A brute force attack is one of the attack types not detected by Wallarm out-of-the-box, its detection should be appropriately configured as this guide describes.
Regular brute force attacks include password brute forcing, session identifier brute forcing, and credential stuffing. These attacks are characterized by a large number of requests with different forced parameter values sent to a typical URI for a limited timeframe.
Configuration method
Depending on your subscription plan, one of the following configuration methods for brute force protection will be available:
-
Mitigation controls (Advanced API Security subscription)
-
Triggers (Cloud Native WAAP subscription)
Mitigation control-based protection  
Wallarm's Advanced API Security subscription provides advanced enumeration attack protection, including protection from brute force attacks.
Trigger-based protection
Brute force protection described in this section is one of the ways for the basic load control provided by Wallarm. Alternatively, you can apply rate limiting. Use rate limiting to slow the incoming traffic and brute force protection to completely block the attacker.
Besides basic brute force protection, you can configure basic protection against forced browsing similarly.
Configuring
Consider the example below to learn how to configure brute force protection with triggers.
Let us say you want to prevent malicious actors from trying various passwords to gain authorized access to your rent-car application via its authentication endpoints (brute force attack). To provide this protection, for your authentication endpoints, you can limit the number of requests per time interval, and set to block IPs exceeding this limit:
-
Open Wallarm Console → Triggers and open the window for trigger creation.
-
Select the Brute force condition.
-
Set the threshold of 30 requests from the same IP per 30 seconds.
Note that these are the example values - when configuring a trigger for your own traffic, you should define a threshold considering your legitimate usage statistics.
Allowed threshold time periods
When adjusting the threshold time period, the value must be a multiple of 30 seconds or 10 minutes, depending on the selected unit.
-
Set the Application filter to
rent-car(the application should be registered in Wallarm). -
Set the URI filter as displayed on the screenshot, including:
**wildcard in the path meaning "any number of components"-
.*login*regular expression in the request part meaning "endpoint containslogin"Combined, they cover, for example:
https://rent-car-example.com/users/login
https://rentappc-example.com/usrs/us/p-login/sq
(note that for entire trigger to work, domains should be linked to selected application)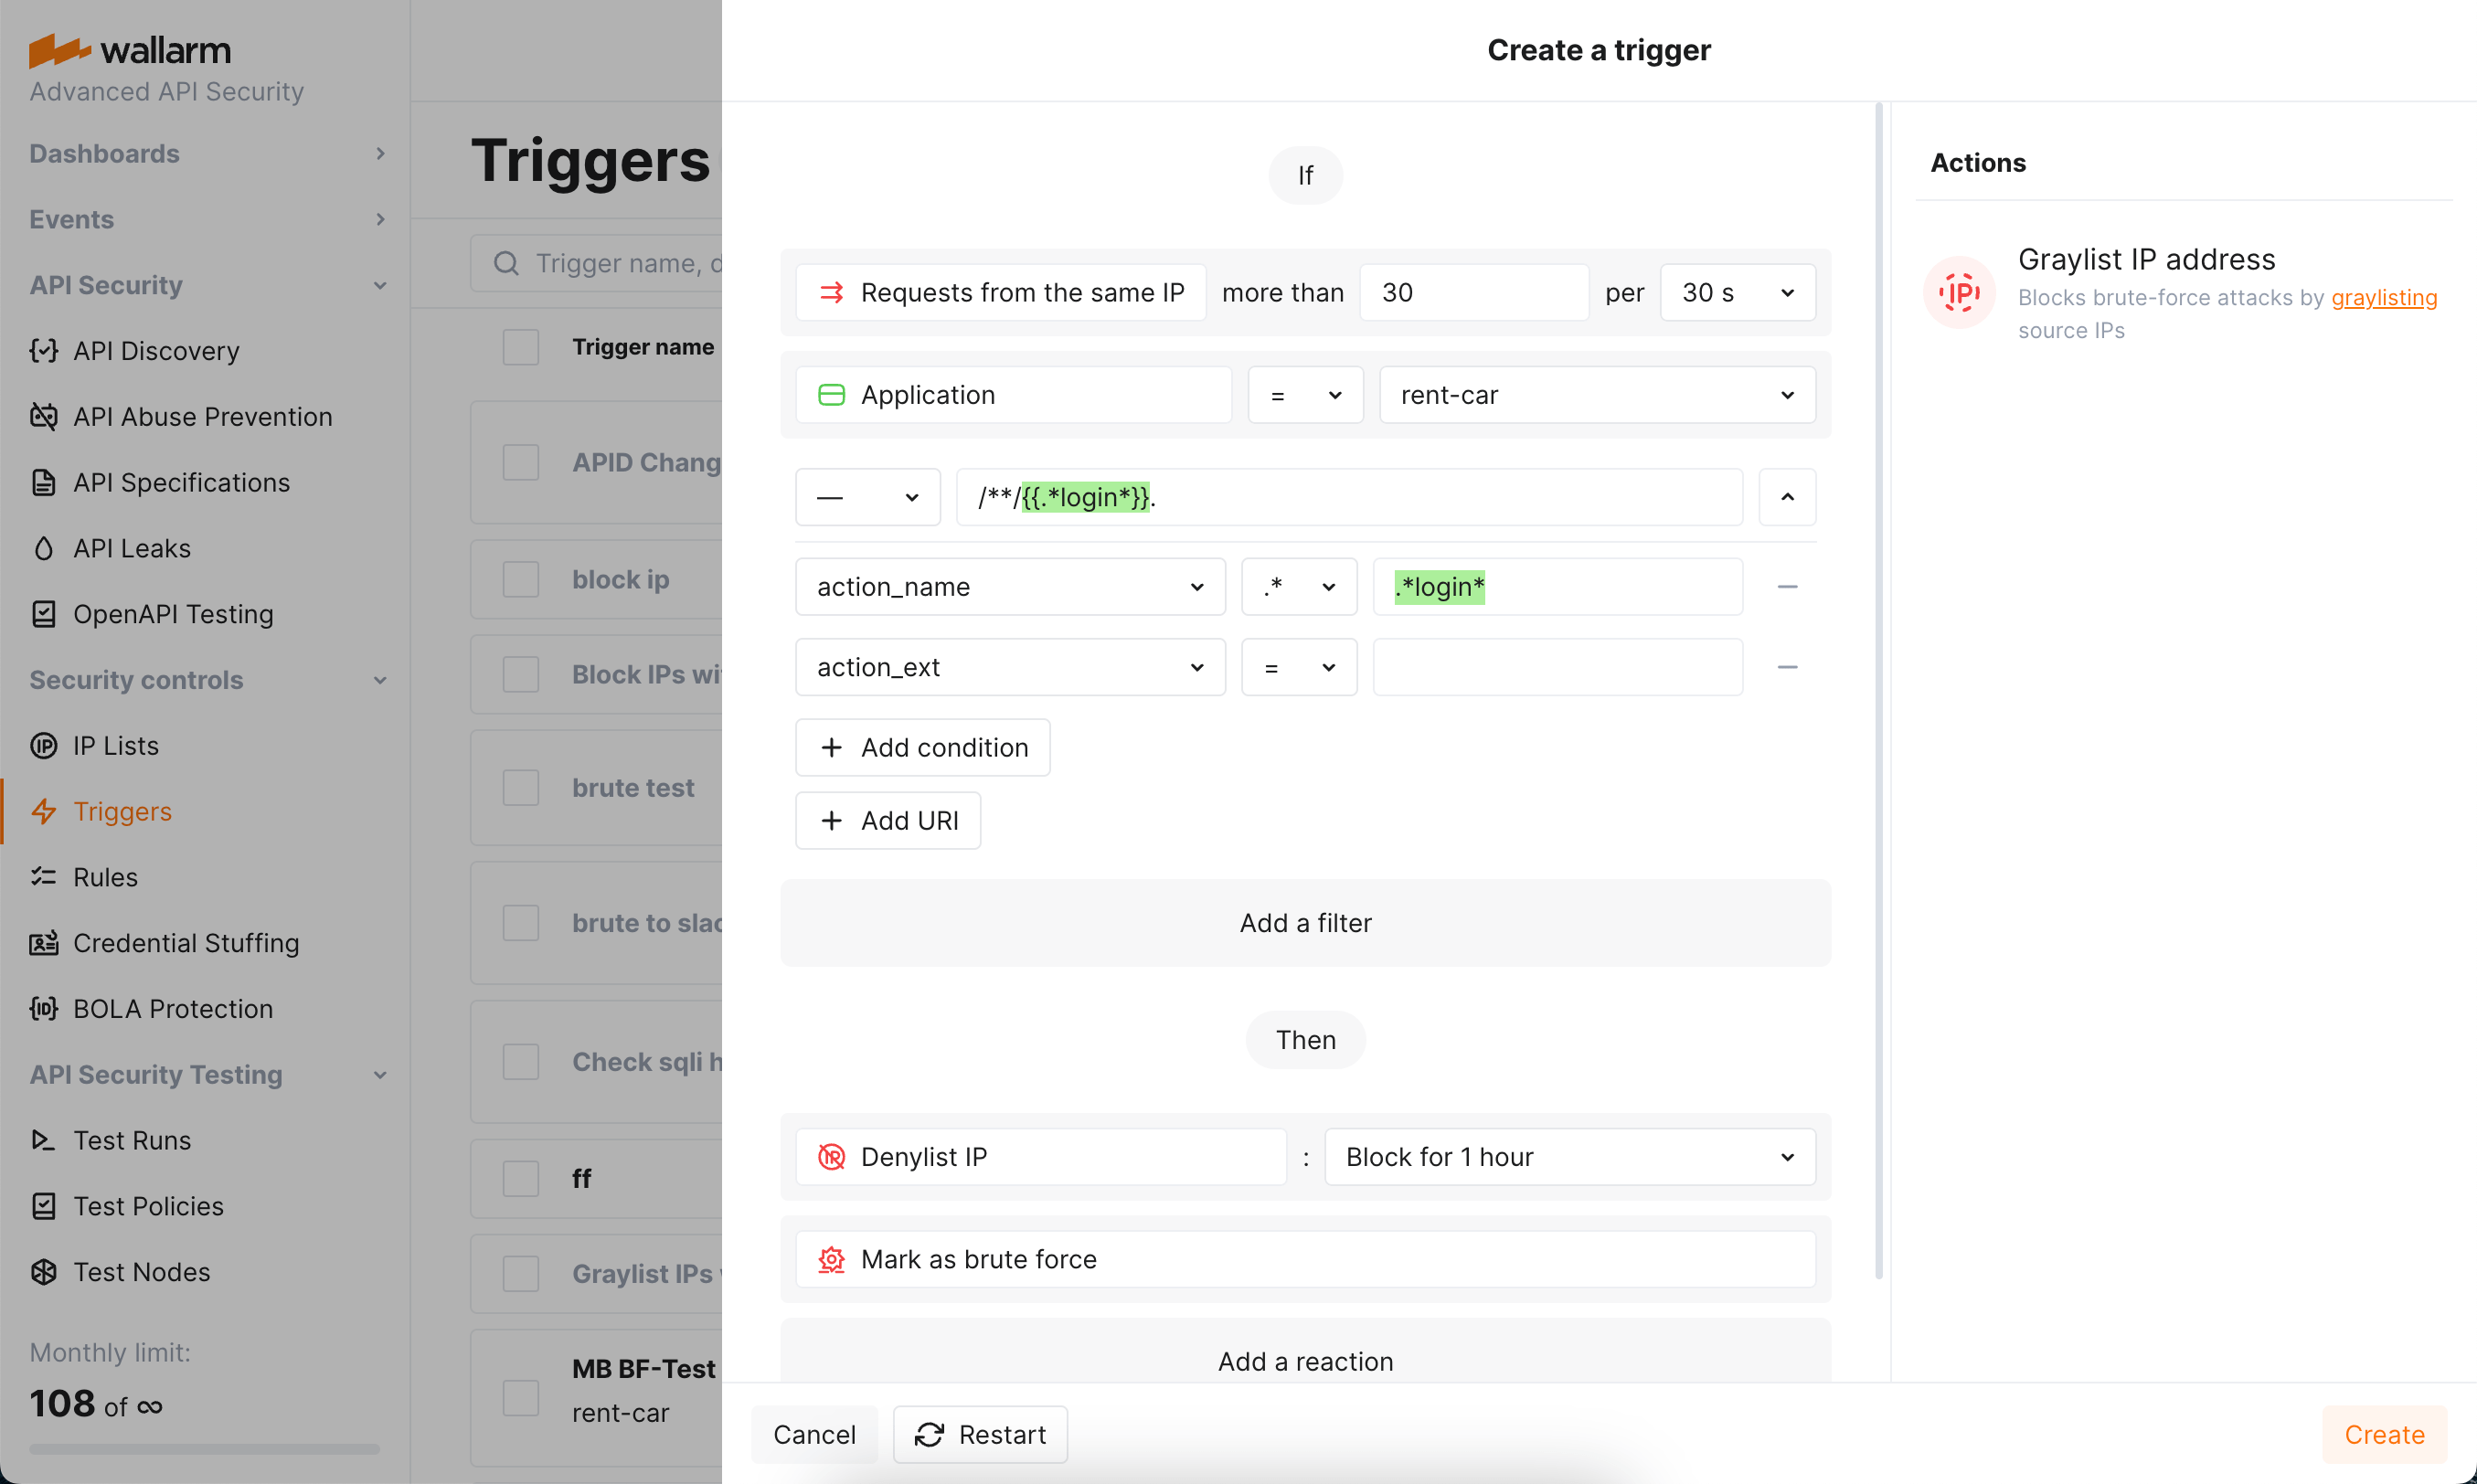
-
Besides configuring the pattern we need in this example, you can enter specific URIs or set a trigger to work at any endpoint by not specifying any URI.
- If using nested URIs, consider trigger processing priorities.
-
Do not use the IP filter in this case, but be aware that you can use it to set triggers only to react to specific IPs originating requests.
-
Select the Denylist IP address -
Block for 1 hourtrigger reaction. Wallarm will put the origin IP on the denylist after the threshold is exceeded and block all further requests from it.Note that even if the bot IP is placed into the denylist by brute force protection, by default, Wallarm collects and displays statistics regarding blocked requests originating from it.
-
Select the Mark as brute force trigger reaction. Requests received after exceeding the threshold will be marked as a brute force attack and displayed in the Attacks section of Wallarm Console. In some cases, you can use this reaction alone to have information about the attack, but not to block anything.
-
Save the trigger and wait for the Cloud and node synchronization completion (usually, it takes 2-4 minutes).
You can configure several triggers for brute force protection.
Testing
Testing in your environment
To test the Brute force trigger in your environment, in the trigger and the requests below, replace the domain with any public one (e.g. example.com). Set your own application and link the domain to it.
To test the trigger described in the Configuring section:
-
Ensure that the
rent-car-example.comdomain is identified as part of therent-carapplication registered in Wallarm. -
Send the number of requests that exceeds the configured threshold to the protected endpoint of this domain. For example, 50 requests to
rent-car-example.com/users/login: -
Open Wallarm Console → IP lists → Denylist and check that the source IP address is blocked.
-
Open the Attacks section and check that requests are displayed in the list as a brute force attack.
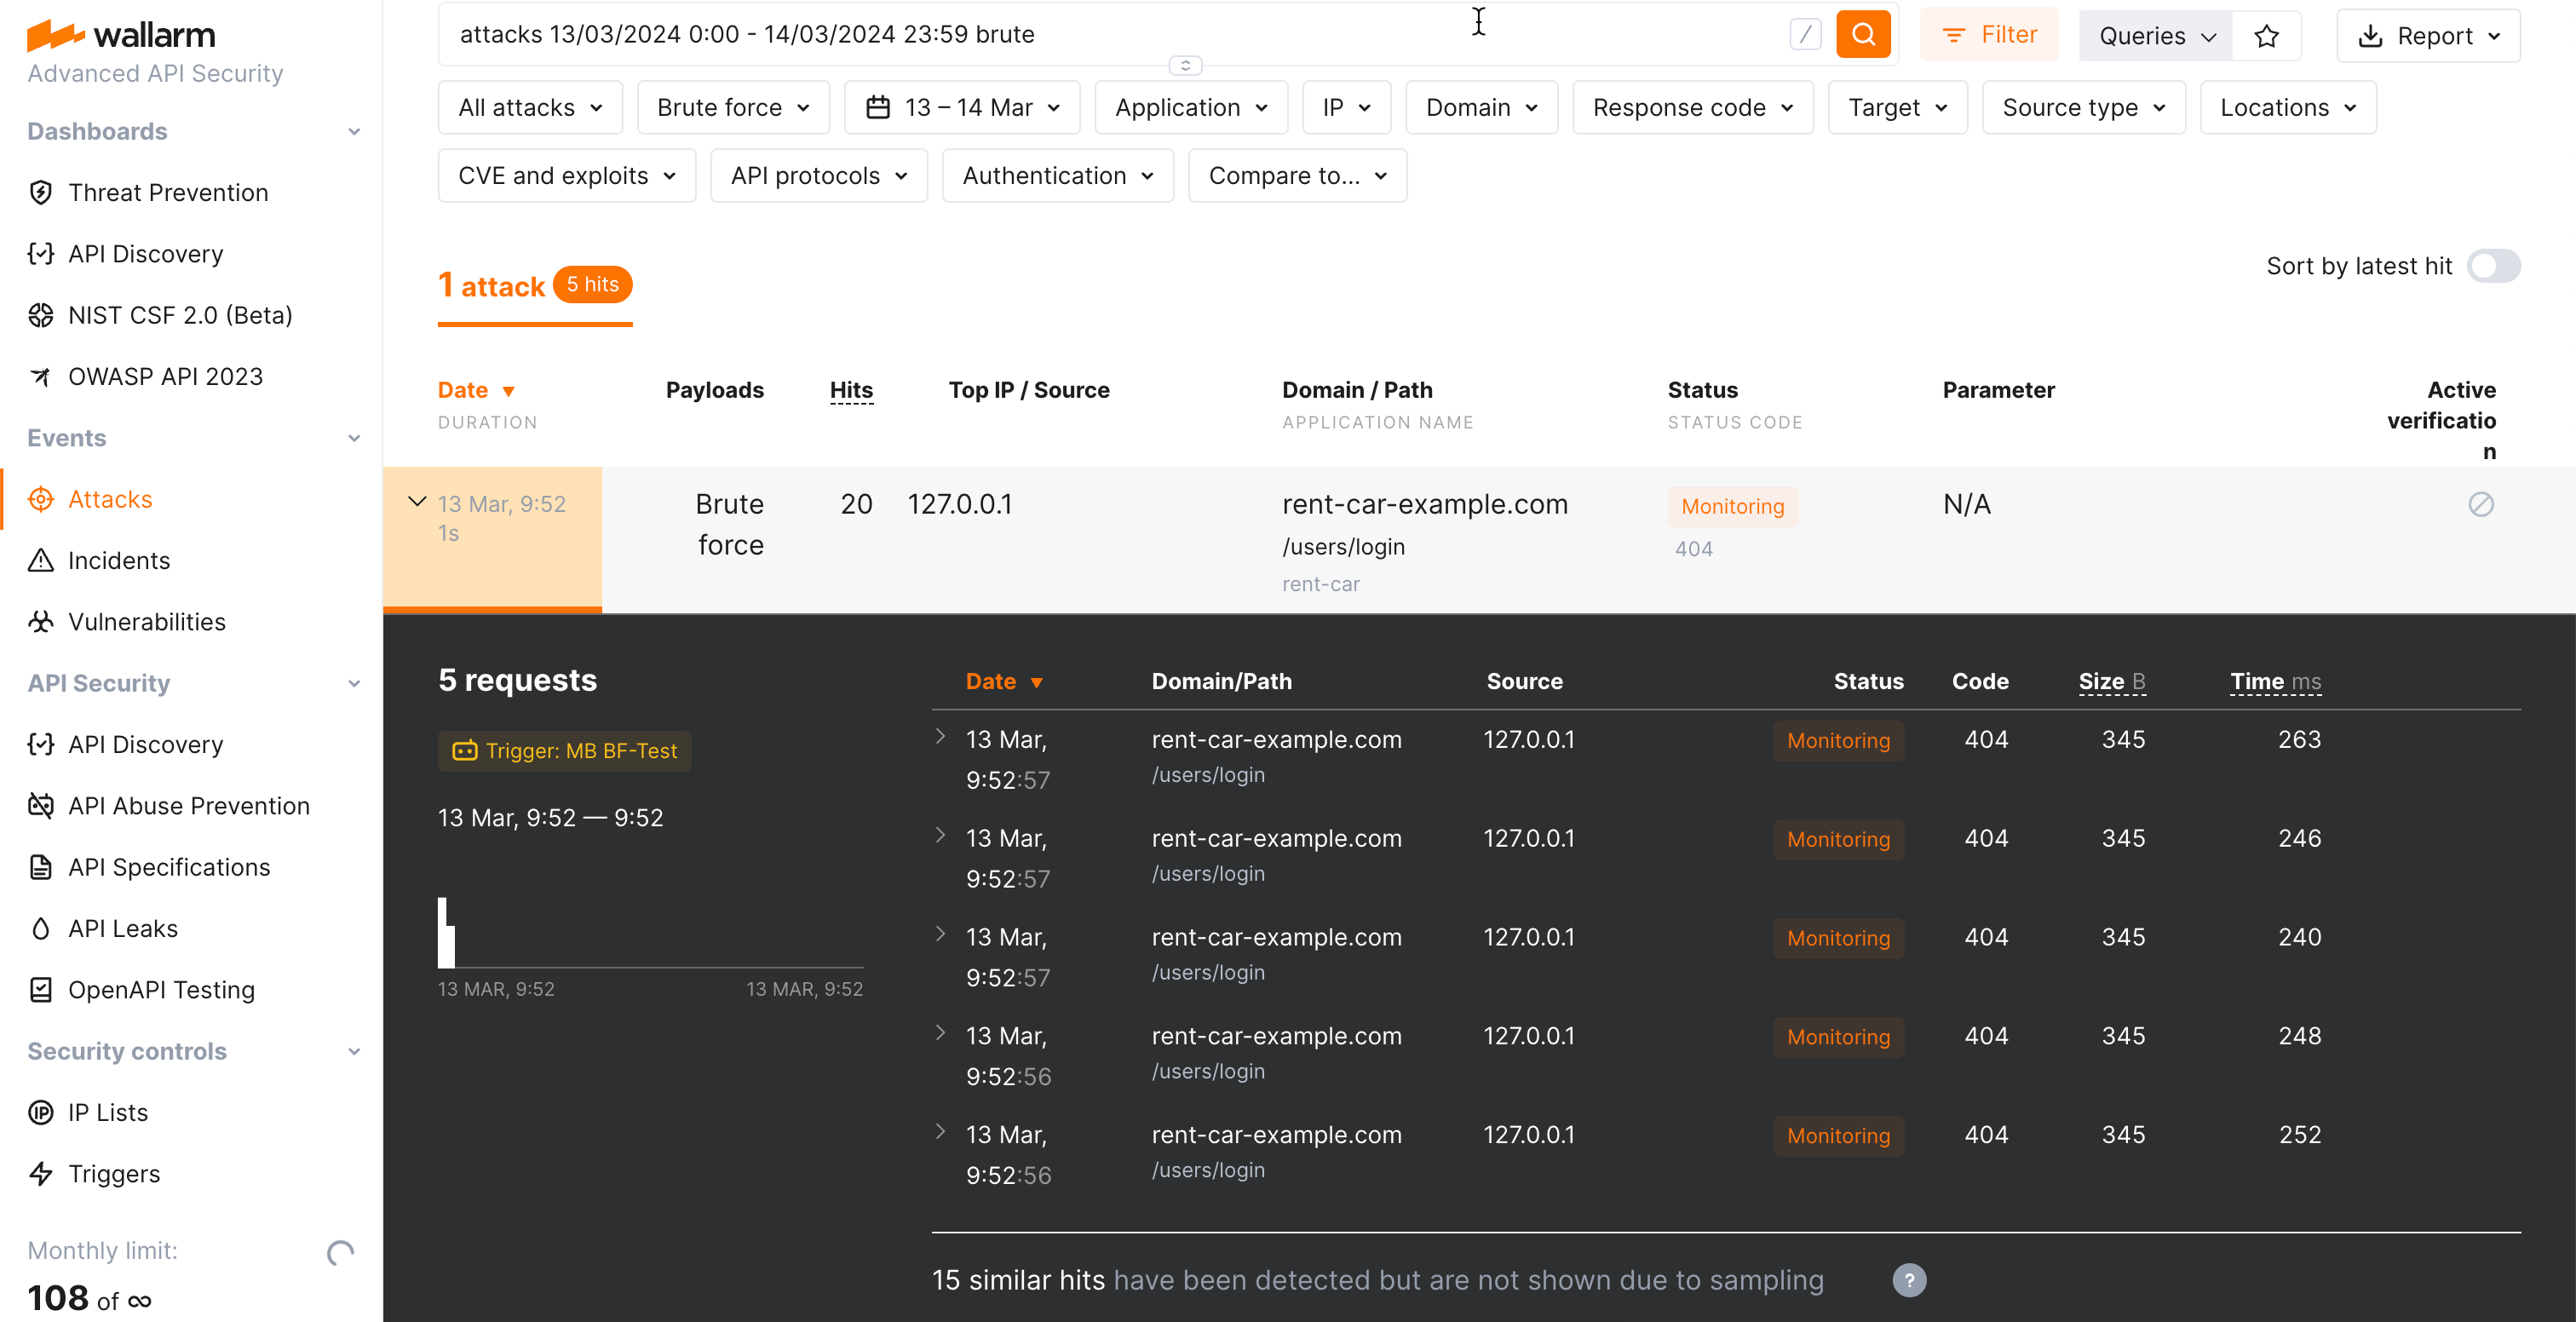
The number of displayed requests corresponds to the number of requests sent after exceeding the trigger threshold (more details on detecting behavioral attacks). If this number is higher than 5, request sampling is applied and request details are displayed only for the first 5 hits (more details on request sampling).
To search for brute force attacks, you can use the
brutefilter. All filters are described in the instructions on search use.
Requirements and restrictions
Requirements
To protect resources from brute force attacks, real clients' IP addresses are required. If the filtering node is deployed behind a proxy server or load balancer, configure displaying real clients' IP addresses.
Restrictions
When searching for brute force attack signs, Wallarm nodes analyze only HTTP requests that do not contain signs of other attack types.