# BOLA Protection
Behavioral attacks such as [Broken Object Level Authorization (BOLA)](https://docs.wallarm.com/attacks-vulns-list.md#broken-object-level-authorization-bola) exploit the vulnerability of the same name. This vulnerability allows an attacker to access an object by its identifier via an API request and either read or modify its data, bypassing an authorization mechanism.
## Configuration method
Depending on your subscription plan, one of the following configuration methods for protection from BOLA attacks will be available:
* Mitigation controls ([Advanced API Security](https://docs.wallarm.com/about-wallarm/subscription-plans.md#core-subscription-plans) subscription)
* Triggers ([Cloud Native WAAP](https://docs.wallarm.com/about-wallarm/subscription-plans.md#core-subscription-plans) subscription)
## Mitigation control-based protection  Wallarm's Advanced API Security [subscription](https://docs.wallarm.com/about-wallarm/subscription-plans.md#core-subscription-plans) provides advanced [enumeration attack protection](https://docs.wallarm.com/api-protection/enumeration-attack-protection.md), including protection from BOLA attacks.
## Trigger-based protection
### Configuring
By default, Wallarm automatically discovers only vulnerabilities of the BOLA type (also known as IDOR) but does not detect its exploitation attempts. Consider the example below to learn how to configure protection from BOLA attacks.
Let us say your e-commerce `wmall-example.com` platform for online stores (shops) stores information for each hosted shop under `/shops//`. You want to prevent malicious actors from getting the list of all hosted shop names. Such list can be obtained via a simple script manipulating the names in the list, replacing `` in the URL. To prevent this, for your shop hosting route, you can limit number of requests per time interval, and set to block IPs exceeding this limit:
1. Open Wallarm Console → **Triggers** and open the window for trigger creation.
1. Select the **BOLA** condition.
1. Set the threshold 30 requests from the same IP per 30 seconds.
Note that these are the example values - when configuring trigger for your own traffic, you should define a threshold considering a legitimate usage statistics.
1. Set the **URI** filter as displayed on the screenshot, including:
* `*` [wildcard](https://docs.wallarm.com/user-guides/rules/rules.md#using-wildcards) in the path meaning "any one component". They will cover all the `wmall-example.com/shops//financial_info` addresses.
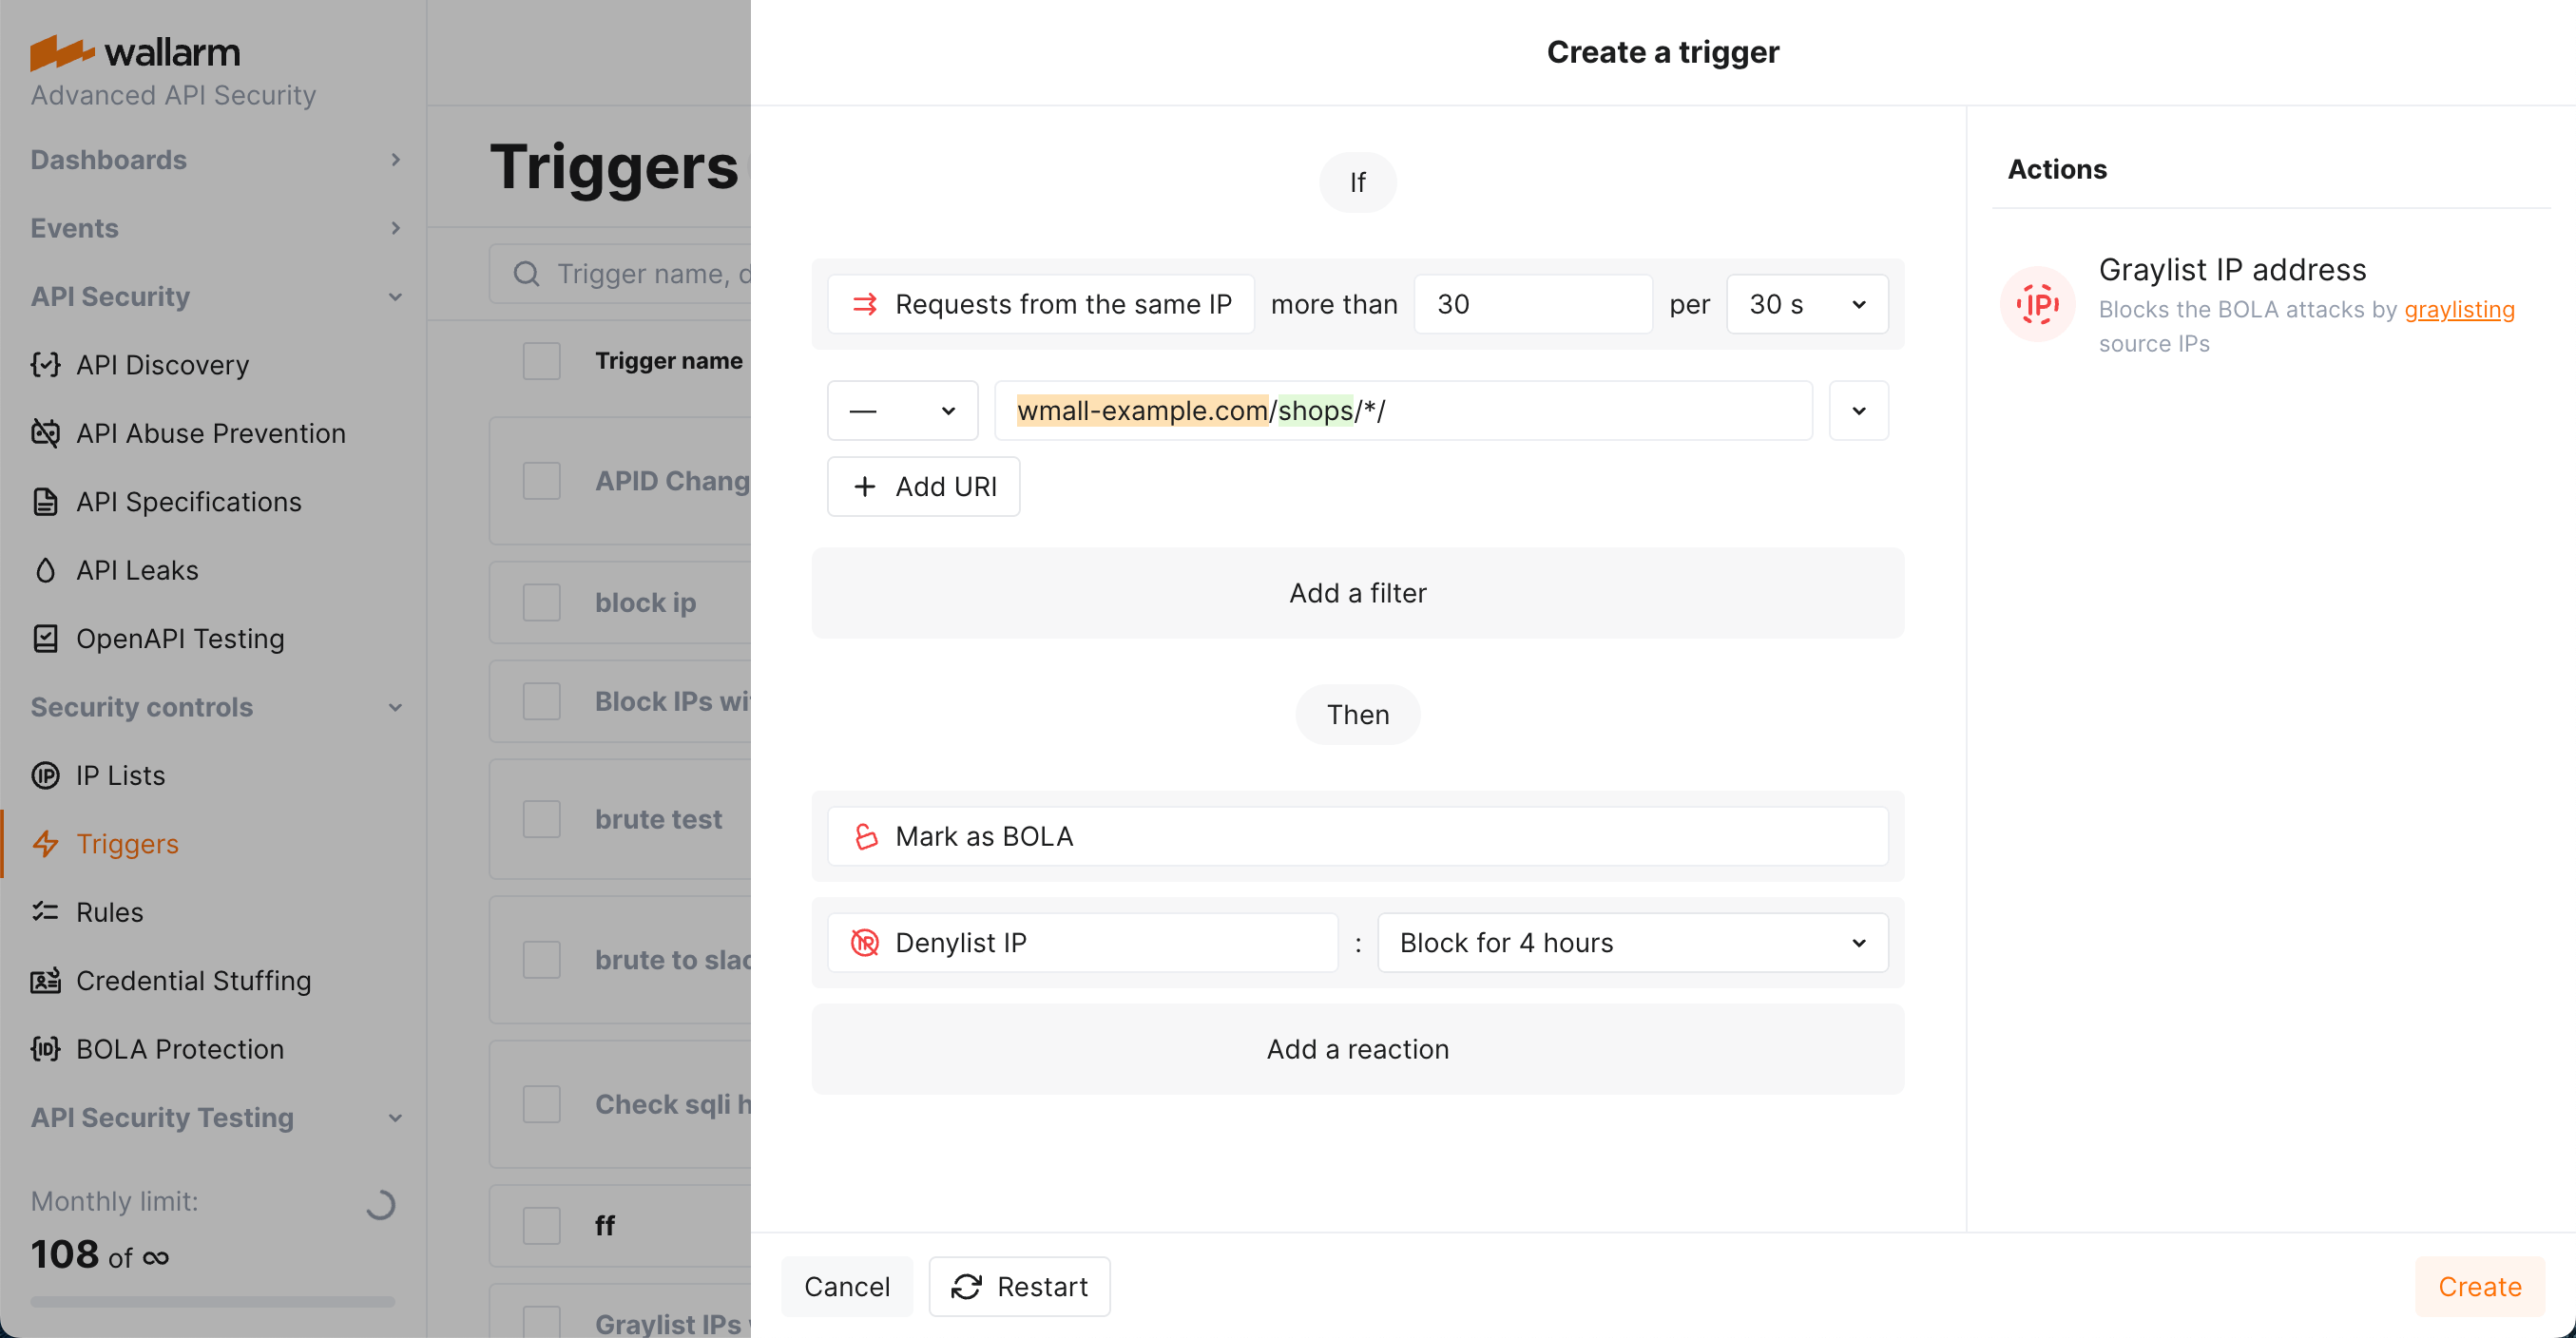
1. Do not use in this case:
* The **Application** filter, but be aware that you can use it to set trigger only to react to the requests targeting domains or specific endpoints of selected applications.
* The **IP** filter, but be aware that you can use it to set triggers only to react to specific IPs originating requests.
1. Select the **Denylist IP address** - `Block for 4 hour` trigger reaction. Wallarm will put origin IP to the [denylist](https://docs.wallarm.com/user-guides/ip-lists/overview.md) after the threshold is exceeded and block all further requests from it.
Note that even if the bot IP is placed into the denylist by manual BOLA protection, by default, Wallarm collects and [displays](https://docs.wallarm.com/user-guides/ip-lists/overview.md#requests-from-denylisted-ips) statistics regarding blocked requests originating from it.
1. Select the **Mark as BOLA** trigger reaction. Requests received after exceeding the threshold will be marked as the BOLA attack and displayed in the **Attacks** section of Wallarm Console. Sometimes, you can use this reaction alone to have information about the attack, but not to block anything.
1. Save the trigger and wait for the [Cloud and node synchronization completion](https://docs.wallarm.com/admin-en/configure-cloud-node-synchronization-en.md) (usually it takes 2-4 minutes).
### Testing
!!! info "Testing in your environment"
To test the **BOLA** trigger in your environment, in the trigger and the requests below, replace the domain with any public one (e.g. `example.com`).
To test the trigger described in the [Configuring](#configuring) section:
1. Send the number of requests that exceeds the configured threshold to the protected URI. For example, 50 requests with different values of `{shop_id}` to the endpoint `https://wmall-example.com/shops/{shop_id}/financial_info`:
```bash
for (( i=0 ; $i<51 ; i++ )) ; do curl https://wmall-example.com/shops/$i/financial_info ; done
```
1. If the trigger reaction is **Denylist IP address**, open Wallarm Console → **IP lists** → **Denylist** and check that the source IP address is blocked.
If the trigger reaction is **Graylist IP address**, check the section **IP lists** → **Graylist** of Wallarm Console.
1. Open the section **Attacks** and check that requests are displayed in the list as BOLA attack.
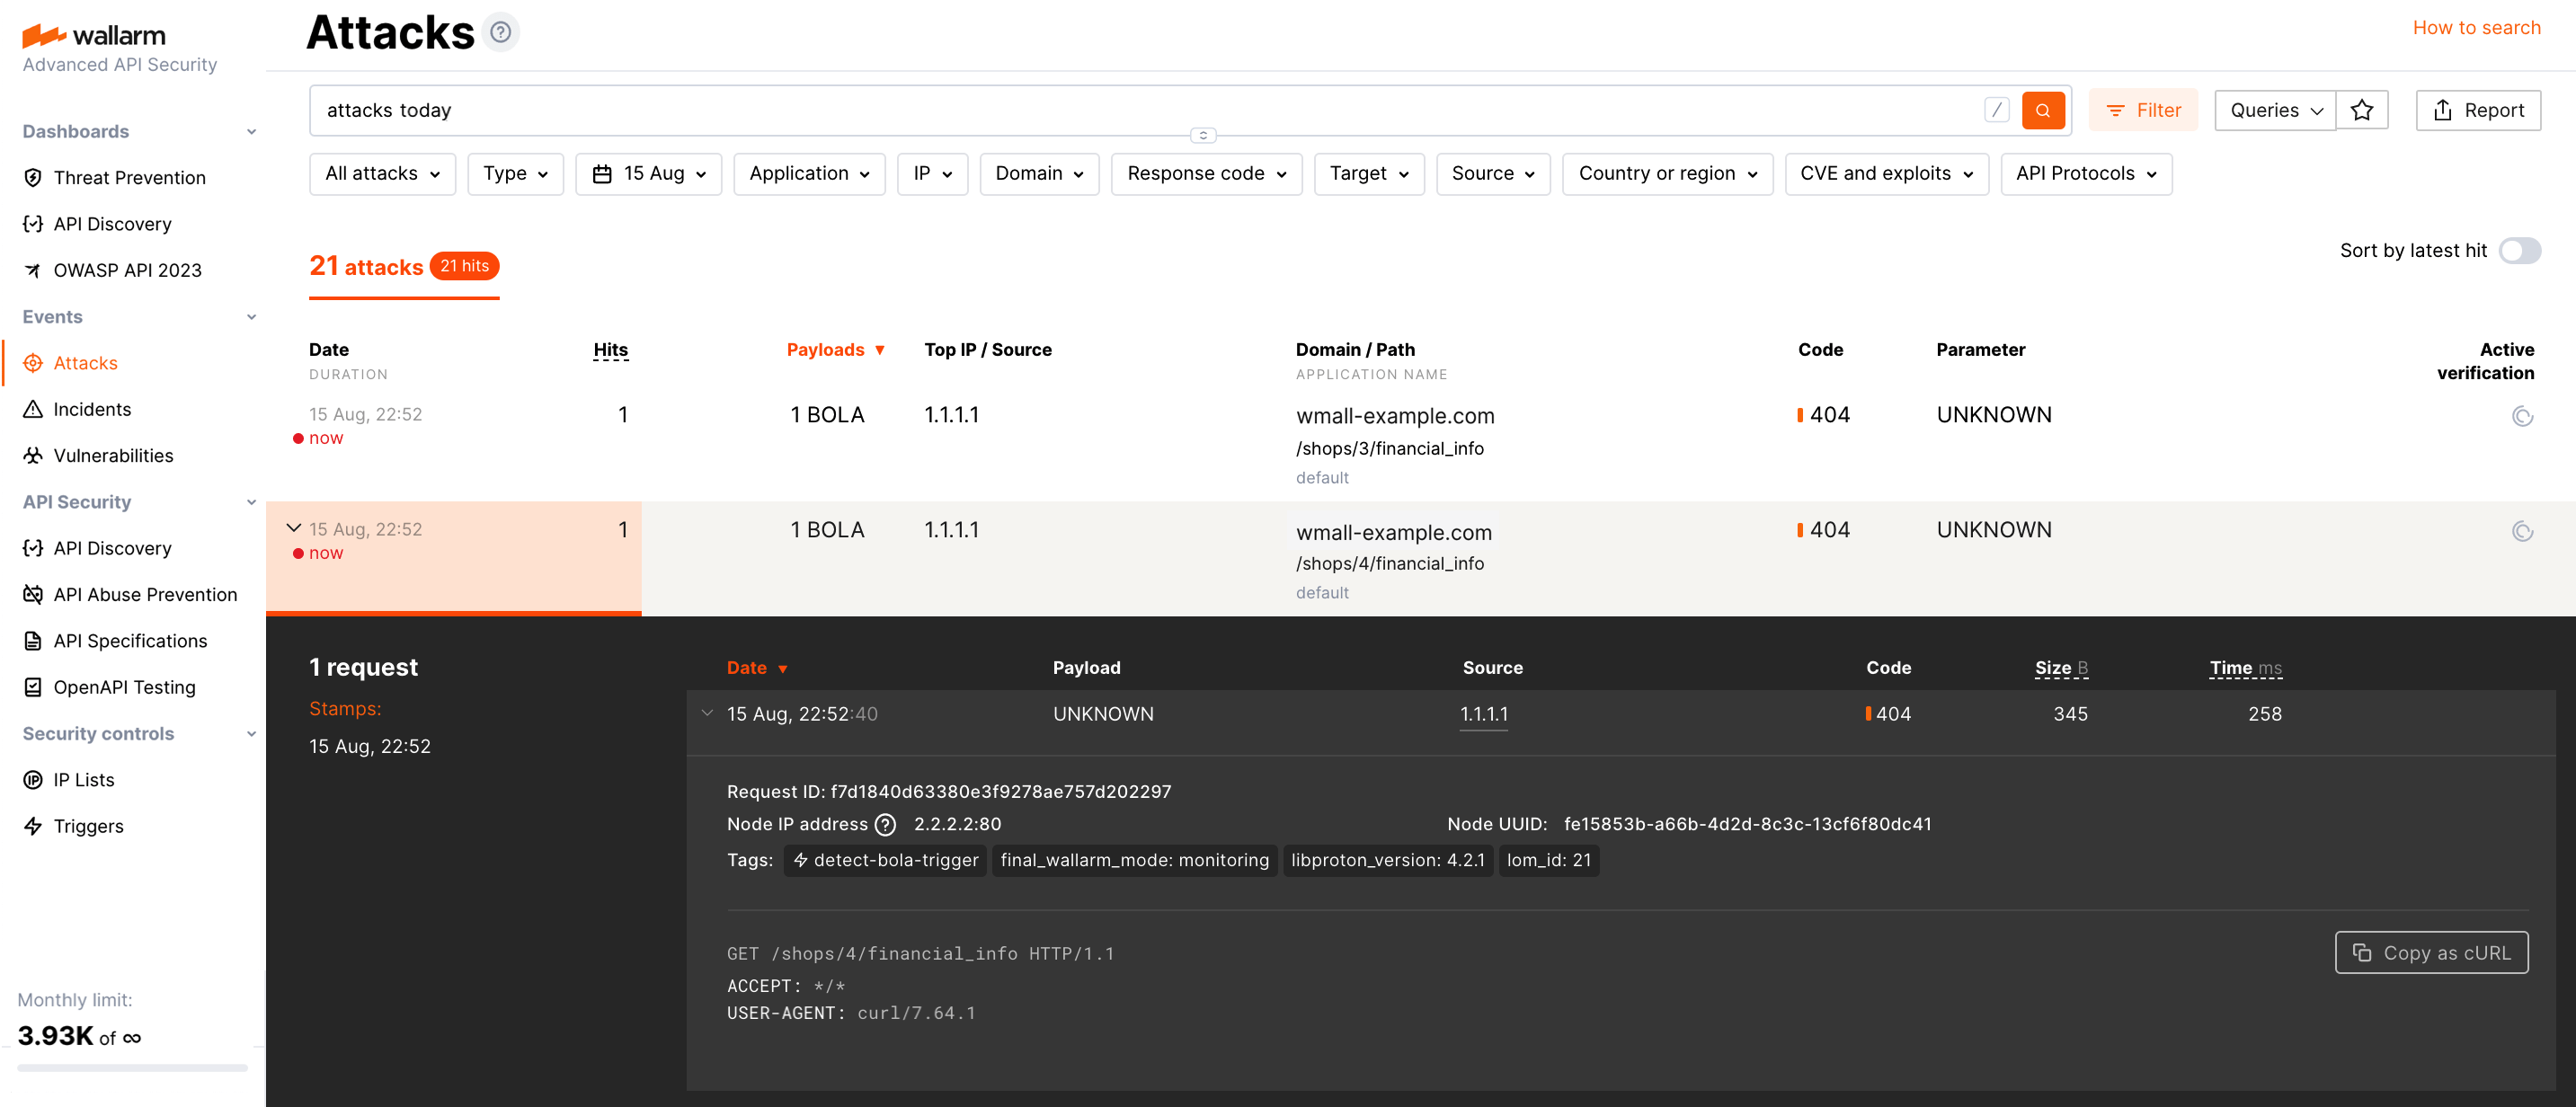
The number of displayed requests corresponds to the number of requests sent after the trigger threshold was exceeded ([more details on detecting behavioral attacks](https://docs.wallarm.com/attacks-vulns-list.md#attack-types)). If this number is higher than 5, request sampling is applied and request details are displayed only for the first 5 hits ([more details on requests sampling](https://docs.wallarm.com/user-guides/events/grouping-sampling.md#sampling-of-hits)).
To search for BOLA attacks, you can use the `bola` search tag. All filters are described in the [instructions on search use](https://docs.wallarm.com/user-guides/search-and-filters/use-search.md).
### Requirements and restrictions
**Requirements**
To protect resources from BOLA attacks, real clients' IP addresses are required. If the filtering node is deployed behind a proxy server or load balancer, [configure](https://docs.wallarm.com/admin-en/using-proxy-or-balancer-en.md) displaying real clients' IP addresses.
**Restrictions**
When searching for BOLA attack signs, Wallarm nodes analyze only HTTP requests that do not contain signs of other attack types.
Wallarm's Advanced API Security [subscription](https://docs.wallarm.com/about-wallarm/subscription-plans.md#core-subscription-plans) provides advanced [enumeration attack protection](https://docs.wallarm.com/api-protection/enumeration-attack-protection.md), including protection from BOLA attacks.
## Trigger-based protection
### Configuring
By default, Wallarm automatically discovers only vulnerabilities of the BOLA type (also known as IDOR) but does not detect its exploitation attempts. Consider the example below to learn how to configure protection from BOLA attacks.
Let us say your e-commerce `wmall-example.com` platform for online stores (shops) stores information for each hosted shop under `/shops//`. You want to prevent malicious actors from getting the list of all hosted shop names. Such list can be obtained via a simple script manipulating the names in the list, replacing `` in the URL. To prevent this, for your shop hosting route, you can limit number of requests per time interval, and set to block IPs exceeding this limit:
1. Open Wallarm Console → **Triggers** and open the window for trigger creation.
1. Select the **BOLA** condition.
1. Set the threshold 30 requests from the same IP per 30 seconds.
Note that these are the example values - when configuring trigger for your own traffic, you should define a threshold considering a legitimate usage statistics.
1. Set the **URI** filter as displayed on the screenshot, including:
* `*` [wildcard](https://docs.wallarm.com/user-guides/rules/rules.md#using-wildcards) in the path meaning "any one component". They will cover all the `wmall-example.com/shops//financial_info` addresses.

1. Do not use in this case:
* The **Application** filter, but be aware that you can use it to set trigger only to react to the requests targeting domains or specific endpoints of selected applications.
* The **IP** filter, but be aware that you can use it to set triggers only to react to specific IPs originating requests.
1. Select the **Denylist IP address** - `Block for 4 hour` trigger reaction. Wallarm will put origin IP to the [denylist](https://docs.wallarm.com/user-guides/ip-lists/overview.md) after the threshold is exceeded and block all further requests from it.
Note that even if the bot IP is placed into the denylist by manual BOLA protection, by default, Wallarm collects and [displays](https://docs.wallarm.com/user-guides/ip-lists/overview.md#requests-from-denylisted-ips) statistics regarding blocked requests originating from it.
1. Select the **Mark as BOLA** trigger reaction. Requests received after exceeding the threshold will be marked as the BOLA attack and displayed in the **Attacks** section of Wallarm Console. Sometimes, you can use this reaction alone to have information about the attack, but not to block anything.
1. Save the trigger and wait for the [Cloud and node synchronization completion](https://docs.wallarm.com/admin-en/configure-cloud-node-synchronization-en.md) (usually it takes 2-4 minutes).
### Testing
!!! info "Testing in your environment"
To test the **BOLA** trigger in your environment, in the trigger and the requests below, replace the domain with any public one (e.g. `example.com`).
To test the trigger described in the [Configuring](#configuring) section:
1. Send the number of requests that exceeds the configured threshold to the protected URI. For example, 50 requests with different values of `{shop_id}` to the endpoint `https://wmall-example.com/shops/{shop_id}/financial_info`:
```bash
for (( i=0 ; $i<51 ; i++ )) ; do curl https://wmall-example.com/shops/$i/financial_info ; done
```
1. If the trigger reaction is **Denylist IP address**, open Wallarm Console → **IP lists** → **Denylist** and check that the source IP address is blocked.
If the trigger reaction is **Graylist IP address**, check the section **IP lists** → **Graylist** of Wallarm Console.
1. Open the section **Attacks** and check that requests are displayed in the list as BOLA attack.

The number of displayed requests corresponds to the number of requests sent after the trigger threshold was exceeded ([more details on detecting behavioral attacks](https://docs.wallarm.com/attacks-vulns-list.md#attack-types)). If this number is higher than 5, request sampling is applied and request details are displayed only for the first 5 hits ([more details on requests sampling](https://docs.wallarm.com/user-guides/events/grouping-sampling.md#sampling-of-hits)).
To search for BOLA attacks, you can use the `bola` search tag. All filters are described in the [instructions on search use](https://docs.wallarm.com/user-guides/search-and-filters/use-search.md).
### Requirements and restrictions
**Requirements**
To protect resources from BOLA attacks, real clients' IP addresses are required. If the filtering node is deployed behind a proxy server or load balancer, [configure](https://docs.wallarm.com/admin-en/using-proxy-or-balancer-en.md) displaying real clients' IP addresses.
**Restrictions**
When searching for BOLA attack signs, Wallarm nodes analyze only HTTP requests that do not contain signs of other attack types.