# Mitigation Controls  Mitigation controls extend Wallarm's [attack protection](https://docs.wallarm.com/about-wallarm/protecting-against-attacks.md#tools-for-attack-detection) with additional security measures and allow fine-tuning of the Wallarm behavior.
## What you can do with mitigation controls
Using mitigation controls, you can enable and configure:
* [Real-time blocking mode](https://docs.wallarm.com/admin-en/configure-wallarm-mode.md#conditioned-filtration-mode)
* [GraphQL API protection](https://docs.wallarm.com/api-protection/graphql-rule.md)
* [Enumeration attack protection](https://docs.wallarm.com/api-protection/enumeration-attack-protection.md)
* [BOLA enumeration protection](https://docs.wallarm.com/api-protection/enumeration-attack-protection.md)
* [Forced browsing protection](https://docs.wallarm.com/api-protection/enumeration-attack-protection.md)
* [Brute force protection](https://docs.wallarm.com/api-protection/enumeration-attack-protection.md)
* [DoS protection](https://docs.wallarm.com/api-protection/dos-protection.md)
* [Business logic abuse detection](https://docs.wallarm.com/api-protection/business-logic-abuse-detection.md)
* [AI payload inspection](https://docs.wallarm.com/agentic-ai/ai-payload-inspection.md)
* [MCP ACL Policy](https://docs.wallarm.com/agentic-ai/mcp-mitigation-controls.md#acl-policy)
* [MCP Request Verification](https://docs.wallarm.com/agentic-ai/mcp-mitigation-controls.md#request-verification)
* [MCP Tool Input Schema Enforcement](https://docs.wallarm.com/agentic-ai/mcp-mitigation-controls.md#tool-input-schema-enforcement)
* [Custom request anomaly detection](https://docs.wallarm.com/api-protection/custom-request-anomaly.md)
* [File upload restriction policy](https://docs.wallarm.com/api-protection/file-upload-restriction.md)
## Mitigation control branches
Mitigation controls are automatically grouped into nested branches by endpoint URIs and other conditions. This builds a tree-like structure in which mitigation control effects are inherited down. Principles:
* All branches inherit [all traffic](#scope) mitigation controls.
* In a branch, child endpoints inherit mitigation control effects from the parent.
* Distinct has priority over inherited.
* Directly specified has priority over regex.
* Case sensitive has priority over insensitive.
## Enabling
Mitigation controls require
* The [Advanced API Security](https://docs.wallarm.com/about-wallarm/subscription-plans.md#core-subscription-plans) subscription plan
* (most controls) [NGINX Node](https://docs.wallarm.com/installation/nginx-native-node-internals.md#nginx-node) 6.0.1 or [Native Node](https://docs.wallarm.com/installation/nginx-native-node-internals.md#native-node) 0.14.1
If you have all of this and still, in Wallarm Console, do not see the **Security controls** → **Mitigation Controls** section, contact the [Wallarm support team](https://support.wallarm.com/) to enable them.
## Creating and applying mitigation control
To create and apply a new mitigation control:
1. Proceed to Wallarm Console → **Mitigation Controls**.
1. Click **Add control**.
1. In the **Add control** dialog, select the type of control you want to create.
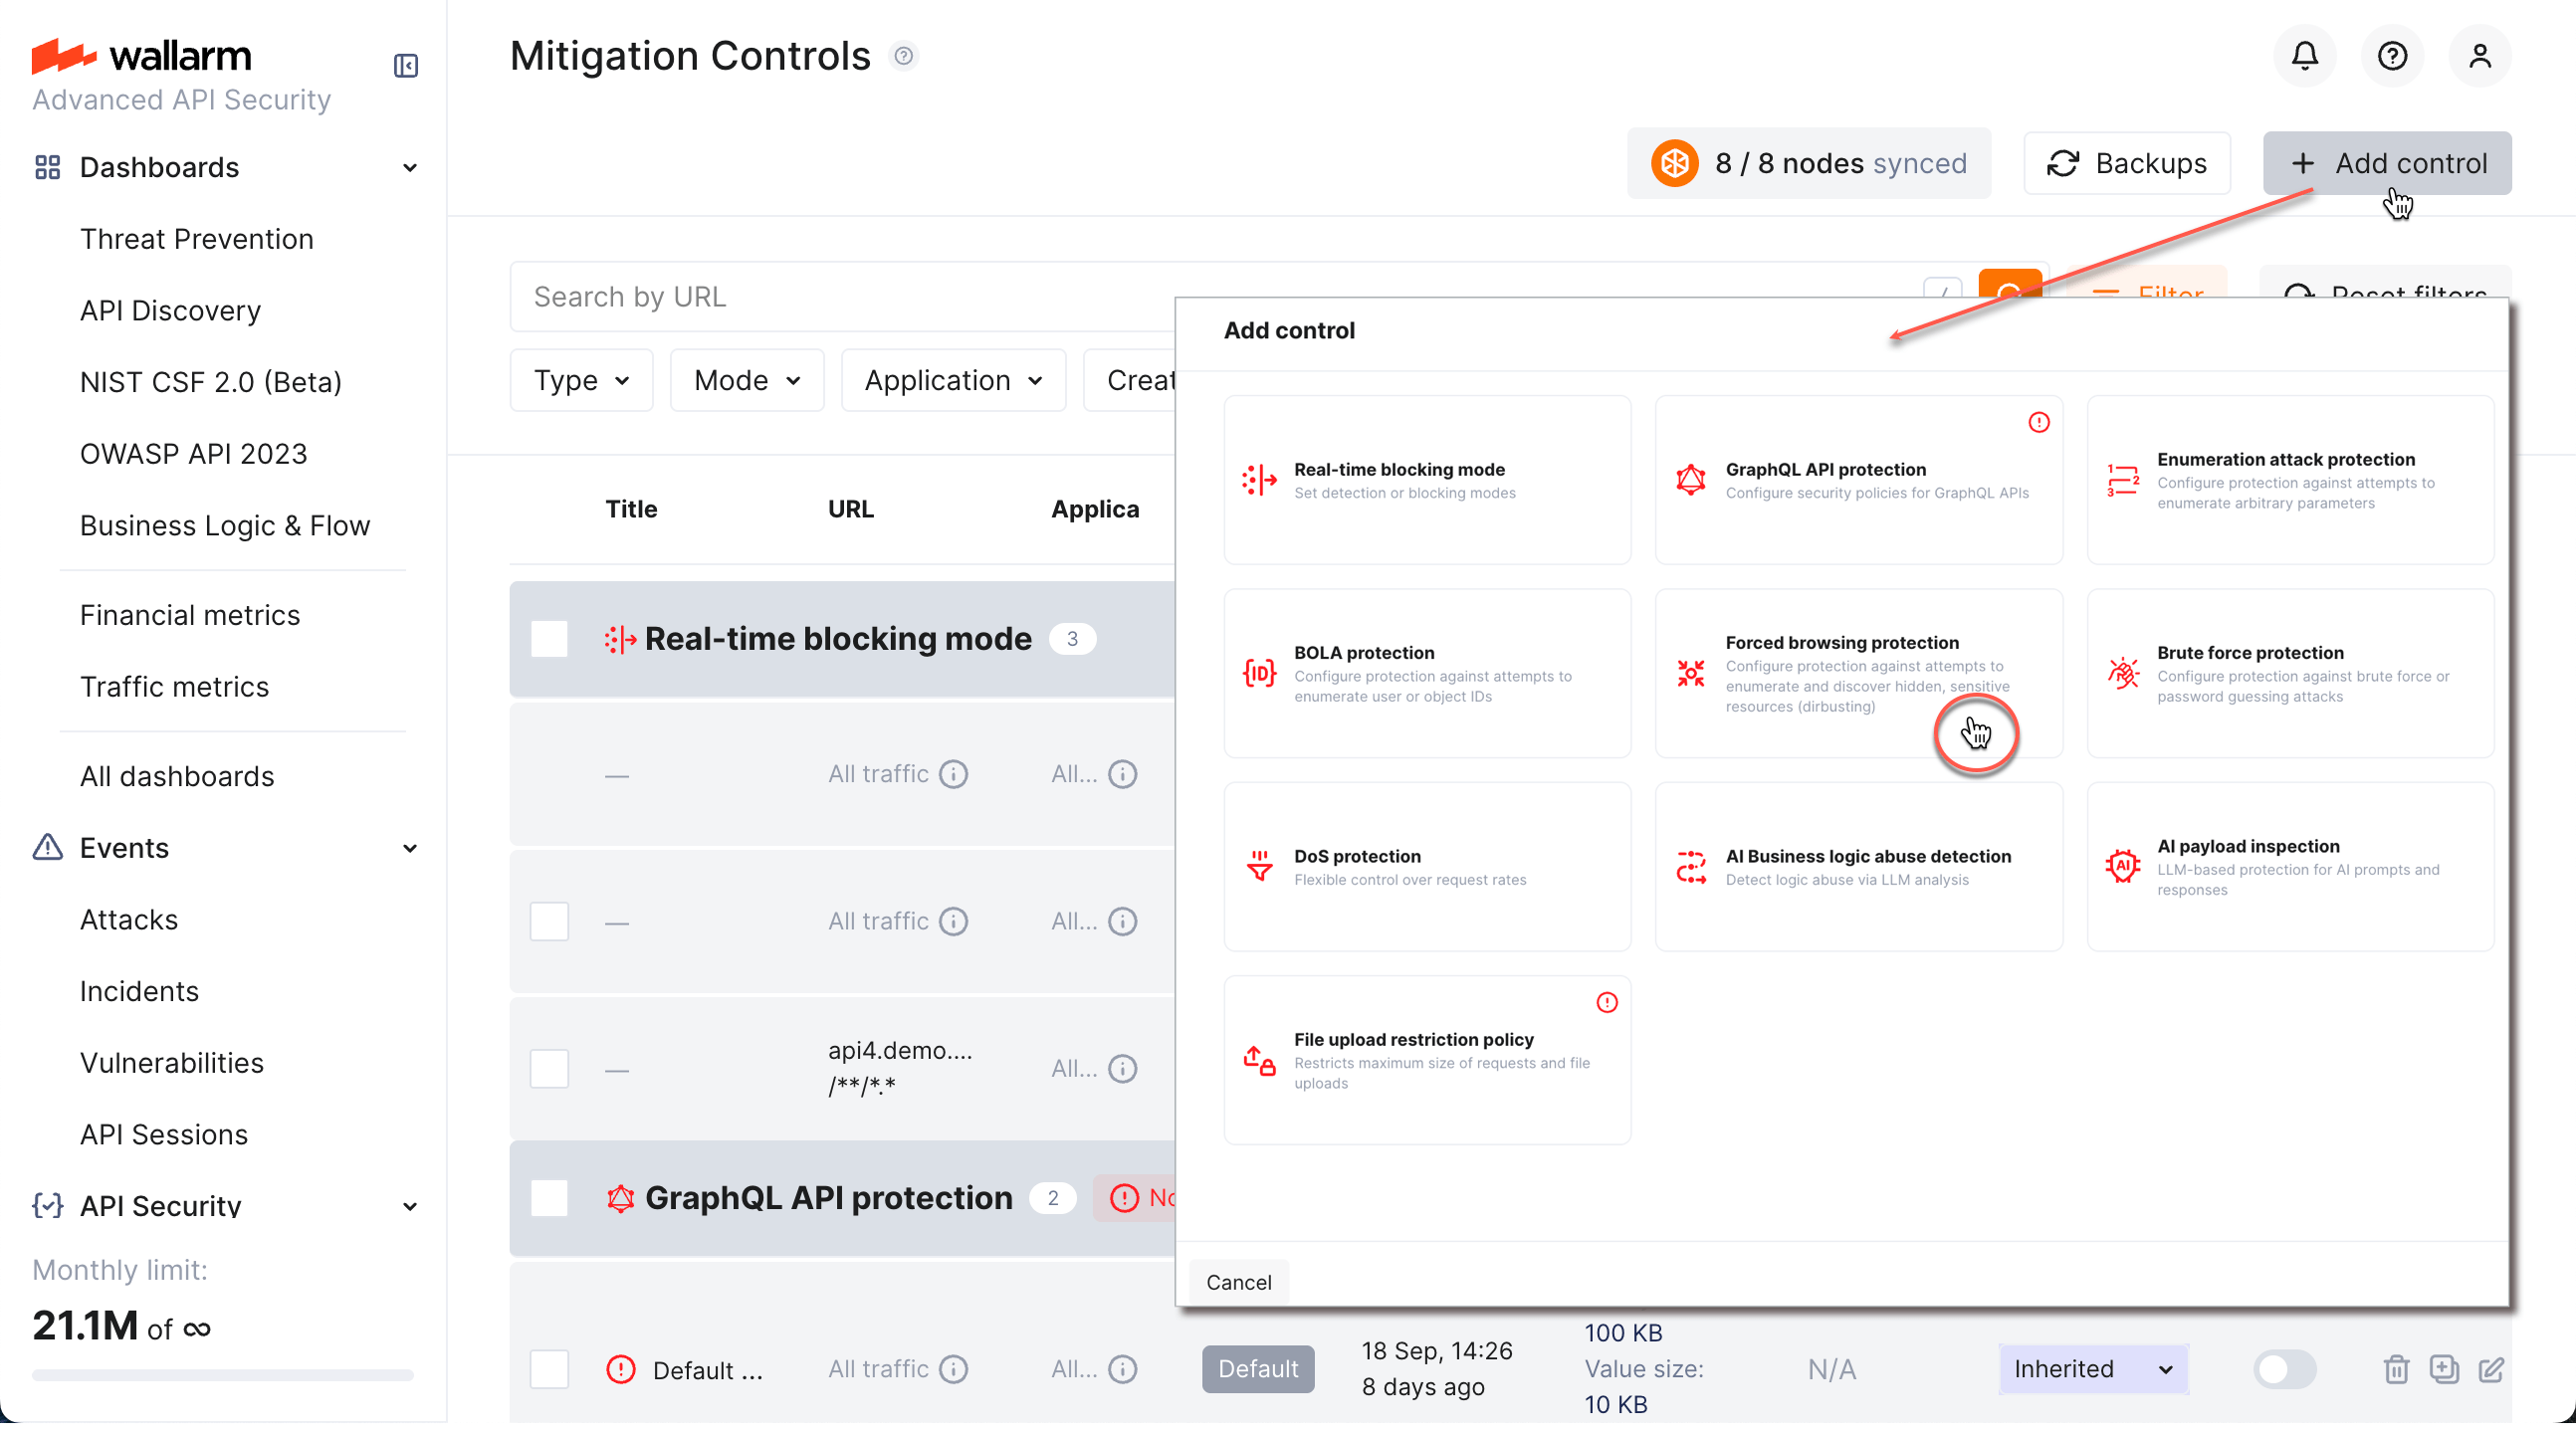
1. [Configure](#configuration) your control.
1. Click **Add**. The created control is displayed in the list. It immediately goes into action and performs in accordance with the selected **Mitigation mode**.
You can temporarily turn off the control right after creation or at any moment later using the **On/Off** switcher.
## Configuration
Perform configuring in the **Security controls** → **Mitigation Controls** section of Wallarm Console. You can also access some mitigation control settings from other places in the system, for example, from API Sessions.
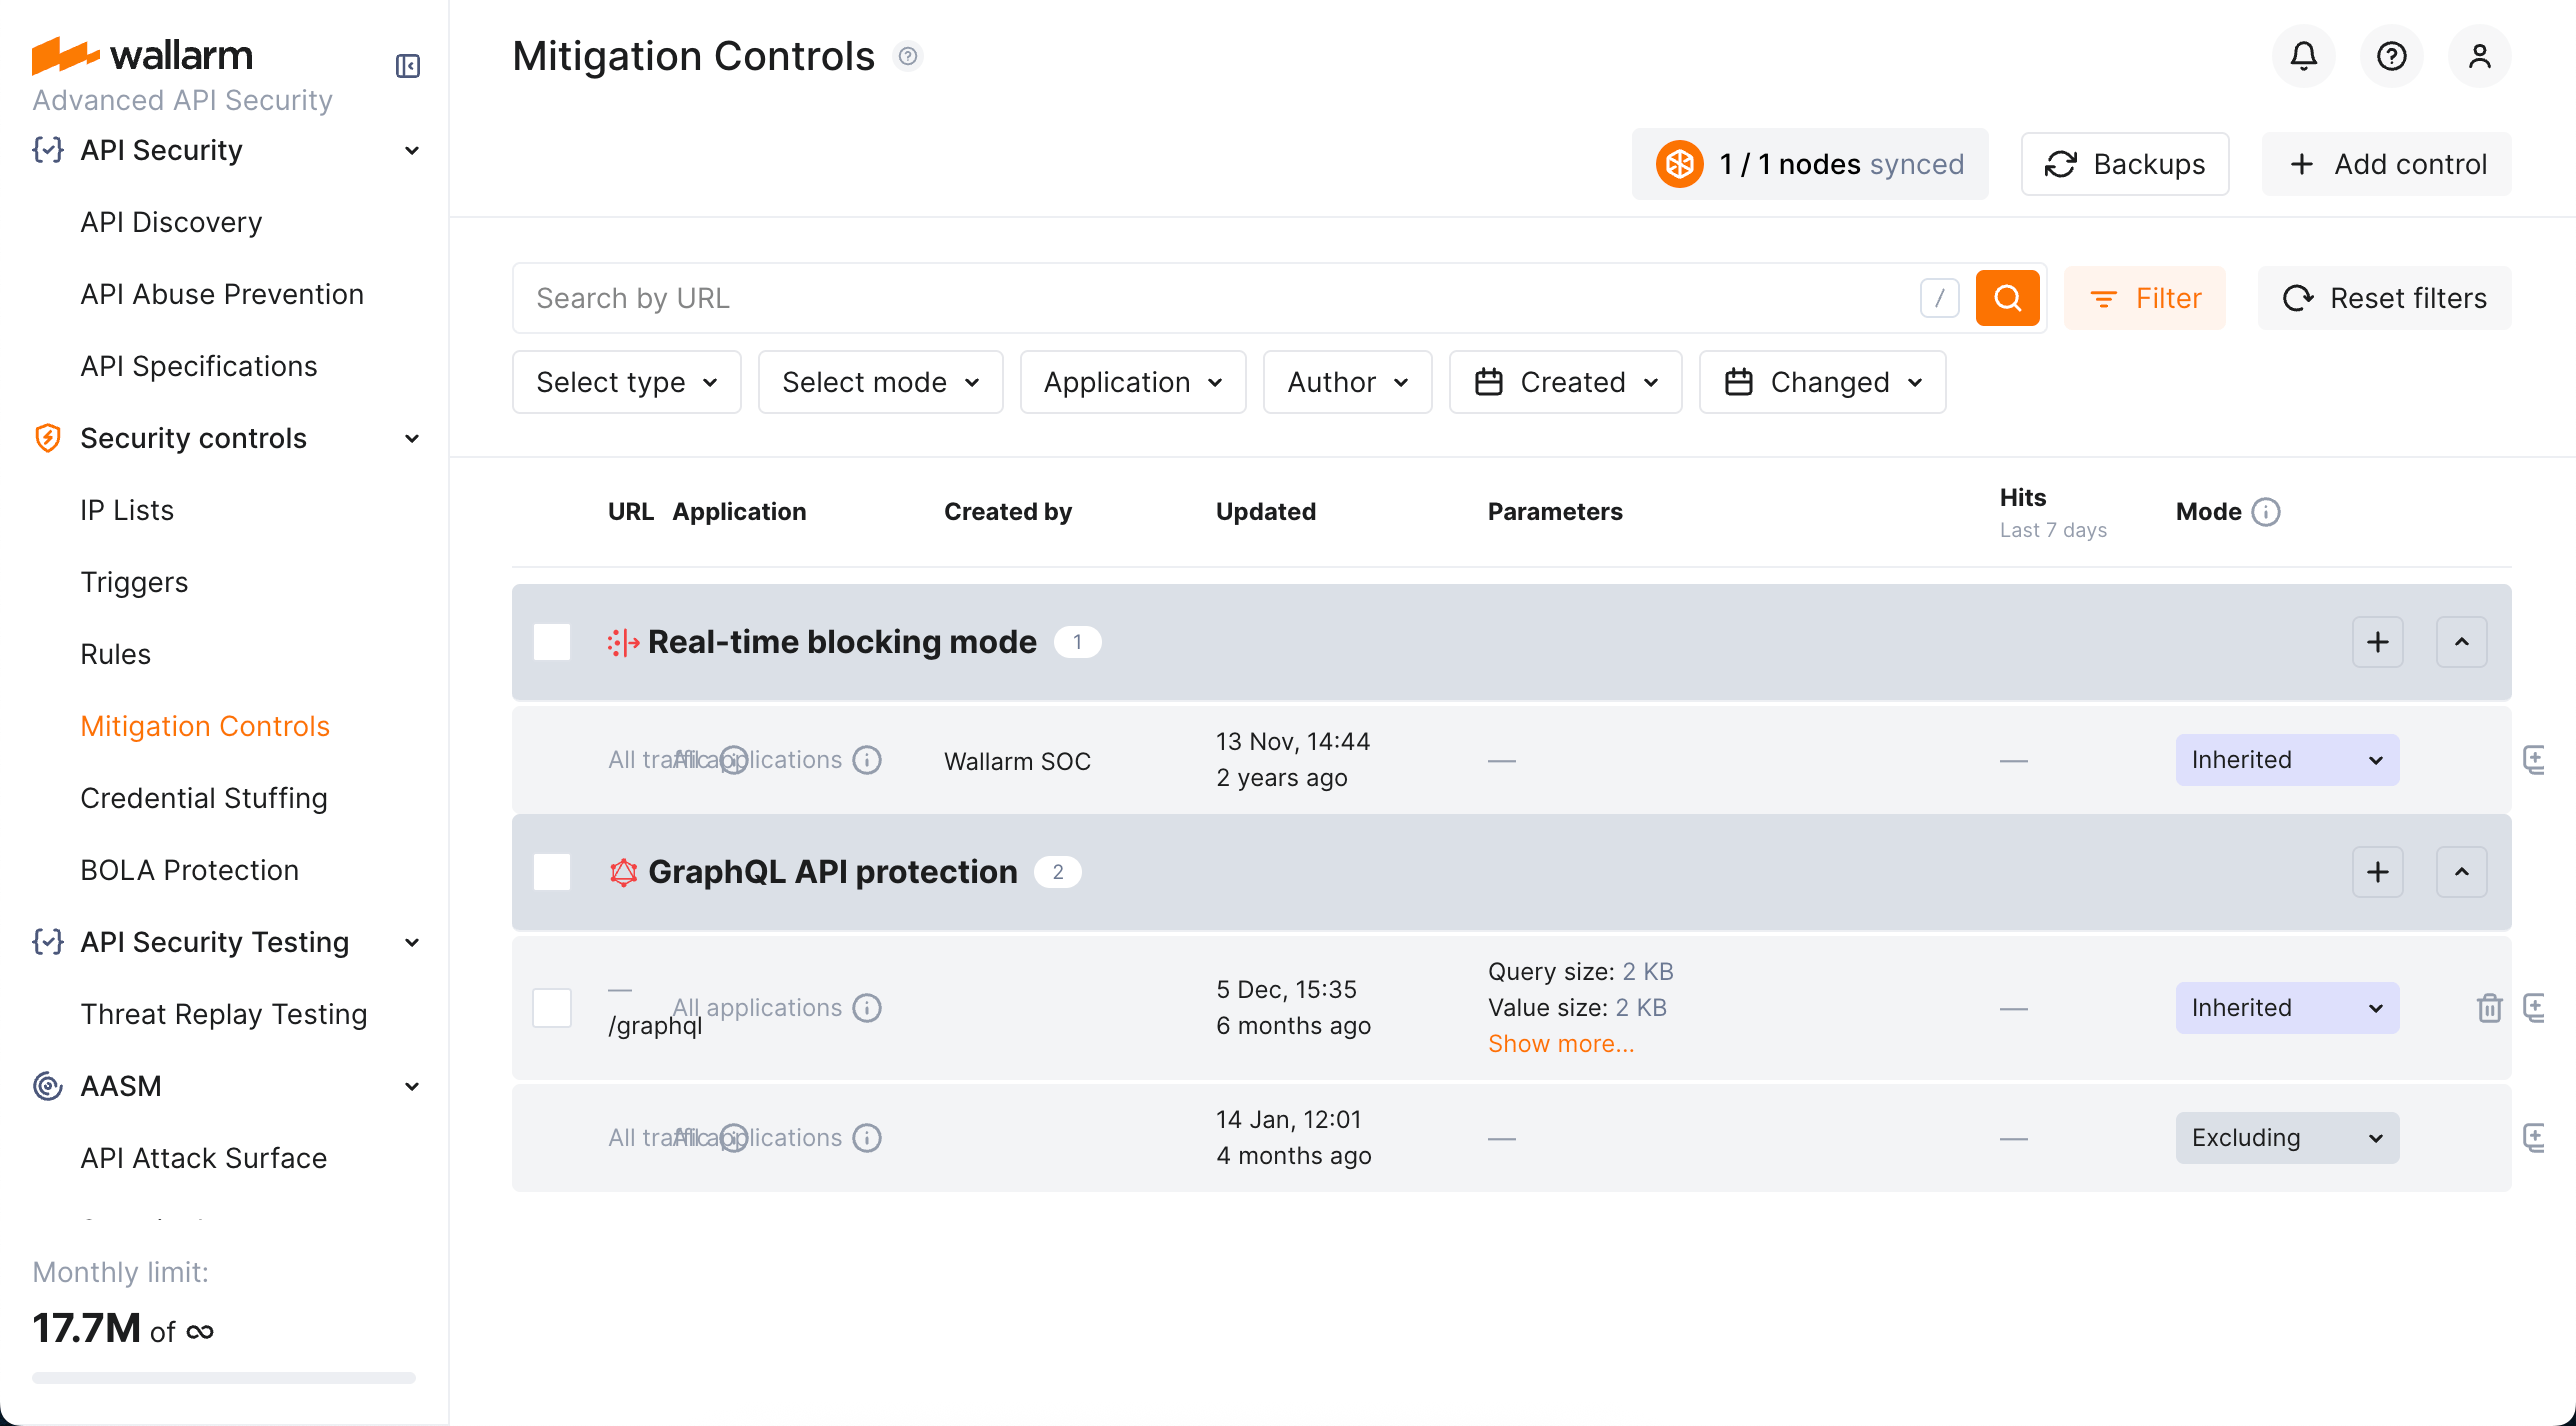
Before configuring, get familiar with the idea of [branches](#mitigation-control-branches) and check what already exists.
In general, configuring any mitigation control includes the following steps:
1. Optionally, set custom **Title**.
1. Set conditions (when all met → action).
1. Set action (mitigation mode).
### Scope
**Scope** defines which requests the control applies to (based on URI and other parameters). It’s configured the same way as request conditions in rules. See details [here](https://docs.wallarm.com/user-guides/rules/rules.md#configuring).
If you leave the **Scope** section blank, mitigation control is applied to **all traffic** and **all applications**; such controls are inherited by all [branches](#mitigation-control-branches).
### Advanced conditions
Besides [Scope](#scope), mitigation control may include other conditions that define whether it will or will not take action, for example:
* For [GraphQL API protection](https://docs.wallarm.com/api-protection/graphql-rule.md) they are policy positions - control will act only if any of them is violated by request.
* For [Enumeration attack protection](https://docs.wallarm.com/api-protection/enumeration-attack-protection.md), they are multiple parameters of requests - control will act only if all specified parameters/values are met.
For some controls, like [Enumeration attack protection](https://docs.wallarm.com/api-protection/enumeration-attack-protection.md) or [DoS protection](https://docs.wallarm.com/api-protection/dos-protection.md), in the **Scope filters** section, you can use the **session context parameters** to quickly select parameters from the list of ones, that were [defined as important](https://docs.wallarm.com/api-sessions/setup.md#session-context) in **API Sessions**. Use the **Add custom** option in this section to add as filters the parameters that are currently not presented in **API Sessions**. If you do so, these parameters will be added to **API Sessions**' context parameters as well (hidden, meaning you will see these parameters in session details if they are presented in requests, but you will not see them in API Session [context parameter configuration](https://docs.wallarm.com/api-sessions/setup.md#session-context)).
For specifying advanced conditions, you can use [regular expressions](#regular-expressions).
### Mitigation mode
When all conditions are met, mitigation control performs its action. The required action is selected in the **Mitigation mode** section:
| Mitigation mode | Description |
| --- | --- |
| **Inherited** | Mode is inherited from the [all-traffic **Real-time blocking mode**](https://docs.wallarm.com/admin-en/configure-wallarm-mode.md#general-filtration-mode) and the [configuration](https://docs.wallarm.com/admin-en/configure-wallarm-mode.md#setting-wallarm_mode-directive) of the Wallarm node. |
| **Monitoring** | Only registers detected attacks; no blocking is performed. Registered attacks are displayed in **API Sessions**, in the corresponding [session details](https://docs.wallarm.com/api-sessions/exploring.md#specific-activities-within-session).
Mitigation controls extend Wallarm's [attack protection](https://docs.wallarm.com/about-wallarm/protecting-against-attacks.md#tools-for-attack-detection) with additional security measures and allow fine-tuning of the Wallarm behavior.
## What you can do with mitigation controls
Using mitigation controls, you can enable and configure:
* [Real-time blocking mode](https://docs.wallarm.com/admin-en/configure-wallarm-mode.md#conditioned-filtration-mode)
* [GraphQL API protection](https://docs.wallarm.com/api-protection/graphql-rule.md)
* [Enumeration attack protection](https://docs.wallarm.com/api-protection/enumeration-attack-protection.md)
* [BOLA enumeration protection](https://docs.wallarm.com/api-protection/enumeration-attack-protection.md)
* [Forced browsing protection](https://docs.wallarm.com/api-protection/enumeration-attack-protection.md)
* [Brute force protection](https://docs.wallarm.com/api-protection/enumeration-attack-protection.md)
* [DoS protection](https://docs.wallarm.com/api-protection/dos-protection.md)
* [Business logic abuse detection](https://docs.wallarm.com/api-protection/business-logic-abuse-detection.md)
* [AI payload inspection](https://docs.wallarm.com/agentic-ai/ai-payload-inspection.md)
* [MCP ACL Policy](https://docs.wallarm.com/agentic-ai/mcp-mitigation-controls.md#acl-policy)
* [MCP Request Verification](https://docs.wallarm.com/agentic-ai/mcp-mitigation-controls.md#request-verification)
* [MCP Tool Input Schema Enforcement](https://docs.wallarm.com/agentic-ai/mcp-mitigation-controls.md#tool-input-schema-enforcement)
* [Custom request anomaly detection](https://docs.wallarm.com/api-protection/custom-request-anomaly.md)
* [File upload restriction policy](https://docs.wallarm.com/api-protection/file-upload-restriction.md)
## Mitigation control branches
Mitigation controls are automatically grouped into nested branches by endpoint URIs and other conditions. This builds a tree-like structure in which mitigation control effects are inherited down. Principles:
* All branches inherit [all traffic](#scope) mitigation controls.
* In a branch, child endpoints inherit mitigation control effects from the parent.
* Distinct has priority over inherited.
* Directly specified has priority over regex.
* Case sensitive has priority over insensitive.
## Enabling
Mitigation controls require
* The [Advanced API Security](https://docs.wallarm.com/about-wallarm/subscription-plans.md#core-subscription-plans) subscription plan
* (most controls) [NGINX Node](https://docs.wallarm.com/installation/nginx-native-node-internals.md#nginx-node) 6.0.1 or [Native Node](https://docs.wallarm.com/installation/nginx-native-node-internals.md#native-node) 0.14.1
If you have all of this and still, in Wallarm Console, do not see the **Security controls** → **Mitigation Controls** section, contact the [Wallarm support team](https://support.wallarm.com/) to enable them.
## Creating and applying mitigation control
To create and apply a new mitigation control:
1. Proceed to Wallarm Console → **Mitigation Controls**.
1. Click **Add control**.
1. In the **Add control** dialog, select the type of control you want to create.

1. [Configure](#configuration) your control.
1. Click **Add**. The created control is displayed in the list. It immediately goes into action and performs in accordance with the selected **Mitigation mode**.
You can temporarily turn off the control right after creation or at any moment later using the **On/Off** switcher.
## Configuration
Perform configuring in the **Security controls** → **Mitigation Controls** section of Wallarm Console. You can also access some mitigation control settings from other places in the system, for example, from API Sessions.

Before configuring, get familiar with the idea of [branches](#mitigation-control-branches) and check what already exists.
In general, configuring any mitigation control includes the following steps:
1. Optionally, set custom **Title**.
1. Set conditions (when all met → action).
1. Set action (mitigation mode).
### Scope
**Scope** defines which requests the control applies to (based on URI and other parameters). It’s configured the same way as request conditions in rules. See details [here](https://docs.wallarm.com/user-guides/rules/rules.md#configuring).
If you leave the **Scope** section blank, mitigation control is applied to **all traffic** and **all applications**; such controls are inherited by all [branches](#mitigation-control-branches).
### Advanced conditions
Besides [Scope](#scope), mitigation control may include other conditions that define whether it will or will not take action, for example:
* For [GraphQL API protection](https://docs.wallarm.com/api-protection/graphql-rule.md) they are policy positions - control will act only if any of them is violated by request.
* For [Enumeration attack protection](https://docs.wallarm.com/api-protection/enumeration-attack-protection.md), they are multiple parameters of requests - control will act only if all specified parameters/values are met.
For some controls, like [Enumeration attack protection](https://docs.wallarm.com/api-protection/enumeration-attack-protection.md) or [DoS protection](https://docs.wallarm.com/api-protection/dos-protection.md), in the **Scope filters** section, you can use the **session context parameters** to quickly select parameters from the list of ones, that were [defined as important](https://docs.wallarm.com/api-sessions/setup.md#session-context) in **API Sessions**. Use the **Add custom** option in this section to add as filters the parameters that are currently not presented in **API Sessions**. If you do so, these parameters will be added to **API Sessions**' context parameters as well (hidden, meaning you will see these parameters in session details if they are presented in requests, but you will not see them in API Session [context parameter configuration](https://docs.wallarm.com/api-sessions/setup.md#session-context)).
For specifying advanced conditions, you can use [regular expressions](#regular-expressions).
### Mitigation mode
When all conditions are met, mitigation control performs its action. The required action is selected in the **Mitigation mode** section:
| Mitigation mode | Description |
| --- | --- |
| **Inherited** | Mode is inherited from the [all-traffic **Real-time blocking mode**](https://docs.wallarm.com/admin-en/configure-wallarm-mode.md#general-filtration-mode) and the [configuration](https://docs.wallarm.com/admin-en/configure-wallarm-mode.md#setting-wallarm_mode-directive) of the Wallarm node. |
| **Monitoring** | Only registers detected attacks; no blocking is performed. Registered attacks are displayed in **API Sessions**, in the corresponding [session details](https://docs.wallarm.com/api-sessions/exploring.md#specific-activities-within-session).
For some controls, in this mode, you can also select additional option of adding source IP in the [Graylist](https://docs.wallarm.com/user-guides/ip-lists/overview.md). |
| **Blocking** | Registers and blocks attacks. [Blocking methods](https://docs.wallarm.com/about-wallarm/protecting-against-attacks.md#attack-handling-process) vary by control type: real-time blocking, [IP-based blocking](https://docs.wallarm.com/user-guides/ip-lists/overview.md), or [session-based blocking](https://docs.wallarm.com/api-sessions/blocking.md#blocking-sessions). |
| **Excluding** | Stops this type of mitigation control for the [specified scope](#mitigation-control-branches). See details in [Excluding mode vs. disabling](#excluding-mode-vs-disabling). |
| **Safe blocking** | Registers attacks but blocks them only if the originating IP is [graylisted](https://docs.wallarm.com/user-guides/ip-lists/overview.md). |
The list of available modes may vary depending on the particular control.
### Excluding mode vs. disabling
You can use **On/Off** switcher to temporarily disable mitigation control and re-enable it when necessary. Consider the example below to understand the difference between disabled mitigation control and the one enabled in Excluding mitigation mode:
* Consider the fact that controls [work in branches](#mitigation-control-branches).
* Let's say you have [DoS protection](https://docs.wallarm.com/api-protection/dos-protection.md) control set for `example.com` (50 request in minute) and control of the same type for child `example.com/login` (10 request in minute). This will result in restriction of 50 request in minute for all addresses under `example.com`, except addresses under `example.com/login` where it will be stricter - 10 request in minute.
* If you disable (switcher to **Off**) rate abuse protection control for `example.com/login`, it will stop doing anything (as if you deleted it) - restriction for all scope will be defined by parent control (50 request in minute).
* If you re-enable rate abuse protection control for `example.com/login` and set its mitigation mode to **Excluding**, it will stop rate abuse protection for this branch - restriction for all `example.com` will be 50 request in minute, except `example.com/login` where there will be no restriction of rate abuse protection type at all.
### Regular expressions
For specifying different mitigation control parameters, like **Scope**, **Scope filters**, and others, you can use regular expressions:
* The **Scope** section uses PIRE regular expression library. See details on usage [here](https://docs.wallarm.com/user-guides/rules/rules.md#condition-type-regex).
* Other sections use [PCRE](https://www.pcre.org/). Use the following operators to involve regular expression:
| Operator | Description |
| --- | --- |
| ~ (Aa) | Find something by case insensitive regexp. |
| !~ (Aa) | Exclude something by case insensitive regexp. |
| ~ | Find something by case sensitive regexp. |
| !~ | Exclude something by case sensitive regexp. |
## Default controls
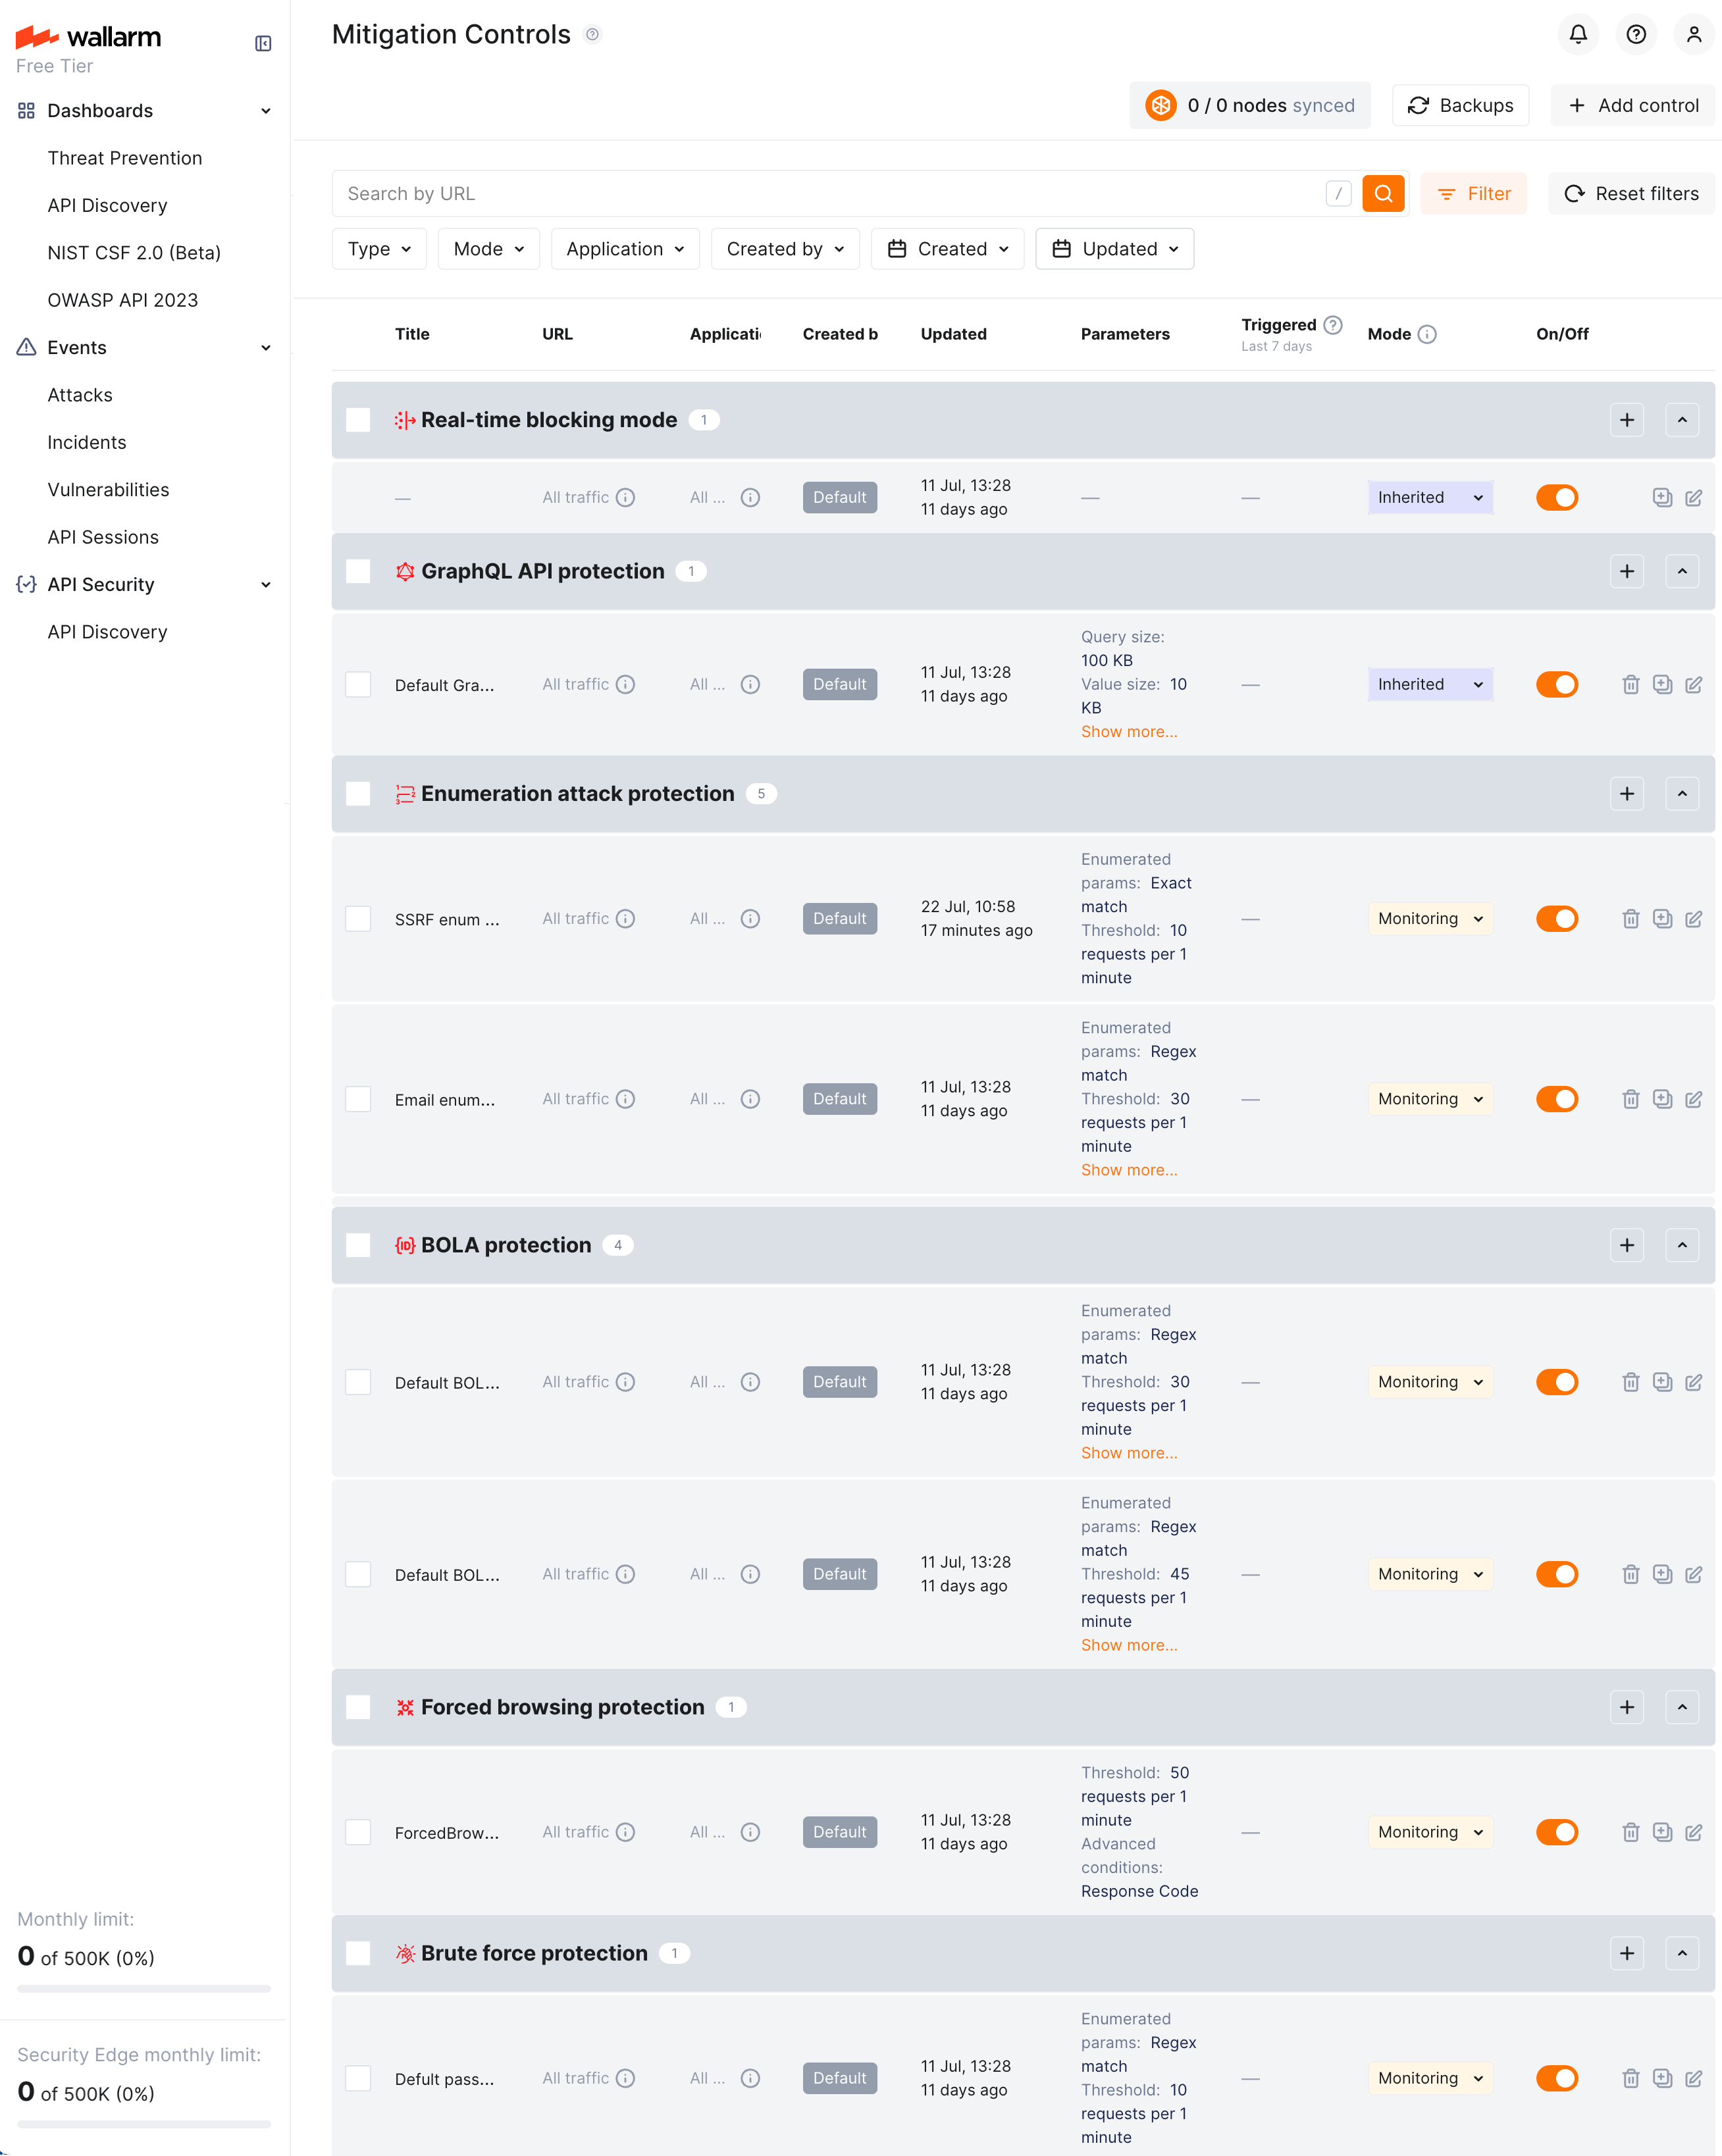
Wallarm provides a set of **default mitigation controls** that, when enabled, significantly enhance the detection capabilities of the Wallarm platform. These controls are pre-configured to offer robust protection against a variety of common attack patterns. The current default mitigation controls include:
* [GraphQL protection](https://docs.wallarm.com/api-protection/graphql-rule.md)
* [BOLA (Broken Object Level Authorization) enumeration protection](https://docs.wallarm.com/api-protection/enumeration-attack-protection.md#bola) for user IDs, object IDs, and filenames
* [Brute force protection](https://docs.wallarm.com/api-protection/enumeration-attack-protection.md#brute-force) for passwords, OTPs, and authentication codes
* [Forced browsing protection](https://docs.wallarm.com/api-protection/enumeration-attack-protection.md#forced-browsing) (404 probing)
* [Enumeration attack protection](https://docs.wallarm.com/api-protection/enumeration-attack-protection.md#generic-enumeration), including:
* User/email enumeration
* SSRF (Server-Side Request Forgery) enumeration
* User-agent rotation
All controls from the default set have the `Default` label. Such controls:
* Added by Wallarm automatically and enabled (`On`) for the new clients, disabled (`Off`) for the rest.
!!! info "Absence of default controls"
If you do not see any default controls, except [obligatory](#obligatory_default_controls) ones, and do want to explore and try them, contact the [Wallarm support team](https://support.wallarm.com/) to get them.
* All are initially applied to [all traffic](#scope) (changeable).
* All initially use `Monitoring` [mitigation mode](#mitigation-mode) (changeable).
* Cannot be deleted.
* Can be disabled/re-enabled and edited like all others. Editing allows you to customize any default control based on the specific needs of the application, traffic patterns, or business context. For example, you may adjust default thresholds or exclude specific endpoints via the **Scope filters** section.
!!! info "Subject to change"
The list of default mitigation controls is subject to change:
* New controls may be introduced over time.
* If a mitigation control is disabled, Wallarm may still update its parameters to improve quality and performance.
**Obligatory default controls**
* All traffic [Real-time blocking mode](https://docs.wallarm.com/admin-en/configure-wallarm-mode.md#conditioned-filtration-mode) control
* [Overlimit res](https://docs.wallarm.com/user-guides/rules/configure-overlimit-res-detection.md)
## Ruleset lifecycle
All created mitigation controls and [rules](https://docs.wallarm.com/user-guides/rules/rules.md) form a custom ruleset. The Wallarm node relies on the custom ruleset during incoming requests analysis.
Changes of rules and mitigation controls do NOT take effect instantly. Changes are applied to the request analysis process only after the custom ruleset **building** and **uploading to the filtering node** are finished.
### Custom ruleset building
Adding a new rule/mitigation control, deleting or changing existing ones in the Wallarm Console → **Security Controls** → **Rules WAF** or **Mitigation Controls** launch a custom ruleset build. During the building process, rules and controls are optimized and compiled into a format adopted for the filtering node. The process of building a custom ruleset typically takes from a few seconds for a small number of rules to up to an hour for complex rule trees.
### Uploading to filtering node
Custom ruleset build is uploaded to the filtering node during the filtering node and Wallarm Cloud synchronization. By default, synchronization of the filtering node and Wallarm Cloud is launched every 2‑4 minutes. [More details on the filtering node and Wallarm Cloud synchronization configuration →](https://docs.wallarm.com/admin-en/configure-cloud-node-synchronization-en.md)
The status of uploading a custom ruleset to the filtering node is logged to the `/opt/wallarm/var/log/wallarm/wcli-out.log` file.
All Wallarm nodes connected to the same Wallarm account receive the same set of default and custom rules for traffic filtering. You still can apply different rules for different applications by using proper application IDs or unique HTTP request parameters like headers, query string parameters, etc.
### Backup and restore
To protect yourself from accidentally misconfigured or deleted rules, you can backup your current custom ruleset.
There are the following rule backup options:
* Automatic backup creation after each [custom ruleset build](#custom-ruleset-building). The number of automatic backups is limited to 7: for each day when you change the rules several times, only the last backup is kept.
* Manual backup creation at any time. The number of manual backups is limited to 5 by default. If you need more, contact the [Wallarm technical support](mailto:support@wallarm.com) team.
You can:
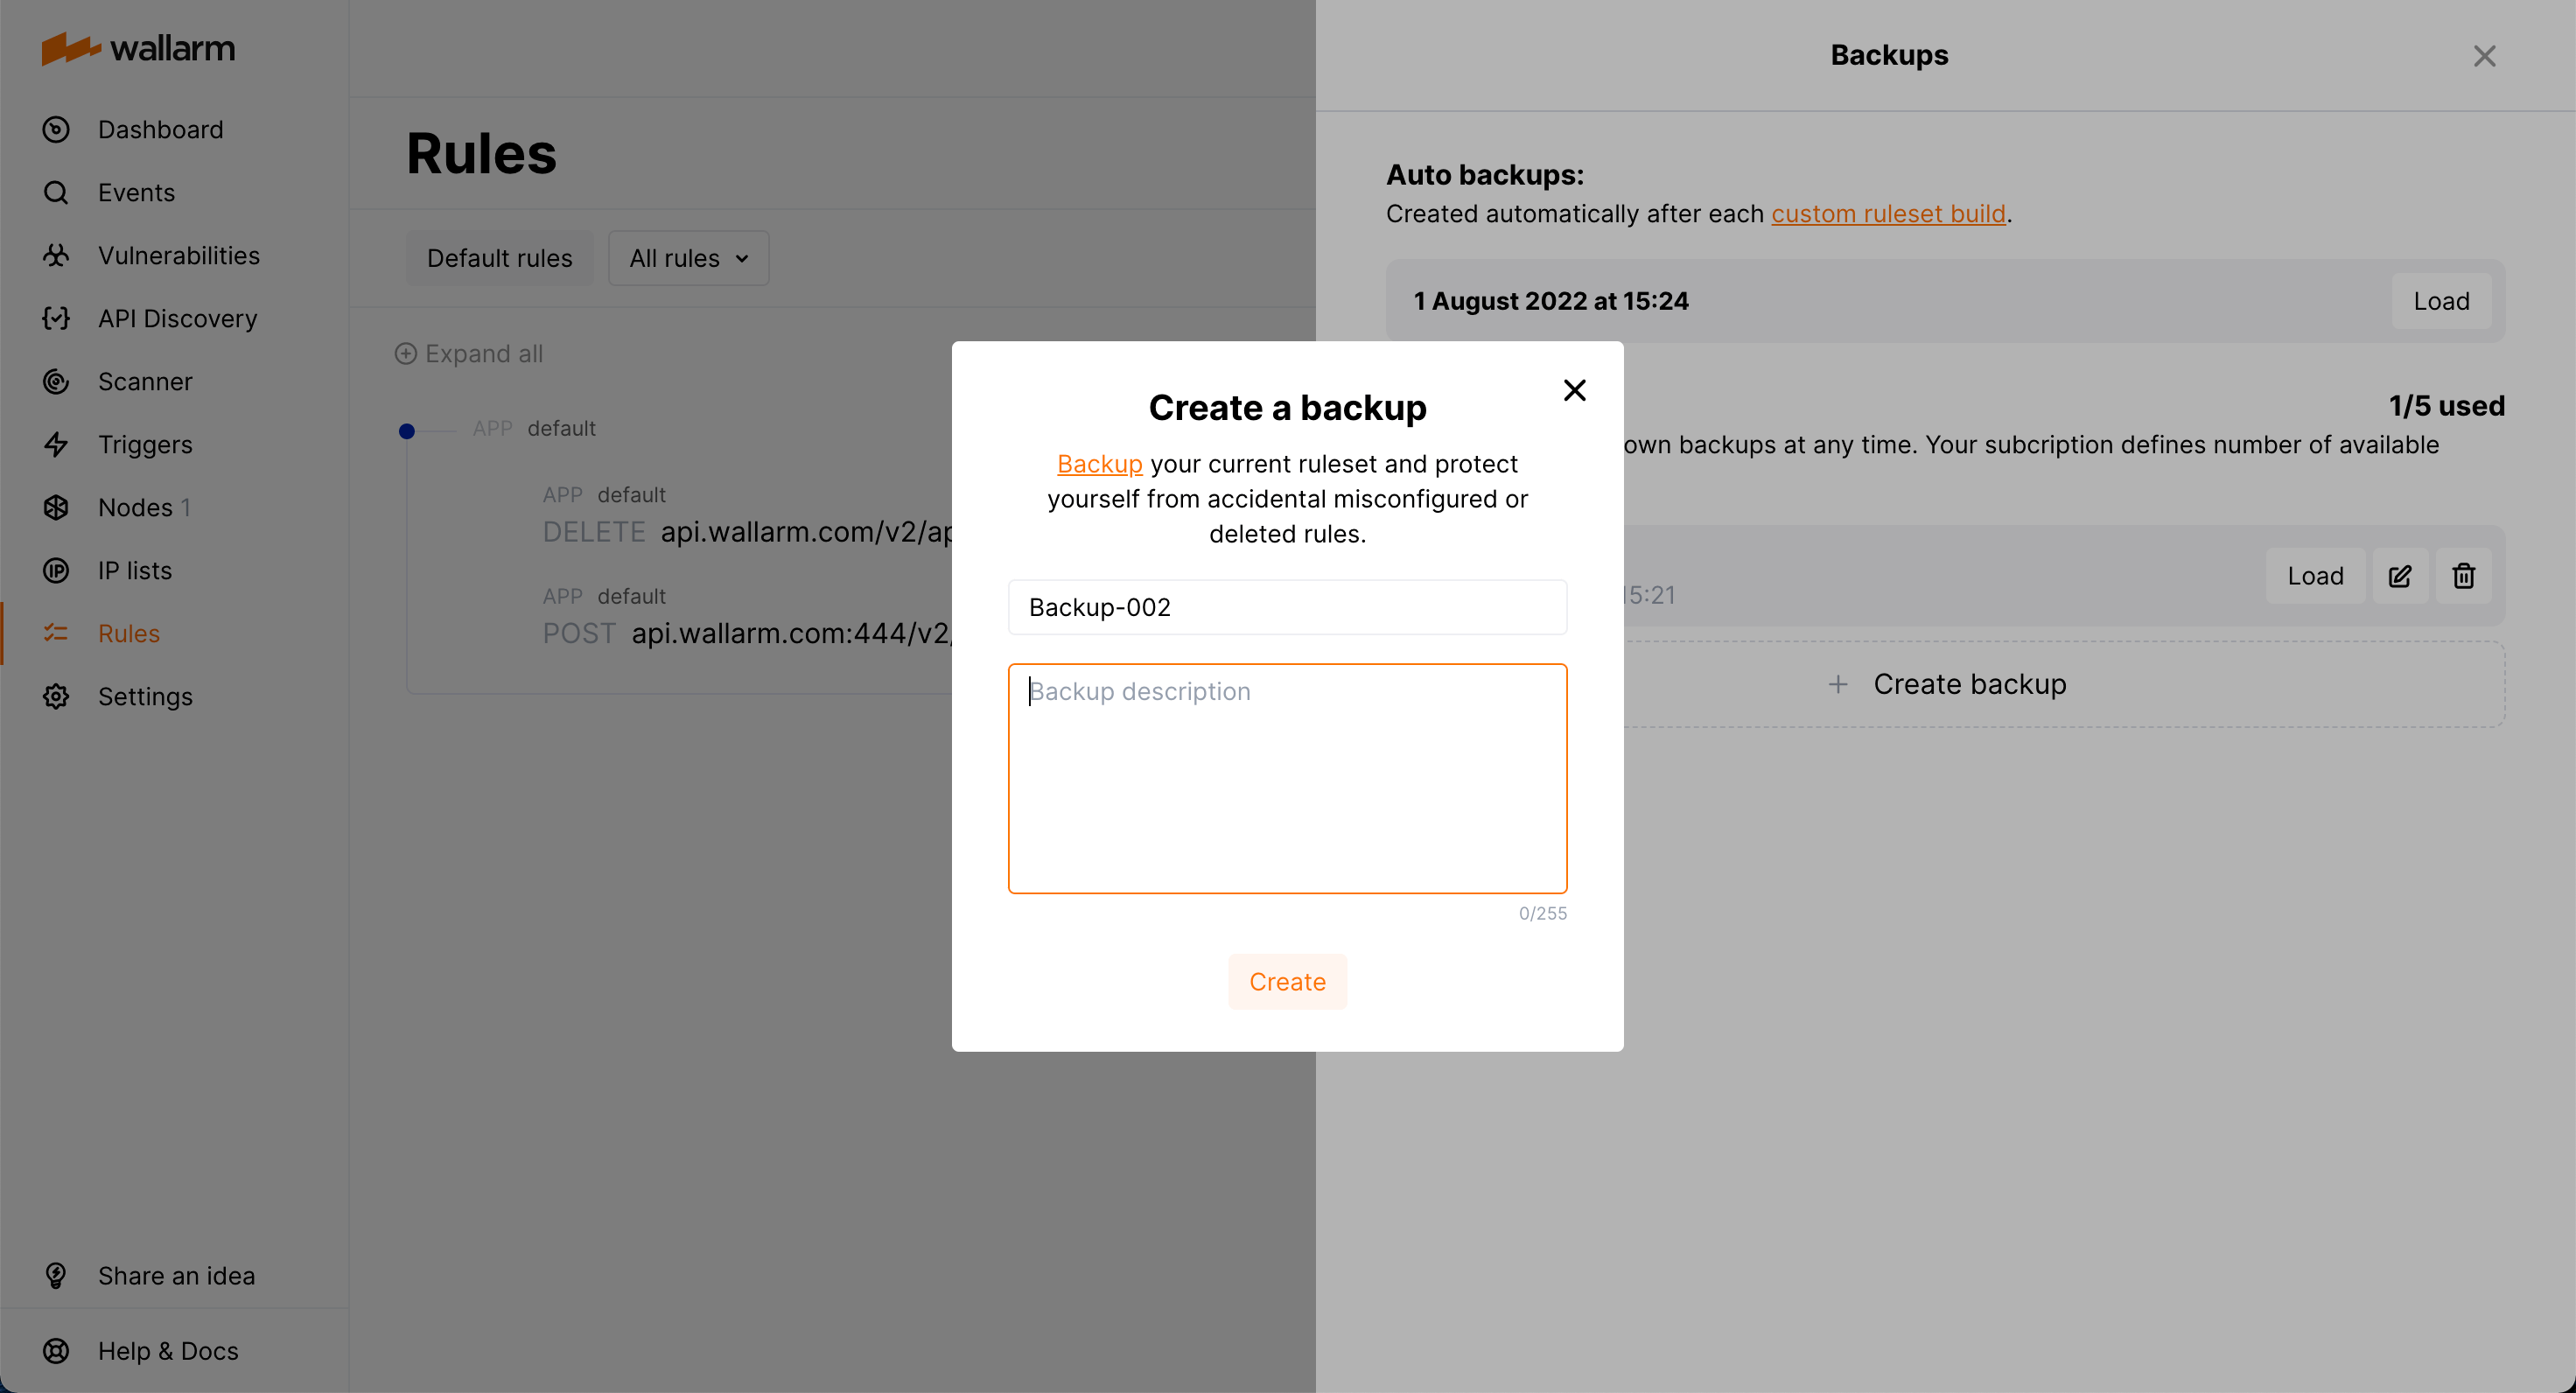
* Access current backups: in the **Rules WAF** section, click **Backups**.
* Create a new backup manually: in the **Backups** window, click **Create backup**.
* Set name and description for the manual backup and edit them at any moment.
!!! info "Naming for automatic backups"
The automatic backups are named by the system and cannot be renamed.
* Load from existing backup: click **Load** for the required backup. When loading from the backup, your current rule configuration is deleted and replaced with the configuration from the backup.
* Delete backup.
!!! warning "Rule modification restrictions"
You cannot create or modify rules or mitigation controls until creating backup or load from backup is complete.
## Migrating between tenants
If you have [multiple tenants](https://docs.wallarm.com/installation/multi-tenant/overview.md), you can [migrate](https://docs.wallarm.com/installation/multi-tenant/overview.md#migrating-rules) (copy) mitigation controls between them **along with other rules**.