Identifying an original client IP address if using an HTTP proxy or a load balancer (NGINX)
These instructions describe the NGINX configuration required to identify an originating IP address of a client connecting to your servers through an HTTP proxy or load balancer.
-
If the Wallarm node is installed from the DEB / RPM packages, AWS / GCP images or the NGINX-based Docker image, please use the current instructions.
-
If the Wallarm node is deployed as the K8s Ingress controller, please use these instructions.
-
If the Wallarm node is deployed as the K8s sidecar container, please use the instructions for deployment based on Helm Charts or Kubernetes manifests.
How Wallarm node identifies an IP address of a request
The Wallarm node reads a request source IP address from the NGINX variable $remote_addr. If the request passed through a proxy server or load balancer before being sent to the node, the variable $remote_addr retains the proxy server or load balancer IP address.

The request source IP address identified by the Wallarm node is displayed in the attack details in Wallarm Console.
Possible problems of using a proxy server or load balancer IP address as a request source address
If the Wallarm node considers the proxy server or load balancer IP address to be the IP address of the request source, the following Wallarm features may work incorrectly:
-
Controlling access to applications by IP addresses, for example:
If original client IP addresses were denylisted, the Wallarm node still would not block requests originated from them since it considers the load balancer IP address to be the IP address of the request source.
-
Brute force protection, for example:
If requests passed through the load balancer have brute force attack signs, Wallarm will denylist this load balancer IP address and therefore will block all further requests passed through this load balancer.
-
The Active threat verification module and Vulnerability Scanner, for example:
Wallarm will consider the load balancer IP address to be the IP address originating test attacks generated by the Active threat verification module and Vulnerability Scanner. Thus, test attacks will be displayed in Wallarm Console as attacks originated from the load balancer IP address and will be additionally checked by Wallarm which will create an extra load on the application.
If the Wallarm node is connected via an IPC socket, then 0.0.0.0 will be considered as a request source.
Configuration for an original client IP address identification
To configure an original client IP address identification, you can use the NGINX module ngx_http_realip_module. This module allows redefining the value of $remote_addr used by the Wallarm node to get a client IP address.
You can use the NGINX module ngx_http_realip_module in one of the following ways:
-
To read an original client IP address from a specific header (usually,
X-Forwarded-For) added to the request by a load balancer or proxy server. -
If a load balancer or proxy server supports the PROXY protocol, to read an original client IP address from the header
PROXY.
Configuring NGINX to read the header X-Forwarded-For (X-Real-IP or a similar)
If a load balancer or proxy server appends a header X-Forwarded-For (X-Real-IP or a similar) containing an original client IP address, please configure the NGINX module ngx_http_realip_module to read this header as follows:
-
Open the following configuration file of NGINX installed with the Wallarm node:
/etc/nginx/conf.d/default.confif the Wallarm node is installed from the DEB / RPM packages./etc/nginx/nginx.confif the Wallarm node is deployed from the AWS / GCP image.- If the Wallarm node is deployed from the NGINX-based Docker image, you should create and edit the NGINX configuration file locally and mount it to the Docker container at the path
/etc/nginx/sites-enabled/default. You can copy an initial NGINX configuration file and get the instructions on mounting the file to the container from the instructions on the Wallarm NGINX-based Docker instructions.
-
In the NGINX context
locationor higher, add the directiveset_real_ip_fromwith a proxy server or load balancer IP address. If a proxy server or load balancer has several IP addresses, please add an appropriate number of separate directives. For example: -
In the documentation on a load balancer being used, find the name of the header appended by this load balancer to pass an original client IP address. Most frequently, the header is called
X-Forwarded-For. -
In the NGINX context
locationor higher, add the directivereal_ip_headerwith the header name found in the previous step. For example: -
Restart NGINX:
NGINX will assign the value of the header specified in the
real_ip_headerdirective to the$remote_addrvariable, so the Wallarm node will read original client IP addresses from this variable.
Configuring NGINX to read the header PROXY
If a load balancer or proxy server supports the PROXY protocol, you can configure the NGINX module ngx_http_realip_module to read the header PROXY as follows:
-
Open the following configuration file of NGINX installed with the Wallarm node:
/etc/nginx/conf.d/default.confif the Wallarm node is installed from the DEB / RPM packages./etc/nginx/nginx.confif the Wallarm node is deployed from the AWS / GCP image.- If the Wallarm node is deployed from the NGINX-based Docker image, you should create and edit the NGINX configuration file locally and mount it to the Docker container at the path
/etc/nginx/sites-enabled/default. You can copy an initial NGINX configuration file and get the instructions on mounting the file to the container from the instructions on the Wallarm NGINX-based Docker instructions.
-
In the NGINX context
server, add the parameterproxy_protocolto the directivelisten. -
In the NGINX context
locationor higher, add the directiveset_real_ip_fromwith a proxy server or load balancer IP address. If a proxy server or load balancer has several IP addresses, please add an appropriate number of separate directives. For example: -
In the NGINX context
locationor higher, add the directivereal_ip_headerwith the value ofproxy_protocol.An example NGINX configuration file with all directives added:
server { listen 80 proxy_protocol; server_name localhost; set_real_ip_from <IP_ADDRESS_OF_YOUR_PROXY>; real_ip_header proxy_protocol; ... }- NGINX listens for incoming connections on port 80.
- If the header
PROXYis not passed in the incoming request, NGINX does not accept this request as it is considered not valid. - For requests originated from the address
<IP_ADDRESS_OF_YOUR_PROXY>, NGINX assigns the source address passed in the headerPROXYto the variable$remote_addr, so the Wallarm node will read original client IP addresses from this variable.
-
Restart NGINX:
To include an original client IP address in the logs, you should add the directive proxy_set_header and edit the list of variables in the log_format directive in the NGINX configuration as described in the NGINX logging instructions.
More details on identifying an original client IP address based on the PROXY header are available in the NGINX documentation.
Testing the configuration
-
Send the test attack to the protected application address:
-
Open Wallarm Console and ensure that the original client IP address is displayed in the attack details:
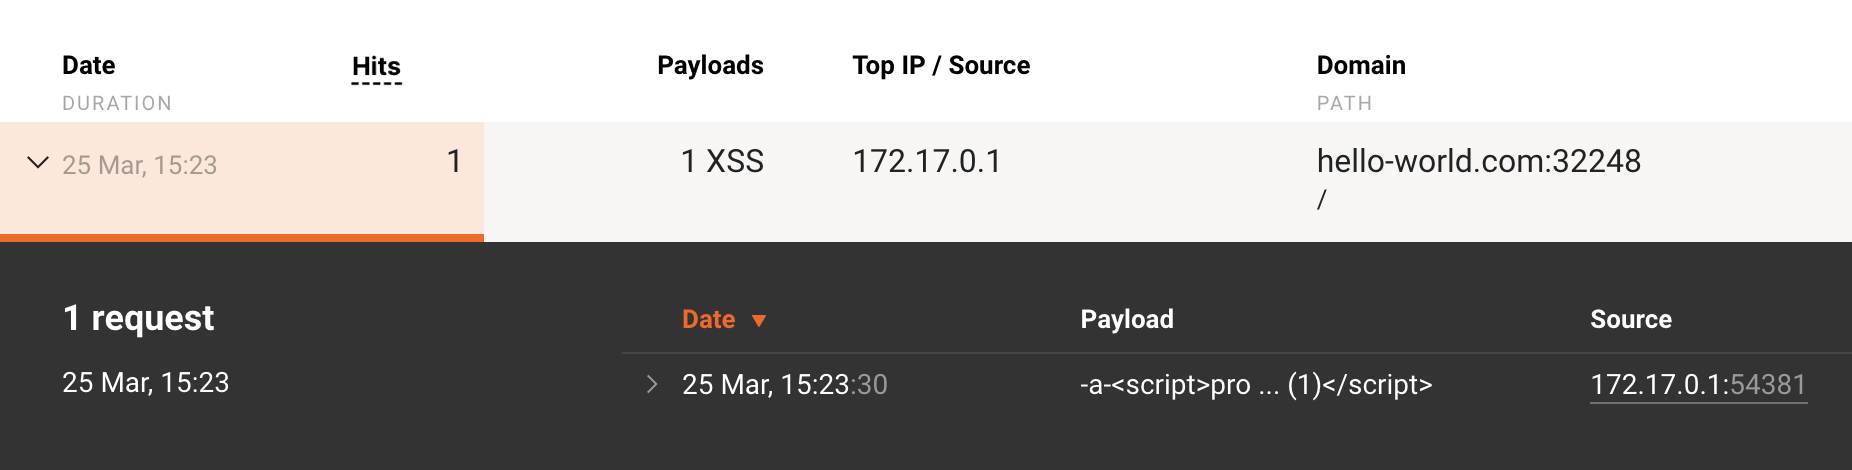
If NGINX read the original address from the header
X-Forwarded-For(X-Real-IPor a similar), the header value would also be displayed in the raw attack.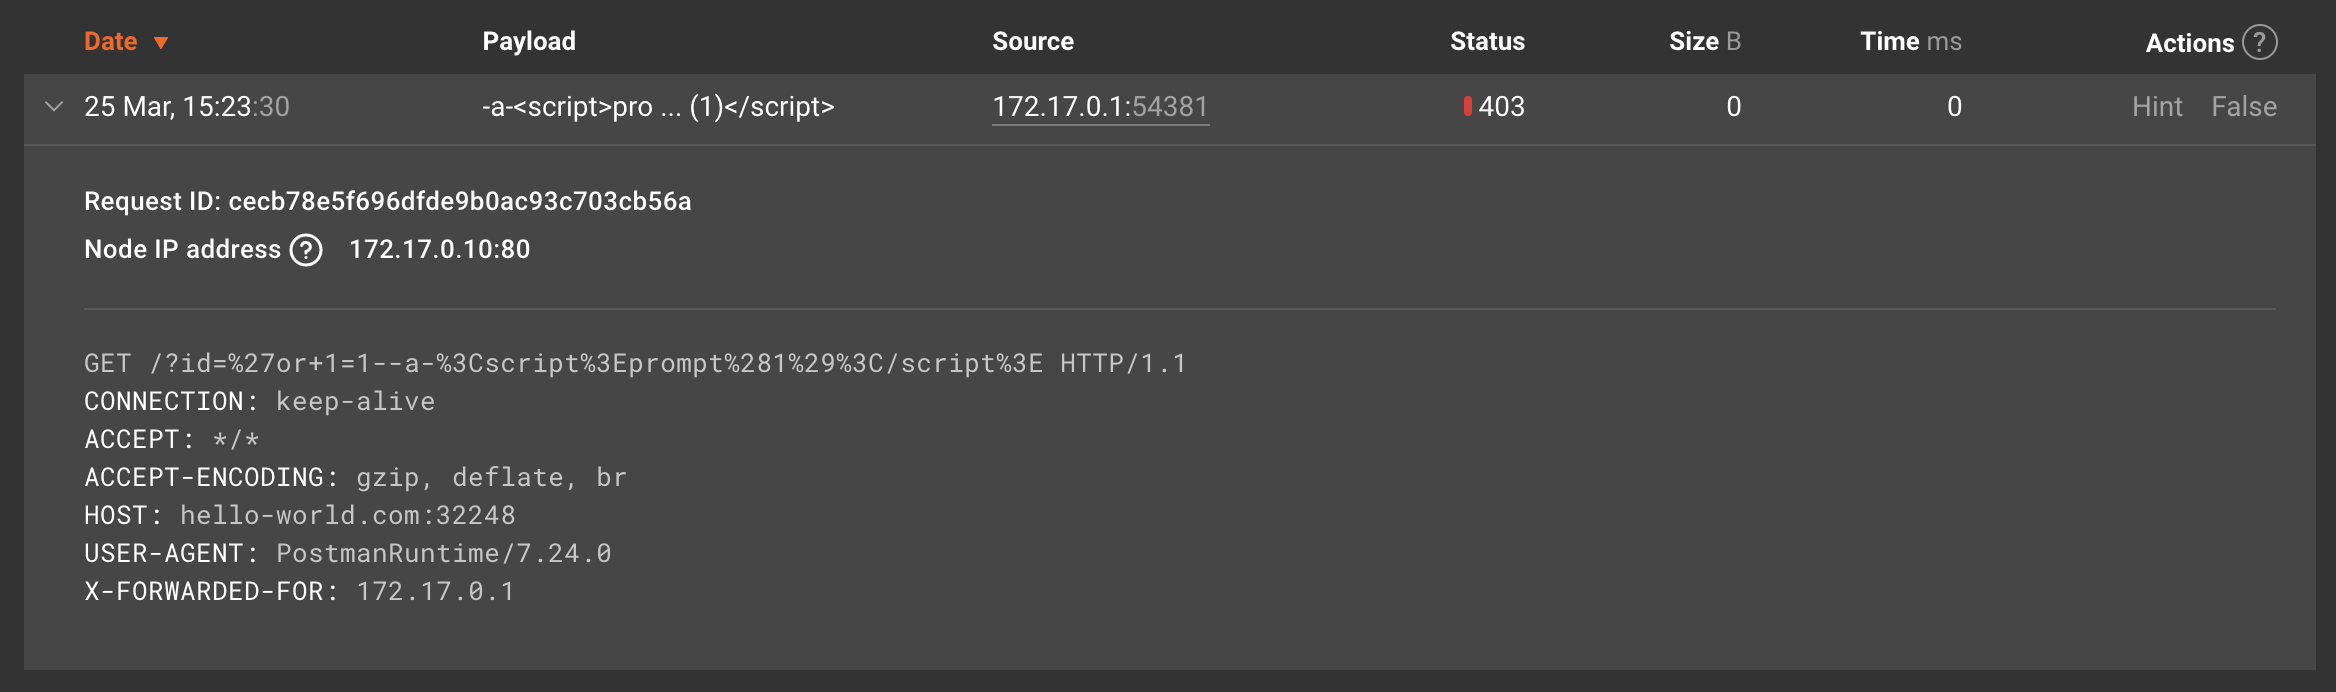
Configuration examples
Below you will find examples of the NGINX configuration required to identify an originating IP address of a client connecting to your servers through popular load balancers.
Cloudflare CDN
If using Cloudflare CDN, you can configure the NGINX module ngx_http_realip_module to identify original client IP addresses.
...
set_real_ip_from 103.21.244.0/22;
set_real_ip_from 103.22.200.0/22;
set_real_ip_from 103.31.4.0/22;
set_real_ip_from 104.16.0.0/12;
set_real_ip_from 108.162.192.0/18;
set_real_ip_from 131.0.72.0/22;
set_real_ip_from 141.101.64.0/18;
set_real_ip_from 162.158.0.0/15;
set_real_ip_from 172.64.0.0/13;
set_real_ip_from 173.245.48.0/20;
set_real_ip_from 188.114.96.0/20;
set_real_ip_from 190.93.240.0/20;
set_real_ip_from 197.234.240.0/22;
set_real_ip_from 198.41.128.0/17;
set_real_ip_from 2400:cb00::/32;
set_real_ip_from 2606:4700::/32;
set_real_ip_from 2803:f800::/32;
set_real_ip_from 2405:b500::/32;
set_real_ip_from 2405:8100::/32;
set_real_ip_from 2c0f:f248::/32;
set_real_ip_from 2a06:98c0::/29;

real_ip_header CF-Connecting-IP;
#real_ip_header X-Forwarded-For;
real_ip_recursive on;
...
-
Before saving the configuration, please ensure that Cloudflare IP addresses specified in the configuration above match those in the Cloudflare documentation.
-
In the
real_ip_headerdirective value, you can specify eitherCF-Connecting-IPorX-Forwarded-For. Cloudflare CDN appends both headers and you can configure NGINX to read any of them. More details in the Cloudflare CDN
Fastly CDN
If using Fastly CDN, you can configure the NGINX module ngx_http_realip_module to identify original client IP addresses.
...
set_real_ip_from 23.235.32.0/20;
set_real_ip_from 43.249.72.0/22;
set_real_ip_from 103.244.50.0/24;
set_real_ip_from 103.245.222.0/23;
set_real_ip_from 103.245.224.0/24;
set_real_ip_from 104.156.80.0/20;
set_real_ip_from 146.75.0.0/16;
set_real_ip_from 151.101.0.0/16;
set_real_ip_from 157.52.64.0/18;
set_real_ip_from 167.82.0.0/17;
set_real_ip_from 167.82.128.0/20;
set_real_ip_from 167.82.160.0/20;
set_real_ip_from 167.82.224.0/20;
set_real_ip_from 172.111.64.0/18;
set_real_ip_from 185.31.16.0/22;
set_real_ip_from 199.27.72.0/21;
set_real_ip_from 199.232.0.0/16;
set_real_ip_from 2a04:4e40::/32;
set_real_ip_from 2a04:4e42::/32;

real_ip_header X-Forwarded-For;
real_ip_recursive on;
...
Before saving the configuration, please ensure that Fastly IP addresses specified in the configuration above match those in the Fastly documentation.
HAProxy
If using HAProxy, both HAProxy and Wallarm node sides should be properly configured to identify original client IP addresses:
-
In the
/etc/haproxy/haproxy.cfgconfiguration file, insert theoption forwardfor header X-Client-IPline into thebackenddirective block responsible for connecting HAProxy to the Wallarm node.The
option forwardfordirective tells the HAProxy balancer that a header with the IP address of the client must be added to the request. More details in the HAProxy documentationConfiguration example:
... # Public IP address for receiving requests frontend my_frontend bind <HAPROXY_IP> mode http default_backend my_backend # Backend with the Wallarm node backend my_backend mode http option forwardfor header X-Client-IP server wallarm-node <WALLARM_NODE_IP> ...<HAPROXY_IP>is the IP address of the HAProxy server to receive client requests.<WALLARM_NODE_IP>is the IP address of the Wallarm node to receive requests from the HAProxy server.
-
In the configuration file of NGINX installed with the Wallarm node, configure the module ngx_http_realip_module as follows:
... location / { wallarm_mode block; proxy_pass http://<APPLICATION_IP>; set_real_ip_from <HAPROXY_IP1>; set_real_ip_from <HAPROXY_IP2>; real_ip_header X-Client-IP; } ...<APPLICATION_IP>is the IP address of the protected application for requests from the Wallarm node.<HAPROXY_IP1>and<HAPROXY_IP2>are IP addresses of HAProxy balancers that pass requests to the Wallarm node.