How to Mirror the Wallarm Repository for CentOS
You can create and use a local copy (also known as a mirror) of the Wallarm repository to be sure that all filter nodes in your infrastructure are deployed from a single source and have the same version number.
This document will guide you through the process of mirroring the Wallarm repository for a CentOS 7 server via the JFrog Artifactory repository manager.
Prerequisites
Make sure that the following conditions are met prior to taking any further steps:
-
You have these components installed on your server:
- CentOS 7 operating system
yum-utilsandepel-releasepackages-
JFrog Artifactory software capable of creating RPM repositories (installation instructions)
Learn more about JFrog Artifactory editions and features here.
-
JFrog Artifactory is up and running.
- The server has internet access.
Wallarm repository mirroring comprises
1. Creating a Local Copy of the Wallarm Repository
To create a local copy of the Wallarm repository, do the following:
-
Add the Wallarm repository by executing the following command:
-
Navigate to a temporary directory (e.g.,
/tmp) and synchronize the Wallarm repository to this directory by executing the following command:
If the reposync command finishes successfully, then the Wallarm packages will be placed in the wallarm-node/Packages subdirectory of your temporary directory (e.g., /tmp/wallarm-node/Packages).
2. Creating a Local RPM Repository in JFrog Artifactory
To create a local RPM repository in JFrog Artifactory, do the following:
-
Navigate to the JFrog Artifactory web UI via either the domain name or IP address (e.g.,
http://jfrog.example.local:8081/artifactory).Log in to the web UI with the administrator account.
-
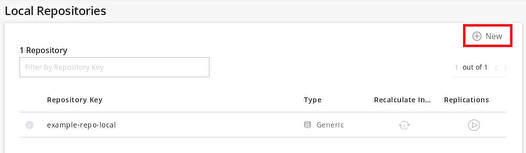
Click the Admin menu entry, then the Local link in the Repositories section.
-
Click the New button to create a new local repository.
-
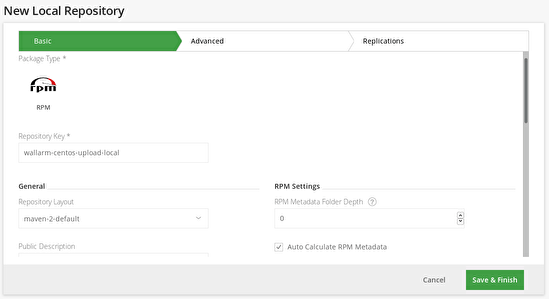
Select the “RPM” package type.
-
Fill the repository name in the Repository Key field. This name should be unique in JFrog Artifactory. We recommend choosing a name that complies with the Artifactory repositories naming best practices (e.g.,
wallarm-centos-upload-local).Select the “maven-2-default” layout from the Repository Layout drop-down list.
You can leave other settings unchanged.
Click the Save & Finish button to create the local Artifactory repository.
Now, the newly created repository should be displayed in the local repository list.
To finish mirroring the Wallarm repository, import synchronized packages into the local Artifactory repository.
3. Importing the Local Copy of the Wallarm Repository into JFrog Artifactory
To import the Wallarm packages into the Artifactory local RPM repository, do the following:
-
Log in to the JFrog Artifactory web UI with the administrator account.
-
Click the Admin menu entry, then the Repositories link in the Import & Export section.
-
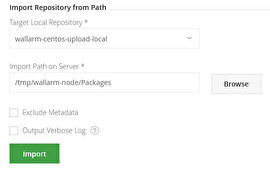
In the Import Repository from Path section, select the local repository you created earlier from the Repository from Path drop-down list.
-
Click the Browse button and select the directory with the Wallarm packages you created earlier.
-
Click the Import button to import the Wallarm packages from the directory.
-
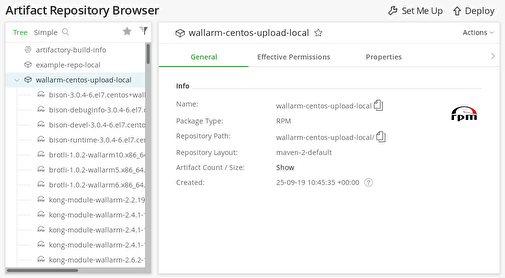
Click the Artifacts menu entry, and make sure that the imported Wallarm packages are present in the desired local repository.
Now you can deploy Wallarm filter nodes using the local mirror of the Wallarm repository.