Configuration of brute force protection
Behavioral attack (brute‑force attack) is one of the attack types that can be detected by Wallarm if it is appropriately configured. These instructions provide steps to configure the Wallarm node to protect your applications against brute‑force attacks. By default, Wallarm node does not detect brute‑force attacks.
There are the following classes of brute‑force attacks:
-
Regular brute‑force attacks: password brute‑forcing, session identifier brute‑forcing, credential stuffing. These attacks are characterized by a large number of requests with different forced parameter values sent to a typical URI for a limited timeframe.
-
Forced browsing. These attacks are characterized by a large number of response codes 404 returned to requests to different URIs for a limited timeframe.
The aim of this attack is to enumerate and access hidden resources (e.g. directories and files containing information on application components). The forced browsing attack type usually allows attackers to collect the information about application and then perform other attack types by exploiting this information.
Detailed brute force description →
Brute force protection restrictions
When searching for brute‑force attack signs, Wallarm nodes analyze only HTTP requests that do not contain signs of other attack types. For example, the requests are not considered to be a part of brute‑force attack in the following cases:
- These requests contain signs of input validation attacks.
- These requests match the regular expression specified in the rule Create regexp-based attack indicator.
Configuration steps
-
Add the module Brute-force protection to the Wallarm subscription plan. To add the module, please send a request to sales@wallarm.com.
-
If the filtering node is deployed behind a proxy server or load balancer, then configure displaying of a real IP address of the client.
-
Configure the trigger Brute force or Forced browsing.
-
Test the configuration of brute force protection.
Configuring the trigger to identify brute force
Triggers for the number of requests
Below is the description of the simplified configuration of brute force protection. Trigger condition Number of requests is now replaced with two conditions for different brute‑force attack class detection. Also, setting up the rules Tag requests as a forced browsing / brute‑force attack is no longer required.
If the trigger for Number of requests and the rules for tagging attacks are configured, they still work but rules cannot be updated or re-created. Nevertheless, we recommend you simplify the current configuration as described below and disable old triggers.
Triggers set the conditions for brute‑force attack detection. Depending on the brute‑force attack class to be detected, you can set up the following conditions:
-
Brute force to detect regular brute‑force attacks based on the number of requests originated from the same IP address.
-
Forced browsing to detect the forced browsing attacks based on the number of the 404 response codes returned to the requests having the same origin IP requests.
The steps to configure the trigger are:
-
Open Wallarm Console → section Triggers and open the window for trigger creation.
-
Select the condition Brute force or Forced browsing depending on the brute‑force attack class to be detected.
-
Set the threshold:
- If the trigger condition is Brute force - the threshold is for the number of requests originated from the same IP address for a period of time.
- If the trigger condition is Forced browsing - the threshold is for the number of the 404 response codes returned to the requests having the same origin IP requests.
-
If required, specify URI to activate the trigger only for requests sent to certain endpoints, for example:
- If you configure password brute‑forcing protection, then specify the URI used for authentication.
- If you configure protection against the forced browsing attacks, then specify the URI of the resource file directory.
- If the URI is not specified, the trigger will be activated at any endpoint with the request number exceeding the threshold.
URI can be configured via the URI constructor or advanced edit form in the trigger creation window.
Triggers with nested URIs
When there are several triggers with identical conditions and some of them have nesting level URI, requests to lower nesting level URI will be counted only in the trigger with the filter by the lower nesting level URI. Same for 404 response codes.
Triggers without URI in the conditions are considered to be the higher nesting level.
Example:
- The first trigger with the Brute force condition has no filter by the URI (requests to any application or its part are counted by this trigger).
- The second trigger with the Brute force condition has the filter by the URI
example.com/api.
Requests to
example.com/apiare counted only by the second trigger with the filter byexample.com/api. -
If required, set other trigger filters:
- Application the requests are addressed to.
- One or more IP the requests are sent from.
-
Select trigger reactions:
- If the trigger condition is Brute force - the reaction is Mark as brute force. Requests received after the threshold exceedance will be marked as the brute‑force attack and displayed in the Events section of Wallarm Console.
- If the trigger condition is Forced browsing - the reaction is Mark as forced browsing. Requests received after the threshold exceedance will be marked as the forced browsing attack and displayed in the Events section of Wallarm Console.
- Denylist IP address and the period for IP address blocking to add IP addresses of malicious request sources to the denylist. The Wallarm node will block all requests originated from the denylisted IP after the threshold was exceeded.
Example of the Brute force trigger to block the regular brute‑force attacks addressed to https://example.com/api/v1/login:
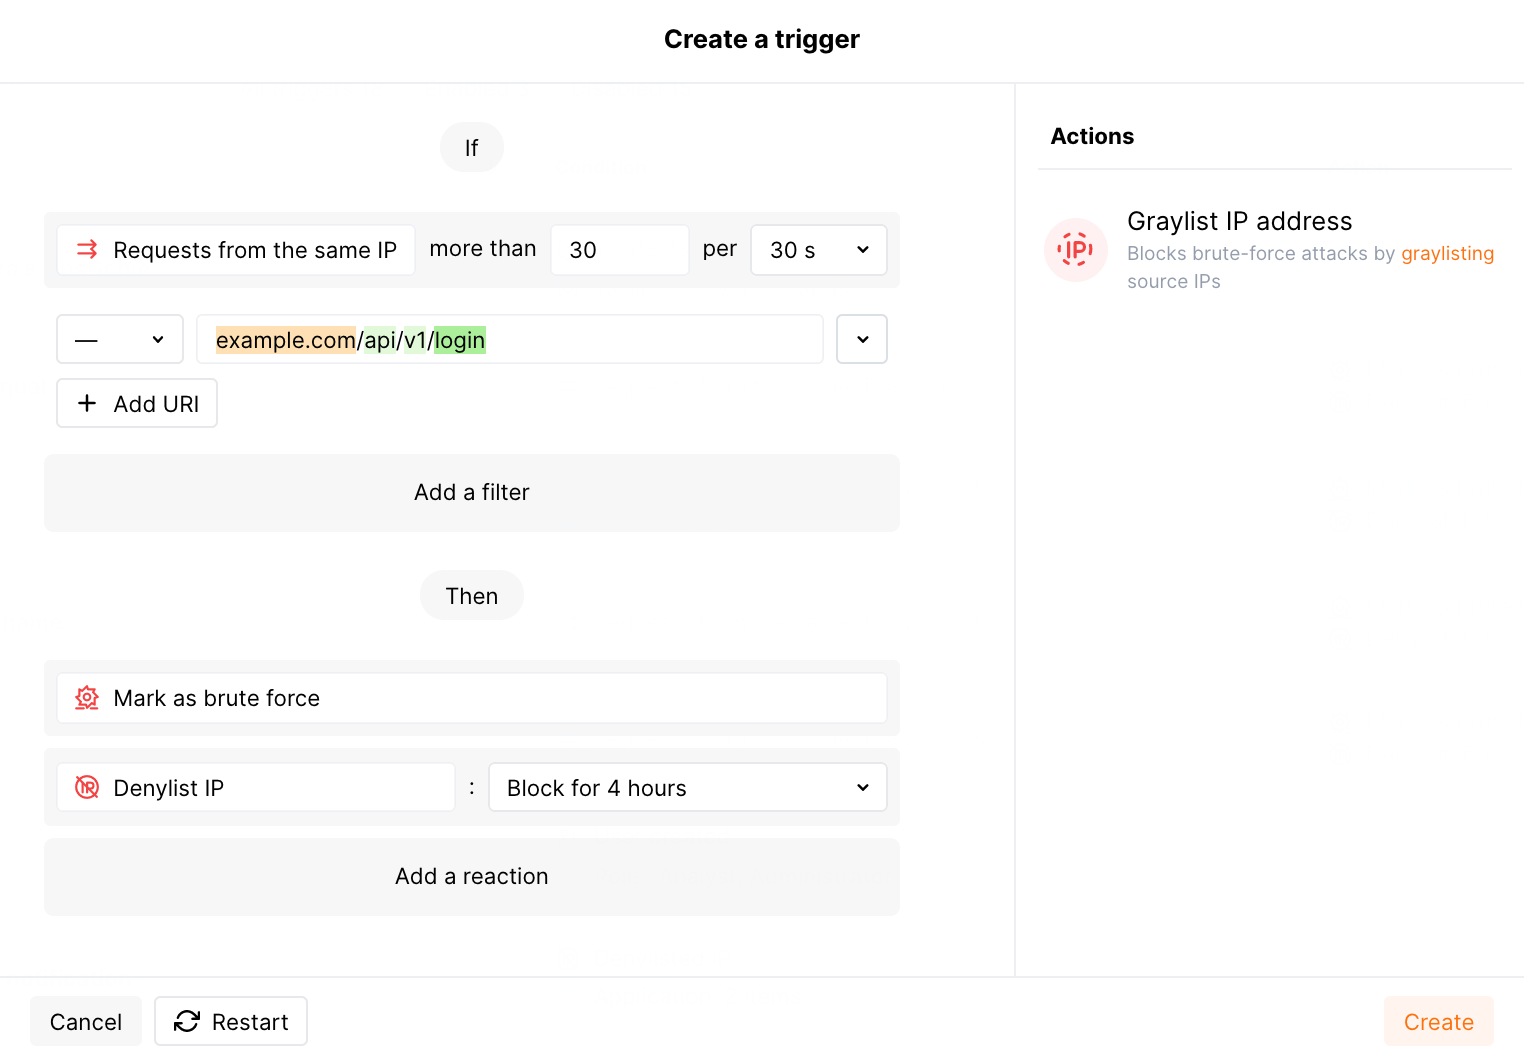
Description of the provided example and other trigger examples used for brute force protection are available within this link.
You can configure several triggers for brute force protection.
Testing the configuration of brute force protection
-
Send the number of requests that exceeds the configured threshold to the protected URI. For example, 50 requests to
example.com/api/v1/login: -
If the trigger reaction is Denylist IP address, open Wallarm Console → Denylist and check that source IP address is blocked.
-
Open the section Events and check that requests are displayed in the list as the brute‑force or forced browsing attack.
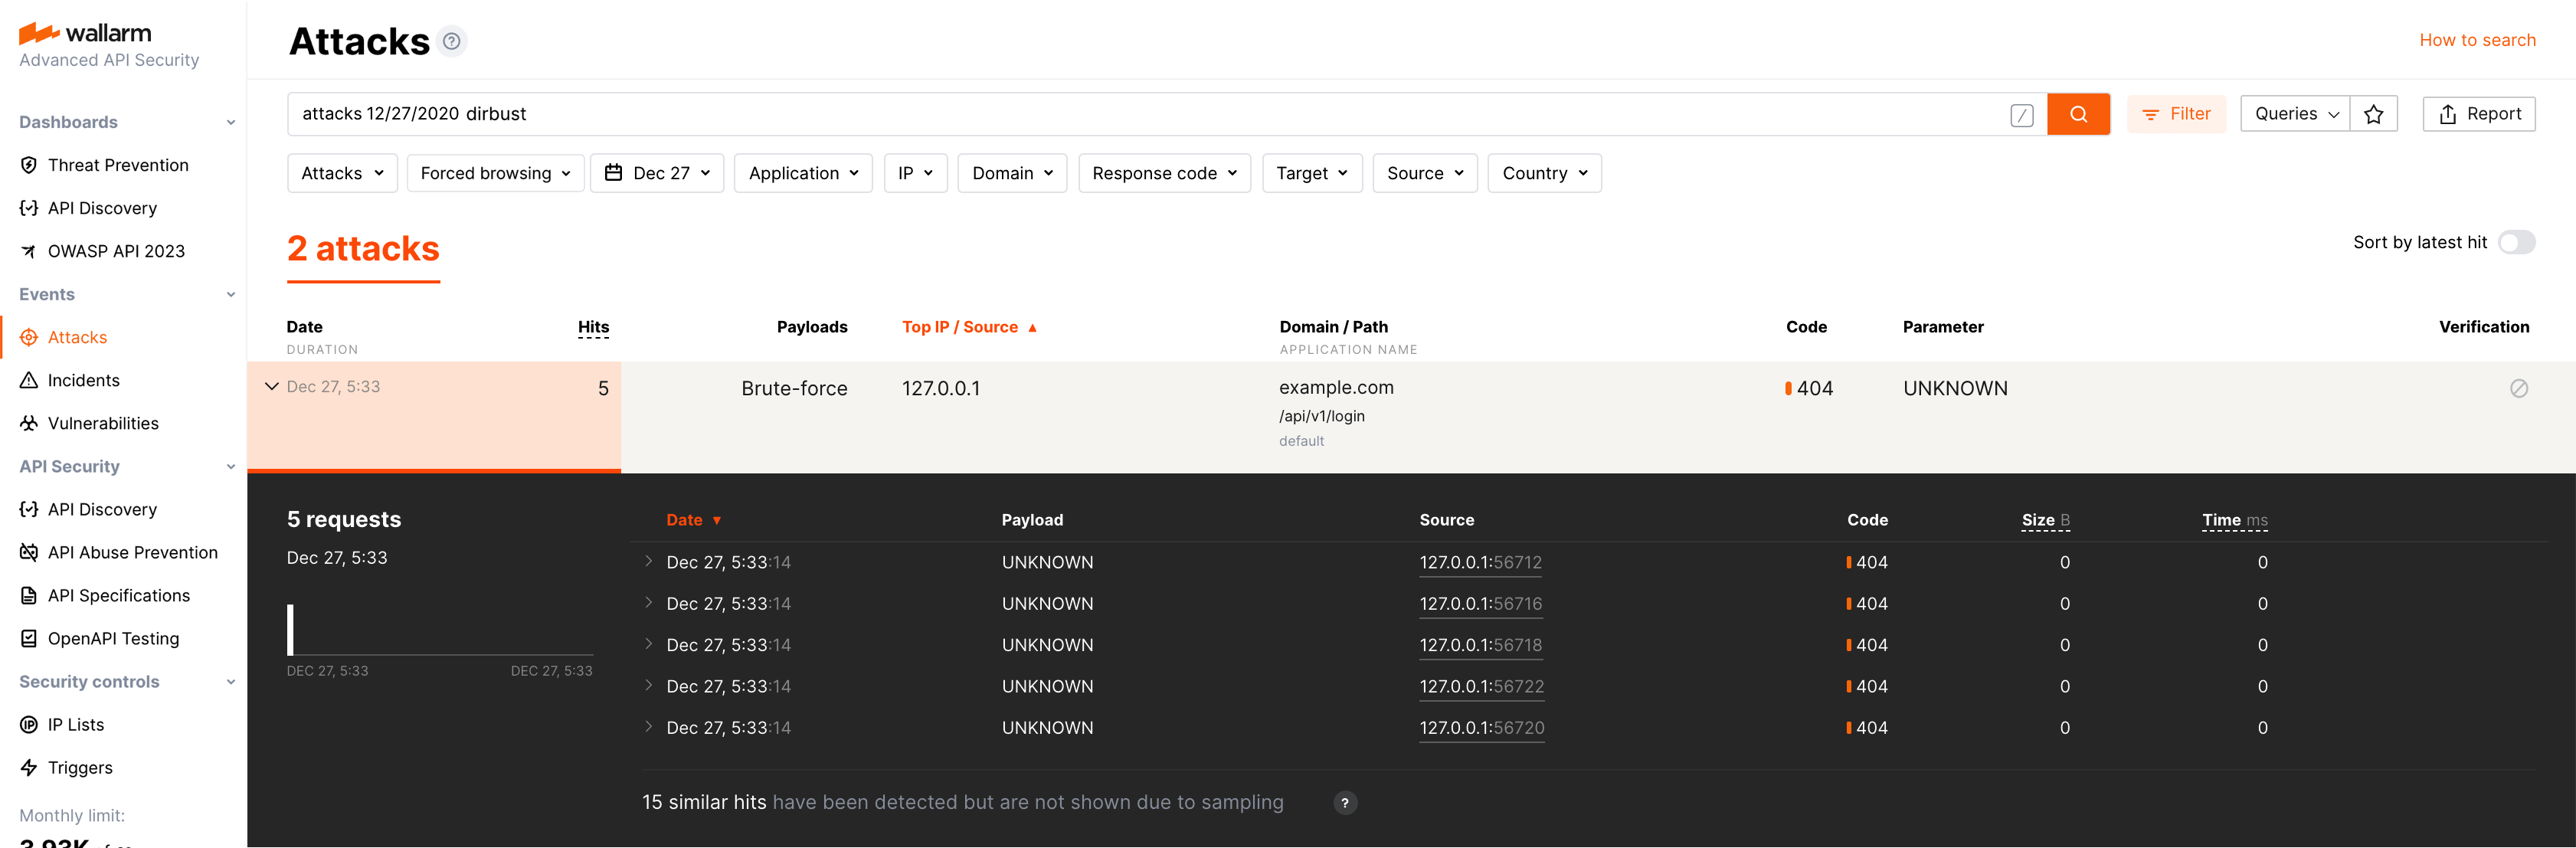
The number of displayed requests corresponds to the number of requests sent after the trigger threshold was exceeded (more details on detecting behavioral attacks). If this number is higher than 5, request sampling is applied and request details are displayed only for the first 5 hits (more details on requests sampling).
To search for attacks, you can use the filters, for example:
dirbustfor the forced browsing attacks,brutefor the brute‑force attacks. All filters are described in the instructions on search use.